
What if the code you are trying to reverse engineer is obfuscated or somehow corrupted? What if no way is left? Here comes what I like to call (wrongly and ironically) the "brute force of reverse engineering".
Before I even start, as always, I wanted to apologize for any unclear part of the article, due to eventual wrong english grammar or basic concepts errors. Please report if you find any, thanks.
Today I'm going to talk about binary patching and why this is an important piece of computer knowledge.
Some of you probably know what I'm talking about, but might not know how far can we go with binary patching.
Here I'm quoting the definition of "patch" from Wikipedia, evading any eventual misunderstanding:
A patch is a piece of software designed to update a computer program or its supporting data, to fix or improve it. This includes fixing security vulnerabilities and other bugs, and improving the usability or performance. In some special cases updates may knowingly break the functionality, for instance, by removing components for which the update provider is no longer licensed or disabling a device.
The uses are infinite and go from games mods to decrypt obfuscated code, patch security holes, backdooring and iOS applications modding.
So we are mostly talking about Reverse Engineering.
The software I'm going to use for the demonstration is Interactive Disassembler, better known as IDA Pro (though I'm going to mention Hopper Disassembler's extremely useful features).
For the tutorial, demo version of IDA is enough, though one part of the article requires a hex editor to save you work (don't worry, I got you covered if you don't have one). I'm going to use HxD (supported by wine, the windows emulator) on Linux.
IDA Pro is available for Linux, Mac OSX and Windows, while Hopper is officially available only for Mac OSX and Linux.
I'm assuming that you are using our dear Kali Linux, but this works almost the same way in Windows and Mac OSX.
You can download an evaluation version of IDA here: https://www.hex-rays.com/products/ida/support/download.shtml
You can download an evaluation version of Hopper here: http://www.hopperapp.com/download.html
I guess the topic becomes clearer with a practical demonstration.
If you want more examples on this, for instance iOS patching, just write in the comments, I'll be pleased to do one!
Step 1: Setup a Demo Program to Patch.
Let's setup a little C program to reverse engineer (we'll even try to modify it) that simply prints "Hello Null Byte" and waits for an input.
Write this in a text editor:
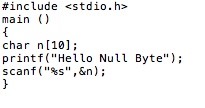
Save and call it Hello.c
Open the terminal and compile the file with GNU Collection Compiler by typing:
gcc -o Hello Hello.c
-o for output
A "Hello" executable should be created in the working folder.
Test it by writing in the Terminal
./Hello
You should be greeted with "Hello Null Byte", and the scant command waiting for you input. You type anything you want and the Terminal goes back to the command line.
So now you should have IDA (and Hopper), a demo program to patch, and a hex editor (optional, I'm using HxD with wine, but you can use your own favorite).
Step 2: IDA Layout
Once installed, run IDA. Accept everything after reading carefully and choose the option "Go: Work on your own".
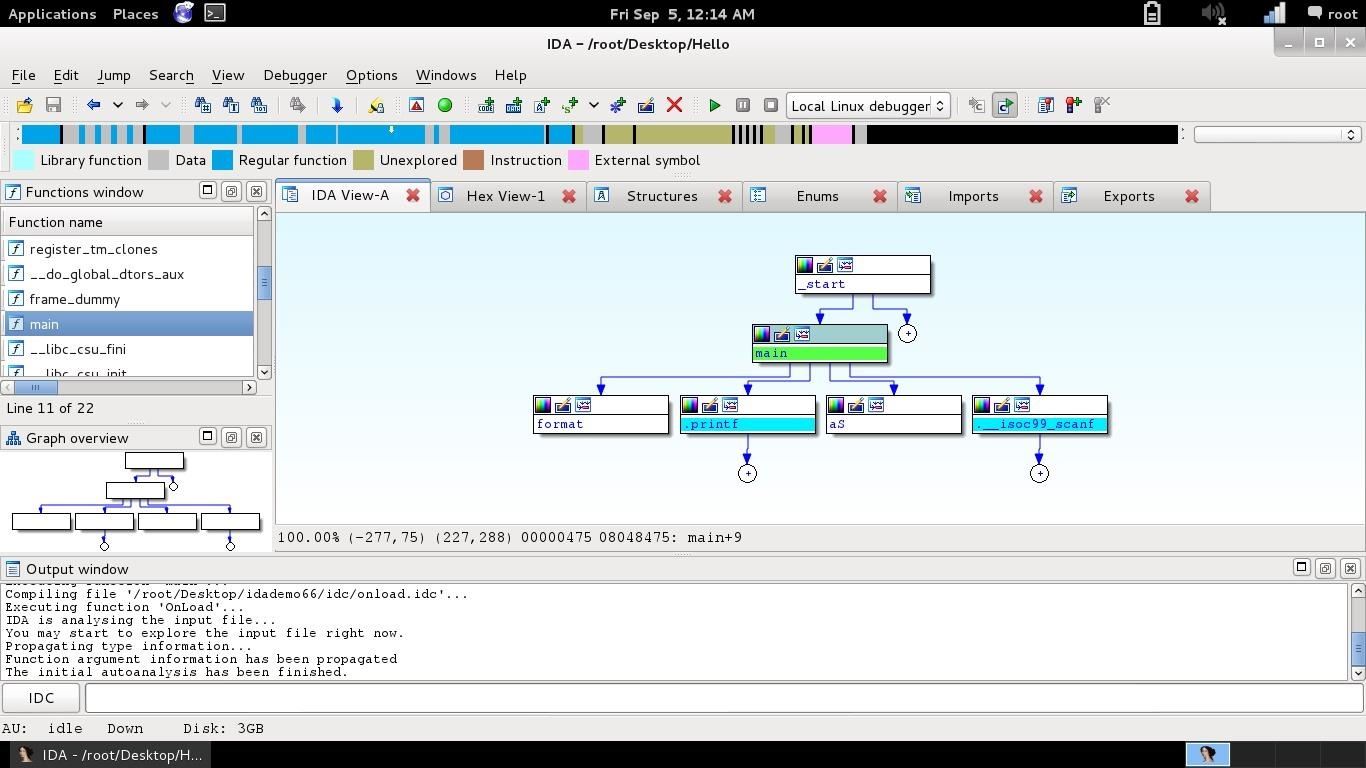
This should be the IDA Layout:
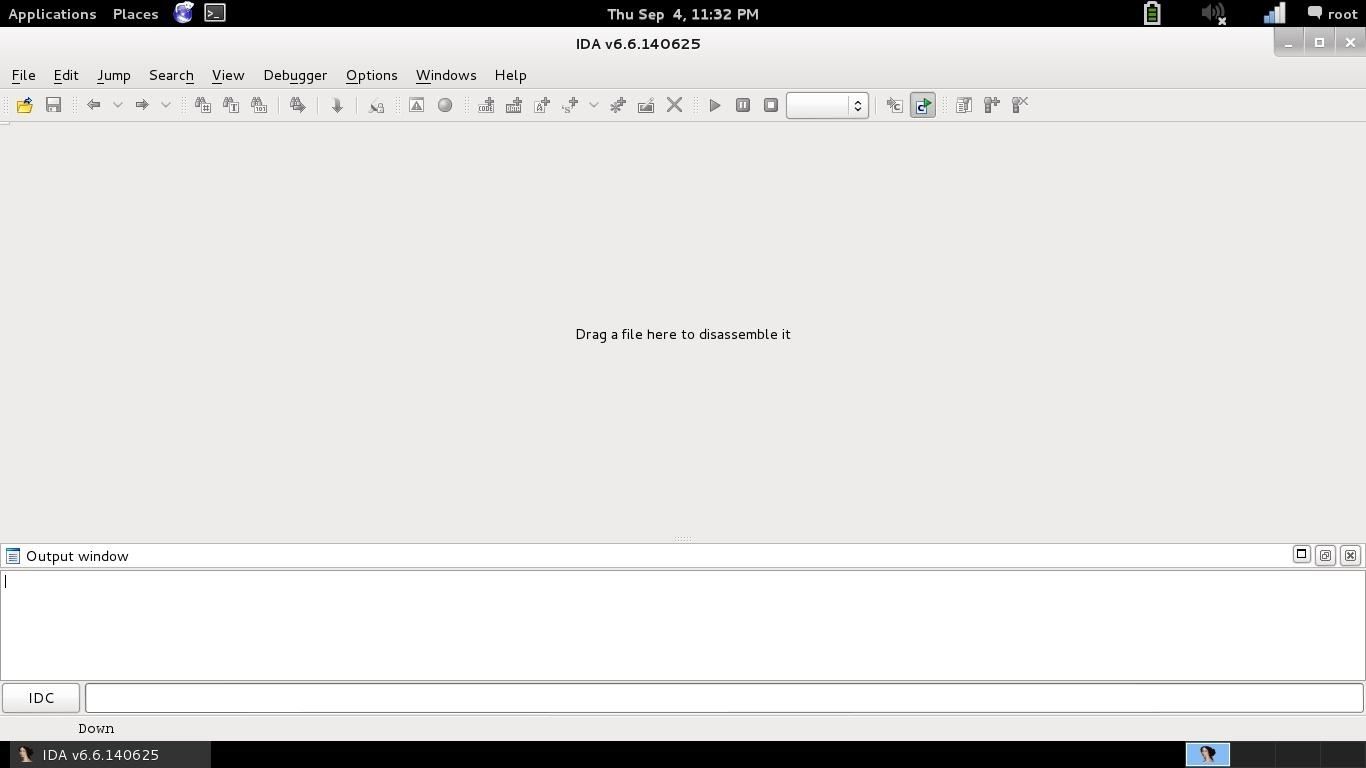
Easily drag and drop your file "there". A prompt will tell you to load the file as a ELF format (which is).Press ok.This is an example of the operative IDA layout:
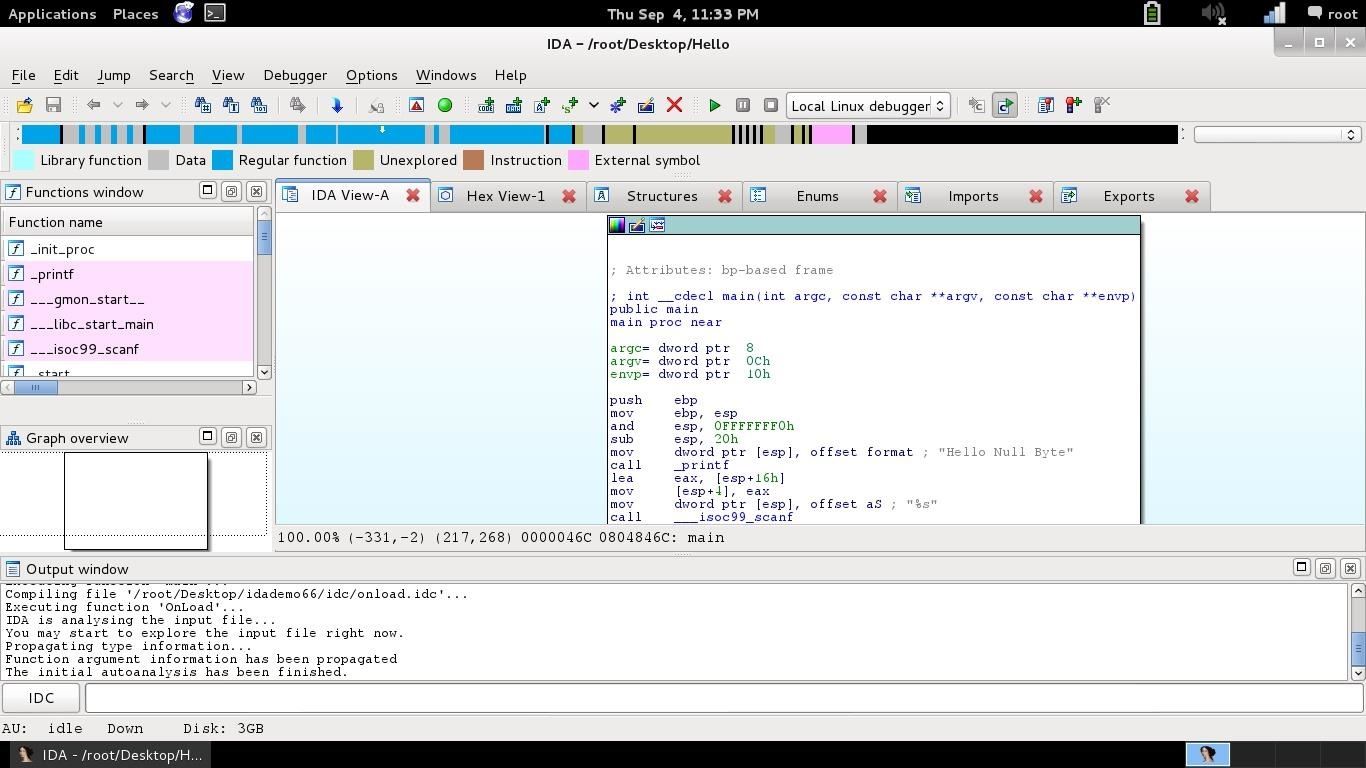
In the left panel we've got a list of the functions, the colored bar on the top gives an idea of what the file is made by (represents strings, vars, ecc...), the right panel is the View (which in this case is the Assembly view), and the lower panel is the output.
So, because we can't explain every IDA feature with this little program, before going on with the reverse engineering, I'd like to talk about IDA and patching, just to give you an idea. You can skip this section.
Break: Where We Talk a Bit About IDA and Some Disassemble Scenarios.
As I said before, my first approach with IDA and Hopper was when I had to reverse engineer an iOS application (of course when you do that, the developer will give you the code, but I had to reverse engineer my own app, which I left the code somewhere over the rainbow, and couldn't find it). Now I'll give you some scenarios just to give you reasons to study it yourself: imagine a program that asks for a password. That program should recognize when the right password will be entered, so it has to be in the code, plain text or hash, it doesn't mind. Isn't that enough? You can make a value return always true, to bypass the login, or always false, just because you like it. Imagine a game where you have to press a combo of buttons to make a move, you'll be able to edit the combo key IDs. Those were some easy examples that don't require knowledge of Assembly and Hex code, but if you know where to edit (I mean fix every piece of the code to not return errors or incorrect buffers, that would occur when you try to edit a variable and the space is too small, for instance), this would be one of your best ways to go. Or you can simply limit yourself to reverse engineering.
Now, you can't do all this stuff using only IDA.Even less if you use only the IDA Demo. There are some free disassemblers out there, but none is like IDA and Hopper, for example the same gcc (gnu compiler collection) we talked about before has its way to do that.
So, find your own way to do that, I'm just giving you some advices!
Step 4: Let's Find Out What to Edit.
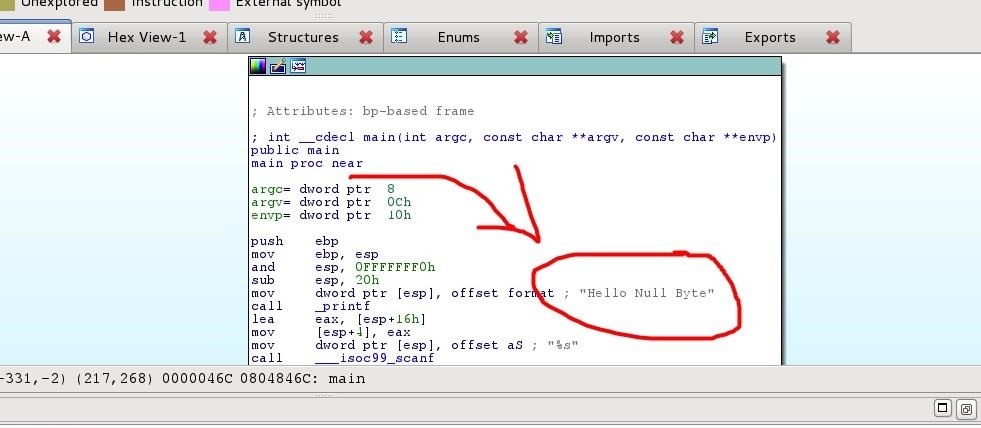
So, suppose we want to edit the prompted string "Hello Null Byte" with "Goodbye Byters".
As we saw in the last image, the string is right there!
But let's first take a look at the various tabs IDA offers to us.
Speaking of the View panel, the "IDA View-A" tab is the Assembly (or ASM) tab. Here's the disassembled code. As I said before, it's not as easy as other languages to understand, because it's intended to be near to the Machine Language (1s and 0s thing). It's like the bridge between human readable and machine language.
Assembly works something like this (very very summary definition):
memoryallocationcommand memoryaddress
You can learn Assembly, there's ton of documentation on the internet.
But hey, since we can have something even better, why not?
That's where Hopper comes in handy!
To just give you a demonstration of how powerful Hopper's pseudo code feature is, look at this:

by class I mean function
The picture covered the ASM panel of Hopper, but is shown below
When we try to read it, it looks very similar to the code we wrote above! We can't edit it from here obviously, but it's a very powerful feature to better understand the code(though it won't be easy with very big programs... it actually makes everything a lot easier).
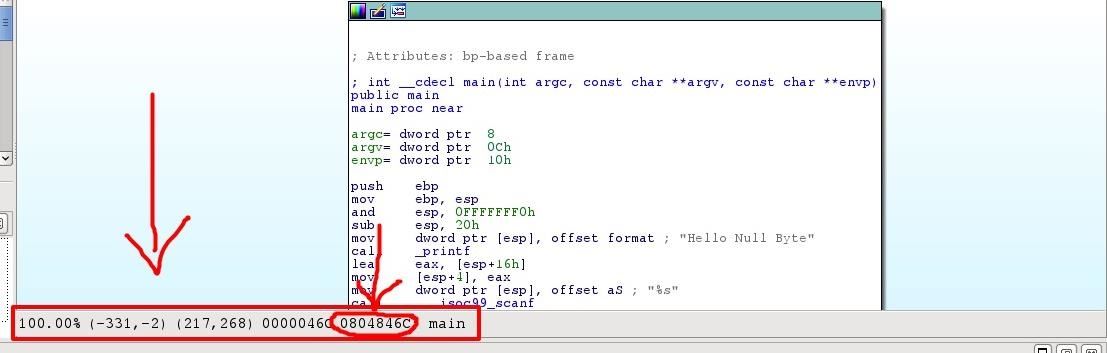
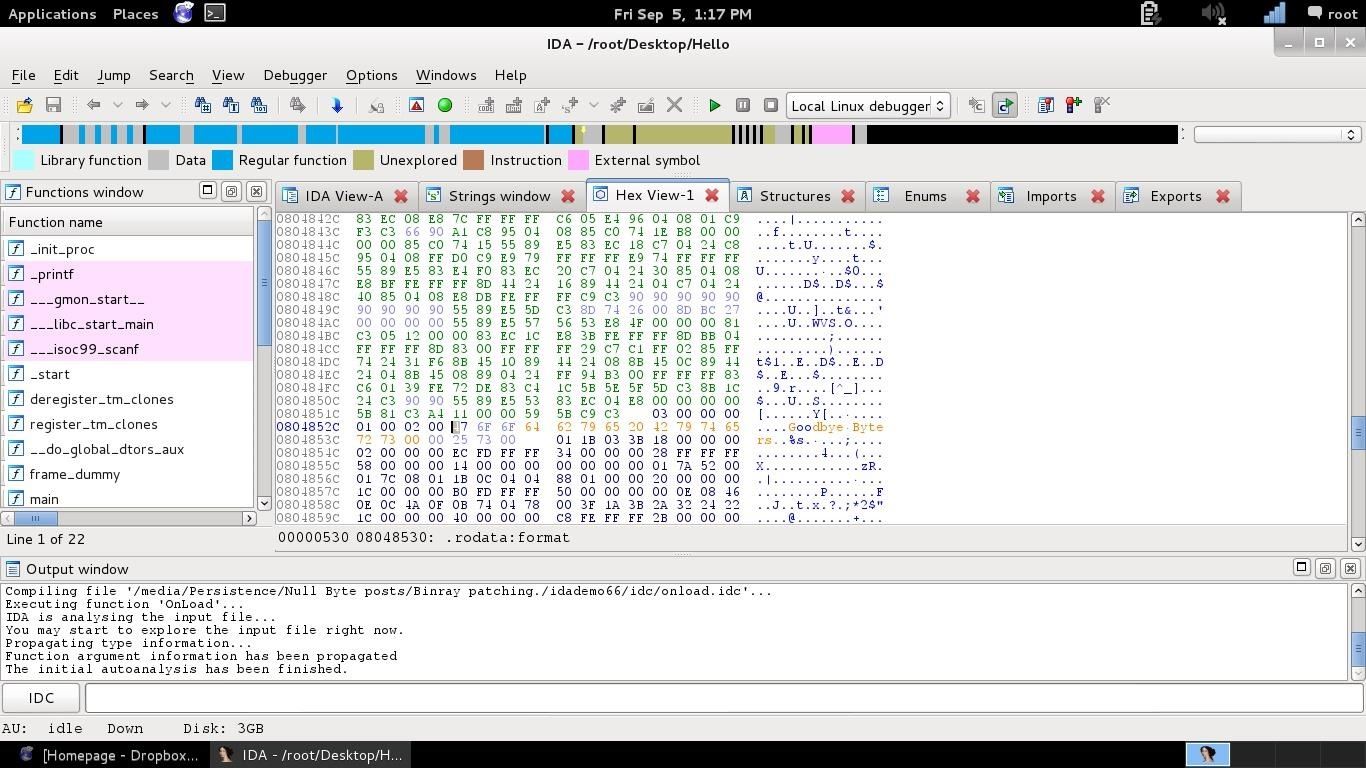
Back to IDA, the "Hex View-1" tab it's a hex viewer. You can do a lot of things from here with the demo version. "Hex looks like a mess to read isn't that?" but if you select or simply focus a line in the Assembly, in the bottom space (the one that also contains the mouse coordinates) you can see the Hex reference (the number at the most right), so you can edit it in the Hex View (the reference "refers" to the left row in the hex view tab).
There's only one problem, this is not the real definition of the string, its just a comment that IDA made to remember us what it should prompt. We have to search deeper.
So, let's open the Proximity browser! Right click and then "Proximity Browser".
The View is something like this:
That's a lot better. It almost looks like the code we wrote. But we can't get anywhere closer, we can explore the function and the type of returned values... but there seems to not be what we are looking for (though I've shown this because it's another very useful feature when you don't know where to start from).
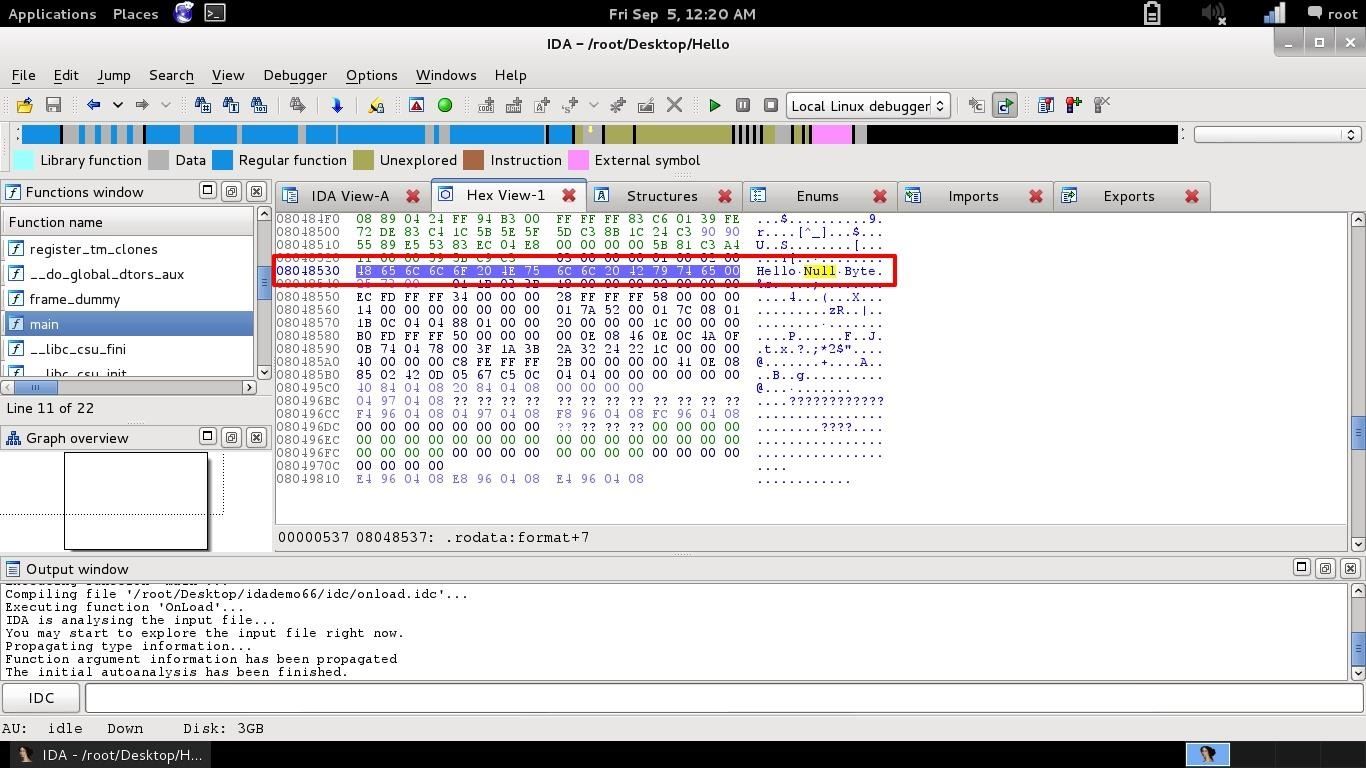
We know that the string has to be in plain text somewhere. Exactly in the Hex View. Go back there and in the right row, where's the hex equivalent in plain text, look for the aforementioned string. The hex code is not very big, in fact, there it is, we found it!
The left row reference could be different, this won't change the process obviously, just remember your own
From here you can now go back to the Assembly view (after selecting the row we are interested in) and we find out the exact location of the definition.
But what if the program was so big that diving in was just mind blowing? You have two options: Hopper's definition handler, or the find-next IDA feature.
I'd suggest the Hopper's one. It's just too good for lazy people (ironically), just double click on the commented string "Hello Null Byte" (the one in the main class) and Hopper will get you to the definition automatically.
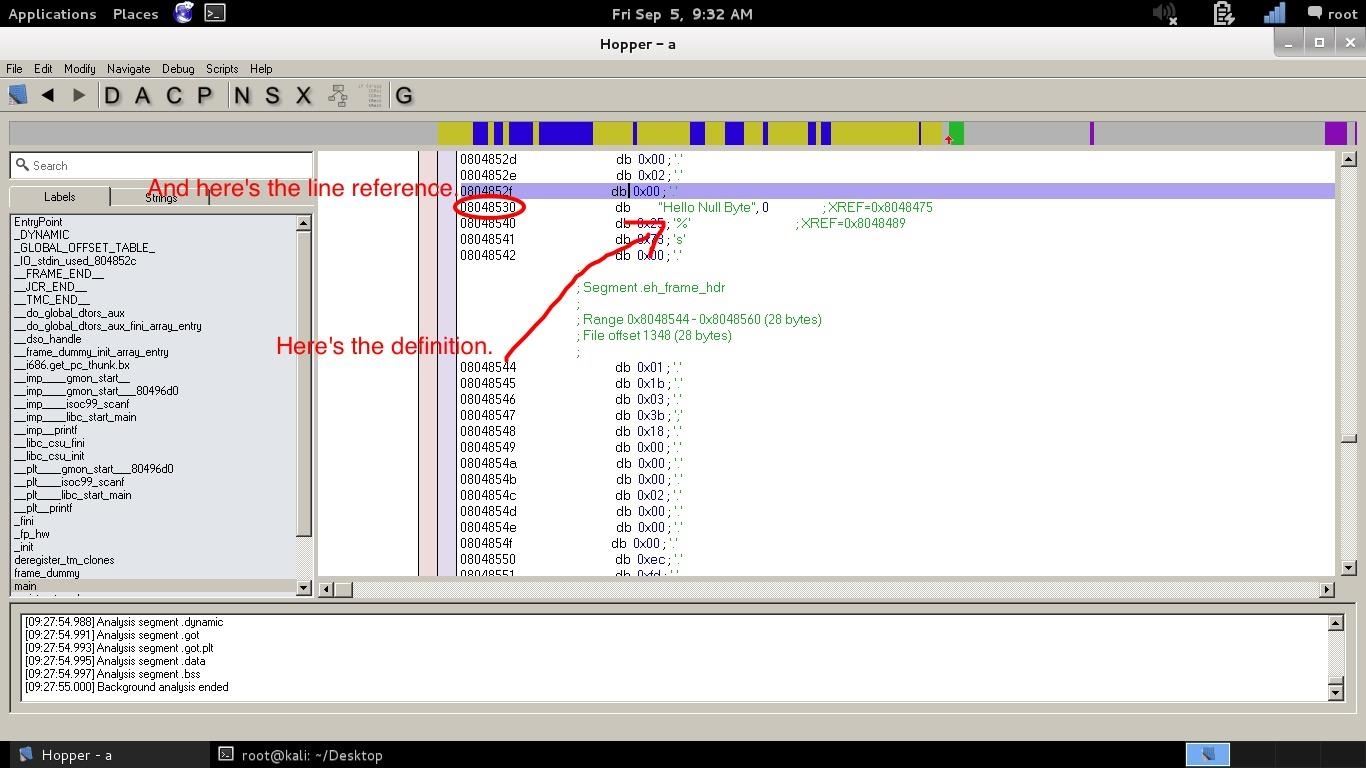
On the left row, there's the reference line. Go there with the IDA hex viewer (but Hopper has one too) and you'll see that the string is actually there, and you'll be able to locate it in the hex file (and obviously is the exact same line we found with IDA).
So now that we now somehow "how to find what to edit" and "what to edit", let's... edit!
Step 5: The Demo Version Doesn't Allow You to Save (Almost). Let's Ask to Hex Editors.
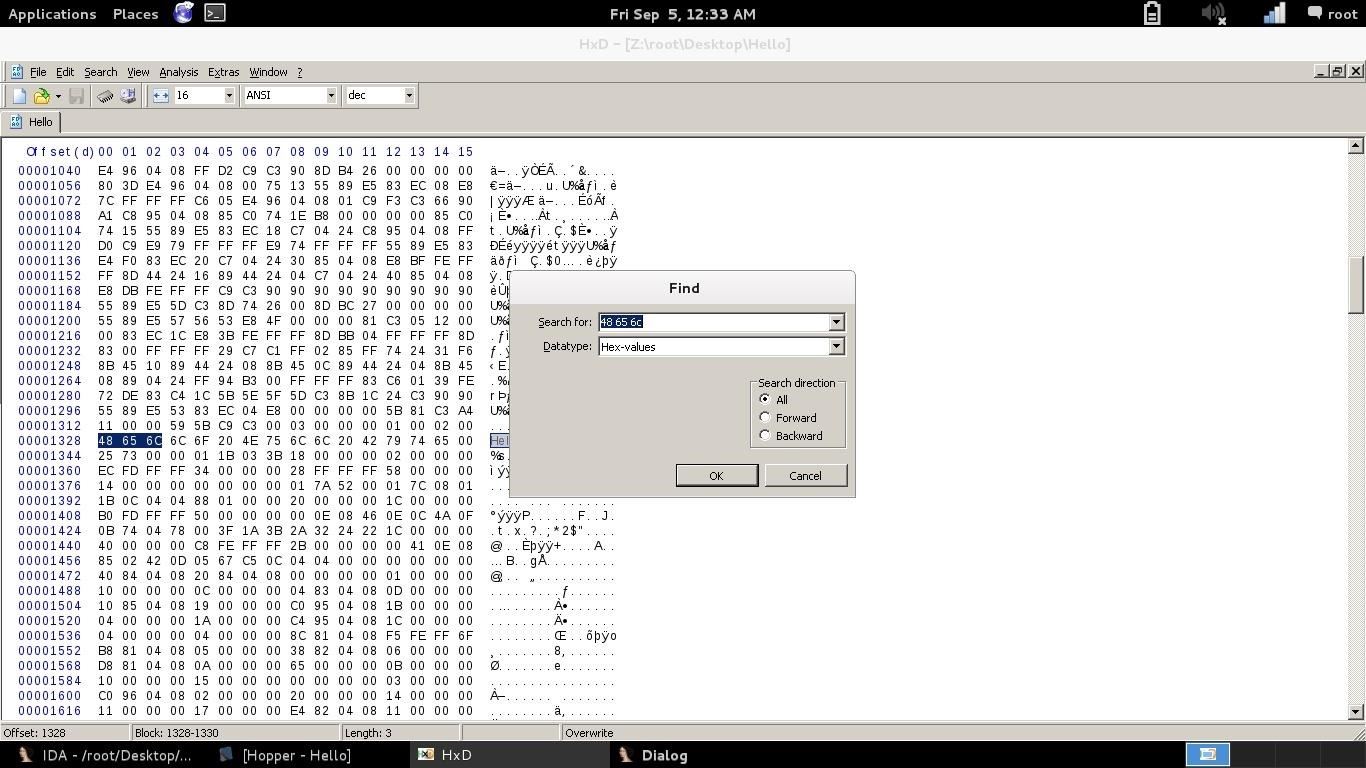
So, the exact string and hex code we have to find and edit is this line:

Open your favorite hex editor, in this case HxD.
Go to Search, select Hex-values. In this case the first three values are enough: "48 65 6C". Make sure that you have "All" selected in the "Search Direction" field, like this:
Now, let's see how "Goodbye Byters" is spelled in Hex (you can use an online converter).
Turns out that is something like this:
"47 6f 6f 64 62 79 65 20 42 79 74 65 72 73 00"(the 00 is to fix the length ,as we are filling the allocation with a shorter string).
So edit that part of the hex from this:
"48 65 6c 6c 6f 20 4e 75 6c 6c 20 42 79 74 65"
to this:
"47 6f 6f 64 62 79 65 20 42 79 74 65 72 73 00"
Then save.
Run the executable and if everything has gone well, the new line will be prompted.
We could have searched for the string here, by searching "Good" as Text-values, but I wanted to show you all the ways you can follow to locate the piece of code you are interested in editing or reverse engineer.
Step 6: Script Files to Save Directly from IDA (Still Not Allowed in IDA Demo)
You can actually save directly from IDA, but this is a pro feature and you need to download some scripts files before, some PE scripts.
I think it's fair to say that there's another very good script here else to the one I'll use, pe(underscore)sections.idc, that helps with the understanding of the structure, but it seems like I can't get it working.
Download them from here:http://www.openrce.org/downloads/details/57/PE_Scripts
and place them in the folder you want.
Unzip them and you should have 7 .idc files.
Now go back in IDA and let's do some changes to the file.
This time you go in the hex view, right click on the hex and "edit".
You are now in edit mode, and you are able to overwrite hex values.
Now edit the string like shown above, you just have to focus a value and overwrite it directly typing there the new value, like this:
Now right click and "Apply changes".
To actually apply changes to the file go to File->Script File, choose the pe(underscore)write.idc, select the file you want to overwrite the changes to, then go to File->Save as, and save the executable (this last is the feature not allowed in IDA evaluate version).
But I know there's even another way to do that, and you can do this with the demo version of IDA, using DIF files.
Step 7: DIF Files and Scripts!
Download (or copy and paste in a .c file) this script:http://www.idabook.com/chapter14/ida_patcher.c.
This is a script made for the book "The IDA PRO book", which I suggest you to read.
If you compile it like this:
gcc -o script ida(unnderscore)patcher.c -o patcher
You'll get an executable called "patcher".
Note: if gcc gives you errors because of the exit function, just edit the file and delete all the 4 exit functions (exit(0)) you find, and try to recompile it. Don't worry, is related to errors trough the process, if you do everything correct, you won't need those exits.
Now, make the changes you want with the IDA Hex View (edit, apply changes as in the chapter above), then go to File->Produce file->create DIF file.
This is basically a file that contains the differences that IDA registered.
Now run the file "patcher" executable by Terminal.
./patcher -i binaryfiletopatch -p difile.dif
Where binaryfiletopatch is our "Hello" program and the difile.dif is the file we just created with IDA.
Now try to run the executable, and if everything has gone well, you should see the new line prompted.
I think this is legal, I read the copyright, but, if referring to this script is somehow illegal, remove this post immediately
Step 8: Enjoy Your Mod!
Now, that's a very simple thing to do, and I didn't talk about memory allocation and else, I just wanted to show you the methods and the tools mainly used for binary patching. As you may notice, the strings ("Hello Null Byte" and "Goodbye Byters ") have the same length because of the "Segmentation fault" error, and by that I mean a memory allocation error. To fix this you have to actually understand how a ELF file format is made, but for the today's purposes of reverse engineering, I think this can be enough.
I'm aware that editing a string is just pointless, and we can just fire HxD and edit it, but I wanted to show you the main features of this programs and how to use them in a real scenario, where for example you have to edit an ID, a byte sequence or a buffer (if you notice, the how-to is structured as if we didn't know that the string we edited is what shows up when the program is ran).
Another fast note here: if you modify the file trough a hex editor IDA and Hopper won't be able to edit it anymore (HxD just edits the hex, making it corrupted), but once edited with those two disassemblers they are capable of recompiling and keeping a plain text declarations of the classes (sometimes even error handling), but you need the full version (though IDA demo handles it, but doesn't name classes properly, even if you can still understand the code).
And last, IDA demo doesn't support those many file formats that the pro version does.
If you want some how-tos about the full versions or a free tool to do this, just tell me in the comments.
Interesting fact: IDA has recently been ported to iDevices, just like any other Kali tool! So you could actually edit iOS applications within the device itself. How nice!
So this was a summary of part of what I learnt in those recent days, when I studied this topic, I hope it was helpful!
Thank you for reading, and again sorry for the unclear parts (if there are), tell me about errors and questions, if you want more about this I'm completely available to give you more!
Just updated your iPhone? You'll find new emoji, enhanced security, podcast transcripts, Apple Cash virtual numbers, and other useful features. There are even new additions hidden within Safari. Find out what's new and changed on your iPhone with the iOS 17.4 update.


3 Comments
This is a very interesting article. Thank you. Kudos to you.
Very Easy to Follow,
For newbies : when you download IDA ..save it in your desktop (Linux Kali) and simply open the program..
Wine makes life easy in Kali so you can just install HxD as well.
Hello, I read your post here, unfortunately, is my concern too complex, so that I can realize alone. Therefore, the request for you to help us. Thank you for your great tutorial.
http://www.insanelymac.com/forum/topic/307318-os-x-el-capitan-1011-public-beta/#entry2156889
keep learning and when you be at high rank like ios kernel exploitation let me know xD
Share Your Thoughts