

Welcome back, everyone. In the previous part of this rapid-fire miniseries, we built the victim portion of the shell. Today, we'll be building the attacker portion. This script will initialize interaction with the victim portion of the shell, send commands, and receive the output.
There are a few concepts that we'll need to discuss to fully understand this script, so let's get started.
Step 1: Setting Interpreter Path & Importing Modules
We've already discussed that the first things we need to do when writing a script is to set the interpreter path and import any modules that we need. Let's go ahead and do that now:
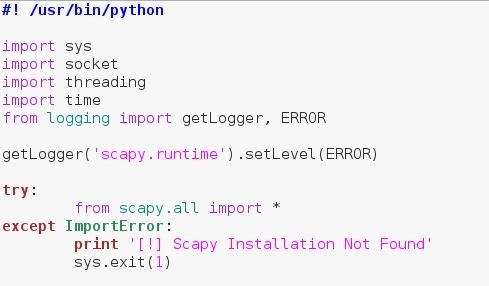
We've set our interpreter path to signify this file as a Python script. Let's quickly go over our modules and what their purpose is.
- sys - To exit the script when necessary.
- socket - To communicate on the localhost (not used).
- threading - To start the ARP spoofing thread.
- time - To make intervals between ARP responses.
- logging - To hide the "No IPv6 Route" error scapy produces.
- scapy - Building and sending packets containing the commands and receiving the output.
You may have noticed that we've placed the importation of Scapy within a try; this is in case the user doesn't have Scapy installed. If Scapy can't be imported, we can't run the script, so we tell the user and exit.
Now that we've got our interpreter path and modules, let's move on to taking some input from our user.
Step 2: Taking Input from the User
In order to properly initialize and operate the shell, we'll need some input from the user. If you need a refresher on basic user input, you can see this article.
We'll just be using the raw_input() function to take input from the user. We'll be asking for the victim IP, the IP to spoof, and the interface to send packets out of. Let's take a look at this code:
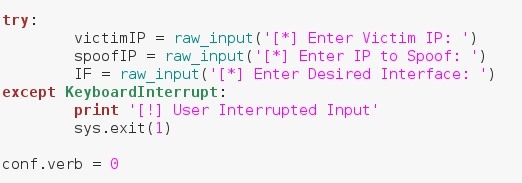
We can see here that we've set these within a try just in case the user interrupts the input. We've also set conf.verb to zero. This stands for configure verbosity. Setting this to zero hides the messages of "Packet Sent" from spilling everywhere.
Now that we have our user's input, we can move on to beginning the initialization. First, we'll need to get the MAC address of the victim.
Step 3: Get the Victim MAC Address
In order to properly send our ARP spoofing packets, we'll need to know the victim's MAC address (the address burned into the network interface card). We can find this address by making ARP requests and returning the result.
We'll be making a function called getMAC(), which will make an ARP request, receive the answer, and return the source MAC address. Let's look at this function now:

The screen shot is rather small, but upon expanding it we can see that we send an ARP request to the broadcast MAC address, requesting the victim's response. This request will be sent out via the interface chosen by the user.
Once we get a response, we iterate through our received packets, returning the value of the source MAC address.
Now that we have our function, we call it and store the returned address in the victimMAC variable. Now that we have our victim's MAC, we can make our spoofing function and start the thread.
Step 4: Start the ARP Spoofing Thread
In order to spoof our IP and send commands at the same time, we'll need to start a thread. A thread basically means that a specified function will run parallel to the script, so we can execute multiple sets of code at once.
First, we'll need to build a function to spoof our IP with ARP responses. We'll send another response every 5 seconds. Let's break down this function now:

We've made a new variable named spoofStatus and we've set its value to True. We then defined a new function simply named poison. This function enters an infinite loop, and upon every iteration it will check the value of spoofStatus. If it is False, it will stop the function. Otherwise it will send an ARP response to the victim and wait 5 seconds before iterating again.
Now that we have our function, we'll need to start our thread. To start a thread, we should store our thread object in a variable, and append this variable to a list. We need to start the thread with the .start() method. Let's take a look at this code now:
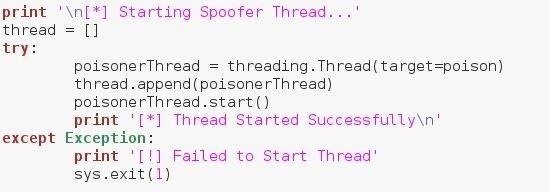
We can see here that we've made an empty list named "thread". We've placed our thread starting within a try just in case the thread fails to start. Once this code completes, we should have our spoofing function running parallel to the rest of the script.
Now that we have our spoofing thread running, we'll need to actually initialize the interaction with the victim.
Step 5: Initializing the Interaction
If you remember from the victim portion of the shell, we need to send some data to the victim in order to start the interaction. We simply need to send some useless strings and wait for a response to see if everything is going well.
Let's look at this initialization code:

Alright, first we send the string "hello victim" and wait for the reply to know that victim is ready to interact. Then we send the string "report" and collect the response. We then extract the data from the received packet and store it in the prompt variable. The data in this packet is the prompt from the getsysinfo() function of our victim shell portion.
Now that we have our initialization complete, we can start sending commands.
Step 6: Send Commands to the Shell
Now that we've complete our initialization, we can utilize our shell. We simply make an infinite loop and use raw_input() to prompt the attacker for a command (using the prompt from the victim). We then send the string given by the attacker to the victim to be executed as a command. We then receive the output and print it directly to the terminal.
Let's take a look at this infinite loop:

We also add an if statement that checks to see if the attacker enters the string "goodbye". If the attacker does enter this string, then the spoofStatus variable is set to False, and we call the .join() method on our thread to join it back with the main script, where it stops executing and finally shuts down the script.
Here is a pastebin link to the attacker script.
There we have it. There's the attacker portion of our script. I feel like this article is way to long to test the shell, so we'll test it in the next part.
If you have any questions, please leave them in the comments below, and I'll try my absolute best to answer them and clear up any confusion.
Thank you for reading!
-Defalt
Just updated your iPhone? You'll find new emoji, enhanced security, podcast transcripts, Apple Cash virtual numbers, and other useful features. There are even new additions hidden within Safari. Find out what's new and changed on your iPhone with the iOS 17.4 update.


2 Comments
First off awesome post really helpful and interseting.
But i am getting an error when trying to install the module Scrapy.
At first it was a c++ windows comp i've installed that and not it's giving me a access Denied message ? i am running the command as admin aswell so not to sure ?
Any help would be amazing
Thanks
I use Python 3, which doesn't support Scapy. Do you know if Phaethon is a good alternative for Scapy, or do you know of any other modules for Python 3 that can function as a good replacement?
Share Your Thoughts