


GRUB, or the GRand Unified Bootloader, is a program that installs to your Master Boot Record and controls what operating system you load at boot time. Normally, it is used for multi-boot systems. Multi-boots allow you to switch between operating systems installed on seperate drives, or partitions at boot time. Linux actually uses it as its default bootloader, even without multiple operating systems.
Today in Null Byte, we are going to be looking at an alternative to GRUB legacy. This alternative will allow us to have background images in the bootloader, as well as change the font and selection colors, allowing you to have a completely unique and custom bootloader.
Prerequisites
- You must have a multi-boot system or a Linux operating system.
- Root access to the computer.
Step 1 Install GRUB-GFX
First, we need to install the version of GRUB that has graphics support. I'm using Arch Linux, so I will use yaourt to install it. If you have no package manager, go to their website to download it.
First, make a copy of your old GRUB menu.lst file:
cp /boot/grub/menu.lst /boot/grub/menu.lst.bak
Now install GRUB-GFX:
yaourt -S grub-gfx
If you are on a Debian-based distro (Ubuntu, Mint) then, install using apt-get.
When the prompt tells you it will replace GRUB if it's installed, type yes.
Step 2 Configuration
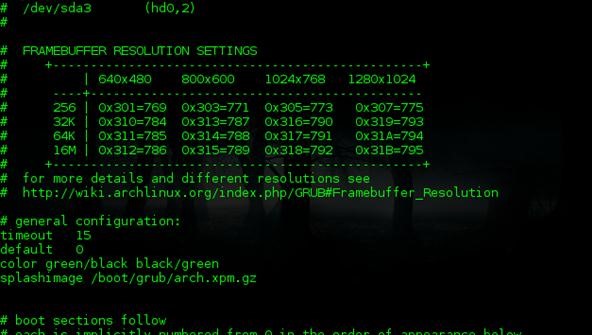
Next, we need to configure our new GRUB setup. We need to tell it where our background image will be, as well as reinstall it to our MBR partition.
First, we need to tell GRUB where our image file will be. Add this line:
splashimage /boot/grub/arch.xpm.gz
It should look like this:

This also brings us to our next changes: color and highlighted colors of text. Change the lines above the one we just created to colors of your liking while keeping original syntax. Here is what mine looks like:
Step 3 Install GRUB to the Master Boot Record
Now we just install GRUB to where our master boot record is located. If you only have one OS installed, it is likely that your boot partition is located at /dev/sda or /dev/sda1. To make sure of this, issue the following command in a terminal:
sudo cfdisk
Whichever partition is toggled with the Boot Flag is the location you need to install GRUB. Install GRUB with your boot path. Leave this program by issuing crtl + c on your keyboard:
su && grub-install /dev/<your partition name here>
All finished! There is one last part we didn't go over...how exactly does one create images?
How to Create GRUB Backgrounds
GRUB-GFX uses a unique image format. It's an .xpm image file inside of a gzip archive. There is also a 640x480 resolution, and 14-color limitation. So lets get started!
- Pick your image.
- Open the image in GIMP.
- Click: Image > Scale Image. Change the resolution to 640x480.
- Click Image > Mode > Indexed.
- Change the maximum amount of colors to 14.
- Save the image as arch.xpm.
- Move the image to your Desktop.
- Cmd: gzip ~/Deskop/arch.xpm
- Cmd: sudo mv ~/Deskop/arch.xpm.gz
You are all set, with no need to reboot! Come join the IRC and chat with the rest of Null Byte!
Just updated your iPhone? You'll find new emoji, enhanced security, podcast transcripts, Apple Cash virtual numbers, and other useful features. There are even new additions hidden within Safari. Find out what's new and changed on your iPhone with the iOS 17.4 update.


2 Comments
under "/boot/grub" There is no menu.lst
The equivalent is "grub.cfg"
How do I go about using Grub-Gfx in Ubuntu 10.04?
Ubuntu uses GRUB2, so I would check out the docs on that :). GRUB2 supports some graphical capabilities out of the box.
Share Your Thoughts