

Welcome back, my budding hackers!
One of the most time-consuming, but necessary, activities in hacking is reconnaissance. Before we can hack a system, we need to know what operating system it's running, what ports are open, what services are running, and hopefully, what applications are installed and running.
Good reconnaissance increases our chance for success and reduces our chances of being detected. One of the best tools for this is hping3.

Due to its versatility, hping3 is often referred as a "packet crafting tool," which means that it can create just about any type of packet you can imagine. This can be very helpful in doing recon, as different packets will illicit different responses from the operating system TCP/IP stack, giving us clues to the underlying OS, ports, and services.
In addition, we can test various IDS and firewall evasion techniques such a fragmenting packets, slow scans, etc. There are so many things we can do with hping3, but I'll limit myself to just a few in this tutorial.
Like nearly all of the tools I demonstrate here in Null Byte, hping3 is built into BackTrack. So, let's fire up our BackTrack and take a look at hping3.
Step 1: Finding Hping3
hping3 is a powerful tool with numerous features and functions. We'll look at some of the basic functions that are applicable to hackers here, but investing a little time to learn additional features will be time well invested.
Let's look at the help screen first.
- hping3 -h
As you can see, the help screen for hping3 is very long and detailed. To better view it, let's pipe it out to more.
- hping3 -h |more
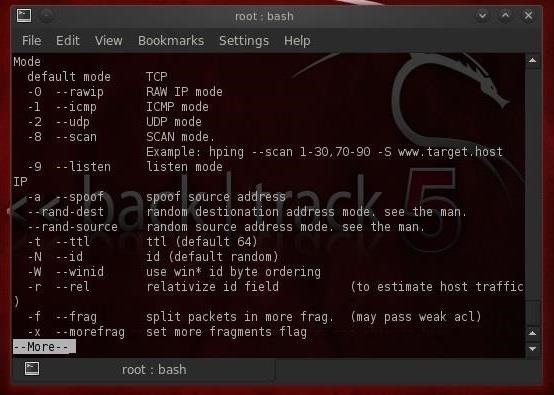
After hitting the enter key a few times to move down the screen, we come to the following information. Please note that hping3 can create TCP, RAW IP, ICMP, and UDP packets with TCP being the default. About the middle of the screen note that:
- -a switch enables us to spoof our IP address
- --rand-dest produces packets with random destination ports
- --rand-source produces packets with random addresses
- -t sets the Time to live for the packets
- -f fragments the packets
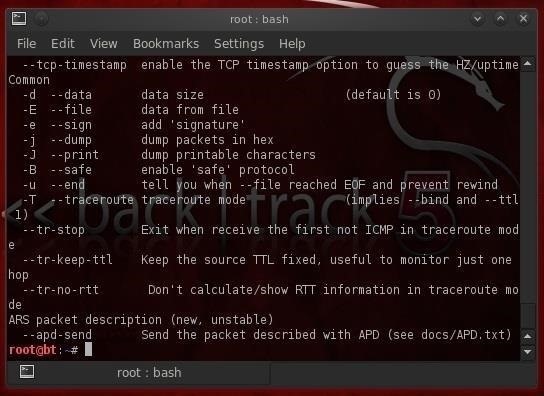
If we now scroll down the help page a bit, we will see the following options. Note that like nmap, we can set any of the flags in the packet (FSPURA).
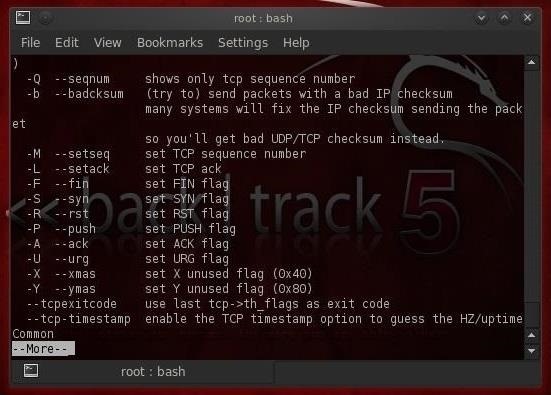
I want you to note the following switches.
- -Q shows only the sequence number
- -S scan using SYN packets
- --tcp-timestamp grabs the timestamp from the tcp packet
Step 2: hping3 Default
One of the most important features to understand about hping3 is that its default packet is TCP. This means that when a network device such a router or firewall is blocking ICMP (ping), we can still do host discovery and reconnaissance with hping3.
Let's try setting the SYN flag (this would be essentially the same as nmap -sS scan) and checking whether port 80 is open (-p 80).
- hping3 -S 192.168.1.105 -p 80
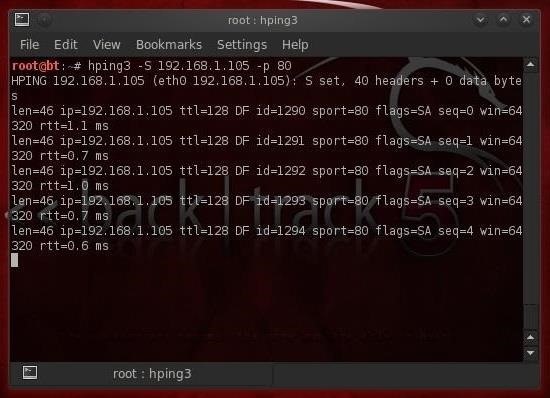
Note in the screenshot above that the packets come back with the flags SA set, meaning the port is open. If the port were closed, the port would respond with an RA.
If we want to scan all the ports beginning with 1, we can simply add the increment switch (++) after the port (p) switch and the port number where we want to start scanning (in this case 1), like so:
- hping -S 192.168.1.105 -p ++1
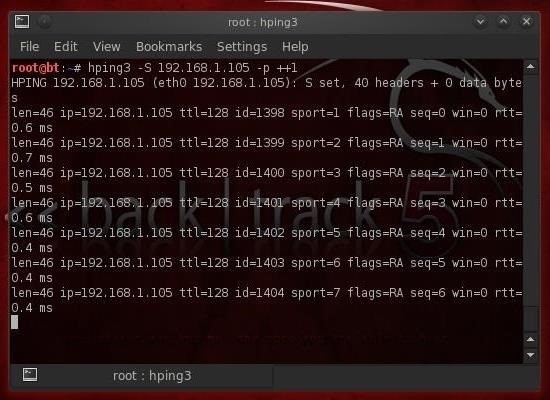
This will scan each port starting at 1, and then increment by one to port 2, then 3, and so on.
Step 3: Fragment Packets with hping3
TCP was designed to be a robust protocol that would continue to communicate even in unfavorable or difficult circumstances. One feature that ensures this robustness is its ability to deal with packets that have been fragmented or broken into multiple pieces. TCP will reassemble those packets when they arrive at the target system.
This feature of TCP can be used against itself by using a tool like hping3 to fragment an attack across multiple packets to evade the IDS and firewall and then have the malware reassembled at the target.
Although most modern IDS's now attempt to catch fragmentation attacks (in Snort, there is a frag3 preprocessor that attempts to detect fragmentation), older ones do not. Even the newer IDS can only pick up fragmentation they are designed to detect. The beauty of hping3 is that it allows us to design new attacks that the IDS has not yet seen.
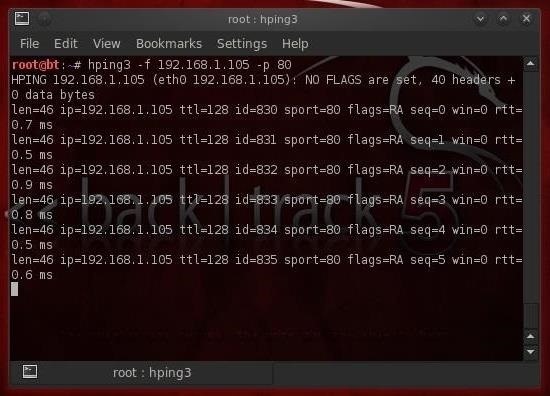
Let's try the hping3 fragmentation.
- hping3 -f 192.168.1.105 -p 80
Step 4: Sending Data with hping3
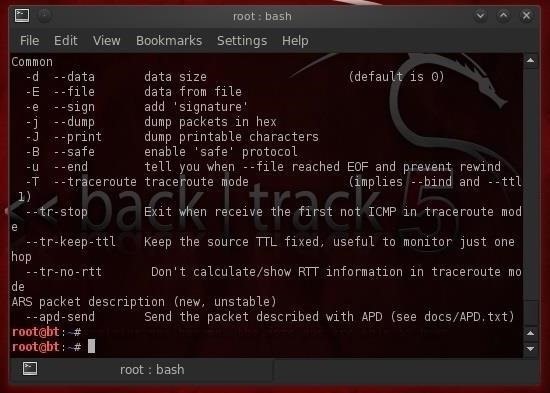
In addition to being able to craft a packet with just about any characteristics we can imagine, hping3 will also allow us to place whatever data we want in those packets. Note in the help screen from Step 1 that the -E switch enables us to denote a file we want to use to fill the payload of the packet.
Let's say we have a file named malware that contains an exploit we're trying to send to the target. In addition, we are concerned that this malware might be detected by the IDS. We could use the fragmentation switch and load the malware across multiple packets where it will be reassembled by the target, while evading the IDS or AV software.
- hping3 -f 192.168.1.105 -p 80 -d 10 -E malware
Where:
- -d is the data payload size (here, we've designated it as 10 bytes)
- -E tells hping3 to grab data from the following file
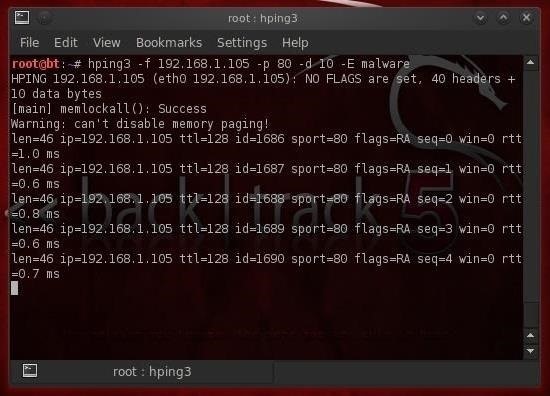
This command then sends the content of the file malware 10 bytes at a time to the target on port 80.
Step 5: Traceroute with hping3
Traceroute is a tool that allows us to trace the route a packet takes across the internet from the client to the target by manipulating the TTL (time to live) of ICMP packets.
It can be a very useful tool for diagnosing problems on an network, and can also be used by hackers to find devices on the network and the location of firewalls, routers, etc. For this reason, most network admin's block or drop ICMP (ping).
Fortunately for us, hping3 enables us to do exactly the same thing, but use TCP which nearly every firewall allows (otherwise, it wouldn't allow Internet traffic). Let's try to run a traceroute using hping3 with the SYN flag set to google.com.
- hping3 -z -t 1 -S google.com -p 80
Where:
- -z connects the command to the ctrl z on the keyboard so that every time we press it, the TTL is incremented by 1
- -t sets the initial TTL (in this case, we're using 1)
- -S sets the flag to SYN
- -p 80 sets the destination port to 80
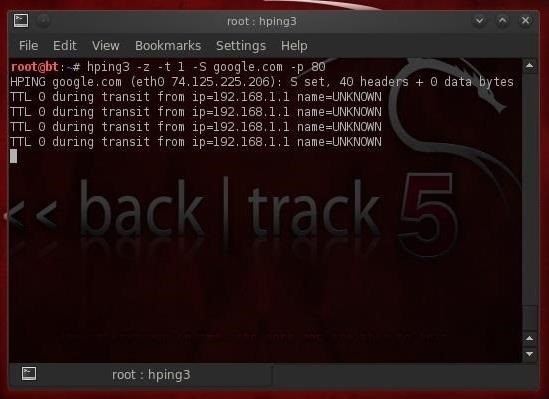
In the screenshot above, the TTL is still 1, and hping3 tells us that the device is UNKNOWN. We can then hit the ctrl z and increment the TTL by one and find each device between us and the target.
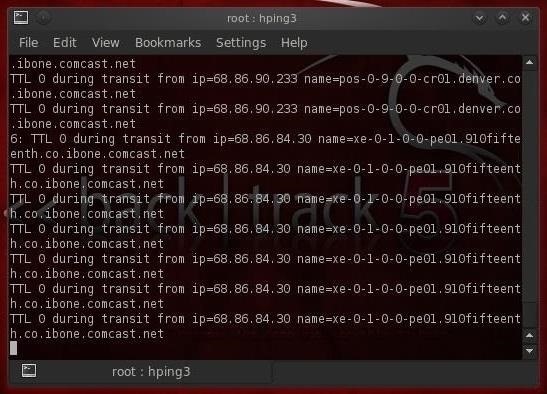
This screenshot shows us two devices between myself and google.com. Continuing to hit ctrl z will increment TTL and find each device until I get to Google's server.
Step 6: Predicting Sequence Numbers with hping3
Another feature that's built into TCP to assure its robustness is the ability to re-order packets at the target even if they arrive out of order.
Remember that packets don't always take the same route to the target, so they very often will arrive out of order. TCP puts a sequence number on the packets so that it can put them back into order where they arrive.
This feature has been used by hackers from the beginning of time (well....at least the beginning of Internet time) to conduct man-in-the-middle attacks (MitM). To protect against MitM attacks, operating system manufacturers tweaked their TCP/IP stack so that the sequence numbers are no longer numbered serially. Instead, to make it harder to conduct MitM attacks, the OS uses an algorithm to generate the sequence numbers.
To conduct a successful MitM attack, then we'll need to predict the sequence numbers. hping3 can help us with that task. We can get the target system to respond with its sequence numbers, and then from the sequence numbers we can decipher what algorithm the OS is using. We can do this by:
- hping3 -Q -S google.com -p 80
Where:
- -Q displays the sequence numbers
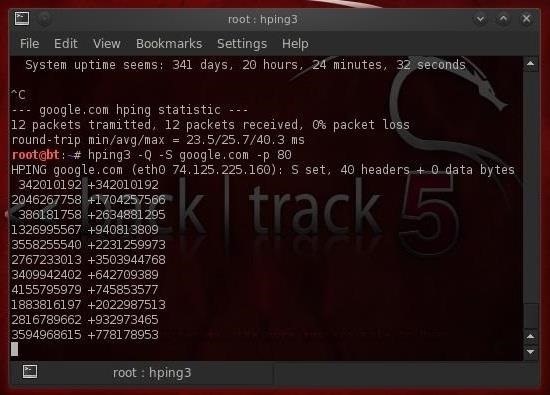
As you can see, google.com responds with its sequence numbers that hping3 captures and displays.
Step 7: hping3 for Uptime
Lastly , we can use hping3 to tell how long the server has been up. This can be very useful information for the hacker, as usually the server must be re-booted to apply updates and patches. By knowing how long the system has been up, we can predict what patches have been applied and what hacks the system is vulnerable to.
For instance, if we find a system that has not been re-booted in three years, we can be pretty certain that any security patches that have been released in that time have not been applied. This means that all the vulnerabilities that have become known in that time are still open on that system.
Hping3 uses the tcp-timestamp packet to predict how long the system has been up. Let's try this against google.com.
- hping3 --tcp-timestamp -S google.com -p 80
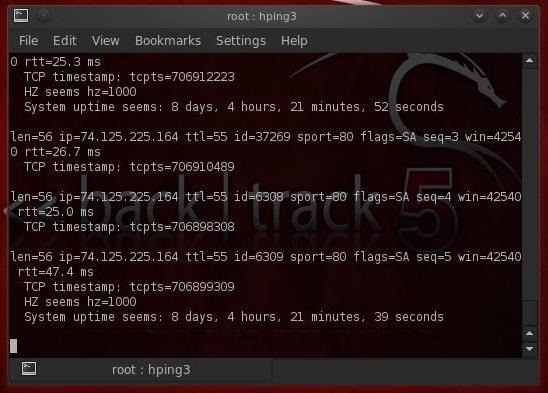
As we can see, this google.com web server has been up just 8 days, 4 hours, 21 minutes, and 39 seconds. If you try this scan against other servers, you are likely to see much longer periods of time between the last reboot, sometimes measured in years. These, of course, would be prime targets!
Keep coming back my aspiring hackers as we continue our exploration of the wonderful world of hacking!
Just updated your iPhone? You'll find new emoji, enhanced security, podcast transcripts, Apple Cash virtual numbers, and other useful features. There are even new additions hidden within Safari. Find out what's new and changed on your iPhone with the iOS 17.4 update.


44 Comments
Your guides are so well thought out and thorough that it makes me want to try them out! I'm not the hacking type of person, but recent circumstances have made me want to, but it's a big move to hack into something. Although if I ever wanted to I know the first place I would come to learn how to use Metasploit!
Fabian:
Thanks for your kind words. I'm glad you enjoy my tutorials.
Hacking need not be malicious and illegal. Some hackers work as penetration testers to help companies identify the weaknesses in their systems. Nearly every military on the planet is training and hiring hackers for cyber warfare and espionage.
OTW
P.S. welcome to Null Byte!
Thanks for welcoming me!
I recently saw an article (Maybe yours) that all countries are recruiting people to build Cyber task forces to help defend themselves and attack because that is the era that we are moving into, where you could do more damage from your laptop than you could from a Military strike, such as shutting off power supplys, destroying databases, clearing bank accounts .
Yes, hacking does not have to be malicious and illegal. I see that now. You might want to try and hack into your own system from another computer to see how secure you are from Metasploit because as I see it, it is a hacker's must have tool!
Don't take this the wrong way, but I have seen your guides as a way to use hacking for malicious reason, such as crashing someone's PC or spying on them, but now I see that that is just how I view it, that it can be used in a lot more ways, such as the annual hacking convention where hackers from all over the world go to go and hack for prizes! To trace back people trying to hack you (and maybe play around with them for a bit haha).
Thanks for the enlightenment
Fabian
Very informative....
When I try the --tcp-timestamp I don't get the estimated uptime instead:
Did I do something wrong ?
It works fine with me. I use kali linux (Live ). May be you are using Virtualbox or VM
Magnorek:
Looking at your command, you seem to have done everything correct, but your output is not for that command. This is the output you should get without the timestamp switch, just the plain hping3 command with the IP address and port number.
I just ran it myself again and it works fine. Try it again and let me know what happens.
OTW
I am experiencing a very similar problem, even after re-attempting this step numerous times, as the attached image helps to illustrate.
Has the command changed?
Or I have I done something wrong in the command line?
Thank you OTW,
Nemesis1512
Nothing changed :/ ...
Hello there mate!
I've been reading your threads and your guides. And i must say, its very interesting, and very informative. But i had to search elsewhere to find more information about IP addresses. For instance. At my school, i use nmap to run a search on the network, but im not very successfull, it doesnt really detect other users. I mean, i dont really know how to do it. Do you have any thread about doing recon and exploiting networks, finding out a targets ip (lets say the guy next to me in a library) and avoid detection from the networks firewall? Ive had some troubles using IP's, because i dont really know how to find my targets IP using BT5.
Congratulations on everything btw. It did get me involved.
Rafael:
Welcome to Null Byte! I'm glad we could get you started at hacking.
There is a tool in BackTrack called Netdiscover. When you run it on the network your connected to, it will discover ever IP on the network using an ARP scan. I'll be doing a tutorial earlier next week on it.
OTW
Thanks mate! Looking forward to it!
Hello all,
I have just a few questions.
I don't see very much difference at all between nmap and hping3, besides a few of the commands. Am I missing something?
Also, every time I enter a command using hping3, the console just sits there, not showing any signs of working like the pictures in the tutorial above. When I hit ctrl^c it stops, and says it has sent hundreds of packages but has received none. I'm stuck. :) Any help would be greatly appreciated!
Thanks.
Jared:
There is some overlap in the capabilities of hping and nmap, but each does it a little differently and each has far more capabilities than I can put into single tutorial.
Before you try using either scanner, make certain you have connectivity with the target.
OTW
Whats the concept of flags ? Why you choose just -S --syn flag ? If i choose some different like --urg or --fin ? please help out with this OTW master! my concept is not clear and i can understand your tutorials only on web, as its so clear to understand! thankyou Master you Rock!
I see, thank you.
Ok, so I tested it, and I do have connectivity (in this case) with google.com.
Here is what I see:
-----------------------------------------------------------------------------------------------
root@bt:~# hping3 -S google.com
HPING google.com (eth0 74.125.228.69): S set, 40 headers + 0 data bytes
^C
--- google.com hping statistic ---
284 packets tramitted, 0 packets received, 100% packet loss
round-trip min/avg/max = 0.0/0.0/0.0 ms
------------------------------------------------------------------------------------------------
As you can see, I waited a while, hit ctrl^C, it stopped and displayed this info. And when I ping google.com I get connectivity.
Sorry for the bother.
Jared:
Thanks for sending that info. It looks like you forgot to designate a port to ping. Your command should be;
hping3 -S google.com -p 80
Try that and see what happens.
OTW
It worked:) So hping3 requires that you specify a port? And nmap doesn't of course, I think I was getting the two confused.
Glad it worked!
OH..wait. :|
I just tried hping3 with another computer on my network which also responds to ping, it is connected. This is what I see:
-------------------------------------------------------------------------------------------------
root@bt:~# hping3 --syn 192.168.0.106 -p 80
HPING 192.168.0.106 (eth0 192.168.0.106): S set, 40 headers + 0 data bytes
-------------------------------------------------------------------------------------------------
and it just sits there.
Jared:
You changed the command. It should be -S, not --syn.
OTW
:| Forgive my mindlessness. I should start reading my own commands. :)
What does --syn do then? In the man files, it lists it like this:
-S --syn Set SYN tcp flag
"-S" and "--syn" are not interchangeable?
Thank you, I think this is my last question on this topic. :)
Jared:
They should be interchangeable, but it doesn't work, try -S.
OTW
so is it possible to use hping3 to send some .exe or .pdf with exploit to a target computer on an open port??
Yes, you can send any file with hping3, but the exploit must be executed to work.
hmmm.... :) thanks OTW
most websites have ofcourse tools for detection but what about the PCs... do they have any type of service that alerts the user when we are doing active reconnaissance...?
yes
but it is user's choice whether to report it or not!! or the service like AV or firewall will report the suspected IP by itself?
also which ip address of victim we need to send the data?? is it the one that we can find on our PC by typing ipconfig in cmd? or is there any other??
Just tried step 3 but for some reason the fragmented packets are all lost. What seems to be the problem?
Shiro:
Do you have a system at 192.168.1.105 on your network? If not, of course, all the packets are lost.
You need to study and understand networking fundamentals to successfully do this type of recon.
OTW
I thought that IP address is an IP address of a website.
I tried the hping3 -S in that IP address, all packets are sent and there are no packets loss. I tried hping3 -f to google.com but still all packets are loss.
Shiro:
Hacking is an elite discipline. You need to do the fundamentals before the advanced stuff. As an analogy, you are trying to do calculus without having first learned algebra.
Please feel free to continue here at Null Byte, but you shouldn't expect me or the other participants to teach you algebra. You need to do your homework.
OTW
To be more specific, you need to study networking fundamentals.
Okay. What about my questions below? For some reason the outputs are different.
The answer to your questions would be book length. Pick up a book on network fundamentals and study it. The answers will become obvious.
Not this question. The questions below about the commands that displays a different output compared to your screenshots.
Same answer. You need to study networking fundamentals. Your questions indicate a basic lack of networking knowledge.
This is not a knock on you. It just means you need to study networking before getting on to this advanced material.
Find a book like "Network+" and study it. You don't have to go deeper than elementary networking, but you need this type of basic knowledge. Otherwise, none of this will make any sense.
I'm running BT 5 R3 GNOME.
I tried TraceRouting google (step 5) but it gives me a totally different output except when the TTL is 0. Did the command really changed how it display the output?
For the last step, I have the same problem with the other users. The timestamp didn't displayed so I just pressed ctrl+c to stop sending packets.
Very informative tutorial looking forward for more interesting topics
after running the hping3 -z -t 1 -S target.com -p 80, I got name = hi.link what does that means "hi.link".
Hi
I'm trying to learn Hping3, I found your tutorials are nice and easy. There is issue I'm facing while trying to exercise your commands with my setup which consists of windows7, kali linux 2 runiing as guest os's in my mac, I see output as following
--- 10.0.0.213 hping statistic ---
2 packets transmitted, 0 packets received, 100% packet loss
round-trip min/avg/max = 0.0/0.0/0.0 ms
firewall for windows is in default mode. Let me know how to proceed with this situation.
Thanks.
Master OTW,
How would you find the IP address of your target, say a laptop connected to a local business network or the IP of a router connected to a home network excuse my little knowledge I just got into this "hobby"
Share Your Thoughts