

Welcome back, my novice hackers!
I have tried to emphasize throughout this "Hack Like a Pro" series that good reconnaissance is critical to effective hacking. As you have seen in many of these hacks, the techniques that we use are VERY specific to the:
- Operating system,
- Service pack,
- Installed applications,
- Open ports,
- Running services, and
- Even language.
I have shown you how to use a few of the best reconnaissance tools, hping, nmap, and xprobe, but each of these has a weakness—they are active. In other words, you have to send packets at the potential victim to get a read on their attributes. This, of course, risks detection and whenever you send packets to a target, your IP address is attached (unless you spoof your IP address, but then you wouldn't get a response from the target).
Using p0f for Passive Recon
In the interest of remaining as stealthy as possible, you want to be able to determine the operating system of a potential target without touching it. That's the beauty of p0f, which uses attributes of the packets on the wire to determine the operating system that sent the packet.
As you probably know, each operating system implements the TCP/IP stack in slightly different ways, and as a result, the TCP packets sent via that OS have slightly different attributes. If we can grab a packet off the wire, examine it, and look for these attributes, we can compare them to a database of attributes and determine with a relatively high degree of accuracy what operating system sent the packet.
It's important note, though, that the reliability of passive recon is lower than active recon.
Taking a Look at Our TCP/IP Packet
The image below is of a TCP/IP header. The IP header is shaded in yellow and the TCP header is in white. I have circled four fields of that header that are critical in determining the operating system that generated the packet.
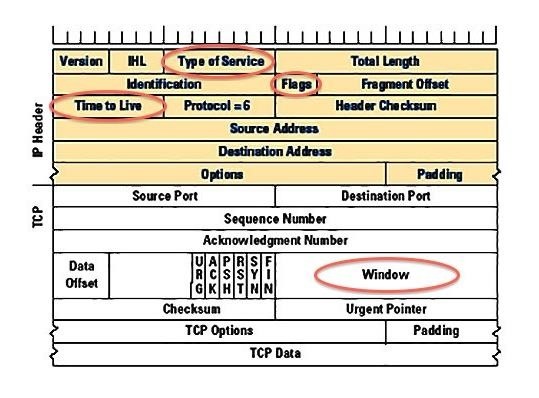
First: Type of Service (TOS)
Their are four different values here.
- Minimize Delay
- Maximize Throughput
- Maximize Reliability
- Minimize Monetary Cost
Second: Flags (DF) of the IP Header
Don't confuse this with the SYN, FIN,RST, ACK, URG, and PSH flags in the TCP header. This is the Fragment or Don't fragment flag. This flag is meant to indicate to the receiving system whether the packet has been fragmented.
Third: The Time to Live (TTL)
This indicates the default setting for the TTL of the packet. Each operating system sets the TTL to maximum number of hops that packet can traverse before it times out. Generally, Windows systems have this set at 32 while Linux systems have the TTL set to 64.
Fourth: The Windows Field
This is probably most important. The Window field sets the size of the buffer of the sending system. This is the way that TCP maintains flow control. This field alone varies the most among operating systems. If you can find this value, you have about 70-80% chance of determining the operating system that sent the packet.
Now that have an idea of how p0f works, let's put it to work.
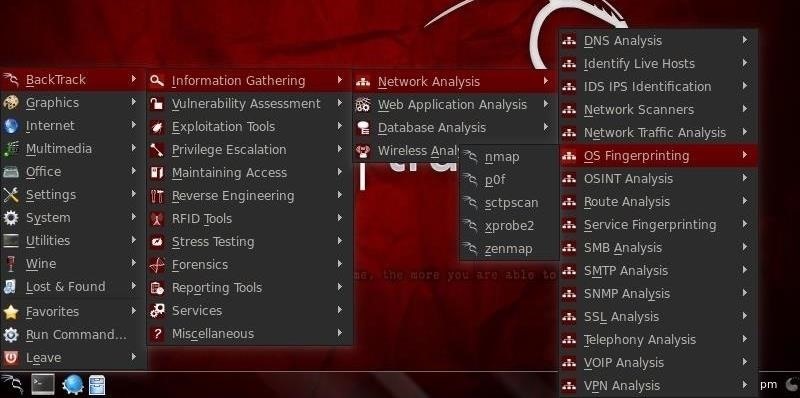
Step 1: Open p0f
Let's start by firing up BackTrack and then opening p0f. We can do that by going to BackTrack -> Information Gathering -> Network Analysis -> OS Fingerprinting, and finally, p0f.
When we do so, p0f will open a terminal with a help screen like that below.
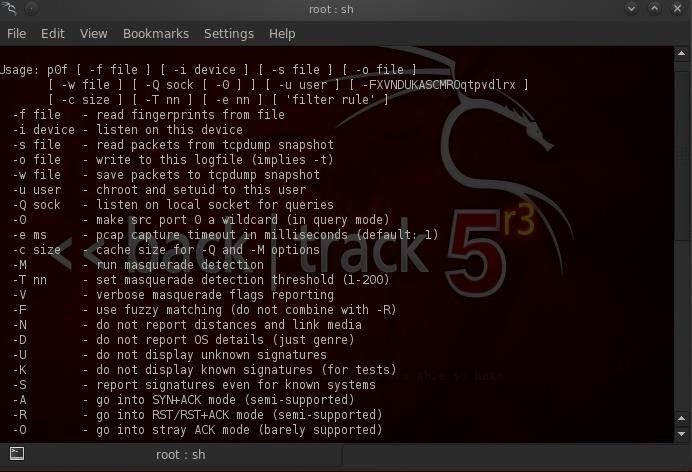
Step 2: Start p0f
There is a lot of information in that help screen, much of which we can leave for another tutorial. To get p0f running, we simply need to type the command (p0f) then -i (for interface), the name of the interface we want to listen on (eth0 here) and then the -v and -t options.
- bt > p0f -i eth0 -vt
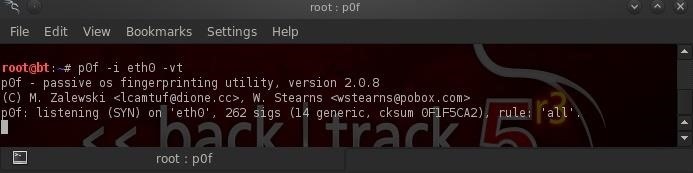
When we do so, p0f will begin to listen on that interface (as shown above) for any traffic.
Step 3: Send Traffic
Now, let's send some traffic from a Windows XP system. I simply used netcat to connect to port 80 on our BackTrack system.
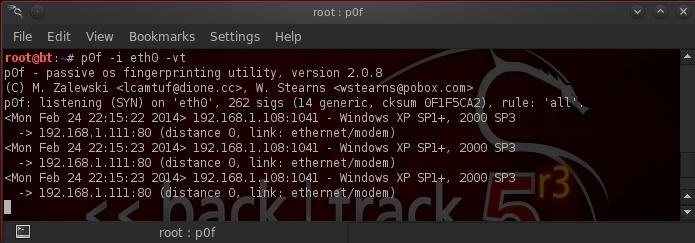
As you can see above, p0f identified it accurately as Windows XP SP1. Also note that it identified the type of connection I was using, in this case "ethernet/modem".
Step 4: Send Windows 7 Traffic
Now, let's send some Windows 7 traffic. Once again, I simply used netcat to connect to port 80. This time, p0f is baffled. It gives us the signature of the packet, but then identifies it as Windows, but doesn't know what version.
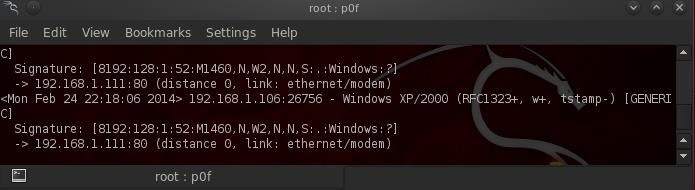
It was able to identify the connection from an ethernet/modem connection.
The problem with the Windows 7 identification, and for that matter anything beyond Windows Vista, is that the developer of p0f stopped updating the signatures in 2006. Any new signatures for new operating systems aren't included in this p0f 1.8 on BackTrack.
Step 5: View OS Signatures
P0f stores the operating system signatures in a file at /etc/p0f/p0f.fp. Let's take a look at that file.
- more /etc/p0f/p0f.fp
This file has a lot of information on p0f, but also includes the operating system signatures. If you scroll down through this file about 60% of the way, you will come to the individual signatures of each operating system.
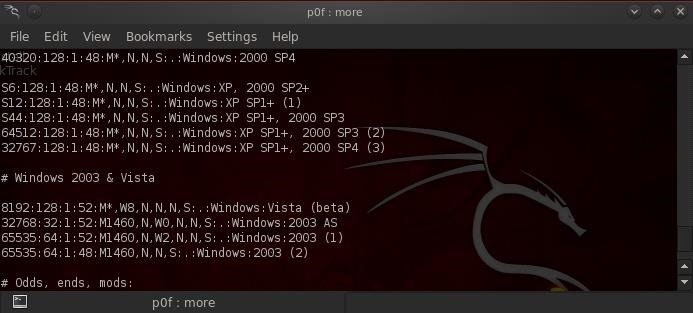
In the screenshot above, you can see the Windows operating systems signatures. You could simply add the signature from your Windows 7 operating system to this file and it would then recognize it the next time a Windows 7 system packet was seen on the wire by p0f.
Good News!
The good news is that the developer of p0f, Michael Zalewski, has recently released p0f version 3 that has up-to-date signatures and new features!
Now that you understand how p0f works, we will download, extract, and compile the new version of p0f in a future tutorial, so keep coming back my novice hacker!
Just updated your iPhone? You'll find new emoji, enhanced security, podcast transcripts, Apple Cash virtual numbers, and other useful features. There are even new additions hidden within Safari. Find out what's new and changed on your iPhone with the iOS 17.4 update.


11 Comments
I want wifi hack software I download but no working
Muhammad:
What software did you download?
OTW
master otw:
i didn't understand "SEND TRAFFIC".....how can i send???
suppose i want to fingerprint my collg server thn how i came to know the ip of my server????
i need to use xprobe or nmap before pof??
Secret:
This a "passive" OS fingerprinting tool. It examines packets on the wire. You would have to intercept or sniff packets coming from the server. I'm sure you can think of hundreds of ways.
OTW
master suppose i hv downloaded something from my collg server thn how can i read tht packets??
Secret:
You have save the packets in a pcap format using Wireshark or simply use p0f while downloading.
OTW
how can i use pof for downloading ???
You don't seem to understand. It is not a downloading tool. It simply examines the packets as they traverse the wire.
i understand master tht its not a downloading tool but examines the packets.....but i didnt understand how to make pof read packets..............sorry very silly question
Incredibly cool.
Is p0f included in Kali?
Nevermind, i found it. its under Information Gathering -> Traffic Analysis -> p0f
Share Your Thoughts