

Welcome back, my neophyte hackers!
In the world of information security, the most common intrusion detection system (IDS) you will ever encounter is Snort. As you probably already know, an IDS works similarly to antivirus (AV) software on your desktop; It attempts to identify malicious software on your network and warns you of its presence.
Snort, conceived by Martin Roesch in 1999, had become so popular that the networking giant Cisco purchased it in 2014, so you will likely see it built into nearly all Cisco devices in the near future. And since Cisco is the world's most widely used network device manufacturer, you are likely to encounter Snort everywhere.
Even if your organization never uses Cisco products (unlikely) or Snort, you will likely benefit from understanding how this IDS works since most other intrusion detection systems work similarly.
I have written a few articles about Snort in the past, but I thought it was time I put together a comprehensive series on Snort. In this series, we will address how to use Snort from start to finish, including installation, configuration, managing output, rule writing, and alert monitoring.
Let's start Snorting!
Method 1: Installing Snort from the Repositories
Installing Snort is simple if you have Snort in your repository. Unfortunately, Snort is no longer in the Kali repository, so our first step is to add a repository that does have Snort. In this case, we will add some Ubuntu repositories.
First, we need to open the /etc/sources.list file. We can do this with any text editor (here, I will use Leafpad).
kali > leafpad /etc/apt/sources.list
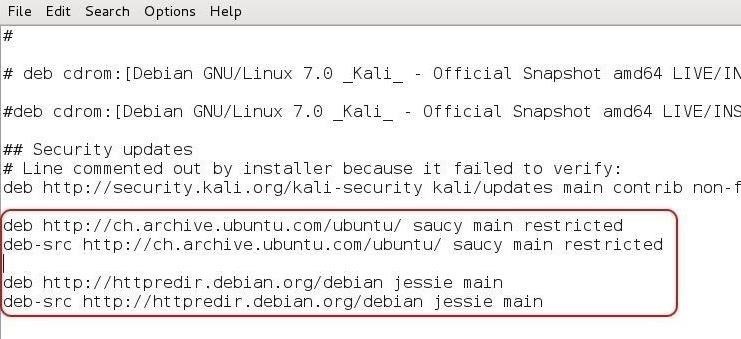
As you can see in the above screenshot, I added several Ubuntu repositories, which are also listed below. As Ubuntu is a fork from Debian (the base Linux distribution that Kali is built on), most Ubuntu packages will work on Kali.
deb http://ch.archive.ubuntu.com/ubuntu/ saucy main restricted
deb-src http://ch.archive.ubuntu.com/ubuntu/ saucy main restricted
deb http://httpredir.debian.org/debian jessie main
deb-src http://httpredir.debian.org/debian jessie main
After saving the file to update our repositories list, we need to next update the packages list. We can do this by typing:
kali > apt-get update
Once our packages have been updated, we can now install the Snort package from the repository with:
kali > apt-get install snort
And that's all there is to it. Snort is installed and ready to go! To test it, simply type:
kali > snort -V

As you can see, Snort responded with its version number (in this case, 2.9.2).
Method 2: Installing Snort from Source
To install Snort from source code is bit more complex and time-consuming, but the advantage is that Snort will be compiled specifically for your particular hardware and software configuration.
This will provide you with significantly improved overall performance. As with any IDS, performance is critical. Slower performance by the IDS will either slow your overall network capability or drop packets. With the former, customers/users will be unhappy; with the latter, you will risk the security of your network.
When using Snort in a secure production environment, installation from source is highly preferred. Furthermore, installing from source ensures that you are installing the latest version of Snort. Many of the repositories contain an older version. The current version of Snort is 2.9.8, while the repositories contain 2.9.2. Not a huge difference, but when we are trying to protect the "crown jewels," every little bit helps.
Let's begin by creating a directory in Kali to download the source code to.
kali > mkdir snort_source
Next, navigate to that directory.
kali > cd snort_source
Before we download Snort, we need to install the Data Acquisition library or DAQ. The DAQ has a few pre-requisites that we need to install.
kali > apt-get install -y bison flex
Now we can download and install DAQ for the Snort web site.
kali > wget https://www.snort.org/downloads/snort/daq-2.0.6.tar.gz
kali > tar -xvzf daq-2.0.6.tar.gz
Next move to the daq directory.
kali > cd daq-2.0.6
Last, configure and make DAQ.
kali > ./configure
kali >make
kali > install
To download the Snort source code directly from Cisco/Snort, we can use the wget command as follows (new version links can be found here).
kali > wget https://snort.org/snort/snort-2.9.8.0.tar.gz

Once it has been downloaded, we need to un-tar it and decompress it. (For more information on the tar command, check out my Linux Basics article.)
kali > tar -xvzf snort-2.9.8.0.tar.gz

Next, we need to change directories to where the new Snort files are located.
kali > cd /snort-2.9.8.0
Then, we need to configure it.
kali > ./configure --enable-sourcefire

Afterward, we need to use the make command, which determines which of the components of the source code needs to be recompiled and then issues the commands to do so.
kali > make
Finally, we make install. This takes our recompiled program components and places then in the proper directories.
kali > make install
Because we installed new library files with this installation, we will need to update the shared libraries. We can do this with by typing:
kali > ldconfig

To enable us to start and run Snort from any directory, we can make a symbolic link from the binaries in /usr/local/bin/snort and a new file in /usr/sbin called snort. Since /usr/sbin is in our PATH variable, we can then type Snort anywhere within our operating system to start our IDS.
kali > ln -s /usr/local/bin/snort /usr/sbin/snort

Finally, let's test our installation of Snort by typing:
kali > snort
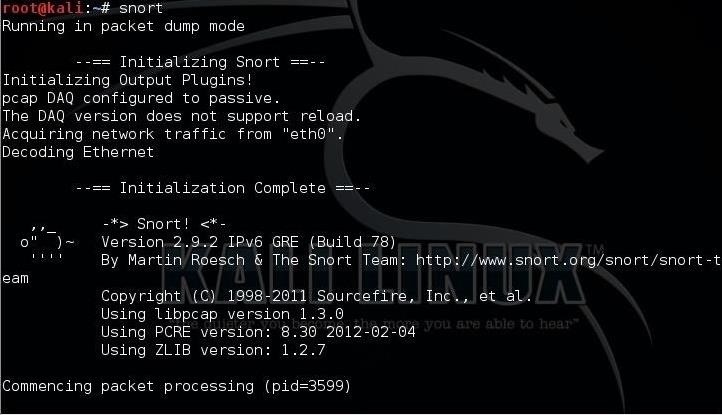
As you can see, Snort has started and is running successfully in packet dump mode, aka sniffer mode.
Now that we have successfully installed Snort, we will progress to configuring it to detect malicious software. That will be in our next article in this series, so keep coming back, my neophyte hackers!
Just updated your iPhone? You'll find new emoji, enhanced security, podcast transcripts, Apple Cash virtual numbers, and other useful features. There are even new additions hidden within Safari. Find out what's new and changed on your iPhone with the iOS 17.4 update.


25 Comments
Nice and easy tutorial on setting up Snort IDS.
I'm excited for the next view tutorials on Snort. Seems like a real important IDS to understand since it is so widely used.
As Kali says " The quieter you become, the more you are able to hear"
Seems like a good quote for this one hehe:)
Long awaited article. Thank you master.
As a hacker, we need to know what and how the security softwares works.
I am curious to know the inner workings of snort
I'll try to include information on the inner workings in a later tutorial.
Thank you, master
Thanks OTW :D
The sources file is inside apt directory:
kali > leafpad /etc/apt/sources.list
Was about the say that
Thanks
I m having some trouble installing by method 2, can you help me?
The error message tells you are missing libpcap.
Yup I know, I did last week a fresh instalation of kali, and now I was just following your tutorial.
This error shows after I run the command:
kali > ./configure --enable-sourcefire
Install libpcap.
It says libcap is already installed -- I'm stuck
Try "apt-get install -y libpcap-dev libpcre3-dev libdumbnet-dev"
Now i got this...
I really need some help here otherwise I can't install snort
I suggest you use the package in step #1
In step 1, It seems like some of the url packages are not available...
Sudo apt-get update:
I had the same issue so I'm currently loading it from the source.
Ironic that this posts the day after I take an exam which asked about snort.
That's great! Everyone in IT security should know snort.
What does --enable-sourcefire do?
I ran into some issues but I believe I found some fixes:
I'm not sure if this is covered in another snort post, but I needed to install wget https://snort.org/downloads/snort/daq-2.0.6.tar.gz
But in order to get that package compiled, I had to install flex and bison.
apt-get install flex bison
Now 2017 still will not pull, same picture above from Roony...
Sad to now look elsewhere as this was no.1 search site.
cheers
I loved it thank you
Share Your Thoughts