
When joining a new network, computers use the Address Resolution Protocol to discover the MAC address of other devices on the same network. A hacker can take advantage of ARP messages to silently discover the MAC and IP address of network devices or actively scan the network with spoofed ARP requests.
Why Do We Need ARP & What Does It Do?
For devices to communicate on a network, they need to be able to link two important pieces of information. The first is an IP address, which you can think of like a parking space that's available on a network. The router checks to see which space is available at any given time and assigns an IP address that isn't being used to any device that connects to the network.
Because a different space might be available at different times, your IP address on a network may be different on any given day. Your IP address will also change each time you join a new Wi-Fi network, as the router behind that network will assign you an IP address according to however the network was set up.
The second piece of information needed to deliver information across a network is a MAC address. A MAC address is like the license plate of a vehicle and stays with your device the same way. While your IP address changes depending on the network you're connected to, your MAC address stays the same. Like the license plate of a vehicle, a MAC address remains unchanged as it's assigned different parking spaces on networks throughout the day.
In our analogy of the vehicle parking in different parking spaces, we would need two pieces of information to locate our vehicle at any given time. The first would be a unique description of the vehicle, like the license plate, or MAC address, so that we know when we find it. The second is the parking space, or IP address, the vehicle is currently assigned, allowing us to both physically locate and verify we have the correct vehicle within all the possible spaces it could occupy.
The MAC and IP address of devices on the network are linked together in a table called an ARP cache that's used to route messages across a network. To populate this cache, computers request the MAC address of other devices assigned a particular IP address on the network by sending them an ARP request. While all devices on a network receive and process these requests, only devices with the matching IP address will reply with their MAC.
ARP requests are how computers on a network automatically request each other's IP and MAC address information. While essential for being able to communicate with other devices on a network, they can also be abused due to the fact that anyone can send an ARP request and include false information.
ARP for Reconnaissance
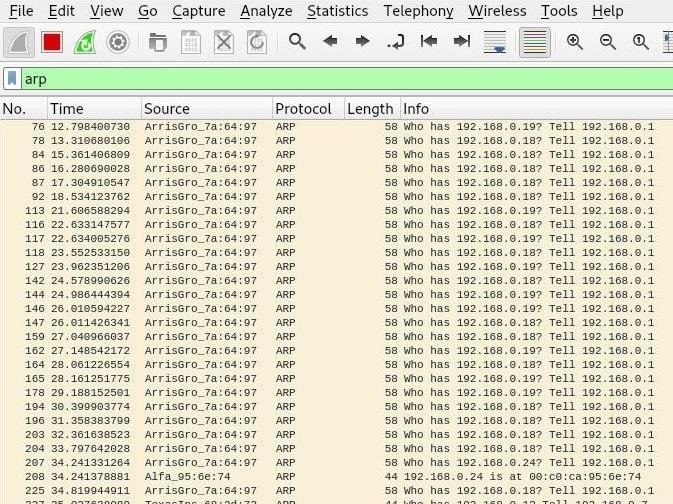
To understand why ARP is useful for recon, we can take a look at ARP requests in Wireshark. In the capture below, I've listened in on traffic in public for about 60 seconds to discover ARP requests from local devices. These requests are incredibly simple, but provide the background information needed for the network to function.
In these requests, we can see the simplified version of the message spelled out. Each request asks "Who is at this IP address?" and lists an IP address to reply to with the information requested. Whichever device is at that IP address replies with its MAC address, allowing an attacker to sit back and passively use ARP to identify which device is at a particular IP address. Moreover, MAC addresses can be used to look up the manufacturer of the device, meaning we can also start to guess about what kind of device is residing at that IP address.
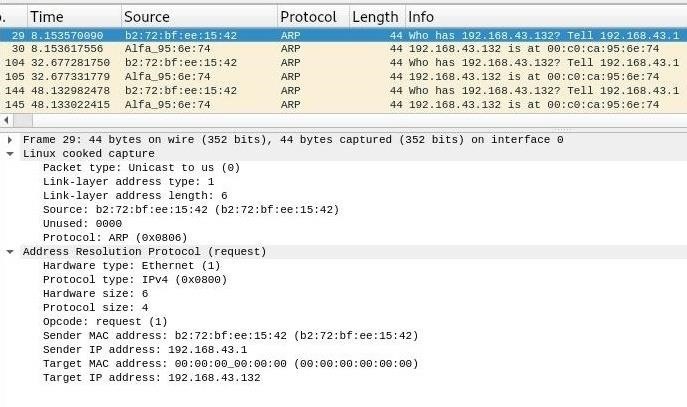
Looking at the structure of the ARP request in Wireshark, you can see that while there is a sender IP address specified, the target MAC address is set to 00:00:00:00:00:00. This is the broadcast address, meaning that all devices on the network will receive and process this request, but only reply if the "target IP address" of 192.168.43.132 matches that of the device receiving the request.
We can use ARP requests to scope out a network in one of two ways, active scanning or passive discovery.
Active vs. Passive Recon
For a hacker or red team exploring a network, active scanning can easily lead to being discovered. One of the safest ways to avoid discovery is to not do things that are clearly associated with attacks, like aggressive scanning of networks using tools that generates lots of suspicious traffic. ARP can be a gold mine when it comes to avoiding discovery in this way, and it can be used to locate nearly every device on a network without running a single scan.
If the risk of discovery isn't too high, more active ARP manipulation can allow a hacker to map, reroute, and even disable a network in a matter of minutes. In the first phase of the attack, a hacker can send out ARP requests to every possible IP address on the network. After getting a list of every device out there, the hacker can send ARP replies to trick any device on the network into assigning the attacker's MAC address to the router's IP address, accidentally sending traffic meant to the router to the attacker's device instead.
- Don't Miss: Easily Detect CVEs with Nmap Scripts
The hacker can either forward this traffic on to the router while sniffing or modifying the data that passes through or he or she can drop the traffic entirely. If the traffic is dropped, the device targeted will be cut off from the network, allowing the hacker to selectively capture the data connection of any device they discover by sending forged ARP replies.
In this example, we'll explore two tools to discover devices with ARP that use both active and passive discovery.
What You'll Need
To follow this guide, Kali Linux is the easiest system to use. You may be able to use these tools on other Linux systems, but I haven't tested them on anything besides Kali.
You'll also need an Ethernet or Wi-Fi connection to sniff, although this will not work if you try in a public place that has a router which restricts you to your own subnet. If it does, the only ARP information you'll be able to obtain through active scanning will be the MAC address of the router.
You should also note that you will need the password to the network if you're using a Wi-Fi connection. You can't do this from the outside of a network, you need the ability to send ARP messages on the network for active scanning or listening to other traffic.
Step 1: Connect to the Network
Once you connect to a wired or wireless network, your computer will begin storing ARP information in an ARP cache. This is stored in the memory of your computer and gets added to every time an ARP reply is received to update your computer's address book of which devices are on the network and what their IP and MAC address are.
You can access the information your computer has saved about your current network by opening a terminal window and typing arp -a to see your ARP cache.
arp -a_gateway (192.168.43.1) at b2:72:bf:ee:15:42 [ether] on wlan0To start, I only see the MAC address and IP of the default gateway, which is the router. If you need to quickly find the router, this is a great way of doing so.
Already, this gives us some useful information. The default gateway is at 192.168.43.1, so in order to impersonate the router, we could send an ARP reply to any device saying our MAC address is at that IP address.
Without running any scans, let's see what we can learn about the network and which IP addresses are occupied by opening Wireshark and looking at ARP requests flowing across the network.
Step 2: Open Wireshark
The first step to discovering devices on the same network is to simply listen in on the ARP requests that are automatically broadcast over the network. After opening Wireshark, select the network adapter connected to the network you want to monitor, and click the shark fin icon to start capturing.
Make sure to click "Enable promiscuous mode on all interfaces" in Capture –> Options –> Input if it isn't checked. This allows you to receive packets even if they aren't addressed to your device. To filter out packets that aren't ARP requests, type arp into the display filter.
So what are we seeing? The router is asking a range of IP addresses for their MAC address to see if a device is connected. We may not be seeing all of the replies, but we can see that our device is replying to the ARP requests by providing its MAC address. We may start to see replies answered, but to take matters into our own hands, we can send some ARP messages of our own.
Step 3: Run an ARP Scan
ARP-scan is an extremely simple tool that allows us to craft ARP messages to discover devices on a network. It should be installed by default on Kali, but if you don't have it, you can install it with apt install arp-scan.
In a terminal window, you can run the most simple ARP scan by typing the following, then watch the results in Wireshark. The command arp-scan -l scans the local network even if we don't know the network range.
arp-scan -lInterface: wlan0, datalink type: EN10MB (Ethernet)
Starting arp-scan 1.9.5 with 256 hosts (https://github.com/royhills/arp-scan)
192.168.0.2 e8:11:32:dc:39:80 Samsung Electronics Co.,Ltd
192.168.0.1 40:70:09:7a:64:97 ARRIS Group, Inc.
192.168.0.5 00:09:1b:0c:62:0f Digital Generation Inc.
192.168.0.8 d4:95:24:c2:36:27 Clover Network, Inc.
192.168.0.6 10:8e:e0:ef:5d:f2 (Unknown)
192.168.0.11 3c:dc:bc:05:77:d4 (Unknown)
6 packets received by filter, 0 packets dropped by kernel
Ending arp-scan 1.9.5: 256 hosts scanned in 2.859 seconds (89.54 hosts/sec). 6 respondedIf we do know the network range, we can also use the command arp scan 192.168.0.0/24 to do the same or limit how many IP addresses we're scanning.
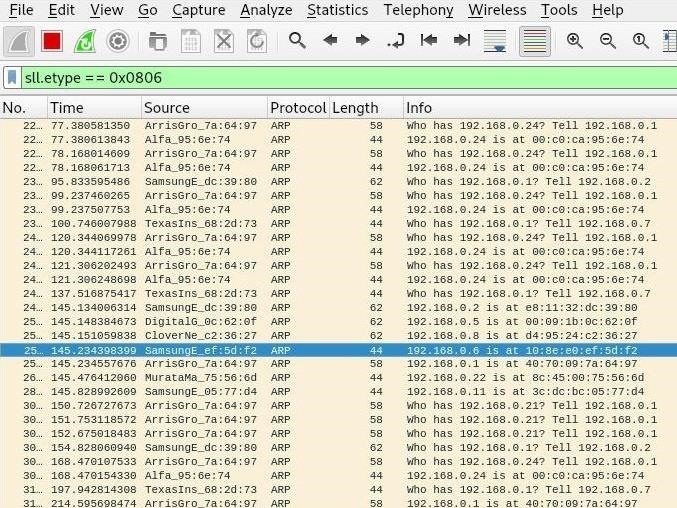
In Wireshark, we can see the replies that have given us this information.
This is a bit obvious though, isn't it? These packets are addressed to us, so it's pretty obvious to anyone looking at the packets that it's us running an ARP scan in an attempt to locate devices on the network. If that's not part of our job, this activity could get our MAC address blacklisted.
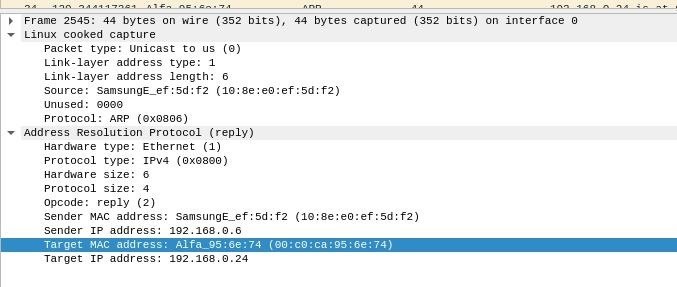
If we look at the packets we intercepted, they're addressed to us. So how can we hide this?
By adding the -s flag, we can specify a fake source for our ARP scan. This means we can pretend someone else is doing the ARP scan! Because we're not using our real MAC address, it means we won't be the MAC address on the packets being sent.
To try this out, let's try to blend in with the ARP requests the router keeps sending. Using the router's IP address of 192.168.0.1, we'll do an ARP scan with the -s source flag and -v verbose flag to display more output.
arp-scan -l -s 192.168.0.1 -vInterface: wlan0, datalink type: EN10MB (Ethernet)
Using 192.168.0.0:255.255.255.0 for localnet
Starting arp-scan 1.9.5 with 256 hosts (https://github.com/royhills/arp-scan)
192.168.0.2 e8:11:32:dc:39:80 Samsung Electronics Co.,Ltd
192.168.0.5 00:09:1b:0c:62:0f Digital Generation Inc.
192.168.0.6 10:8e:e0:ef:5d:f2 (Unknown)
--- Pass 1 complete
192.168.0.8 d4:95:24:c2:36:27 Clover Network, Inc.
192.168.0.11 3c:dc:bc:05:77:d4 (Unknown)
192.168.0.7 50:33:8b:68:2d:73 (Unknown)
--- Pass 2 complete
6 packets received by filter, 0 packets dropped by kernel
Ending arp-scan 1.9.5: 256 hosts scanned in 2.551 seconds (100.35 hosts/sec). 6 respondedAwesome! We've spoofed the router and discovered other devices on the network by sending ARP requests on behalf of the router. But we used our MAC address rather than the router's MAC address. Does it matter? Let's look at Wireshark.
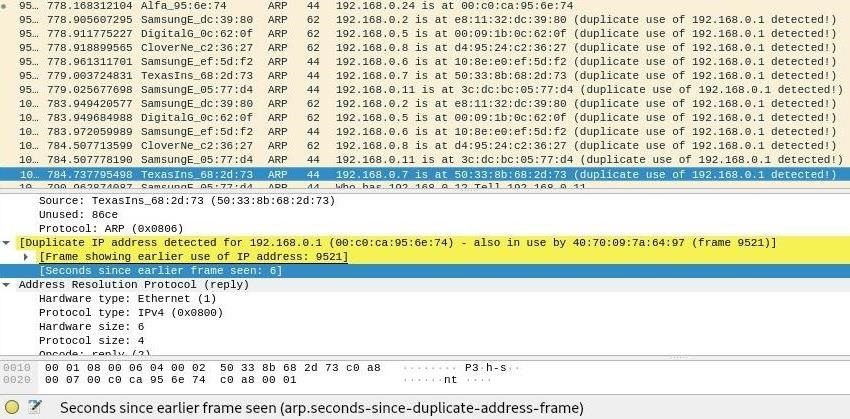
Wireshark has discovered what we're doing and ratted us out! Because our MAC address was used with another IP address on the network, Wireshark knows something fishy is going on and flags this as suspicious behavior.
Instead, we can use an IP address that isn't currently in use to hide this behavior. If we run the same scan with an IP address close to the end of the range of possible IP addresses on the network, Wireshark won't flag the packets as suspicious.
Step 4: Run a Stealthy Passive Scan with Netdiscover
Now that we've tried out ARP scan, let's try out another scanning tool that uses ARP. Netdiscover should come installed by default in Kali Linux, but if it doesn't, you can install it by typing apt install netdiscover in a terminal window.
To get started, let's take a look at the available options. We can review them by typing netdiscover -help in a new terminal window.
netdiscover -helpNetdiscover 0.3-pre-beta7 [Active/passive arp reconnaissance tool]
Written by: Jaime Penalba <jpenalbae@gmail.com>
Usage: netdiscover [-i device] [-r range | -l file | -p] [-m file] [-s time] [-n node] [-c count] [-f] [-d] [-S] [-P] [-c]
-i device: your network device
-r range: scan a given range instead of auto scan. 192.168.6.0/24,/16,/8
-l file: scan the list of ranges contained into the given file
-p passive mode: do not send anything, only sniff
-m file: scan the list of known MACs and host names
-F filter: Customize pcap filter expression (default: "arp")
-s time: time to sleep between each arp request (milliseconds)
-n node: last ip octet used for scanning (from 2 to 253)
-c count: number of times to send each arp reques (for nets with packet loss)
-f enable fastmode scan, saves a lot of time, recommended for auto
-d ignore home config files for autoscan and fast mode
-S enable sleep time supression between each request (hardcore mode)
-P print results in a format suitable for parsing by another program
-N Do not print header. Only valid when -P is enabled.
-L in parsable output mode (-P), continue listening after the active scan is completed
If -r, -l or -p are not enabled, netdiscover will scan for common lan addresses.To run the most basic passive scan, we can run Netdiscover in passive mode with the following command. Wait a while for the router and other devices on the network to send and reply to ARP replies, and you'll begin to see this list populate.
netdiscover -pCurrently scanning: (passive) | Screen View: Unique Hosts
9 Captured ARP Req/Rep packets, from 7 hosts. Total size: 460
_____________________________________________________________________________
IP At MAC Address Count Len MAC Vendor / Hostname
-----------------------------------------------------------------------------
192.168.0.7 50:33:8b:68:2d:73 2 84 Texas Instruments
192.168.0.2 e8:11:32:dc:39:80 1 60 Samsung Electronics Co.,Ltd
192.168.0.1 40:70:09:7a:64:97 2 112 ARRIS Group, Inc.
192.168.0.5 00:09:1b:0c:62:0f 1 60 Digital Generation Inc.
192.168.0.8 d4:95:24:c2:36:27 1 60 Clover Network, Inc.
192.168.0.6 10:8e:e0:ef:5d:f2 1 42 Samsung Electronics Co.,Ltd
192.168.0.11 3c:dc:bc:05:77:d4 1 42 Samsung Electronics Co.,LtdAlthough we are gathering the same information, we are gathering the information in a way that is invisible from the perspective of someone monitoring network traffic.
Step 5: Run an Active Scan with Netdiscover
If we want to start mapping the network more quickly, we can run active scans with Netdiscover as well. Without specifying a network range, Netdiscover will actually go after pretty much every common network range, leading to longer scan times. This may not always be accurate as well. I noticed that Netdiscover scanned the /24 network I was connected to as a /16, which may cause it to take much longer or miss some hosts.
You can also increase the amount of ARP requests you send with the -c flag. To run an active scan against the network using 20 ARP requests per IP address, we can run netdiscover -c 20 in a terminal window.
netdiscover -c 20Currently scanning: 192.168.34.0/16 | Screen View: Unique Hosts
100 Captured ARP Req/Rep packets, from 7 hosts. Total size: 5528
_____________________________________________________________________________
IP At MAC Address Count Len MAC Vendor / Hostname
-----------------------------------------------------------------------------
192.168.0.2 e8:11:32:dc:39:80 19 1140 Samsung Electronics Co.,Ltd
192.168.0.1 40:70:09:7a:64:97 28 1568 ARRIS Group, Inc.
192.168.0.5 00:09:1b:0c:62:0f 17 1020 Digital Generation Inc.
192.168.0.11 3c:dc:bc:05:77:d4 6 252 Samsung Electronics Co.,Ltd
192.168.0.6 10:8e:e0:ef:5d:f2 8 336 Samsung Electronics Co.,Ltd
192.168.0.8 d4:95:24:c2:36:27 16 960 Clover Network, Inc.
192.168.0.7 50:33:8b:68:2d:73 6 252 Texas InstrumentsARP Resolves Host Information for You
When exploring a new network, ARP is the perfect tool for discovering what else is out there. Whether it's through passive eavesdropping over the natural flow of ARP requests or actively forging ARP requests to pretend someone else is sending them, manipulation of ARP messages make more obvious or suspicious scans unnecessary. If you need to start learning the IP and MAC addresses of other devices on a network, let the protocol designed to do just that take care of the heavy lifting for you.
I hope you enjoyed this guide to using ARP to discover devices on a network! If you have any questions about this tutorial on the ARP protocol or you have a comment, feel free to reach me on Twitter @KodyKinzie.
Just updated your iPhone? You'll find new emoji, enhanced security, podcast transcripts, Apple Cash virtual numbers, and other useful features. There are even new additions hidden within Safari. Find out what's new and changed on your iPhone with the iOS 17.4 update.


Be the First to Comment
Share Your Thoughts