

After enabling disk encryption, creating encrypted disk images, installing KeePassX and iTerm2, and using Git with local repositories, the next step to getting your Mac computer ready for hacking is setting up a package manager that can install and update open-source hacking tools. There are multiple options to choose from, but Homebrew has a slight advantage.
A Linux/Unix environment without a package manager means a lot of extra work on your part. So without a good package manager, any additions to the system will need to be compiled from source. Yes, you already have the Mac App Store on your macOS hacking computer, but most of the open-source pentesting tools we rely on as hackers and security professionals are not available there.
It costs developers money to submit to the Mac App Store, and the code must be reviewed and accepted by Apple before it can be published. For some developers, this is too much of a hassle. This means we need another package manager to pull down free software such as Hydra, Sshtrix, Aircrack-ng, and GNU Coreutils (if you're like me and prefer Linux flags to Unix flags), as well as dependencies for tools located on GitHub.
Why Having No Package Manager Sucks
If I wanted to compile Aircrack-ng from source on my macOS machine, first I would need to verify that I had all of the dependencies and that they were in the correct locations and functioning properly. I would then need to download the source for Aircrack-ng, configure it, and begin the compilation process, resolving any issues I ran into on the way.
A few months down the road, I might need to update the compiled software. To do so, I would have to remove the software from my machine, check to see which libraries are required in the latest version, and repeat the process over again — then check some to see if I have dependencies that are no longer in use (hopefully I've been tracking what I've installed in some sort of list).
If I had a package manager, all of this work would be handled for me.
So, What Package Manager Should You Use?
There are a few package managers for macOS such as Macports and Nix, but I prefer Homebrew. The syntax is very straightforward, it's fast, the packages are well-maintained and up to date, and it leverages more of macOS's default libraries instead of redundantly installing new ones. Also, everything is owned by a regular user, meaning there is no need to use sudo. But best of all, Homebrew is clean, with everything kept in its own sandbox in /usr/local.
With this package manager, the source or binaries are pulled down with their requirements met. Homebrew then keeps track of what has been installed, what is using it, and where it is located. It also keeps track of configuration information and makes the whole process of maintaining open-source software on your Apple product a piece of cake.
I will generally search for a package in Homebrew before cloning it from GitHub and compiling from source. If the package is missing in Homebrew, it's worth considering creating a brew formula for it. However, there aren't a lot of pentesting tools in the Homebrew repos, but there are lots of libraries and general purpose open-source tools which can come in handy.
Step 1: Install Homebrew
Our first step is to get Homebrew from the site brew.sh. Before installing, though, we should review the source on GitHub. Generally, I don't like piping a script off the internet, but I trust their repository. It's on GitHub, I can read the source code, and the author doesn't have access to the internals of the GitHub servers to muck about with the timing and detect cURL pipes.
Open up iTerm on your Mac and execute the following command.
/usr/bin/ruby -e "$(curl -fsSL https://raw.githubusercontent.com/Homebrew/install/master/install)"It will show you what it will install, and you'll need to hit Return to continue. You will be prompted for your password, so enter it, then it will install everything. I'm cut out some of work that was automated in iTerm2 below for brevity.
==> This script will install:
/usr/local/bin/brew
/usr/local/share/doc/homebrew
/usr/local/share/man/man1/brew.1
/usr/local/share/zsh/site-functions/_brew
/usr/local/etc/bash_completion.d/brew
/usr/local/Homebrew

Press RETURN to continue or any other key to abort
==> /usr/bin/sudo /bin/mkdir -p /Library/Caches/Homebrew
Password:
.............
Cloning into '/usr/local/Homebrew/Library/Taps/homebrew/homebrew-core'...
remote: Enumerating objects: 4940, done.
remote: Counting objects: 100% (4940/4940), done.
remote: Compressing objects: 100% (4743/4743), done.
remote: Total 4940 (delta 47), reused 322 (delta 5), pack-reused 0
Receiving objects: 100% (4940/4940), 3.98 MiB | 6.91 MiB/s, done.
Resolving deltas: 100% (47/47), done.
Tapped 2 commands and 4723 formulae (4,982 files, 12.3MB).
Already up-to-date.
==> Installation successful!

==> Homebrew has enabled anonymous aggregate formulae and cask analytics.
Read the analytics documentation (and how to opt-out) here:
  https://docs.brew.sh/Analytics

==> Homebrew is run entirely by unpaid volunteers. Please consider donating:
  https://github.com/Homebrew/brew#donations
==> Next steps:
- Run `brew help` to get started
- Further documentation:
    https://docs.brew.sh
Step 2: Create an Access Token
If you search the brew repository often enough, you will want an access token since the GitHub API rate limits queries to their servers.
brew search hydra

hydra
Error: GitHub API Error: API rate limit exceeded for XXXXXXXXXXXX. (But here's the good news: Authenticated requests geta a higher rate limit. Check out the documentation for more details.)
Try again in 15 minutes 25 seconds, or create a personal access token:
  https://github.com/settings/tokens/new?scopes=&description=Homebrew
and then set the token as: export HOMEBREW_GITHUB_API_TOKEN="your_new_token"
In order to set your token, you will need to follow the link presented to you in the terminal. If you don't see one, visit github.com/settings/tokens/new. You will need to login to GitHub or create a new account. If you've been following this series, you already have a GitHub account.
Next, ensure the token has a description, in this case, Homebrew, then make sure the boxes are all unchecked since we only need the token — Homebrew doesn't need access to anything in our GitHub account.
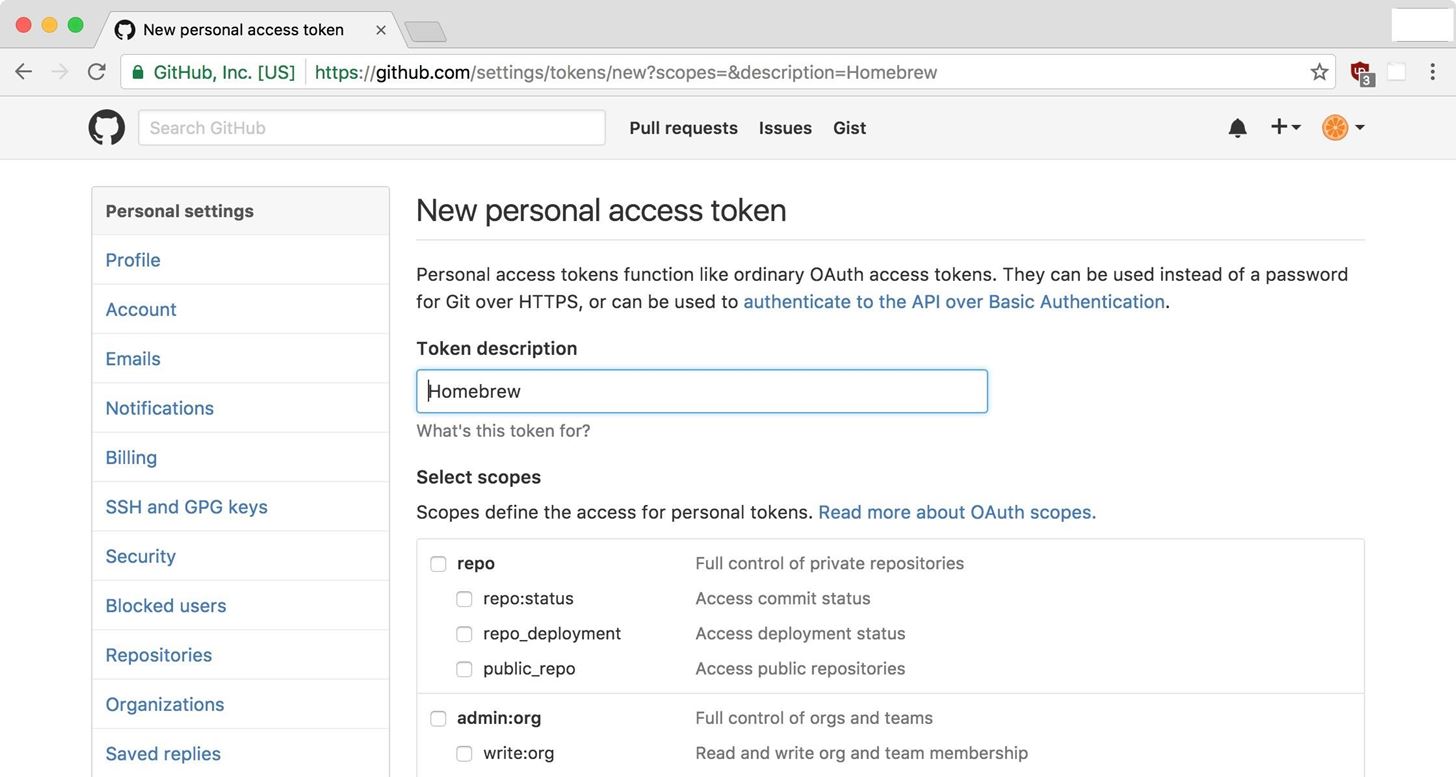
At the bottom of the page, click on "Generate Token." You now have a token, so let's get it working with Homebrew.
Step 3: Add the Token
We're going to have to edit a few Bash files in your home directory to get the token working, both the .bashrc and .bash_profile files. The .bashrc file is the configuration file for Bash, the default shell on macOS. The .bash_profile file is a personal initialization file executed for login shells (SSH or from the console) whereas .bashrc is the individual per-interactive-shell startup file.
While we could just edit the .bash_profile and that's it, I prefer to keep all of my Bash settings in .bashrc, which ensures that no matter how the shell is spawned, I have my preferences set. Setting my .bash_profile to source my .bashrc means that if I log in from SSH, I will have the same environment as my local terminal.
I'll be using Vim for this, but if you aren't familiar with Vim, you can use the plain text editor of your choice to do it manually, or just open it with your default text editor using open ~/filename in the terminal.
To use Vim, open a new iTerm window or type in cd to get to your home directory. Next, type in the following command. (If you don't have a .bashrc file yet, you can create one first with touch .bashrc).
vim .bashrcNow add your token to the bottom of the .bashrc file in insert mode using the following format. Use either a to append after the cursor or i to insert before the cursor.
HOMEBREW_GITHUB_API_TOKEN="your_token_here"In the file, it'd look like this:
HOMEBREW_GITHUB_API_TOKEN="your_token_here"
~
~
~
~
~
~
~
~
~
~
~
~
~
~
~
~
~
~
~
~
-- INSERT --
Hit Escape to exit insert mode back into normal mode, then type :wq to save the file. The colon starts the command, and wq means write and quit.
Next, let's edit your .bash_profile. Type in the following command. (If you don't have a .bash_profile yet, you can create one first with touch .bash_profile).
vim .bash_profileNow, at the bottom of the .bash_profile file, you could do one of two things. First, you can do exactly as above, adding the token line, or you can choose to redirect this to source .bashrc instead. Whichever you choose, use either a to append after the cursor or i to insert before the cursor.
HOMEBREW_GITHUB_API_TOKEN="your_token_here"

- OR -

source .bashrc
In the file, it'd look like the following if you choose the redirect approach:
source .bashrc
~
~
~
~
~
~
~
~
~
~
~
~
~
~
~
~
~
~
~
~
-- INSERT --
Again, hit Escape and enter :wq to save and exit the file. Next, let's tell Bash to execute the commands in the .bashrc file as if they were executed on the command line. Only do this particular step if you added source .bashrc to the file, not the HOMEBREW_GITHUB_API_TOKEN="your_token_here" line.
source ~/.bashrcAnd we're all done with this part. Let's move on to working with Homebrew!
Step 4: View Homebrew's Options
Homebrew has a similar feel to Linux package managers, and it's fairly easy to run. First, we'll use help to see some quick info on getting started.
brew help

Example usage:
  brew search [TEXT|/REGEX/]
  brew info [FORMULA...]
  brew install FORMULA...
  brew update
  brew upgrade [FORMULA...]
  brew uninstall FORMULA...
  brew list [FORMULA...]

Troubleshooting:
  brew config
  brew doctor
  brew install --verbose --debug FORMULA

Contributing:
  brew create [URL [--no-fetch]]
  brew edit [FORMULA...]

Further help:
  brew commands
  brew help [COMMAND]
  man brew
  https://docs.brew.sh
A very simple package manager indeed. If you're already familiar with APT, you may see a similarity. Now let's go through the steps for installing a package. I have selected the popular brute-force tool Hydra, but make sure to check out the video above which uses Sshtrix as an example.
Step 5: Install a Hacking Tool
First, we'll search to ensure the tool is available with brew search hydra. Swap "hydra" with whatever tool it is you're trying to get.
brew search hydra

hydra
homebrew/emacs/hydra-emacs
Next, we'll get info on the tool, Hydra in my example, to confirm that it is what we're looking for. Use the brew info hydra command, swapping out "hydra" with your tool.
brew info hydra

hydra: stable 8.8 (bottled), HEAD
Network logon cracker which supports many services
https://github.com/vanhauser-thc/thc-hydra
/usr/local/Cellar/hydra/8.8 (16 files, 1.5MB) *
  Poured from bottle on 2019-02-20 at 10:48:44
From: https://github.com/Homebrew/homebrew-core/blob/master/Formula/hydra.rb
==> Dependencies
Build: pkg-config ✘
Required: libssh ✔, mysql-client ✔, openssl ✔
==> Options
--HEAD
	Install HEAD version
==> Analytics
install: 1,358 (30 days), 4,474 (90 days), 16,693 (365 days)
install_on_request: 1,250 (30 days), 4,145 (90 days), 15,292 (365 days)
build_error: 0 (30 days)
Lastly, we'll install the tool with brew install hydra making sure to swap out "hydra" again with your tool's name.
brew install hydraWhen Homebrew finishes the tool installation, we'll have a version of Hydra (or whatever tool you ended up installing) on the macOS machine. Use the tool's name or the tool's name with help command to make sure it's installed and to see what you can do with your new hacking tool.
hydra help

Hydra v8.8 (c) 2019 by van Hauser/THC - Please do not use in military or secret service organizations, or for illegal purposes.

Hydra (https://github.com/vanhauser-thc/thc-hydra) starting at 2019-02-20 11:59:10
Syntax: hydra [[[-l LOGIN|-L FILE] [-p PASS|-P FILE]] | [-C FILE]] [-e nsr] [-o FILE] [-t TASKS] [-M FILE [-T TASKS]] [-w TIME] [-W TIME] [-f] [-s PORT] [-x MIN:MAX:CHARSET] [-c TIME] [-ISOuvVd46] [service://server[:PORT][/OPT]]

Options:
  -l LOGIN or -L FILE  login with LOGIN name, or load several logins from FILE
  -p PASS  or -P FILE  try password PASS, or load several passwords from FILE
  -C FILE   colon separated "login:pass" format, instead of -L/-P options
  -M FILE   list of servers to attack, one entry per line, ':' to specify port
  -t TASKS  run TASKS number of connects in parallel per target (default: 16)
  -U        service module usage details
  -h        more command line options (COMPLETE HELP)
  server    the target: DNS, IP or 192.168.0.0/24 (this OR the -M option)
  service   the service to crack (see below for supported protocols)
  OPT       some service modules support additional input (-U for module help)

Supported services: adam6500 asterisk cisco cisco-enable cvs ftp ftps http[s]-{head|get|post} http[s]-{get|post}-form http-proxy http-proxy-urlenum icq imap[s] irc ldap2[s] ldap3[-{cram|digest}md5][s] mssql mysql(v4) nntp oracle-listener oracle-sid pcanywhere pcnfs pop3[s] rdp redis rexec rlogin rpcap rsh rtsp s7-300 sip smb smtp[s] smtp-enum snmp socks5 ssh sshkey teamspeak telnet[s] vmauthd vnc xmpp

Hydra is a tool to guess/crack valid login/password pairs. Licensed under AGPL
v3.0. The newest version is always available at https://github.com/vanhauser-thc/thc-hydra
Don't use in military or secret service organizations, or for illegal purposes.

Example:  hydra -l user -P passlist.txt ftp://192.168.0.1
As you can tell from Homebrew's help page in Step 4, if you need to update, upgrade, list, uninstall, reinstall, or search any tools, it's pretty intuitive. You can also type brew man and brew commands to see even more that you can do.
And That's All There Is to It
Installing and maintaining packages with Homebrew is a piece of cake, especially if you have previous Linux experience. When I am looking to install an open-source application, I almost always check Homebrew first to save time. If the package isn't available in Homebrew, then it's off to GitHub, but between the two, most of your software needs should be met.
Just updated your iPhone? You'll find new emoji, enhanced security, podcast transcripts, Apple Cash virtual numbers, and other useful features. There are even new additions hidden within Safari. Find out what's new and changed on your iPhone with the iOS 17.4 update.


13 Comments
When I try running the Ruby install command, it says "this must be run as root!" If I use sudo, it says "don't run this as root!"
I need to be logged into an admin account...
Dont know what I am doing wrong but Homebrew telling me the Personal access token is wrong :-(
Anonym0us$ /usr/bin/ruby -e "$(curl -fsSL https://raw.githubusercontent.com/Homebrew/install/master/install)"
==> This script will install:
/usr/local/bin/brew
/usr/local/share/doc/homebrew
/usr/local/share/man/man1/brew.1
/usr/local/share/zsh/site-functions/_brew
/usr/local/etc/bash_completion.d/brew
/usr/local/Homebrew
Press RETURN to continue or any other key to abort
==> Downloading and installing Homebrew...
error: could not lock config file /usr/local/Homebrew/.git/config: Permission denied
fatal: could not set 'core.repositoryformatversion' to '0'
Failed during: git init -q
What do I do wrong???
nvm
brew search hydra
==> Searching local taps...
dehydrated hydra
==> Searching taps on GitHub...
==> Searching blacklisted, migrated and deleted formulae...
What's happening?
brew search hydra
==> Searching local taps...
dehydrated hydra
==> Searching taps on GitHub...
==> Searching blacklisted, migrated and deleted formulae...
I have the same message as well
dehydrated and hydra are two different packages.
hi ! i can't find the GUI of hydra,can u help me ?
need --with-gtk+
Type "xHydra" and away you go.
How do fix this syntax error message
Hey.
Im stuck here.
I copy the command and pass it in terminal and nothing happens.
just goest to new line.
Any thoughts?
Share Your Thoughts