

With some of the groundwork out of the way in getting a Mac set up for hacking, it's time to start looking at toolboxes. Our first toolbox is Git, which will be used throughout future tutorials.
Git is currently the most widely used version control system (VCS) in the world, mainly due to GitHub. Version control systems record changes to a file or set of files over time so that you can recall specific versions later. Git is a distributed form of version control, where each system, not just a central location, has a full repository.
Projects hosted on GitHub, or your own personal remote repositories, are fully mirrored when they are cloned. This means that when you pull down a repository, you get all of the files contained in it, you can make changes and commit them back to your own fork of the project, clone different versions, or just clone and compile. You can even push your changes into staging for the main project.
- Previously: How to Install iTerm2 Using the Terminal
Many open-source projects rely on GitHub, even the Linux kernel. Lots of popular hacking tools also host their source on GitHub. If you don't already have an account, you should create one.
Git works perfectly with macOS, and it works similarly on Linux systems. I'll be covering the bare basics in this article, just enough to get us off the ground modifying some code and maintaining our own local repositories. By using Git, we will be able to clone popular open-source hacking tools, compile them, and even make changes or push bug fixes!
If you don't already have Git, you can download and install the newest version. Git is also available in the Xcode Developer Tools, which can be gained by either installing the latest Xcode software or just the Xcode Developer Tools with:
xcode-select --installStep 1: Clone Some Source Code (git clone)
The git clone command is what we'll be using to pull source off of GitHub. It's probably the most common command you'll use as a pentester unless you also do development on the side. To use this command, simply find a repo (I selected theHarvester) and execute the following command, swapping out the repo I chose with whatever you chose.
git clone https://github.com/laramies/theHarvester

Cloning into 'theHarvester'...
remote: Enumerating objects: 96, done.
remote: Counting objects: 100% (96/96), done.
remote: Compressing objects: 100% (50/50), done.
remote: Total 1927 (delta 51), reused 79 (delta 46), pack-reused 1831
Receiving objects: 100% (1927/1927), 3.30 MiB | 6.37 MiB/s, done.
Resolving deltas: 100% (1258/1258), done.
There we have it. I now have a copy of theHarvester for my own use. However, I am missing a required dependency — the Python requests library. Since we are dealing with source code when cloning from GitHub, it's common that dependencies will not be met. If we were pulling this from a package manager such as Homebrew, the package would include the dependencies.
In this case, I simply need to install pip (a package manager for Python libraries) and pull down the appropriate dependencies.
To see all of the files located in the directory, change into the directory (in my case, cd theHarvester), then do a listing (ls). You can see I have a few files that came from the original GitHub project. If you created your own directory instead of cloning one, so you can build one from scratch, you won't have anything show up in listing until you add files to it.
ls

COPYING			discovery		tests
Dockerfile		lib			theHarvester.py
LICENSES		parsers			wordlists
README.md		requirements.txt
changelog.txt		stash.py
Step 2: Initialize a New Repository (git init)
The git init command allows us to initialize a directory as a Git repository, allowing us local version control of our projects in development. You can use the same one created above, but I created a new project called "myProject" and threw a few files in there. Either way, change into its directory (cd myProject), and initialized the directory into a local repo with:
git init

Initialize empty Git repository in /Users/smokeless/myProjects/.git/
When you initialize a directory, Git will create a .git folder which tracks changes to your project. Use git status to see the status of tracking. At the moment, Git will not track any of the files in my project folder because I haven't added them to the tracking list yet. If you just created a new directory for your project, you may not have any files, so it won't be able to track anything until there's something to track.
git status

On branch master

Initial commit

Untracked files:
  (use "git add <file>..." to include in what will be committed)

        hackThePlanet.py
        readme.MD

nothing added to commit but untracked files present (use "git add" to track)
If you just do this right after cloning a repo and changing into its directory, your branch will be up to date with the master repo, so you won't see any files listed individually like above.
Step 3: Add Files for Tracking (git add)
Now that I have an initialized folder, it's time to add the files for tracking. You can add all of the files that are currently in the project's directory with one simple command:
git add *Alternatively, you can add files one by one using git add filename. For instance, if I just wanted to have Git track changes for my hackThePlanet.py file, I would use:
git add hackThePlanet.pyUse git status again to make sure everything went okay. We can see that Git is tracking both my files. When I make changes to the files, Git tracks those changes. When I'm happy with the code, I can commit the changes (see the next step). In the meantime, Git keeps track of what I'm working on.
git status
On branch master
Initial commit
Changes to be committed:
(use "git rm --cached <file>..." to unstage)
new file: hackThePlanet.py
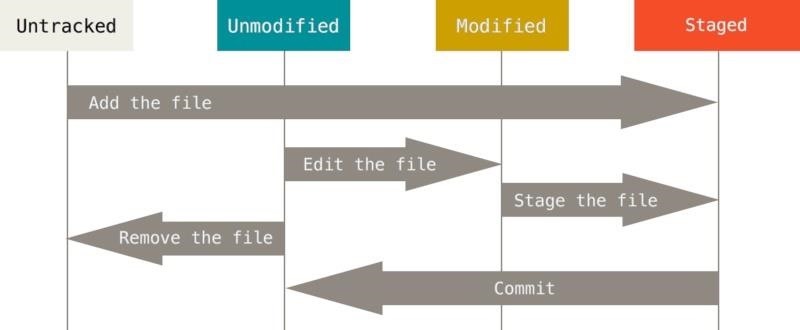
new file: readme.MDThe lifecycle of a Git file starts with the addition of the file. It then tracks changes to that file until the file is committed. Once the file has been committed, it returns to an unmodified state. A commit is essentially saying you are happy with code in the file. The cycle then starts again at the unmodified state.
Step 4: Commit the Source Code (git commit)
Once I'm satisfied with the state that my files are in. I will commit the changes using the command below. The git commit part is telling Git that the modifications made to the files are ready to go. The -a flag tells Git to commit all currently tracked files, while the -m flag is the message to include with these changes.
git commit -a -m 'changed some core UI components'

[master (root-commit) 39f7557] changed some core UI components
 2 files changed, 3 insertiions(+)
 create mode 100755 hackThePlanet.py
 create mode 10064 readme.MD
Check your status again, and you'll see everything is good.
git status

On branch master
nothing to commit, working directory clean
You can also just use git commit alone, which should open the document up in Vim or another text editor, in which you can add your message directly to the file and review any changes that will be made.
Step 5: See What's Up with Your Repo (git status)
Sometimes we leave projects for a long time, and other times it's just difficult to keep track of what's happening. Luckily, we can find out the status of the repository with the following code.
git statusI've been using the command throughout all stages of my repository to show what Git is doing behind the scenes. The command shows me untracked files, files that have changed but have not committed, and my working branch.
Step 6: Add & Test New Features (git branch)
Branches allow you to add or test new features without making changes to the stable code base. For example, my hackThePlanet.py has been committed, and it's currently stable, but I want to add some new experimental features without breaking anything in the stable version. In that case, I would use the git branch command below, replacing the name of the branch with whatever you want.
git branch experimentalThis will create a new branch of the project. Next, I switch over to my "experimental" branch with:
git checkout experimental

Switched to branch 'experimental'
I could have also done this with the following command, which checks out a new branch that is specified with the -b flag.
git checkout -b experimentalNow that I have a new branch, I'll add in my experimental features, get everything working, and commit the changes to the branch. If I were working with a team, it's possible there would be multiple branches of the stable version — one branch for new UI elements, another branch with bug fixes, and maybe another branch where there is some new functionality being added. Of those branches, more people might branch them to work on specific pieces.
Step 7: Add Those Features or Fixed to the Master (git merge)
Since everything went so well with our changes, it's time to merge my branches back together. First, I check out the master branch using:
git checkout master

Switched to branch 'master'
Next, I will merge my master with my experimental branch using the command:
git merge experimental

Updating 8e38f38..bd5f0c2
Fast-forward
 hackThePlanet.py | 1 +
 1 file changed, 1 insertion(+)
Now my master branch contains the new, no longer experimental code changes. I can always go back and check out the experimental branch and continue adding new features — or create new branches.
And That's How You Use Git for Your Repos
This guide was a very basic intro to working with Git. There are many powerful features that I did not cover here. I only touched on what was necessary to work with your own local repositories on your machine. Git is capable of so much more, especially when used in conjunction with GitHub.
While some of you may not ever use these features, it's important to know they are there. There are times in pen-testing where you will have to modify a PoC (proof of concept) or get a piece of code working on your system. If you find yourself doing this kind of work, these basics will help to keep your workflow organized. As with most commands, git is documented extremely well. Commands like git branch --help will open man pages specific to the command. I suggest reading through these.
Coming up, we'll be looking at another toolbox working with RVM, as well as finalizing our setup.
Just updated your iPhone? You'll find new emoji, enhanced security, podcast transcripts, Apple Cash virtual numbers, and other useful features. There are even new additions hidden within Safari. Find out what's new and changed on your iPhone with the iOS 17.4 update.


8 Comments
I get stuck on Step 3:
Step 3
Add Files for Tracking (git add)
Now that I have an initialized folder, it's time to add the files for tracking. I'll do this with:
git add *
Add?
It says:
xcrun: error: invalid active developer path (/Library/Developer/CommandLineTools), missing xcrun at: /Library/Developer/CommandLineTools/usr/bin/xcrun
Use this command, then follow the prompt to update the tools.
This part is confusing:
how did you get it so that it knows where to initlize, and also to have it like myProject@name?
You must first have a file to add/edit/commit:
Then use the following commands (in Terminal):
git init
git add path/to/your_file.txt
git status -uno (this shows the file without the untracked files)
Then you can edit, commit, add features, etc.
Hope that helps.
git clone https://github.com/laramies/theHarvester
xcode-select: note: no developer tools were found at '/Applications/Xcode.app', requesting install. Choose an option in the dialog to download the command line developer tools.
How do I fix this? It came up when I tried to use the git clone command on iterm2
Looks like it wants to install xcode.
I get stuck on step 3 plssss help
Share Your Thoughts