

As Android bug bounty hunters and penetration testers, we need a properly configured environment to work in when testing exploits and looking for vulnerabilities. This could mean a virtual Android operating system or a dedicated network for capturing requests and performing man-in-the-middle attacks.
There are many ways to configure a pentesting lab. Virtual Android environments are made possible by projects like VirtualBox, OSBoxes, and Androidx86. And there are a few benefits to creating a virtual Android OS inside your Kali machine.
Virtual machines (VMs) are very easy to clone and restore in the event we accidentally break or brick the Android system beyond repair. Also, it gives us the ability to increase the CPU and RAM to higher than physical Android devices are capable of. For example, it's possible to create a virtual Android OS with 32 GB of RAM. While this value is incredibly high and unrealistic, it would theoretically allow us to keep many applications and services running simultaneously.
On the other hand, some reader's may not have the available resource (e.g., RAM, CPU) to run an Android VM. Another environment we can set up requires a physical Android device and a dedicated Wi-Fi network. Sure, we can simply connect Kali and our Android device to our home Wi-Fi network, but using Kali as a Wi-Fi hotspot and routing all of the Android's data through Kali allows us to very easily intercept data transmitting to and from the physical device.
There are a lot of conveniences with using a virtualized Android OS, but it doesn't quite compare to a real physical phone capable of providing a real-world simulation of how an Android will respond to a particular exploit or hack. For that reason, pentesting a physical Android is my preferred method. But I'll show how to quickly set up both and let you decide which best meets your needs.
Option 1: Virtual Android Environment (VirtualBox Lab)
OSBoxes offers ready-to-use Linux operating systems that are preconfigured for our convenience. Using the OSBoxes Android virtual machines for VirtualBox, we can have a virtual Android system up and running in just a few clicks.
Step 1: Download the Android Image
Head over to the Android x86 download page on Oboxes' site to grab the latest 64-bit Android image for VirtualBox.
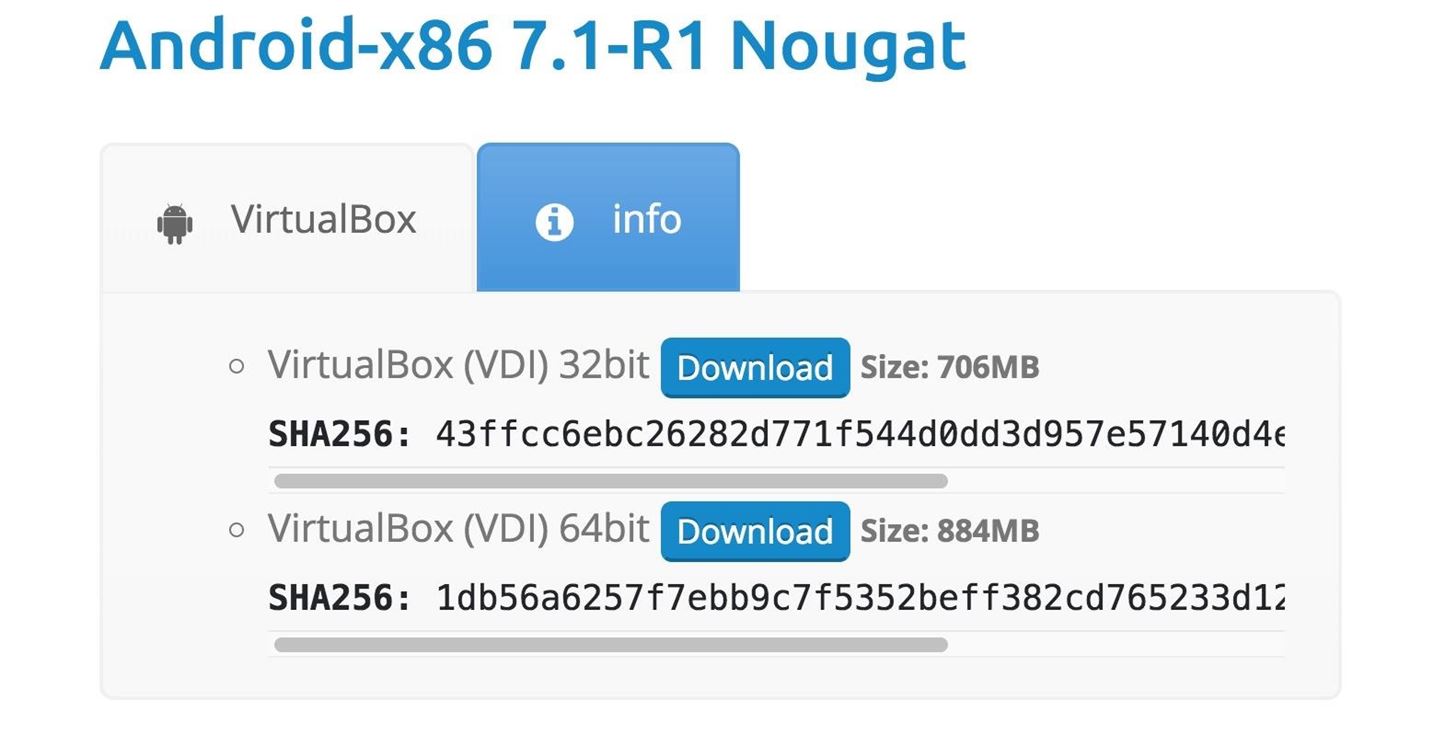
At the time of this writing, OSBoxes only supports up to Android version 7.1 Nougat. Android Oreo (version 8.1) will be available soon. Readers with a more technical understanding of ISO installations can head over to the Android-x86 website and grab the Oreo ISO which is not preconfigured like OSBoxes images.
Step 2: Extract the VirtualBox Disk Image
When the compressed Android-x86_7.1_r1-VB-64bit.7z file (or whatever version you chose) is done downloading, extract the VirtualBox Disk Image (VDI) using the below 7z command. Unzipping the .7z file could take several minutes. When it's done, a new 64bit/ directory will be present in your Downloads/ directory.
7z x Android-x86_7.1_r1-VB-64bit.7z

7-Zip [64] 16.02 : Copyright (c) 1999-2016 Igor Pavlov : 2016-05-21
p7zip Version 16.02 (locale=en_US.UTF-8,Utf16=on,HugeFiles=on,64 bits,4 CPUs AMD Ryzen 7 1700 Eight-Core Processor           (800F11),ASM,AES-NI)

Scanning the drive for archives:
1 file, 927273974 bytes (885 MiB)

Extracting archive: Android-x86_7.1_r1-VB-64bit.7z
--
Path = Android-x86_7.1_r1-VB-64bit.7z
Type = 7z
Physical Size = 927273974
Headers Size = 204
Method = LZMA2:25
Solid = -
Blocks = 1

Everything is Ok

Folders: 1
Files: 1
Size:       5433720832
Compressed: 927273974
Step 3: Configure the Android VM Settings
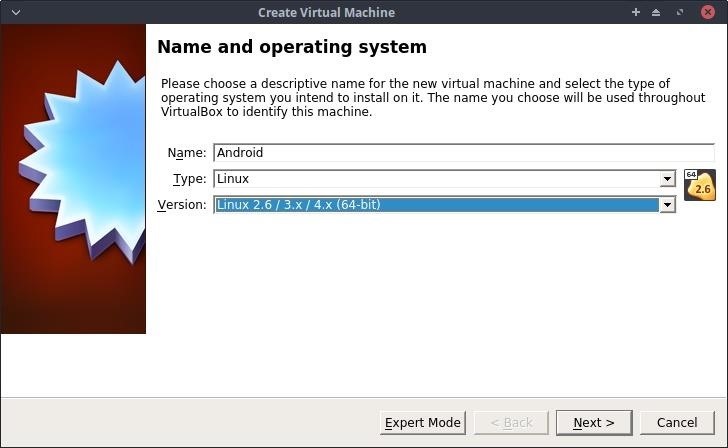
Open VirtualBox on your Kali system, and create a new virtual machine using the "New" button. If you don't already have VirtualBox, you can download it for free from its website. On the first page, name it "Android," and choose "Linux" as the Type and Linux 2.6 64-bit for the Version. Click on "Next" to continue.
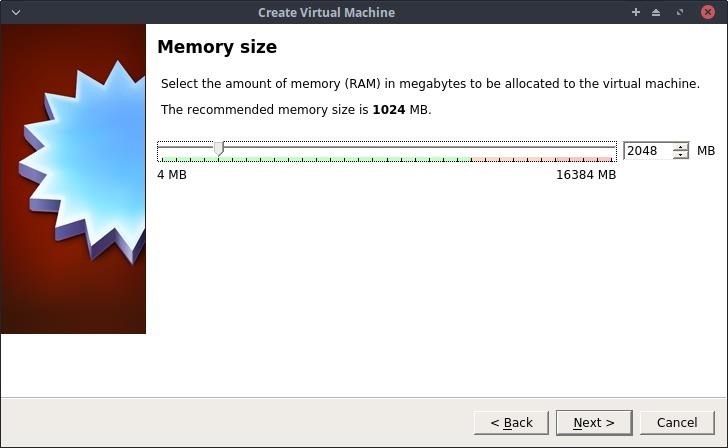
Set the memory (RAM) to a value of at least 1,024 MB. Click on "Next" to continue.
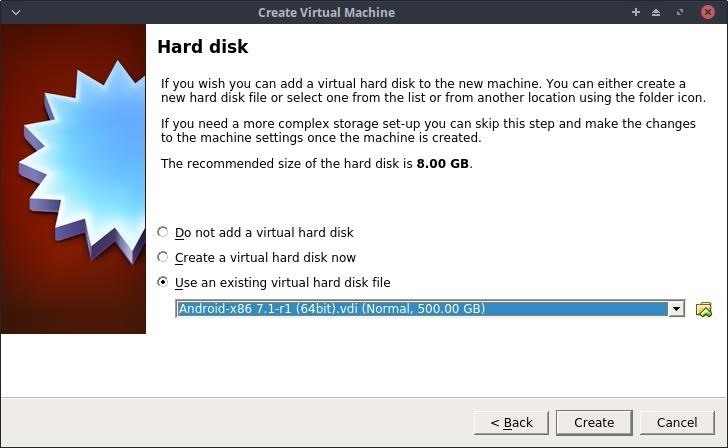
Select the "Use an existing virtual hard disk file" option on the Hard disk settings, then select the Android VDI in the 64bit/ directory we extracted previously. Click on "Create" to continue.
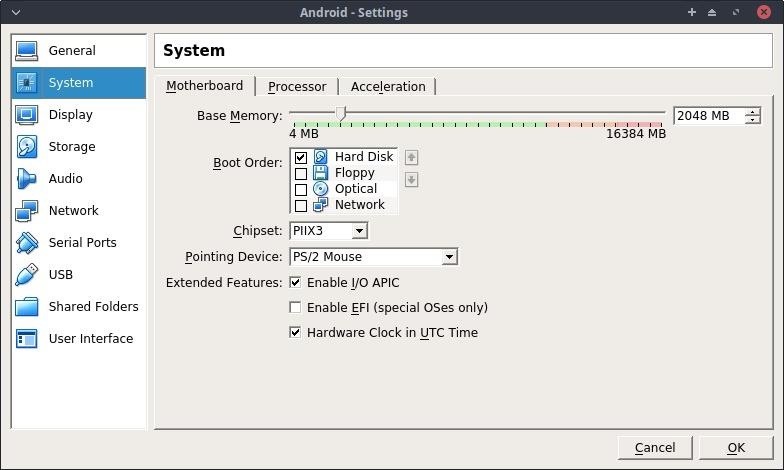
Then, with the new Android VM selected from the list of machines in VirtualBox, click on "Settings," then the "System" tab, and adjust the Boot Order so the "Hard Disk" is the first option and the Pointing Device is configured to "PS/2 Mouse."
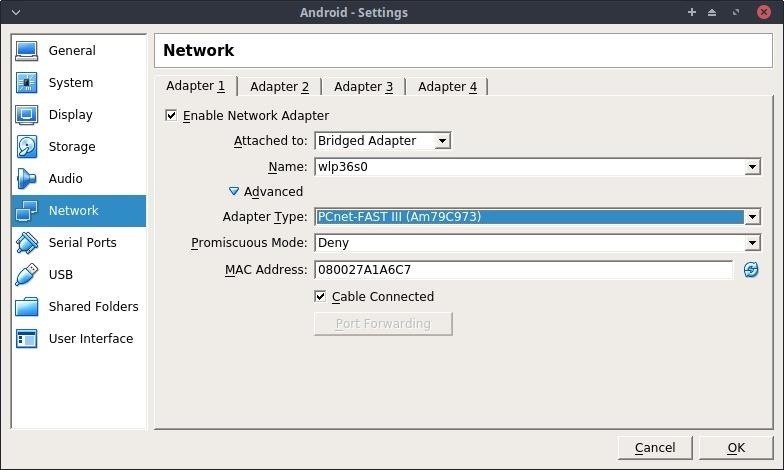
In the "Network" settings tab, configure "Adapter 1" as a "Bridged Adapter" and set the Adapter Type in the "Advanced" menu to "PCnet-FAST III." This will allow the Android VM to connect to your Wi-Fi router and acquire its own IP address.
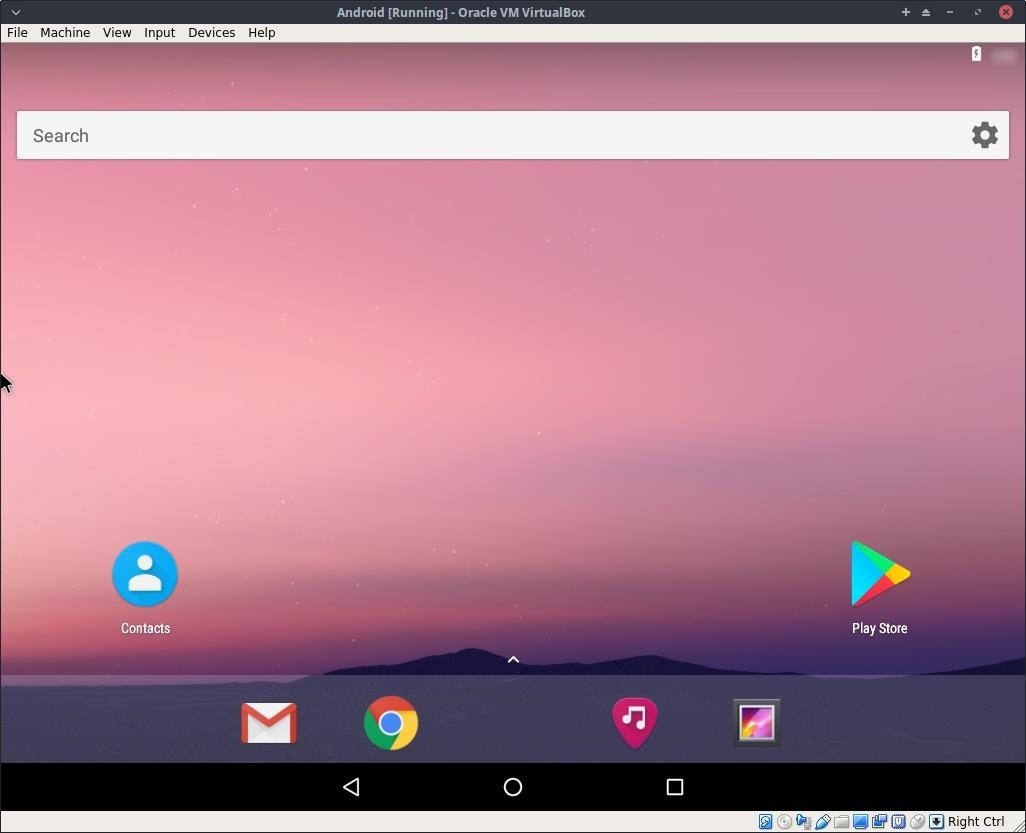
When done, click "OK," and start the Android VM. After about 60 seconds, the operating system will boot, and we'll have access to a new virtual Android OS for experimenting and pentesting.
In bridged mode, other devices on the Wi-Fi network will be able to ping and interact with the Android OS. We can perform man-in-the-middle attacks against the OS as if it were a physical device on the Wi-Fi network. Below is an example man-in-the-middle attack performed using MITMf.
python mitmf.py -i wlan0 --arp --spoof --gateway 192.168.0.1 --target 192.168.0.4

███╗   ███╗██╗████████╗███╗   ███╗███████╗
████╗ ████║██║╚══██╔══╝████╗ ████║██╔════╝
██╔████╔██║██║   ██║   ██╔████╔██║█████╗
██║╚██╔╝██║██║   ██║   ██║╚██╔╝██║██╔══╝
██║ ╚═╝ ██║██║   ██║   ██║ ╚═╝ ██║██║
╚═╝     ╚═╝╚═╝   ╚═╝   ╚═╝     ╚═╝╚═╝

[*] MITMf v0.9.8 - 'The Dark Side'
|
|_ Net-Creds v1.0 online
|_ Spoof v0.6
|  |_ ARP spoofing enabled
|_ Sergio-Proxy v0.2.1 online
|_ SSLstrip v0.9 by Moxie Marlinspike online
|
|_ MITMf-API online
 * Serving Flask app "core.mitmfapi" (lazy loading)
|_ HTTP server online
 * Environment: production
   WARNING: Do not use the development server in a production environment.
   Use a production WSGI server instead.
 * Debug mode: off
 * Running on http://127.0.0.1:9999/ (Press CTRL+C to quit)
|_ DNSChef v0.4 online
|_ SMB server online

2018-07-23 18:26:22 192.168.0.4 [type:Chrome-50 os:Android] login.website.com
2018-07-23 18:26:22 192.168.0.4 [type:Chrome-50 os:Android] login.website.com
2018-07-23 18:26:23 192.168.0.4 [type:Chrome-50 os:Android] fonts.googleapis.com
2018-07-23 18:26:24 192.168.0.4 [type:Chrome-50 os:Android] login.website.com
2018-07-23 18:26:25 192.168.0.4 [type:Chrome-50 os:Android] Zapped a strict-transport-security header
2018-07-23 18:26:26 192.168.0.4 [type:Chrome-50 os:Android] login.website.com
2018-07-23 18:26:26 192.168.0.4 [type:Chrome-50 os:Android] login.website.com
2018-07-23 18:26:27 192.168.0.4 [type:Chrome-50 os:Android] fonts.gstatic.com
2018-07-23 18:26:28 192.168.0.4 [type:Chrome-50 os:Android] login.website.com
2018-07-23 18:26:48 192.168.0.4 [type:Chrome-50 os:Android] POST Data (login.website.com):
utf8=%E2%9C%93&authenticity_token=j7bVyOKFLu%2BausgDzlIr0Z9H0Mmh%2FoWSBZh9OyyCqvKNdPFtPL47fqRECBwN97gJmlYt4AgvI6e%2FyDmcAvNeog%3D%3D&user%5Bemail%5D=distortion%40nullbyte.com&user%5Bpassword%5D=secure_password_999&commit=&user%5Bremember_me%5D=0
2018-07-23 18:26:49 192.168.0.4 [type:Chrome-50 os:Android] login.website.com
We can see the Android device (192.168.0.4), using Chrome version 50, sent a POST request containing an email address and password in plain-text.
Option 2: Dedicated Wi-Fi Hotspot & Hardware
This method requires a dedicated (physical) Android device for pentesting on and an external Wi-Fi adapter to create a hotspot. The idea is, Kali will effectively create a Wi-Fi hotspot that the Android device connects to. All of the data traversing to and from the Android will be very easily observed without any kind of man-in-the-middle attack. This is convenient for bug bounty hunters using tools like Burp Suite or Wireshark to inspect packets on a very granular level.
If you don't have an Android phone laying around that you can use as a pentesting device, Amazon has plenty of cheap options available for a test phone, which will become a valuable asset in your pentesting toolkit.
Step 1: Create a New Wi-Fi Hotspot
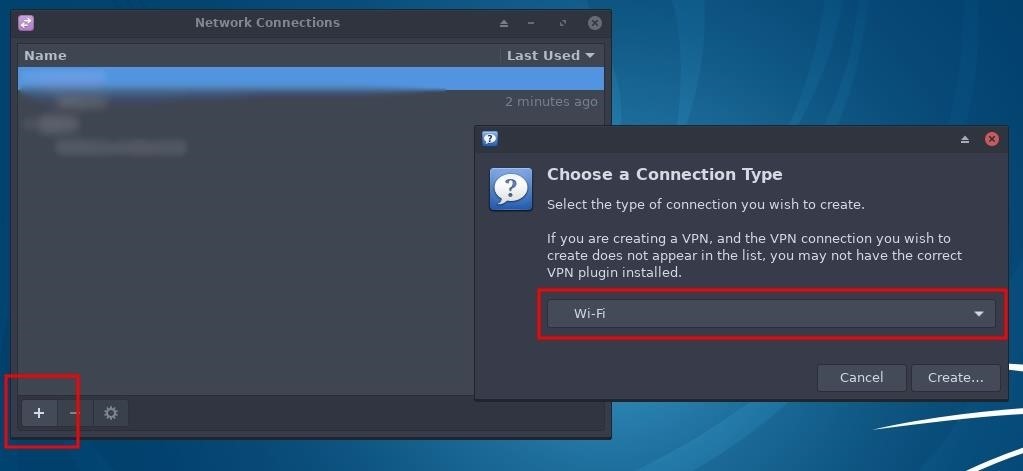
To start, fire up Kali and connect an external Kali-compatible wireless network adapter to the system. Open the "Network Connections" menu, click the "+" symbol to add a "Wi-Fi" connection, then select "Create."
Network connection settings vary slightly between different versions of Kali. I'm using the XFCE4 version but all versions have a network manager capable of creating Wi-Fi hotspots using very similar steps.
Step 2: Configure the Hotspot & Password
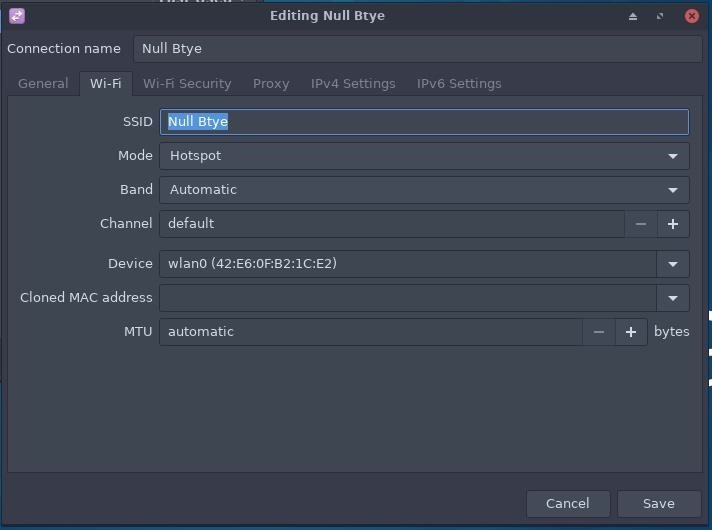
A new Editing window will pop up. The required fields are SSID, Mode, and Device. Be sure to use the "Hotspot" mode and select the device (most likely wlan0) of your Wi-Fi adapter. If you don't know the name of the network adapter, you can use ifconfig to figure it out. The Wi-Fi network name (SSID) can be anything you want; I'm using "Null Byte" for this demonstration.
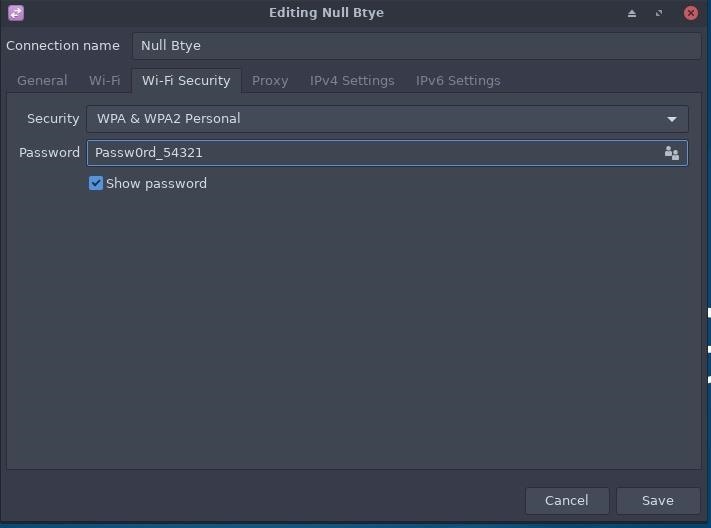
Next, click on the "Wi-Fi Security" tab and enter a strong password.
Click "Save" when done, and Kali should automatically create the "Null Byte" Wi-Fi hotspot. This can be verified by using ifconfig in a terminal.
ifconfig wlan0

wlan0: flags=4163<UP,BROADCAST,RUNNING,MULTICAST>  mtu 1500
        inet 10.42.0.1  netmask 255.255.255.0  broadcast 10.42.0.255
        inet6 fe80::ea9b:cff:fee3:bb6a  prefixlen 64  scopeid 0x20<link>
        ether 42:e6:0f:b2:1c:e2  txqueuelen 1000  (Ethernet)
        RX packets 78176  bytes 4968034 (4.7 MiB)
        RX errors 0  dropped 4  overruns 0  frame 0
        TX packets 137808  bytes 191871580 (182.9 MiB)
        TX errors 0  dropped 0 overruns 0  carrier 0  collisions 0
Notice the inet 10.42.0.1 address. This is the new internal address scheme used by devices connecting to your "Null Byte" Wi-Fi network. Upon connecting an Android to the network, it will automatically acquire the address 10.42.0.2.
At this point, we can open Wireshark and begin capturing data on the wlan0 interface to observe packets going to and from the Android. There's a direct connection between the Android and Kali so your "Null Byte" network won't be littered with network traffic from other devices on your external (192.168.0.1) network. Other pentesting tools like Burp Suite can be configured with Android to intercept and modify every request.
Let the Penetration Testing Begin
There are benefits to both methods. If you can afford the RAM and CPU, a virtual Android environment might be the best option for you. If hardware resources are limited and you have a spare Android device to pentest on, option two might be your preferred method as well. Either way, you are encouraged to try both methods and learn what suits you best.
If you have any questions, please feel free to leave a comment below.
Just updated your iPhone? You'll find new emoji, enhanced security, podcast transcripts, Apple Cash virtual numbers, and other useful features. There are even new additions hidden within Safari. Find out what's new and changed on your iPhone with the iOS 17.4 update.


Be the First to Comment
Share Your Thoughts