
Welcome back everyone! In the last training session we covered basic file input and output. We're going to leave this topic for a bit and start on something that will change the way we write scripts, classes.
A class is basically an object. It's something that we can make attributes for and perform actions on. We can make our own attributes and even our own methods for our object. First, we'll need to know more about something called object oriented programming (OOP), so let's get started!
What Is Object Oriented Programming?
In programming/scripting, we use logic. This logic dictates actions that we take and how we perform them. Focusing on the action in programming is rather difficult, instead, we can look at the bigger picture. Take a ball for example. We can bounce the ball, and this is an action. But this action is way more complicated than taking a step back and saying "This is a ball, I can bounce it.'"
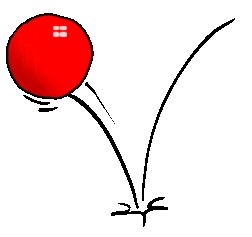
By using object oriented programming, we can make it easier to see how two things relate. Since we've taken a step back to see that the ball can bounce, we can also see it's relation to the object is bounces off of.
Now that we've discussed how OOP can make programming easier, let's make our own class. We'll try to build that ball we we're just taking about.
Step 1: Define the Class
When we make a new class, we have to define it (much like a function). We do this by entering the keyword class, followed by the name of our class, and the class it inherits from in parenthesis. Don't worry about inheritance as of right now, it will all be explained later. So, let's use this syntax to define our new class:
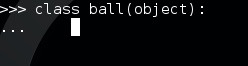
Alright, that was easy right? Let's move on to the next step.
Step 2: Define the Initializer
Now that we have our class, we have to define our initializer. This is the function that runs when we create a new instance of our class. Essentially, we use this to define any variables or attributes that we want to use throughout the object.
Some examples (which we'll be using in our class) are the color of the ball, the shape of the ball, and the status of the ball (such as where is it).
When we define our initializer, we essentially just make a function with the name __init__ (There are two underscores there). This must be the first function of our class. If you haven't seen our training session about functions, I highly suggest you read that before continuing any further. Let's go ahead and define our initializer:

Now that we're done defining __init__, let's move on to giving our ball some attributes.
Step 3: Define Object Attributes
We can see here that __init__ is just like any other function, but there are some things that make this a bit more complicated. We've already covered that classes are objects, but what if we want to make an attribute that plays off of another attribute, how do we use our object within itself? Well, we can use self. Self is basically a way of telling the object that this is found within itself. When we define attributes, we have to define them as part of the object's self. Let's go ahead and define our objects attributes so we can see an example:
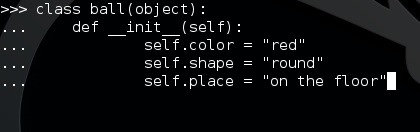
Here we can see that we've successfully defined the attributes for our ball. Our ball is red, it's round, and it's on the floor as of right now. When we're defining/changing attributes within our class, we need to refer to them with the self.(ATTRIBUTE) format. This tells the class that the following attribute is it's own. Now that we have our attributes, let's see if we can make some actions to perform on our red ball.
Step 4: Make the Actions
We'll be making two actions today. One to pick the ball up and put the ball down, and one to bounce our ball. We'll start with the action to move the ball, then we'll make the action to bounce it.
When we're making actions, we define them as normal functions, except they need to take self as an argument, just like __init__. Let's go ahead and make our action, we'll name it move:

Now what we've done here is that we've made a function to change the value of self.place to the opposite of what is currently is. If we're currently holding the ball, calling this function will place it down and vice versa. Let's move on to making the action to bounce our ball.
In this function, we'll need to check where the ball is first. If the ball is in our hands, we can bounce it, if it's on the floor, we cannot. After we perform this check, we'll simply need to bounce the ball. Let's go ahead and see what this action would look like:
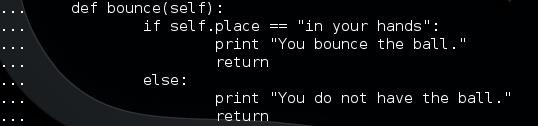
We can see here that this action is very simple, even though it sounded complicated. This is the beauty of object oriented programming. Let's exit making our class and bounce our ball!
Step 5: Create an Instance
If we want to bounce our ball, we'll need to make an instance of the class first. Basically this means that we need to call our class and assign it to a variable. Let's do that now:

Now that we've assigned our class to a variable, we can use that variable to perform actions on. We can also print values of the attributes we defined in __init__. Let's print out all of our attributes:

Alright, we can see that our round, red ball is currently on the floor. Let's call our move action and pick it up. When we call actions, we call them as methods, which means in order to pick up our ball, we'll need to use move as a method instead of a function, let's see this in action:
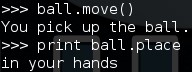
There, we can see that we've picked up the ball. Now let's finally bounce this ball:

Alright! Our ball bounces! Let's wrap this up, shall we?
Wrapping It Up
We've covered a lot here, I hope it wasn't too confusing. There is still more to learn about classes though, so don't think this is the last you'll see of them! Classes are extremely important in scripting with Python because they allow us to look at the big picture instead of just the goal.
If any of this seemed a bit too confusing, let me know and I'll be more than happy to clear everything up!
Thank you for reading!
-Defalt
Just updated your iPhone? You'll find new emoji, enhanced security, podcast transcripts, Apple Cash virtual numbers, and other useful features. There are even new additions hidden within Safari. Find out what's new and changed on your iPhone with the iOS 17.4 update.


8 Comments
Excellent tutorial TheDefalt!
Brain is frying :) it seems that you just have to work with classes and bit by bit you will understand them. I have checked a few different tutorials and slowly i am getting the hang of it.
Nice tutorial overall:) +1 kudo for you as always.
If you have any questions, feel free to PM me. I'll answer to the best if my ability.
-Defalt
The tutorial taught me many things and also by re-reading the article once more, Things are more clearer than they were in the past .. Haha.. Thank you Defalt hope to hear more from you in the future.
The_Unknown.
This isn't just in python, i am a webdeveloper (mostly PHP and javascript).. and OOP is found in almost every language. It makes programming easier when u understand it (:
hey im new to python, its my first programming language and having a little trouble
with this lesson. I can'ts seem to run the script in root@kali terminal. Am i doing it wrong?
I am trying to get around the same thing Kevin!
-Justin (lol!)
Update:
Well, it seems to me that it is already executed but as we had nothing to call in the script, it printed nothing.
Hello and thanks for the nice tutorial. If we want to ask the user to input about where is the ball and after this input to run the program according to users input how we use the input commnad in this ?
Share Your Thoughts