

Greetings to all geeks, hackers, nerds, and explorers of Null Byte. Welcome to my brand new tutorial, "Using BASH for Computer Forensics". This tutorial will give you a look at how the computer programming language, Bash, can be used to find out details on apple devices for later use.
Before we start executing commands using BASH, let's take a look at what it is and where to find it.
What Is Bash?
"Bash", sometimes referred to as a Unix Shell, is a command language authored by Brian Shell. It was created as a free alternative to the previously used, "Bourne Shell".
Bash is used in almost every apple operating system around the globe, making it a very useful language to know.
Bash can be accessed on most Linux/Unix command lines. In Mac, you can access the utility application, "Terminal", and be able to write bash commands right from the start. In Kali Linux, you can also use a similar program to the Terminal called the Command Line (Or CMD).
Other places to learn about Bash and its origins can be found in the references/sited sources list at the bottom of this tutorial.
Basic Bash Commands
Unlike many other programming languages, bash is used to configure and access things on a computer. This means that what you write in bash directly connects to how the computer operates and functions.
Let's look at some examples.
If we go to our Terminal/Command Line, and type "ls", we will get a list of directories and files like below:
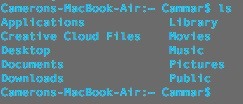
The "ls" command stands for "list directory contents". Since I ran this command from my default user directory, I will see what files are available from that directory.
Tip: A good way to check what directory you are currently running commands from is type "pwd". This command should return the full directory that you are "in". When I typed "pwd" into my Terminal application, it gave me the plaintext, "/Users/Cammar".
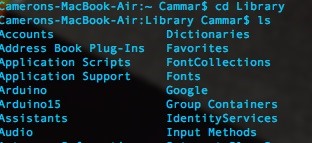
Another good command to navigate directories is "cd". "cd" followed by a directory name, such as "Desktop", will jump to that directory, and run commands from there instead. You can always go back to (or jump around in) different directories.
Here is what it looks like when I jump to my Library directory and run the "ls" command from there. Notice how much information I can get with just two commands!
You may see where I'm going with this. In the next section of this tutorial, I am going to teach you some more specific commands to find out information about the computer itself, and what services it is running.
Bash Commands for Forensics
Here is the real "bulk" of the tutorial. Putting bash skills to work and finding out information, possibly even writing a report, about a computer.
First let's find some useful information to write down about the specific model of computer in case we need it later. It's always well and professional to work in detail. Every little thing is good to have.
Here is a command (that works on Mac, and Unix/Linux systems) to find the current screen resolution of a computer.
xdpyinfo | grep 'dimensions:'
When running this on my 11 inch Macbook Air, the result was:
dimensions: 1366x745 pixels (361x197 millimeters)
If that isn't cool I don't know what is!
Another good couple of things to write down would by the Username, and information about the operating system. Luckily, once again, bash has just the command in stock for us. It is as follows:
Uname -a
Once I ran this on my computer, it immediately gave me the username, and version of the operating system. For the sake of learning, I will not include my terminal's output below. This is up to you! Run the command on your computer, or virtual machine, and see what it spits out.
Last but not least we can record some network information. Things that are useful to us are the:
- Types of connections (ethernet, or wireless)
- Local Internet Protocol Addresses
- Public Internet Protocol Addresses
To find out these small bits of information, we can use on board commands and even a little help from some third party sources.
To find out what kinds of connections we have and what our local IP address (or Internet Protocol Address), we can use the command "ifconfig". This command is actually a tool used mostly to set up and configure connections. However just by running "ifconfig" on its own, we can pull down all the necessary information we need in a relatively small amount of time.
By running ifconfig, you will most likely see a list of different interfaces, such as eth0, en0, p2p0, and so on. However, to find out what the local internet protocol is, you must search through many different interfaces looking for the phrase, "inet" and not "inet6" (inet is the ipv4 address, and you can find more info about that on the references page). Next to that, will be something similar to:
192.168.x.x
10.0.x.x
Or perhaps 192.x.x.x or 10.x.x.x depending on the network configuration you are currently using.
The public IP can easily be found using a third party website called icanhazip.com, that will display the ip upon connecting with a browser. However, using the bash command "curl", we can pull down the information right from the start.
The full command would look like:
curl icanhazip.com
To put the curl command into perspective, try running something like
curl https://null-byte.wonderhowto.com/
The result is the entire HTML pulled down and examined. This is a great way to quickly look at the source code of a website or webpage.
Making a Report
Now that we have some basic Bash commands in our noggins, we can begin writing a small script that we can put on a usb stick or cloud and use on any machine running Bash.
Didn't know you could turn Bash commands into a full script? Well you can! Simply open up a text editor of your choice and follow the steps I am giving below. Directly below is a screenshot of the final script, and below that, I will explain what every little bit does.
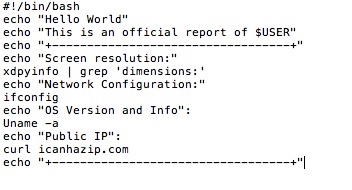
Line 1. This line is called a shebang. It used for scripts in any language that are being run by the Command Line/Terminal. The shebang for the Bash programming language is typically "#!/bin/bash"
Line 2. "echo" is a command in Bash that will display whatever text follows it. For example, typing: echo "test", would produce the plaintext, test. In our script, we echo the phrase, "Hello World" as a sign to all programmers that we now know the basics of Bash.
Line 3. In this line, we echo a phrase just like on Line 2, but this time we use a strange, $USER. The "$" in a bash language typically refers to a variable coming after it. $USER is the variable for a computer user's username. Therefore, we would be echoing "This is an official report of (user goes here)"
Line 4. This is just a banner to put before and at the end of our program. It keeps things organized, and looks pretty clean.
Line 5. We echo that the screen resolution is coming soon. More specifically, we are echoing the phrase "Screen resolution:"
Line 6. This is the command we discussed earlier that will return the screen resolution. Know that it may take a few seconds to generate a response, so don't freak out when everything doesn't happen instantaneously.
Line 7. We echo that the network information is below.
Line 8. We run the command we discussed earlier, "ifconfig", and get a full description of the network configuration.
Line 9. We echo that information about the Operating System and User are coming below.
Line 10. We run the command we discussed earlier to return information on the operating system version and type as well as username.
Line 11. We echo that the public IP will be displayed below.
Line 12. We use the curl command, and an external website, to return the public IP address and display it as follows.
Line 13. We end our script with the same flashy banner that we started it with.
To save this script, name it whatever you want and make sure it ends with ".sh". This is the universal ending for bash scripts. To run the script on any computer, type "bash " followed by the exact location of a script in its directory. On mac, you can make this process simpler by typing "bash " and then dragging the script into the terminal window.
Conclusion
As you can see, Bash is a wonderful and delightful language to know if you are going to be a hacker. Understanding how Bash integrates with Linux and Unix is vital and necessary to perform recon and forensics, both excellent skills in a hacker's arsenal.
Please let me know if this worked for you, and give me suggestions to make it better. All criticism is welcome, and will only make me better at writing these tutorials and providing content.
All references are below this conclusion
Thanks for reading! - Cameron Glass
References
IP Addresses Explained
Bash Wikipedia Page
GNU Bash Reference Manual
Curl Manual
Just updated your iPhone? You'll find new emoji, enhanced security, podcast transcripts, Apple Cash virtual numbers, and other useful features. There are even new additions hidden within Safari. Find out what's new and changed on your iPhone with the iOS 17.4 update.


5 Comments
Nice tutorial bro, in my opinion bash is a very nice scripting language, specially for admins, and its syntax is very easy..great tut..
Hacked by Mr_Nakup3nda
Thank you for the comment! I agree. Bash is an excellent language to learn.
I typed xdpyinfo | grep 'dimensions:' into the OSX Terminal, I got the result "-bash: xdpyinfo: command not found"
Am I missing something?
Also, what does Grep do?
I'm not sure what the issue is here, but that specific part of the tutorial is not too important. It may be that you don't have X11 or X Quartz installed. Also here is a description of what grep does and how it can be used to its fullest potential.
Yea, I have the X11 program/app icon in my Applications, but never opened because I didn't know what it was there for...
Share Your Thoughts