

In my last tutorial I very briefly introduced Zanti , but in this tutorial I will start to show its many features. The first step on hacking is recon . You could use Nmap , but the problem with Nmap on Android is that by itself, in order to gain full functionality your phone must be rooted. Thank goodness for a few geniuses in Zanti's dev team whom managed to implant full fuctionality of Nmap in Zanti without rooting your phone. With that being said, boot up your Android phone and lets start wrecking havoc, or not.
Nmap
Of course the most common way to do recon is with our handy tool Nmap. Luckily for us Nmap is built into the Zanti application and all we have to do is tap a Ip and hit scan. Simple as that, right? Except it's no use using a application without being called a skid without understanding the mechanics behind it. I should explain before I jump in that I'm gonna explain a normal scan. But in this part I'm gonna be breaking down the exact Nmap scan in general. Your screen should look like this:
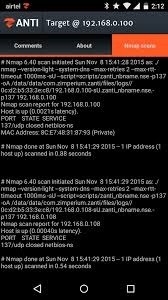
Now that you got your information, lets break it down to its bare-bone necessity. From my first observations, I'm assuming the Nmap command would look something like this:
nmap -sS -A -T (Ip/24)
I'm not sure which speed Nmap used so I've left the flag '-T' as it is. But the flag '-A' tells us a bunch of information. I'm assuming that there's a huge possibilities that it could be the '-A' flag only of the amount of information that the scan can show. I admit, I'm gonna contradict myself a little bit. There's one problem with the '-A' flag, when you add the '-A' flag it's suppose to show also the OS of the system. Thus, if you haven't noticed that the scan did not show the OS. I'm concluding that there isn't a decent possibility that the '-A' flag could be in the scan. Thus the scan could look just like a normal boring scan:
nmap -sS -T (Ip/24)
or:
nmap -sS (Ip/24)
Conclusion
I know that I probably contradicted a bit, but my point is that I want to show how vital it is to understand what is going behind the fancy GUI, because in order to become a good hacker you must be able to understand what you are doing. This is a crucial skill in case something has gone wrong and you need to figure out why it did and fix the problem. Thus, I conclude that even if you are wrong thinking through what is going on is still a must. I do like to apologize for the shortness of this tutorial, but since there's many tutorials on Nmap I decided to keep this simple and short. With that being said, please shower me with lovins and comment down below. Hack on my partners in crime (or not). :)
Just updated your iPhone? You'll find new emoji, enhanced security, podcast transcripts, Apple Cash virtual numbers, and other useful features. There are even new additions hidden within Safari. Find out what's new and changed on your iPhone with the iOS 17.4 update.


3 Comments
A lot of the 'full' functionality in nmap requires you to have root access. The Zipmerium team did not include those functions within the Zanti 2 app. But fair play to them, they managed to present nmap in a beautiful GUI layout.
Judging from the screenshot, the scan is most probably nmap -v -sT -sV at most. You explained it well though, good job.
TRT
I just grabbed a example screen shot from google so yeah... I should've probably explained that I was explaining a normal scan. XD
Hello I'm having a problem, and i'm French so sorry for my English ^^ When I execute scan I haven't scans Nmap and when I watch scan logs there is "NMAP failed to run: NSE failed to initialize the script engine: ... did not match a category ..." Help !
Share Your Thoughts