
So this is my methodology for this project of writing a
rootkit. Please leave feedback on what is right/wrong. I tried to simplify concepts the best I could however...
One needs an deep understanding of how different types of processors work and how memory protection is implemented. Understanding how the target Operating System, in this case Windows 10, protects memory will be crucial later in the process of rootkit development. As this research continues, I expect this transform from "Writing a Windows 10 rootkit" to "1001 Ways not to write a Windows 10 rootkit". However, if everyone knew what they were doing, this would no longer be research.
The main approach that is currently being taken is comparing the ways in which the Windows 10 kernel/OS handles processes than Windows Vista, Windows 7, or Windows 8 does. Windows Vista is included due to the fact that the "defacto" book by Blunded 1 on rootkit development is written around Windows Vista. There is an updated version of this book which may be purchased at a later date.
While a deep understanding of how memory is accessed through the processor is needed, this short paper will provide a high level overview of this process, the memory protection that has been used by other Windows Operating Systems, and the tools and setup that I will use to begin examining the Windows 10 Kernel.
Step 1: Understanding Processes
Each process that is run has its own space in RAM. Additionally, each process that is running has different levels of access to memory. These levels can be thought of as a type of permissions. There are 4 different levels of permissions, each referred to as Ring 0, Ring 1, Ring 2, and Ring 3. A process running in ring 0 has the highest level permissions. The process running in ring 0 are often running at the kernel level.
The kernel is the layer that is between the operating system and the hardware that the operating system uses such as a keyboard, mouse, speakers, etc. In order to be able do this, drivers are often installed to assist in this process. While most of this does not have a lot to do with a user-mode rootkit, a kernel level rootkit can leverage the installation of these drivers to install itself at the kernel level. This can effectively run the rootkit in ring 0, giving it the highest level of permissions.
Step 2: Understanding Memory Protection
This research will focus on Intel 32 bit processors. The difference between 32-bit and 64-bit processors is the amount of memory that each can access. 32 bit processes can access 4 GB of memory, 64-bit can access much more than this. However, there are some extensions that can enable a 32 bit process to deal with more memory. Physical Address Extension ( PAE) for example will allow a 4 extra bits to be able to be used by the processor. So 2^36, a 32 bit processor can now utilize 64 GB of memory vs. the old 4 GB of memory.
There are two main methods to protect memory that can be implemented, these methods are segmentation and paging. Paging is optional, however segmentation is not. Segmentation is the concept in which the point in memory that needs to be accessed is stored in two separate parts in a CPU register (a CPU register is an area that allows CPU to hold information in). In a simplified explination of this model, the first half of the register points to a certain segment in memory and the second half of the register points to a specific location in this segment. How does this help protect memory? By splitting up memory into segments, each segment can have a specifically designated size, each segment can be defined to only store certain types of information, and finally each segment can run at different level of privilege (i.e. ring 0 to ring 3). This stops attackers from inserting code into arbitrary segments of memory. Paging essentially provides a similar type of protection but with finer granularity 1. As mentioned before, previous versions of Windows have relied mostly on hardware/paging to implement memory protection. This gives processes a privilege level of ring 0 or ring 3. There does not seem to be an in-between privilege level for executable code in previous versions of Windows. This can be seen by setting up a two machine system and issuing debug commands to debug the kernel. The setup up used for this research is described in the next section. However for now, issuing the command:
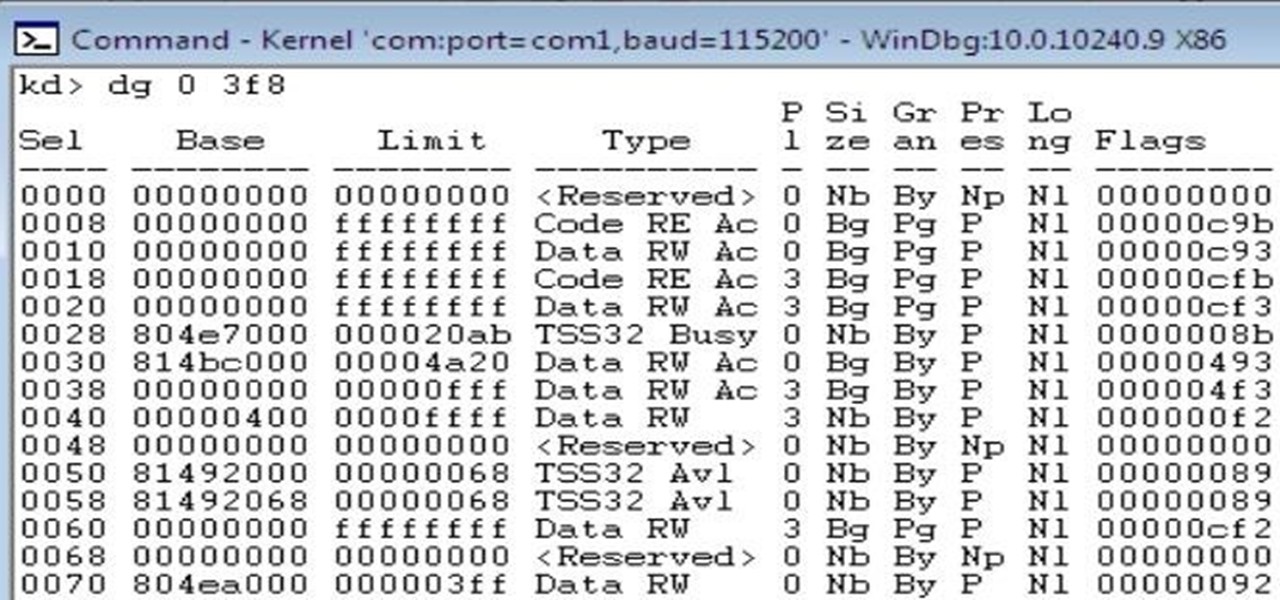
dg 0 3f8
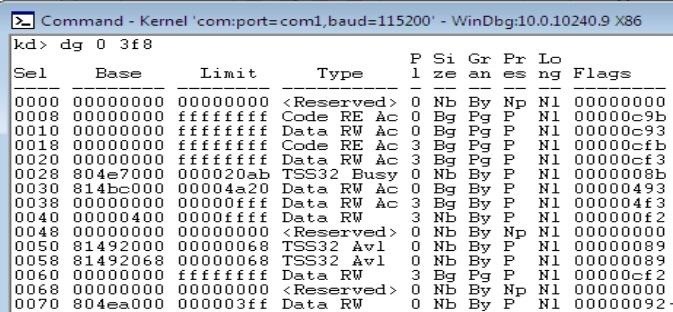
to the debugger will spill out and decode the segmentation descriptors that correspond to the segmentation selector fed to the command. In this case the command return the following.
Looking at the 5th column provides the level of privilege that each segment descriptor defines. In this case they are all running at ring 3 or ring 0. This can be thought of as a two-ring memory model instead of a 4 ring memory model. The above output does not implement segmentation. This can be seen because segments 2-5 span the same address space. This provides us with an overview of what the memory protection in Windows 10 looks like. This type of protection is the same as previous versions of windows. There is no surprise here.
Step 3: Setting Up an Environment for Kernel Debugging
The setup for debugging the Windows 10 kernel is as follows:
I have one host machine running Ubuntu 14.04. This machine is running two virtual machines (VMs) on a VirtualBox hypervisor. The first one is running Windows 10 32 bit English and the second is running Windows 7 32 bit with Windows 10 debugging tools installed. This setup may change as the project progresses.
Once both Operating Systems are installed, Windows10 must be configured to allow kernel debugging. This can be done by opening an elevated command prompt and entering:
bcdedit /debug on
bcdedit /dbgsettings SERIAL DEBUGPORT:1 BAUDRATE:115000
This will allow kernel debugging over a serial port. Then the Windows 10 debugging tools must be downloaded onto the Windows 7 VM. They can be downloaded from:
https://dev.windows.com/en-us/downloads/windows-10-sdk
Then the symbols must be installed on the Windows 7 VM. These can be downloaded from:
https://msdn.microsoft.com/en-us/windows/hardware/gg463028.aspx
These are by default installed in "C:\Symbols", this path will become important later.
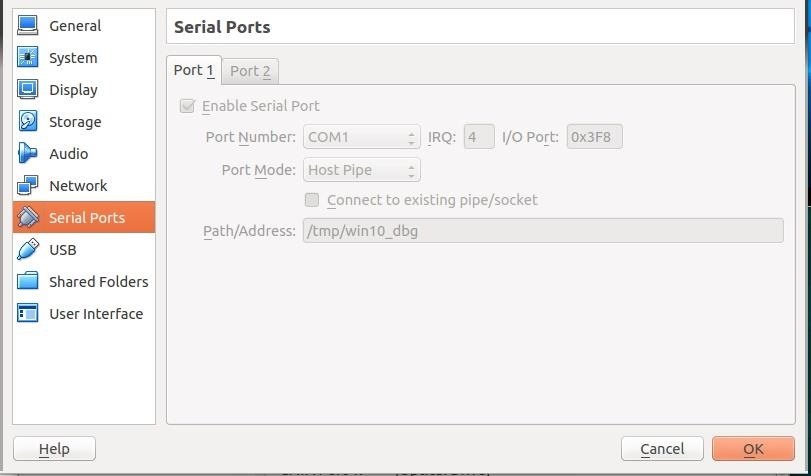
Now VirtualBox must be configured to allow these two machine to communicate over a serial port. This can be done by going to settings>serial>enable serial port. Then giving a path, for example "/tmp/debugport". On the Windows 7 machine, uncheck the "Connect to existing pipe" box; however leave this box checked on the Windows 10 VM Figure 1. Then boot up the Windows 7 VM.
Once the VM is started, start the program "WinDbg" which will let us interact with the Windows 10 VM. We must first however specify where the symbol path is. Go to File>System File Path. In this box specify where the symbols are located:
SRVC:\Symbolshttp://msdl.microsoft.com/download/symbols
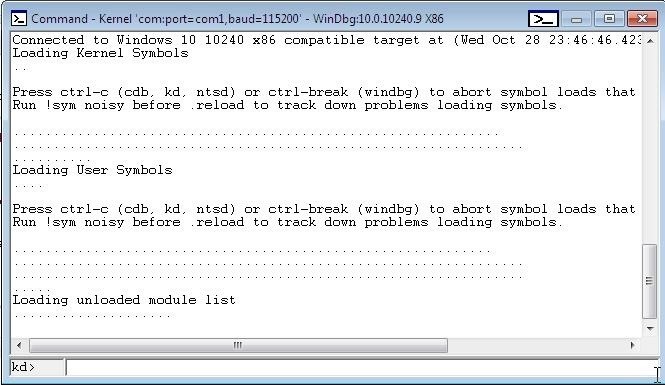
Then the kernel debugger can be started by pressing "Ctrl + k". Now start the Windows 10 VM. You should see messages beginning to appear in WinDbg. Once WinDbg says "Debugee Connected", press "Ctrl+Break". However, this sometimes fails. Reboot the Windows 10 VM until you get a prompt as in Figure 2 below:
Now we can run debugging commands to see the processes running, view what is stored in the registers, and more! This will help with understanding the Windows 10 kernel.
Sources
1 Bill, Blunden. "The Rootkit Arsenal. Escape and Evasion in the Dark Corners of the System." (2009).
Just updated your iPhone? You'll find new emoji, enhanced security, podcast transcripts, Apple Cash virtual numbers, and other useful features. There are even new additions hidden within Safari. Find out what's new and changed on your iPhone with the iOS 17.4 update.


9 Comments
Hmmm interesting. I like it
Hey looks pretty sweet, I'm looking forward to this!
Interesting....
Great article! can't wait for part 2!
Great article! Looking forward to more parts in the series!
Wow, this is really advanced stuff, congrats :)
Cheers,
Washu
This is amazing.
I wish I could decipher this tutorial lol.
I tried learning ASM. It went horribly bad lol.
Thanks for the tutorial.
Very nice really picking up on this..
We are at highest level here.
Share Your Thoughts