
While obvious, it's a lot more difficult to hack into a locked computer than an unlocked computer. As a white-hat hacker, pentester, cybersecurity specialist, or someone working in digital forensics, there's an easy solution — make it so that the computer won't fall asleep and lock automatically in the first place.
One way to stop a laptop or desktop computer from sleeping into a locked state is to use a mouse jiggler. It's a tactic used frequently by law enforcement to avoid having to get a password for the account later when examining the data for evidence. The suspect will likely not give up the credentials, but if the suspect was caught off-guard during a raid, a mouse jiggler could be planted quickly to make sure the computer doesn't doze off, avoiding the need for a password altogether.
A mouse jiggler simply moves the mouse pointer or cursor around just enough to keep the operating system in an active state. There are mouse jigglers that can be purchased online that are ready to go, such as ones from AFK TECH, CRU, HONKID (it has multiple ones), JEDIA, Punkdig, Qualitrusty, Reliabest, and VAYDEER (also with multiple versions). Still, it's much more fun to build your own.
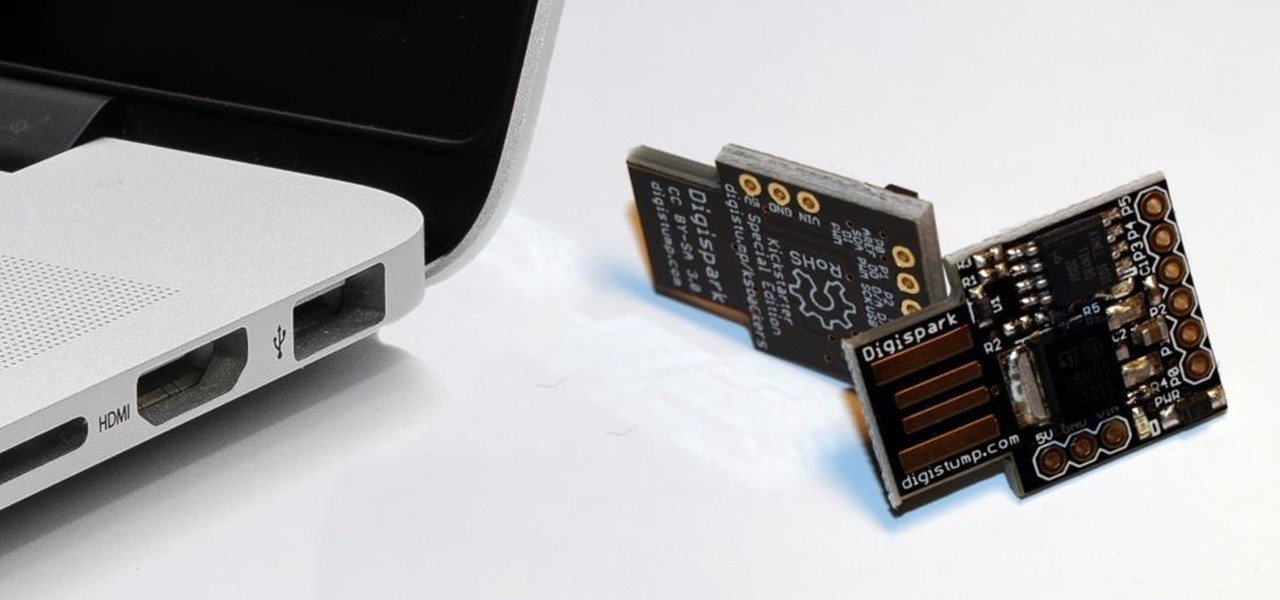
In previous articles, we've shown how to use a Digispark, an ATtiny 85-based microcontroller development board, to mimic a keyboard to input keystrokes on a computer. And we'll be using the same board to create a mouse jiggler. You could also turn it into an auto-clicker, but we'll be showing you how to code it to jiggle the mouse pointer endlessly to avoid the screensaver kicking in.
Requirements
As mentioned already, you'll need a Digispark MCU, which will plug directly into a USB port on the target machine. Here are some options available on Amazon:
- Digispark - 1 unit for almost $6 (4 stars, 8 ratings)
- Digispark - 1 unit for almost $10 (4.7 stars, 5 ratings)
- Digispark - 2 units for almost $10 (5 stars, 1 rating)
- Digispark - 2 units for about $12 (3.7 stars, 7 ratings)
- Digispark - 3 units for about $8 (5 stars, 48 ratings)
- Digispark - 5 units for about $10 (5 stars, 1 rating)
- Digispark - 5 units for about $11 (4.5 stars, 60 ratings)
- Digispark - 5 units for about $11 (4.2 stars, 24 ratings)
- Digispark - 6 units for about $12 (5 stars, 1 rating)
You'll also need the Arduino IDE, the software we'll be using to program the Digispark. You can download it for Linux, macOS, and Windows from Arduino's website. Once you've downloaded it, install it, and we're ready to go!
The Inspiration
Our project was inspired by a mouse jiggler developed by James Franklin. It's a really cool example because it shows one way that you can implement it, where the movement is so subtle that the average person would probably never notice it. It would keep the screen unlocked indefinitely, provided you could plug the Digispark in somewhere where it wouldn't be noticed, like at the back of a desktop tower or a monitor connected to the USB grid. With it hidden, it could run forever and keep the computer always unlocked unless the user logs out manually.
Here, we'll be using a slightly modified script, one where it's super obvious that the mouse is moving, for demonstration purposes. You could even have some real fun with this, making it so that the mouse moves at random intervals so that whoever is using the computer will wonder why their mouse pointer keeps jumping across the screen and moving erratically. It'd be a fun prank to play on a friend or coworker.
Step 1: Get the Modified Mouse Jiggler Code
Before we configure Arduino IDE to work with the Digispark, we'll need the modified code. In Arduino IDE, click on "File," then "New," if a new sketch isn't already open, and paste the following code into the body. You could also find and download the modified code from GitHub.
// Digispark Mouse Jiggler
// Written by James Franklin for Air-Gap in 2019
// www.air-gap.com.au
// Modified by Kody Kinzie of Null Byte
// https://github.com/skickar/USBAttackWorkshop/blob/master/MouseJigglerBIG.ino
#include <DigiMouse.h>
unsigned int LowerCycleTime = 500; //Minimum Time in milli-seconds between each mouse action Default: 10000 (10 Seconds), Max 65535ms
unsigned int UpperCycleTime = 1000; //Maximum Time in milli-seconds between each mouse action Default: 30000 (30 Seconds), Max 65535ms
//Random Function will randomly execute a mouse move between these two values
void setup() {
randomSeed(analogRead(0)); //Random Seed off background noise on analog pin
pinMode(1, OUTPUT);
DigiMouse.begin(); //start
}
void loop() {
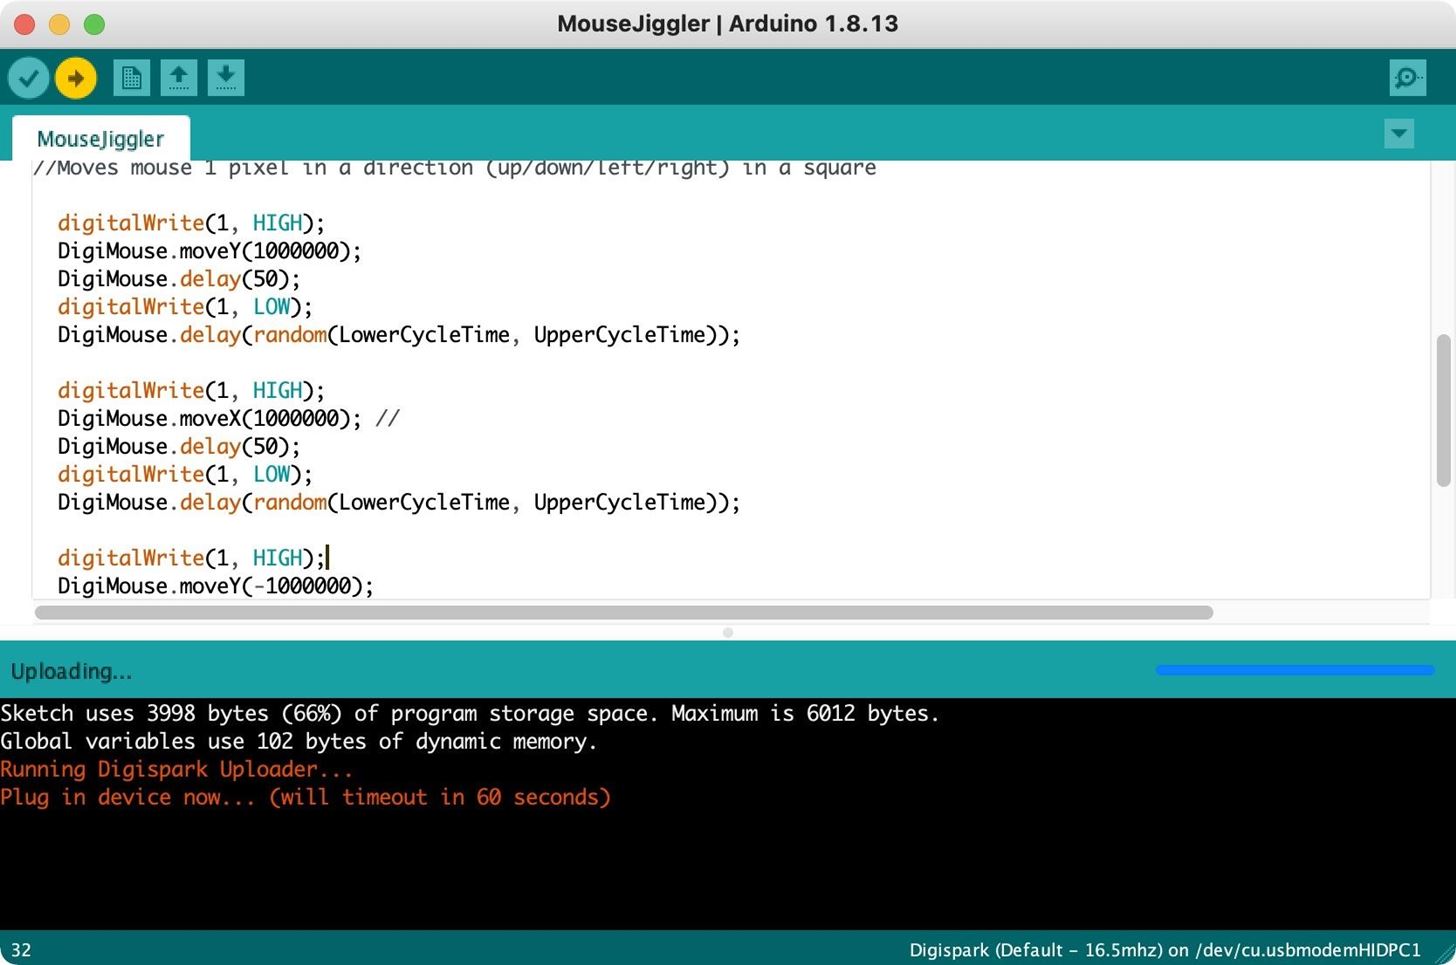
//Moves mouse 1 pixel in a direction (up/down/left/right) in a square
digitalWrite(1, HIGH);
DigiMouse.moveY(1000000);
DigiMouse.delay(50);
digitalWrite(1, LOW);
DigiMouse.delay(random(LowerCycleTime, UpperCycleTime));
digitalWrite(1, HIGH);
DigiMouse.moveX(1000000); //
DigiMouse.delay(50);
digitalWrite(1, LOW);
DigiMouse.delay(random(LowerCycleTime, UpperCycleTime));
digitalWrite(1, HIGH);
DigiMouse.moveY(-1000000);
DigiMouse.delay(50);
digitalWrite(1, LOW);
DigiMouse.delay(random(LowerCycleTime, UpperCycleTime));
digitalWrite(1, HIGH);
DigiMouse.moveX(-1000000);
DigiMouse.delay(50);
digitalWrite(1, LOW);
DigiMouse.delay(random(LowerCycleTime, UpperCycleTime));
}Compared to Franklin's original code, in the beginning, there's a LowerCycleTime of 500 and UpperCycleTime of 1,000, which is milliseconds for 0.5 and 1 seconds. The former sets the shortest amount of time between random mouse movements, while the latter sets the longest time between random mouse movements. Franklin's original has them set to 10,000 (10 seconds) and 300,000 (300 seconds), respectively.
The second difference is that we've chosen 1,000,000 for the first DigiMouse.moveY and DigiMouse.moveX instructions, then down to –1,000,000 for the last two. This will make the mouse pointer's location move up, left, down, right in the shape of a square, which should be fairly noticeable.
Step 2: Configure Arduino IDE
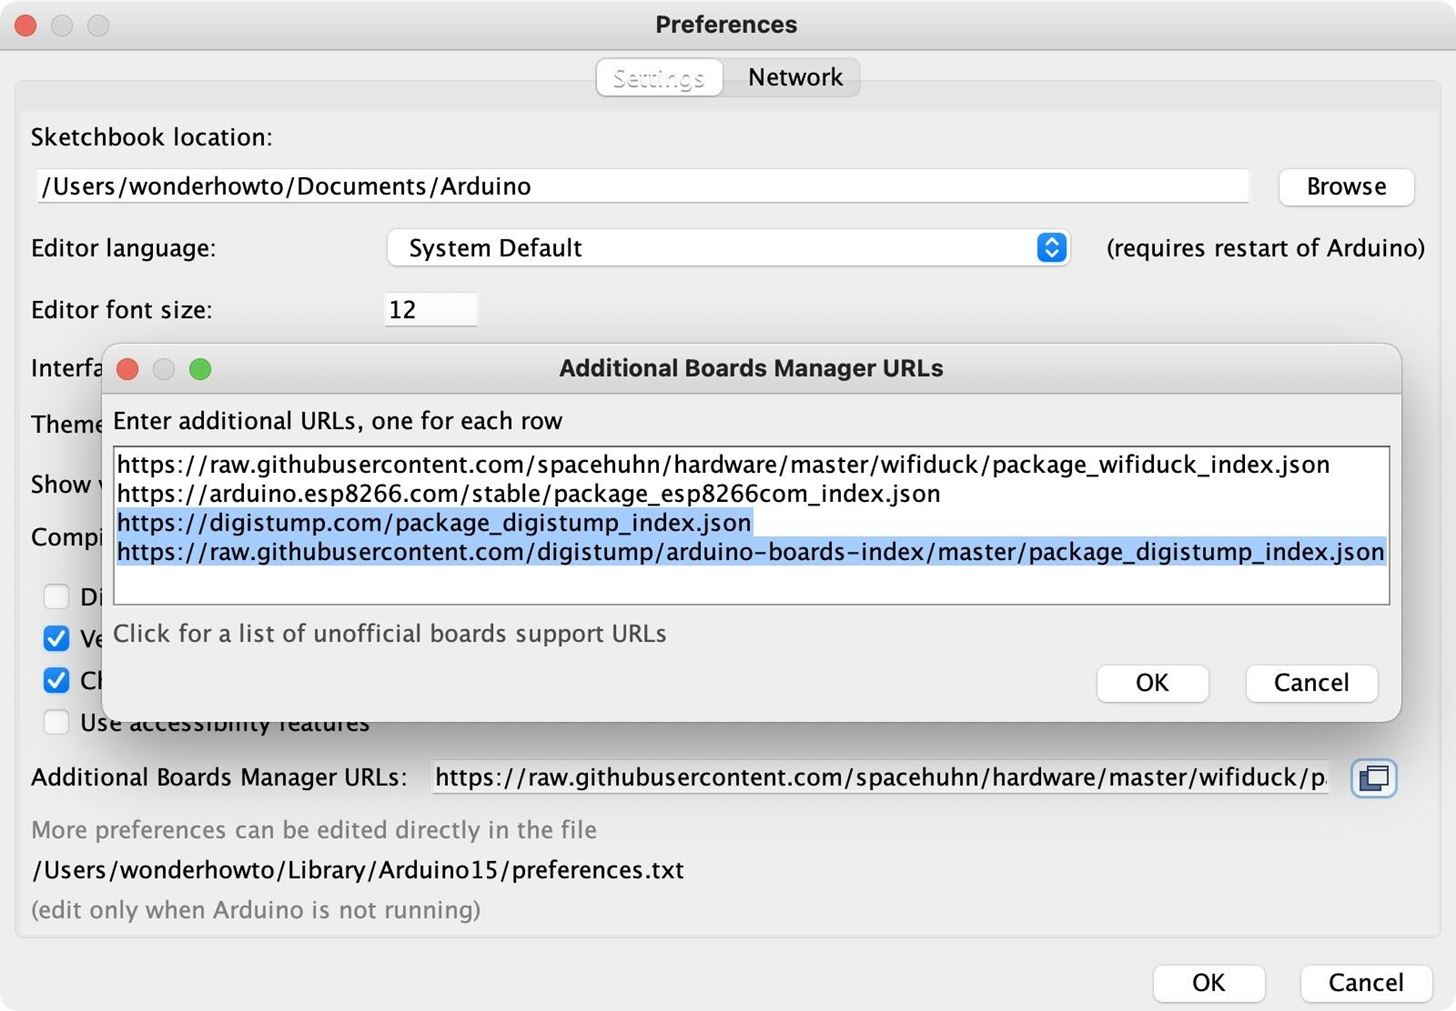
To connect to the Digispark, we'll need to add it to our boards manager in Arduino IDE. First, open up the "Preferences" menu in Arduino IDE. Next, click on the windows button next to the "Additional Boards Manager URLs" field to expand it.
https://digistump.com/package_digistump_index.json
https://raw.githubusercontent.com/digistump/arduino-boards-index/master/package_digistump_index.json
Now, paste in one of the above links onto a new line (you don't need them both, the first one just redirects to the second one). Click "OK," then "OK" again to save. The JSON link basically provides all of the port definitions for the various Digispark variations.
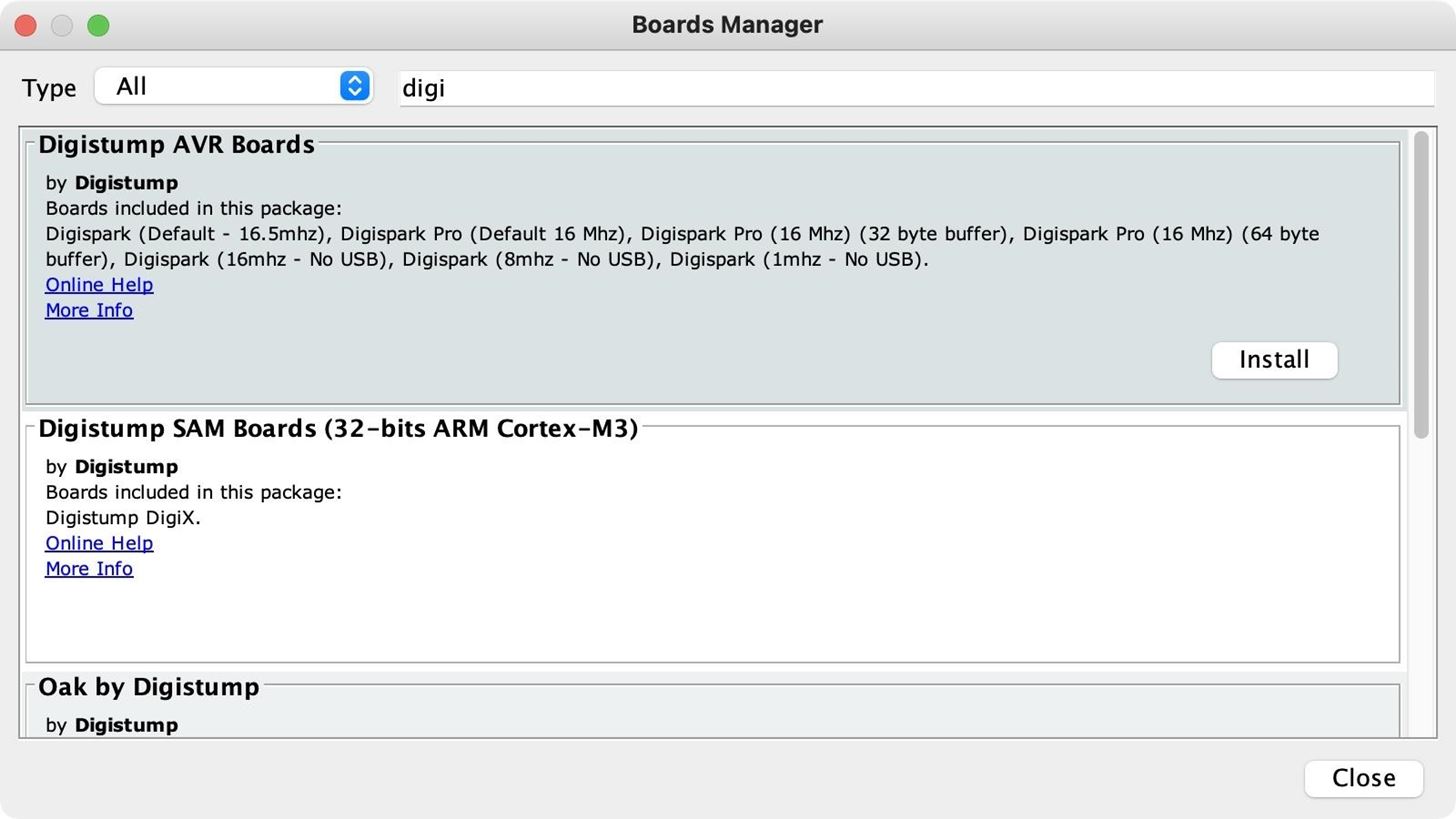
Next, go to "Tools," click "Board," then "Boards Manager." Here, you'll search for "digi" and "Install" the Digistump AVR Boards. If you already have it, you could also update it from here if an update is available. Hit "Close," and you're all set.
Step 3: Select the Digispark Board
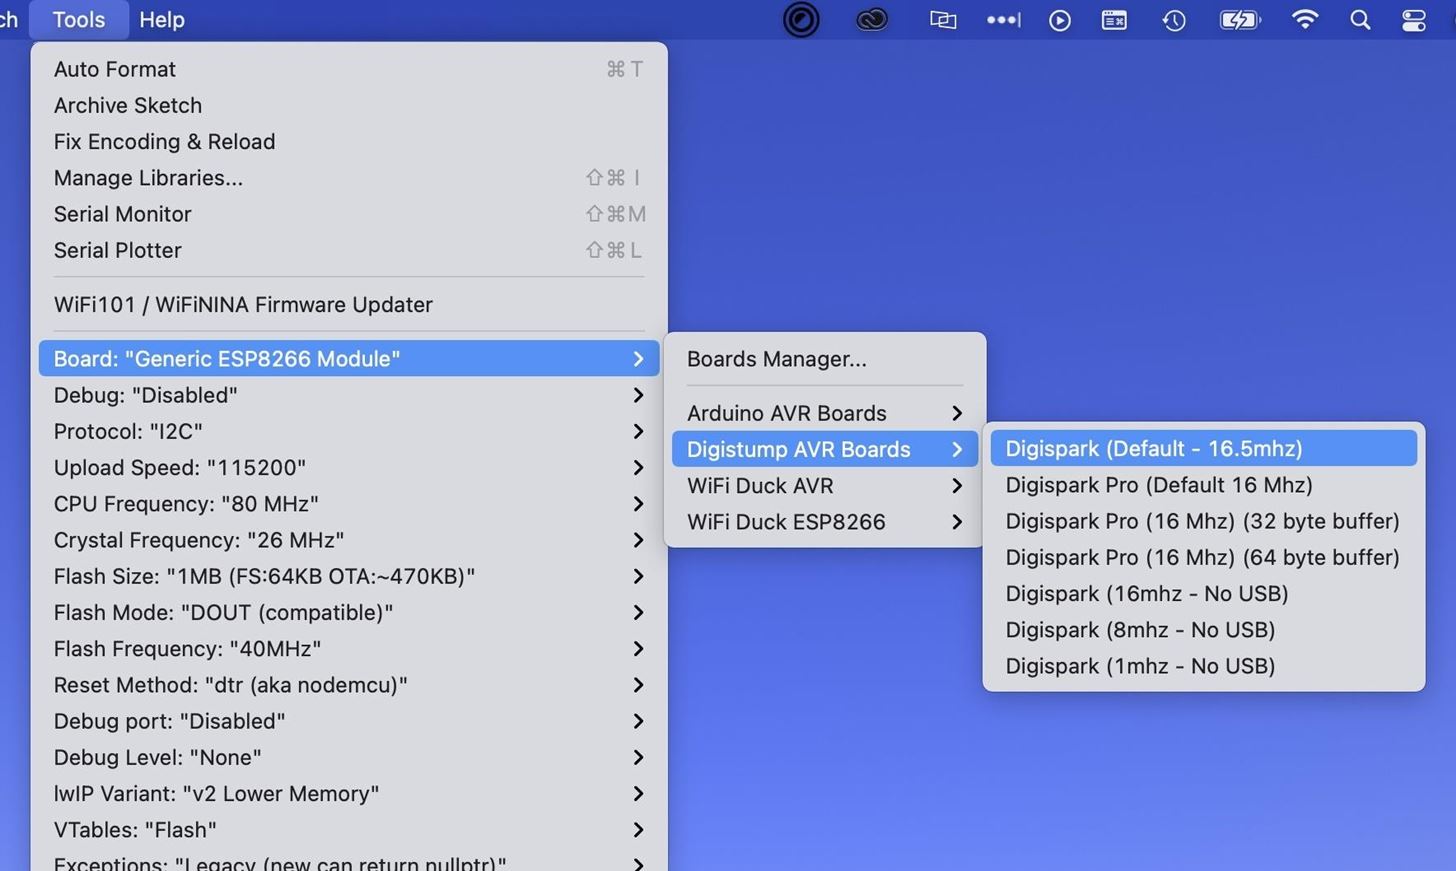
Go back to "Tools," click "Board," and you should see "Digispark AVR Boards" listed. Select that, then choose the first result for "Digispark (Default - 16.5mhz)."
Step 4: Push the Code to the Digispark
Unlike many sketches, you'll want to leave the Digispark unplugged from your computer before you start uploading it, however weird that sounds. So in your Mouse Jiggler sketch, click the Upload button (right-facing arrow) or go to "Sketch" –> "Upload" in the menu. Once you do that, it will compile the sketch, then tell you to plug in the Digispark, so do that now. After it says it's completed the upload, you should see the mouse pointer start to jump around the screen in a square motion.
If you want to see how the original code worked, you can grab the INO from GitHub or use the code below. Then, unplug the Digispark, hit "Upload," and plug it back in to load the original sketch on it. Once it's loaded, you shouldn't see your mouse cursor move at all, and you never will, because it's making micro-movements that are impossible to spot but will keep the computer on forever.
// Digispark Mouse Jiggler
// Written by James Franklin for Air-Gap in 2019
// www.air-gap.com.au

#include <DigiMouse.h>
unsigned int LowerCycleTime = 10000; //Minimum Time in milli-seconds between each mouse action  Default: 10000 (10 Seconds), Max 65535ms
unsigned int UpperCycleTime = 30000; //Maximum Time in milli-seconds between each mouse action  Default: 30000 (30 Seconds), Max 65535ms
//Random Function will randomly execute a mouse move between these two values
void setup() {
  randomSeed(analogRead(0));  //Random Seed off background noise on analog pin
  pinMode(1, OUTPUT);
  DigiMouse.begin(); //start

}
void loop() {
//Moves mouse 1 pixel in a direction (up/down/left/right) in a square

  digitalWrite(1, HIGH);
  DigiMouse.moveY(1);
  DigiMouse.delay(50);
  digitalWrite(1, LOW);
  DigiMouse.delay(random(LowerCycleTime, UpperCycleTime));

  digitalWrite(1, HIGH);
  DigiMouse.moveX(1); //
  DigiMouse.delay(50);
  digitalWrite(1, LOW);
  DigiMouse.delay(random(LowerCycleTime, UpperCycleTime));

  digitalWrite(1, HIGH);
  DigiMouse.moveY(-1);
  DigiMouse.delay(50);
  digitalWrite(1, LOW);
  DigiMouse.delay(random(LowerCycleTime, UpperCycleTime));

  digitalWrite(1, HIGH);
  DigiMouse.moveX(-1);
   DigiMouse.delay(50);
  digitalWrite(1, LOW);
  DigiMouse.delay(random(LowerCycleTime, UpperCycleTime));

}
Get Creative with Your Digispark Sketches
Using the Digispark as a mouse is an imperfect science. While we made a pretty simple tool today, it's worth noting that as soon as we need to control this more precisely — for example, working with an unknown screen resolution — that's where things start to get really difficult.
Aside from that, it's possible to use the mouse and inject keystrokes simultaneously, so you can really get creative with these scripts. Check out our previous Digispark guides to learn more about the keystroke side of things.
Just updated your iPhone? You'll find new emoji, enhanced security, podcast transcripts, Apple Cash virtual numbers, and other useful features. There are even new additions hidden within Safari. Find out what's new and changed on your iPhone with the iOS 17.4 update.


Be the First to Comment
Share Your Thoughts