

While hackers adore the command line, working with the GUI (graphical user interface) of an operating system has some advantages. This is especially true when it comes to post-exploitation. When we can control the mouse and keyboard of a remote computer, we can truly say we have complete control over the device. Today, I'm going to introduce to you the PyAutoGUI module, which does just that, and just how much fun you can have with it!
Endless Possibilities
Being able to control the mouse and keyboard with the lightning-quick speed of a computer program lends itself to several applications: Designing AI video game players, quickly maneuvering through a file system, running commands from a command prompt ... the list goes on.
As you think of more complicated applications, more complicated solutions will be needed. We're going to keep it simple today by showing you how to create a simple program to automatically tweet from a desktop computer.
Step 1: Installing PyAutoGUI
The process for installing PyAutoGUI is pretty simple. The first step depends on your OS. If you're running macOS, first type the following into a terminal window to install dependencies.
sudo pip3 install pyobj-framework-Quartz
sudo pip3 install pyobjc-core
sudo pip3 install pyobjc
If you're on Linux, type the following into a terminal window.
sudo pip install python3-xlib
Following that, type the text below to install the rest of the dependiecies.
sudo apt-get install scrot
sudo apt-get install python3-tk
sudo apt-get install python3-dev
If you're using Windows, I've got great news: You don't have any dependencies to install! For all three operating systems, finish by typing the following (with Windows users replacing type pip3 with pip).
pip3 install pyautogui
Alrighty, now that we've got what we need, it's time to dive in and code our Twitter hijacker!
Step 2: Understanding Pyautogui & Its Functions
Before we can use PyAutoGUI, we first have to understand the different functions we'll be using. Let's start with this one:
pyautogui.moveTo(x,y)
As you might've guessed, the function moveTo moves the mouse to a certain part of the screen. The key to understanding this function, though, is knowing how the coordinate graph is laid out. The following wonderful ASCII art graph can be found in the documentation:
So, as we can see, the upper-left corner has the coordinates (0,0). Moving downwards increases the y coordinate, and moving to the right increases the x coordinate. If I wanted to move the mouse to the bottom left corner of the screen (which we will soon), I would type:
pyautogui.moveTo(0,1079)
Moving the mouse is pretty simple when you know the dimensions of the screen, but what about when you don't? We can't move the mouse to (0,1079) on a screen that's only 1280 by 720 pixels. This is where knowing the size of the screen allows us to create a more flexible program. We can get the size of the screen by using the pyautogui.size function.
x, y = pyautogui.size()
By calling the function in this way, we'll assign the width of the screen to x and the height of the screen to y. These variables will give us anchors to work with when it comes to finding where an item is on screens of varying size.
x, y = pyautogui.position()
Similar to the size function we just discussed, position() will return an x and y value. Instead of returning the maximum height and width, however, it will return the current location of the mouse. This will come in handy when it comes to figuring out where on the screen we want to click.
Now that we can move the mouse with confidence, we need to be able to click it. This is a really simple process, as you can see below.
pyautogui.click()
And that's it! Now we could use pyautogui.click(button='right') to click the right mouse button instead of the left, or we could use pyautogui.click(200,200) to click at a particular location. For our example, we'll use moveTo and then click to better illustrate the process by which we create our solution.
Finally, we need to know how to utilize the keyboard. PyAutoGUI once again offers a simple solution for us here by typing the following.
pyautogui.typewrite('The text you want to type')
And just like that, we can type text!
But what about when we want to utilize the enter key? We're going to need it in order to browse to Twitter. This is still done with the typewrite function, but the argument we pass will look a little different, as seen below.
pyautogui.typewrite(['enter'])
Instead of passing a string, we pass a list containing 'enter'. We can pass a list containing several key names, and typewrite will type all of them in order. For instance, we can type the following example.
pyautogui.typewrite(['a','b','left','left','X','Y'])
This will output "XYab" because it types ab, then moves the cursor left two spaces, and then types XY.
While we won't need it for this project, it is also worth noting that keyDown(keyname) and keyUp(keyname) can be used for sustained key presses. You should know, these don't require you to put button names into a list. This is useful when it comes to creating programs that play video games.
Step 3: Writing TweetJack.Py
Now that we know what we're working with, let's start writing our program. Looking at the problem programmatically, we have two tasks we want to complete.
First, we want to open a web browser and browse to twitter.com.
Second, once we're on Twitter, we want to tweet something. This is assuming the user is already logged in.
To do this, let's first write a function that will allow us to browse to a specified website. You can see the function below.
Lines 1 and 2 import PyAutoGUI and the sleep function. As you'll soon find out, we're going to need to use the sleep function to make sure that our previous commands executed successfully before we move on to the next one.
On line 3, we define a function called browse and pass it a parameter website. On lines 4 and 5, we tell the browse function to use two variables declared outside the scope of the function: x and y. These are the width and height of the screen. We'll actually assign these variables later.
Once we have everything we need, we can go about opening up the web browser. When we do this, we're going to make a few of assumptions. First, we're assuming that Google Chrome is installed on the target machine. This can be easily swapped for another browser, but for now, we'll stick to Chrome. Second, we're assuming that the target is using Windows 10. The script should work for Windows 7 as well, but definitely won't for Windows 8.1, Linux, or macOS (previously Mac OS X).
Once you see the process we go through, however, you'll be able to modify the program accordingly. Finally, we're going to assume that the user is already logged into Twitter. This is a fairly reasonable assumption, as most people who use social media on their computers stay logged in.
Moving on, we see that on line 7 we move the mouse to the location (0,y-1). Why would we do that? Well, in order to open Google Chrome we're going to rely on the Windows search bar. To open the search bar, we're going to open up the start menu in the very bottom left of the screen. This means that the actual coordinate of the location we want the mouse to be will vary, depending on the screen size.
Next, we're going to wait a second to make sure everything has loaded, and just start typing. Once we finish typing Google Chrome, the Windows search program will have found what we need. From here we can just hit the enter key, and Google Chrome should open up.
As we continue coding together, I would encourage you to do some problem-solving on your own. Given the tools we discussed earlier, how would you go about finishing the process of browsing to a website? Keep in mind working with varying screen sizes.
Moving on, let's look at the rest of the function below.
On line 15, we sleep for 5 seconds to make sure that Chrome is open before we start clicking all over the place. Depending on the speed of the system, this interval may need to be increased.
Figuring Out Where to Click
From there, we can see on line 16 that we move the mouse to (297,63). Let's look at how we arrived at that location.
First, you're going to want to fire up a Python interpreter in a command prompt. To do this, open up a terminal and type python. Next, type import pyautogui. With this terminal, we can move the mouse around on the screen, then type x,y = pyautogui.position() to store the coordinates of the mouse.
By using the position() function, we can find a location which will hover the mouse over the browser search bar. Once we're there, we click on the search bar and type in the website parameter that was passed to the function. After the website name has been typed into the search bar, we hit enter to browse to that website.
As a quick side note, while I've arranged the following lines as you see below, I could use another way of doing the same thing.
pyautogui.moveTo(297,63)
pyautogui.click()
The following would do the same.
pyautogui.click(297,63)
Step 4: Sending Our Tweets
Before we jump into writing this next function, let's take a look at the layout of the Twitter website:

We see there's a big blue "Tweet" button in the upper right-hand corner that will do what we want. We also see that a user can directly tweet from the text input box in the center of the screen. Either one would work for our purposes. In this example, we're going to use the "Tweet" button.
Clicking on that, we see the following:
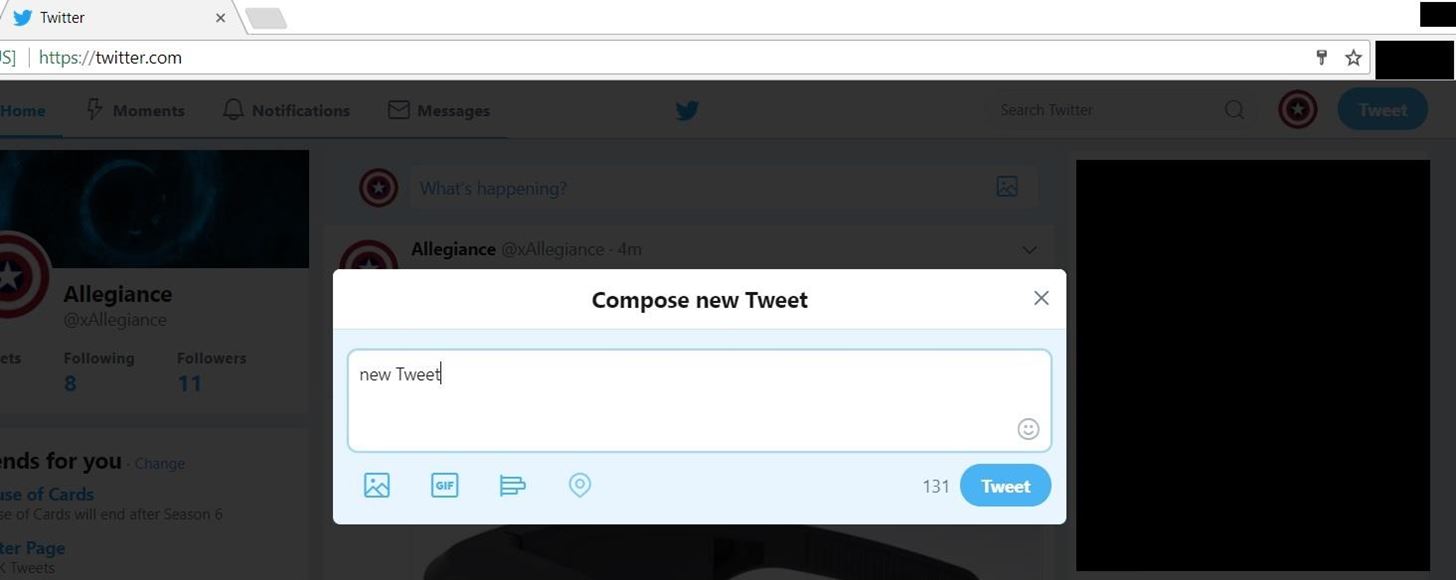
We notice that the text input box is active as soon as the button is clicked, which means we won't have to try to click on it before typing. This is a nice break for us.
So, once we browse to the website, our list of steps to send a tweet looks like this:
- Move the mouse to the "Tweet" button.
- Click the button.
- Type in the tweet.
- Move the mouse to the tweet box.
- Click the tweet box.
Simple enough. Let's walk through the code for this function.
Step 5: Coding Our Function
When we're tweeting, the first thing we're going to want to do is actually browse to Twitter. We do this in line 22 when we call the browse function we just wrote and pass www.twitter.com as an argument. Once that function executes, we need to make sure that the function uses the global variables x and y, which we will assign later.
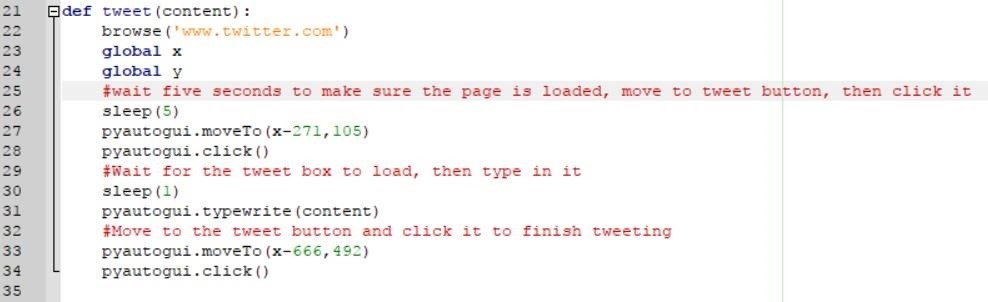
As the comment on line 25 explains, we sleep for 5 seconds on line 26 in order to make sure that Twitter has sufficiently loaded before we try to tweet. Then, we move the cursor to the location (x-271,105).
By getting the position() of the mouse when it is over the tweet button, we see that the button is roughly 270 pixels from the right edge of the screen.
It's a better idea to use this value instead of hard-coding the coordinates in because it allows our program to work for varying screen sizes. We didn't need to worry about this when we were clicking the URL bar in Google Chrome because the bar is within the first 300 pixels of width and height. Unless laptops have 200 x 200 screens now, it's safe to say that we could hard code that value.
The same is not true for the tweet button. On a 1920 x 1080 screen, the button resides at (1650,105). If the victim has a screen that is 1280 x 720 in size, this hard-coded value wouldn't work.
Once we have clicked the "Tweet" button, we'll type in whatever was passed for the content parameter. After that, we'll move the mouse to the new "Tweet" button and send our tweet!

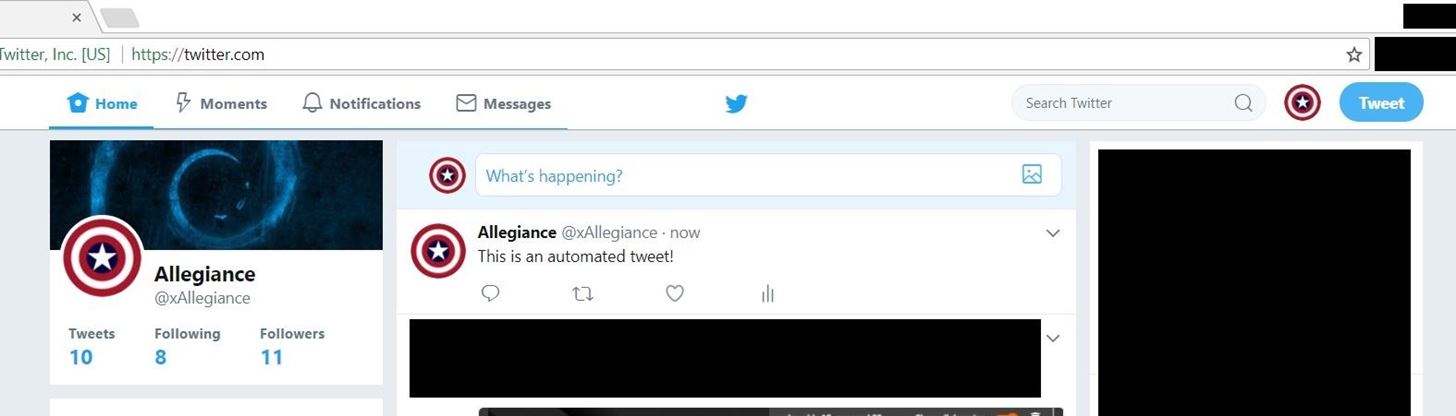
Now we have to finish things up. We'll get our tweet from the command line and assign it to the variable theTweet. Then, we're finally going to assign x and y with the output from the pyautogui.size function. Once this is done, we can call the tweet function and enjoy the fruits of our labor.
Have Fun with PyAutoGUI
I hope you found this introduction to PyAutoGUI helpful. I really love this module because of how much you can do with it. There are so many different applications that go beyond security, and there's so much fun to be had for anyone interested in learning about it.
Thank you so much for reading! Comment below with any questions, or contact me via Twitter @xAllegiance.
Just updated your iPhone? You'll find new emoji, enhanced security, podcast transcripts, Apple Cash virtual numbers, and other useful features. There are even new additions hidden within Safari. Find out what's new and changed on your iPhone with the iOS 17.4 update.
Screenshots by Allegiance/Null Byte


3 Comments
Son of a damn, thank you
exactly what I need, do you think I could apply it to something that could make it execute invisibly, I'm typically a beginner so do you think it would work if I could (maybe) make this as a payload of (maybe) a worm?
nevertheless I love this thank you, very much
(edited)
but uhm, where do I download it, I have python 2.7 on windows 7, do I till need to download it or maybe you could tell me where directory it is located
Here's a link that will walk you through how to download the pip program. From there installing the module should be a breeze:
https://pip.pypa.io/en/stable/installing/#do-i-need-to-install-pip
Wait mine ain't working do I have to wait?
(2nd edit)
I used wrote the "def website" but did not use it the hell
I'm goddamn floating right now bra...
thanks
Share Your Thoughts