
Hello fellow Nullbytiens, today we will be talking about IRC again (if you haven't read OTW's post about head over there now)and more specifically about using 1 nickname with multiple devices or IRC clients.
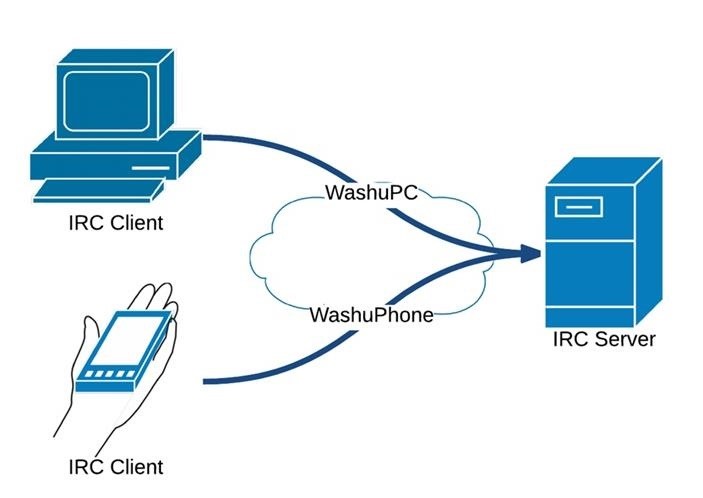
IRC was a protocol that was developed in 1988 and doesn't support using a the same username from multiple devices. Some of you may have noticed that there are people on the IRC channel that have a nickname and the same nickname but with "Phone" or "Laptop" after it. To solve this problem people use something called a bouncer.
Bouncers
In official terms, a bouncer is a "piece of software that is used to relay traffic and connections in computer networks". That means that its essentially a server dedicated to pass on information from something connected to it to something it is connected to, for example a proxy.
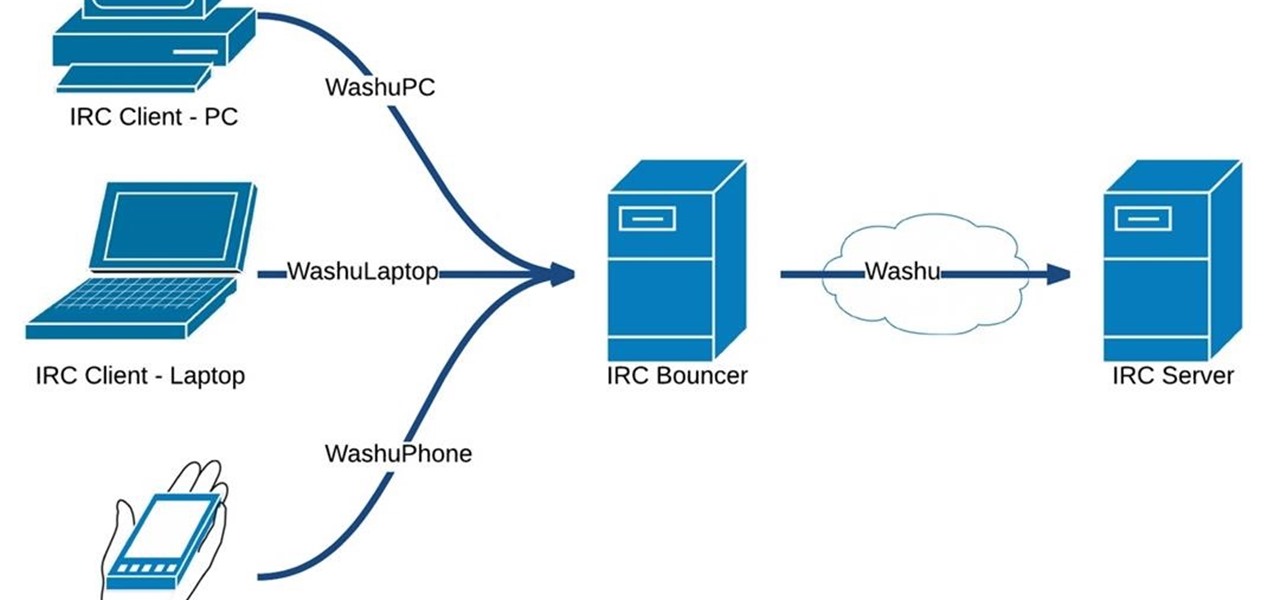
More specific to our needs is a IRC bouncer; a IRC bouncer acts as an IRC server and a IRC client. The user connects to the server part, just like he would with any other IRC server, and sends a message. The bouncer receives that message and sends it as a client to another IRC server from the chosen nickname.
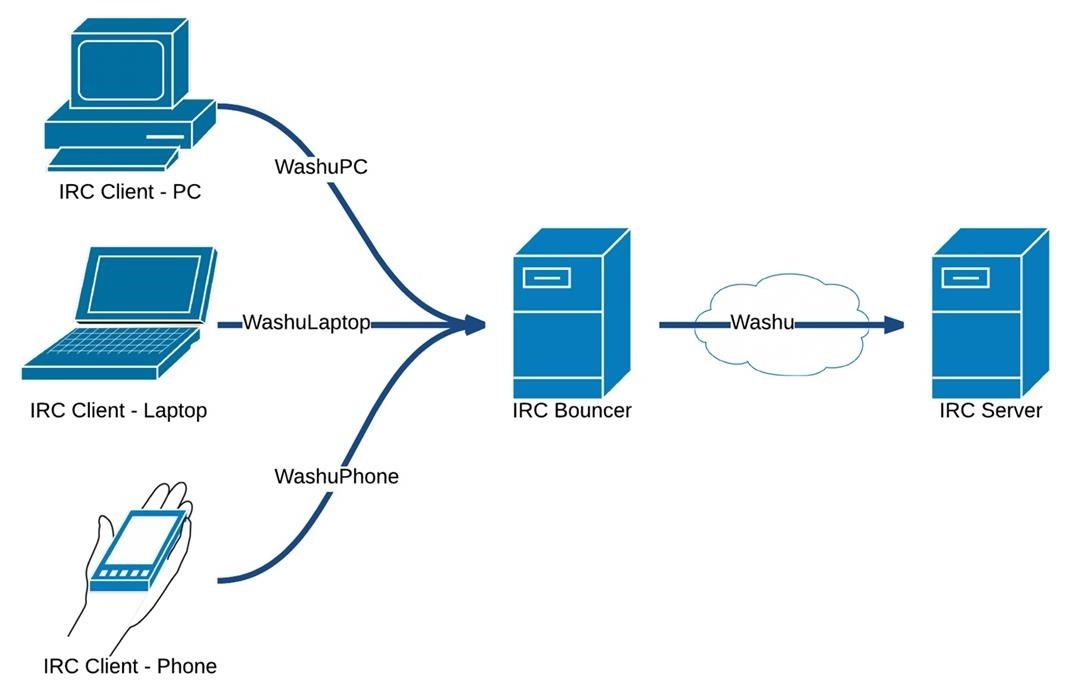
So by using a bouncer, multiple Clients can connect and send messages under the same nickname.
One the the most common bouncer is called ZNC, it a has lots of useful feature and includes a web interface. So let's set one up.
Setting Up
For a bouncer to work it needs to constantly be up and running so that our clients can always connect to it. Since we don't all have a server running 24/7 we can use a service called BNC4FREE. This company offers free bouncer (aka BNC) hosting and its very easy to set up.
Warning I cannot guarantee for the integrity of this company, they are based in the UK and therefore must compile to the UK laws. So far I have used them without a problem and I have no complains (plus the price is right :D)
First thing we need to do is request a bouncer from BNC4FREE. To do this we must head over to this online IRC channel. Once there we will be greeted with a online IRC client connected to ##BNC4FREE.
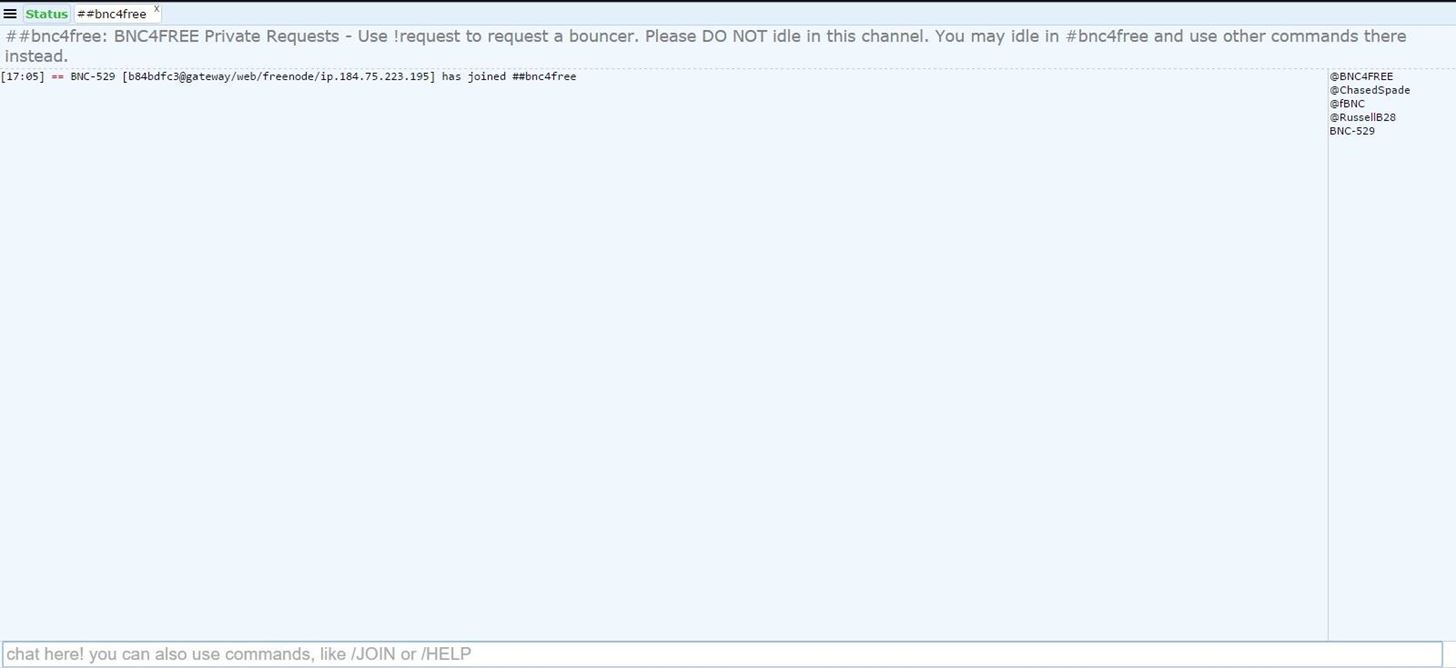
Once there we have to type a command to sign up for the bouncer. The command is !request [USERNAME] irc.freenode.net 6667 [EMAIL].

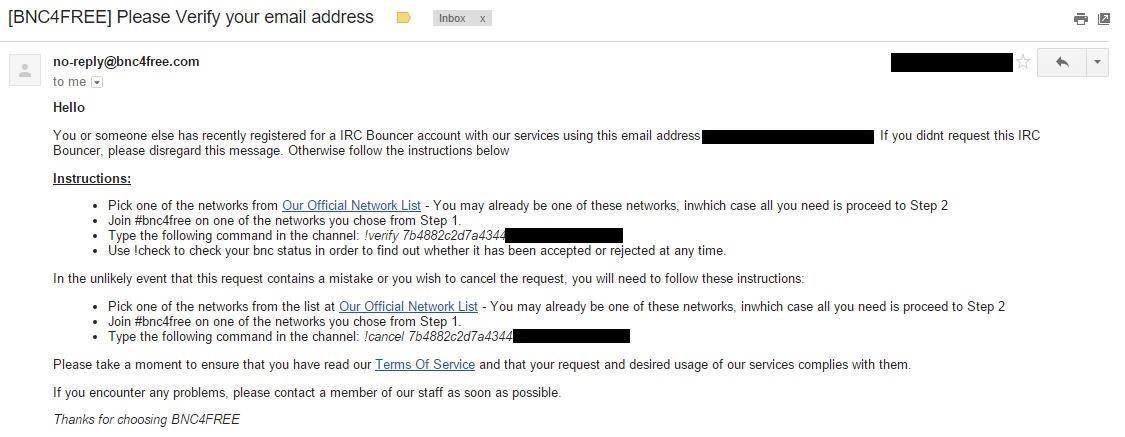
Once this is done you will receive an email from BNC4FREE to confirm your email address with instruction requesting you to enter a command into the IRC channel so that they can make sure that its a real email address. If you don't want to give your true email address you could always use a disposable email address, but make sure that you still have access to it for the next couple of day, because we will need it one more time.
Another way to request a bouncer is to send an email to request@bnc4free.com with the following information:
- Desired Username
- The IRC server you wish the bouncer to connect to (chat.freenode.net)
- The port for the IRC Server (if none specified 6667 will be used)
Now we wait... The request should be processed within 48hrs although it might take up to 72hrs; my request took under 24hrs to process.
Logging In
Once your request has been processed you will receive an email containing your username, your password, and your webadmin page.
The first thing to do is to log into your webadmin page. BNC4FREE have many different servers that are all named after a fruit (i.e. melon, kiwi, apple) so you be randomaly assigned to one of them. I got the melon server.

Once you log in with your username and password which were in the email you will be greeted with a page like this:
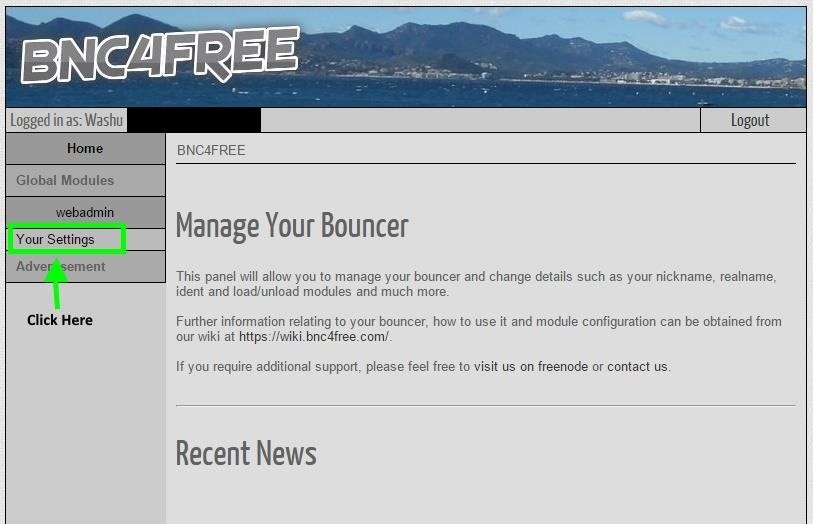
Once on this page click on "Your Settings" on the left and it will bring you to a page were you can change and tweak all your settings.
Warning When changing your setting make sure that you press save at the bottom left of the page so that the changes are recorded. I learnt that the hard way xD
Settings
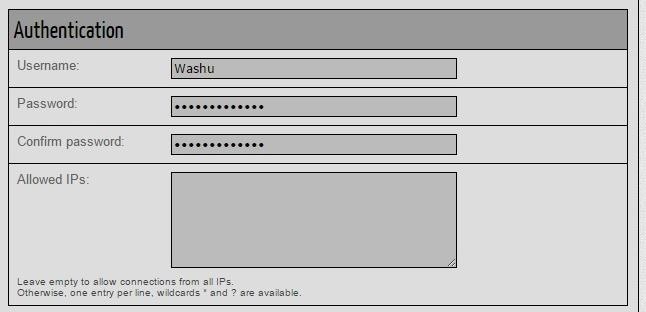
Most things in the setting should already be configured for you but you may want to change a couple of things based on your preference. The first thing you should do is enter a password and if you want to allow any IP to connect (they will still need your username and password) just leave the "Allowed IPs" blank. Once this is done scroll to the bottom of the page and press "Save".
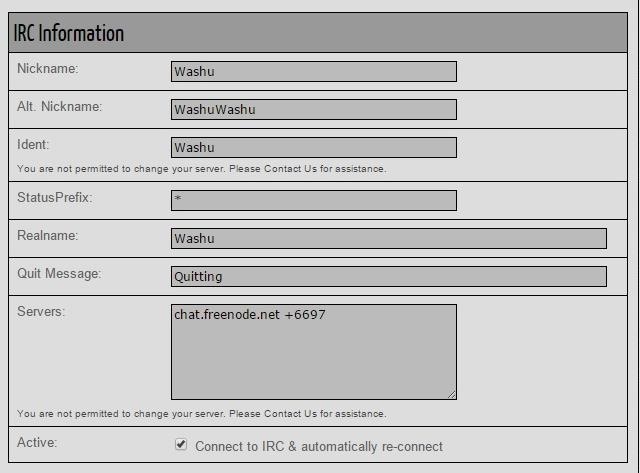
Next enter your preferred nickname (the nickname that people will see you as), and any other information required. Finally make sure to check "Connect to IRC & automatically re-connect" and click "Save".
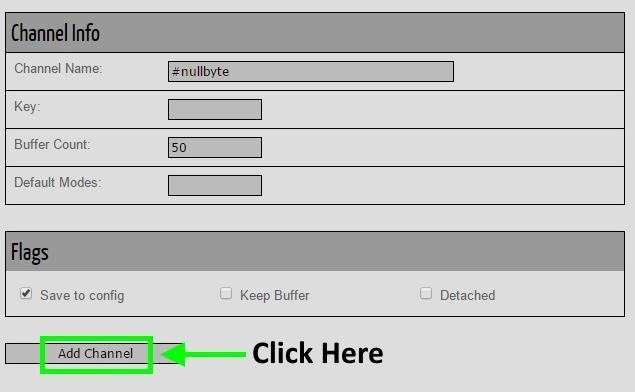
For now we can skip the Modules section and go right to the Channels section. This is were we specify which channels you want the bouncer to connect to. We start by pressing the "[ADD]" button on the left. We will then be brought to a new screen were we can enter the channel name, change any channel specific settings and press "Add Channel" when done.
Connecting to Our Bouncer
Finally, we are done! Now you should be able to connect to your bouncer through your IRC client and any message you send to it will appear in #nullbyte. BUT you must first do a little bit of configuring in your IRC client. We must add a new server to our client and connect to it instead of the usual FreeNode server.The address and port of the server should be included in the email BNC4FREE sent you as confirmation of your account. In my case it was melon.bnc4free.com but yours may be different. Since I'm on windows I use the HexChat IRC client which is just a port of the Linux xChat client so thing should be very similar.
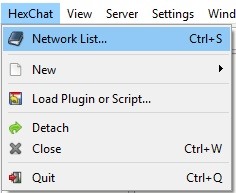
The first thing to do is click on the top left and click on "Network List"
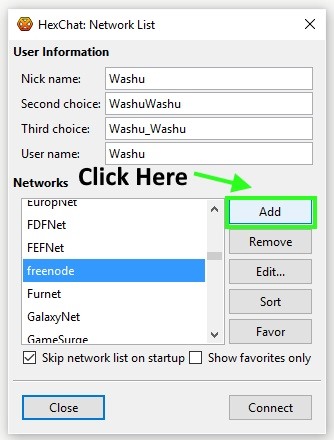
Then press on "Add" and enter the name for the new server, I just put in BNC4FREE
Next configure all the appropriate option with the server and information that was in the email. You need to enter the server name and then the port to connect to (usually 1337, and 1339 for SSL connection). Fill out the rest of the options to your liking but don't worry about the nickname, realname, etc. since it will be ignored by the server and use the nickname specified in the webadmin panel instead. Don't select a channel to connect to, this will be done by the bouncer automatically. BNC4FREE says to select "Accept Invalid SSL Certificate" if you want to connect with SSL but it seems to work even without it and if you do check it that option you are essentially losing the protection SSL provides you.
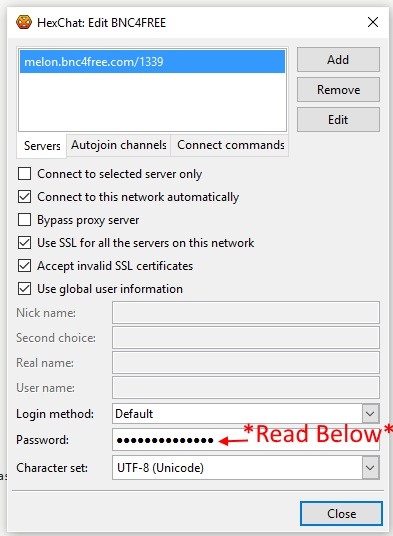
Leave the login method as default since we will be using the password as a way to authenticate our BNC4FREE account with the bouncer. Since there are many people connecting to this server the bouncer needs a way to differentiate one persons account from another so that they don't send messages under the wrong nickname.
The password must be formatted carefully as [USERNAME]:[PASSWORD]. For example if my username was "Washu" and my password was "secretpassword" then as a password for the server I would put "Washu:secretpassword" (without the quotation).
At this point you should be able to connect to the bouncer and it will redirect all you messages to the appropriate server without any problem. You can use it as you normally would and connect to the bouncer server with multiple clients and all your messages will be displayed through the same nickname, woot woot :D
Modules
There are many advantages to using a bouncer, since the bouncer is always online even when your not it can store the conversation in a buffer while your away and replay then to you when you connect again to make sure that you never miss anything. It does the same for private messages and time stamps all the messages.
Additionally there are things called modules, which are options for extra functionality, like automatic message replies, automatically mark you as away, say "Hello all!" every time you log on, etc. Since BNC4FREE uses the popular bouncer ZNC you can also write your own in C++, Perl, TCL, or Python modules. For a full list of modules and what they do look at ZNC's modules list.
There are a few modules that I recommend using:
- NickServ - Assuming you have registered you nickname, select this module and enter you nickserv password to authenticate the bouncer when it logs in with you nickname
- Simple Away - Automatically set you as away when the last client disconnects from the bouncer
- Away - Store messages for you while you are away, requires a word to encrypt the messages with
There are plenty of great modules and if a modules doesn't have what your looking for, why not create one for yourself? :P
Conclusion
I hope that this makes it easier for some of you that have more than 1 device and use IRC on all of them to manage everything, and also for people that just want the added benefits of a bouncer. I'd like to again thank OTW for the IRC channel and everything he's done for the community and hope to see many fellow Nullbytiens on the IRC channel :D
Cheers,
Washu
Just updated your iPhone? You'll find new emoji, enhanced security, podcast transcripts, Apple Cash virtual numbers, and other useful features. There are even new additions hidden within Safari. Find out what's new and changed on your iPhone with the iOS 17.4 update.


3 Comments
Oh neat, I should do this :D
Its quite useful, especially since it records what happening when your not there and plays it back to you after :)
Cheers,
Washu
can you give a guide on how to do it using irssi .
I want to use it from both my windows' new kali linux command line and my kali linux machine
Share Your Thoughts