

Computer crashes, fried hard drives, red rings of death, delinquent memory cards... nothing is worse than dysfunctional technology. In just a minute, your favorite and most used device has become the biggest headache of your life, frustrating you to the brink of madness. But what's worse than your electronics just giving up on you?
User Error
One of the most vexing things for me is accidentally deleting something on my hard drive or memory card that I didn't mean to delete. I've done it a number of times. Once, I even deleted an entire photo album with thousands of pictures off of my hard drive—by accident. And I'm sure I'm not the only one.
Recovery Apps
To get your data back, you could go buy some recovery software online, but you can't trust most of it. You'll spend anywhere from $30 to $100 for some spammy recovery app that might or might not work. And chances are, they'll take the money and run, meaning you'll never get another update, no customer support—zilch. Why make things more frustrating?
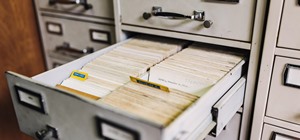
Trash Can?
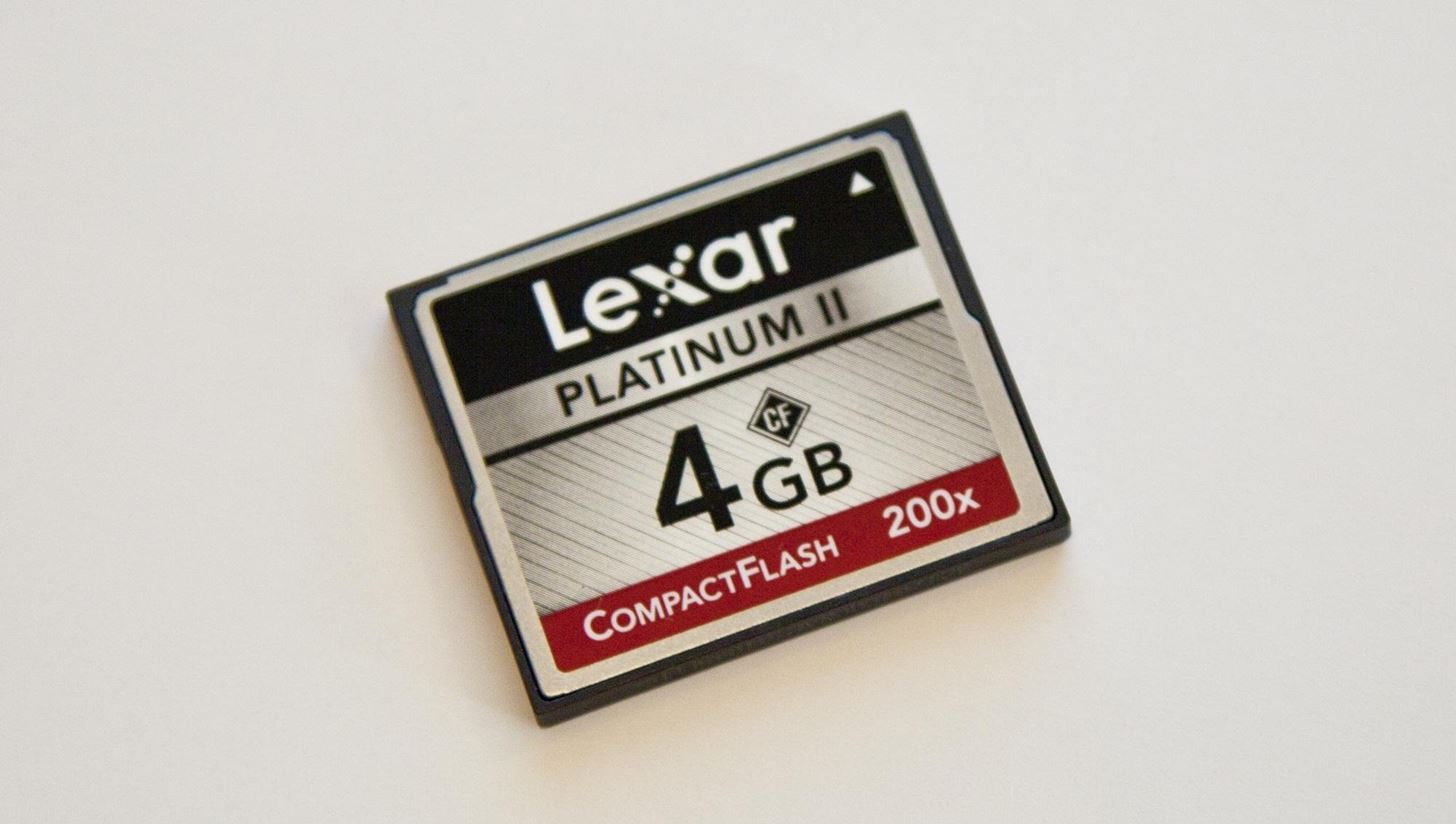
A few days ago, I accidentally erased a couple photos on my CompactFlash card inside of my Canon EOS digital camera. Just a bonehead move. They weren't even important photos, but I was aggravated at myself for deleting something that I didn't mean to delete. And I wanted to get them back, without paying for some spammy crapware.
As most of you probably know, there are no un-delete options directly on digital cameras these days. Some of you might be able to use your camera as a card reader via USB and mount the memory card onto your computer, enabling you to take the deleted photos out of the trash.
Lucky you.
If you have a Canon (like me), you cannot access the contents of your memory card directly on your computer when you're using your camera as your reader. On a Mac, it either wants to show the images in Image Capture or using the Canon EOS Utility. It will not mount as a drive in your Finder. Which means you need a card reader.
Notes
- This will work for all kinds of situations, not just user error. If you've got a damaged memory card or want to see if you can recover a few photographs from a couple shoots ago (even after reformatting the card), this could work for you, too.
- This will also work on other storage devices, like external hard drives, flash drives, etc.—whatever you've got that has media on it. iPhones are a little tricker, though; they need to be jailbroken, among other things.
Step 1: Find a Card Reader
Again, if your device doubles as a card reader, great. Most smartphones do. Some cameras do. If you need an actual card reader, check out your printer first. You might be surprised to see a few memory card slots on there. If yours has the right ones, great. If not, you'll need a solo card reader.
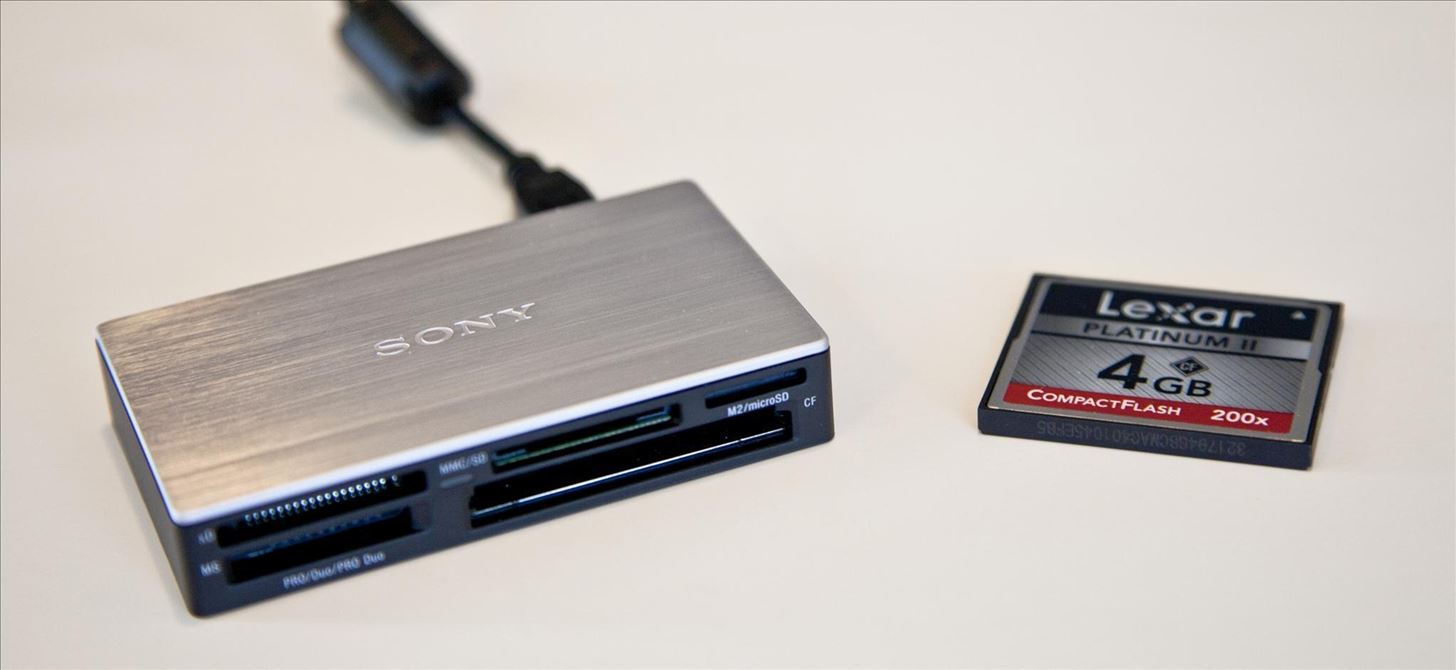
I just happen to have a Sony multi-card reader. I got it on sale and keep it in my camera case now. Any brand will do, but I suggest getting one with a good rating. I hear this Kingston one is good, too. Just make sure that you get one that reads your cards (all of them!).
Step 2: Mount Your Card
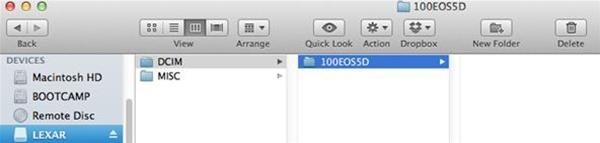
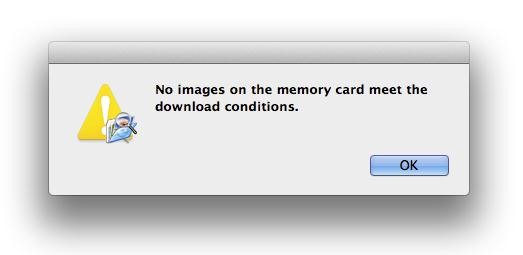
Now that you've got a way to mount the disk image, it's time to connect to your computer. I hooked up my card reader via USB to my computer and plugged in my CF card. Nothing on the card, just as I suspected.
I got a warning, too. Also, nothing was in the trash like I had hoped.
Now what?
Step 3: Download Some Free Software
Again, there are tons of applications out there for recovering deleted images, and they want your hard-earned dough. Having just purchased a card reader, I didn't feel like buying anything else. Especially an application I would probably only use once. So, I went hunting for a free one and found one—PhotoRec.
"PhotoRec is a file data recovery software designed to recover lost files including video, documents and archives from hard disks, CD-ROMs, and lost pictures (thus the Photo Recovery name) from digital camera memory. PhotoRec ignores the file system and goes after the underlying data, so it will still work even if your media's file system has been severely damaged or reformatted."
Awesome.
Download PhotoRec for you operating system. It works with Mac, Linux, Windows and more.
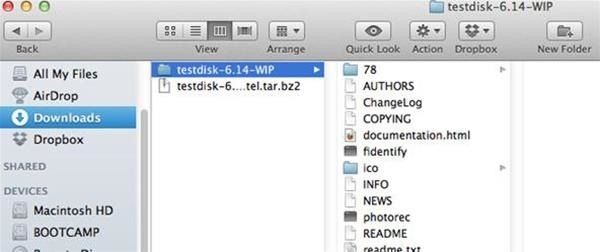
Then untar or unzip the file, depending on which file you downloaded, so you can see the folder and its contents.
Step 4: "Unmount" Your Card
Now you need to "unmount" your memory card that we mounted in Step 2. If you haven't already, make sure your card reader is hooked up to your computer. PhotoRec will not be able to gain access to your card's contents unless you hide it from your operating system.
Before unmounting the card, we need to find out its name. Open up Terminal. To find the raw device name, use the command:
df
This will bring up a list of your drives:
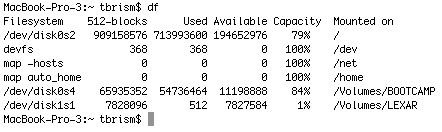
Find your drive and remember its name. It will probably be something different on your system. But mine is the LEXAR one; its raw device name is /dev/disk1s1. Though yours will be different, it should still start with /dev/.
Now, you need to run in root, essentially "unmounting" the volume. We do this by simply hiding it from OS X. Though it will still be physically connected (which means don't disconnect it from your computer), the OS will not think it's there. Use the following command, substituting your device's name for mine:
sudo umount /dev/disk1s1
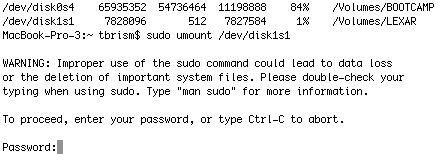
Now, type your administrator password and press enter.
Step 5: Run PhotoRec
Run the PhotoRec app by typing in the location, followed by the name of your drive. Mine was:
downloads/testdisk-6.14-WIP/photorec /dev/disk1s1
If you moved or renamed the folder after downloading, make sure to reflect that in the command.

Step 6: Start the Recovery
PhotoRec will now open in your Terminal window.
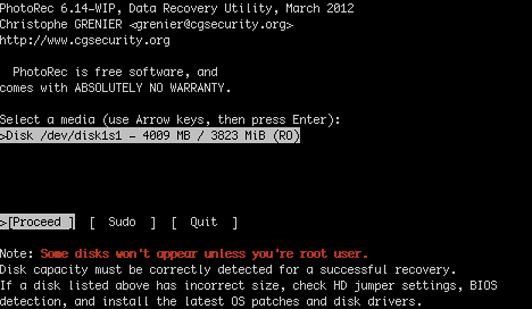
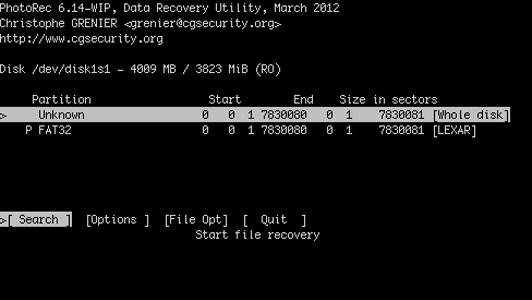
- Make sure to select your disk and [Proceed], then hit enter.
- Then just select [Whole disk] and enter.
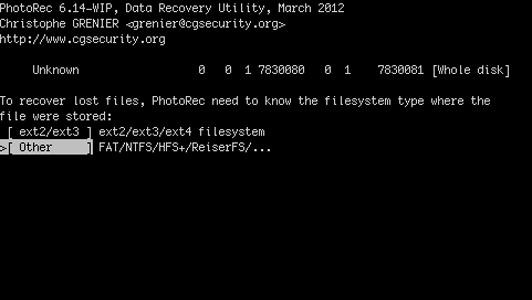
- Then select your filesystem, more than likely [Other], then hit enter.
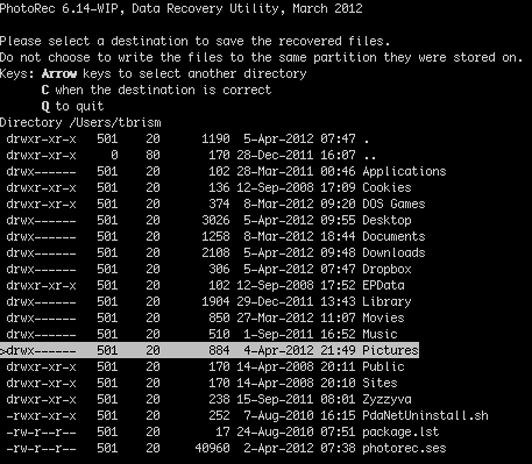
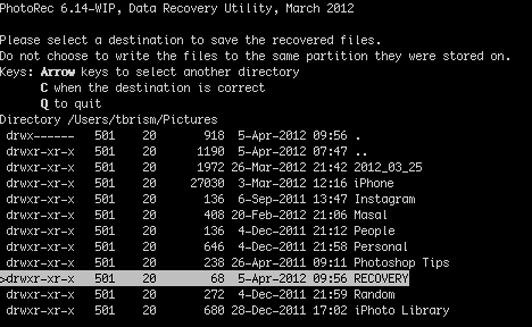
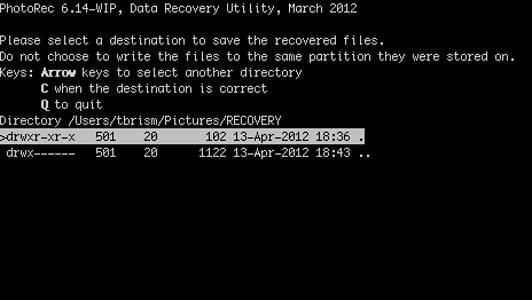
- Then proceed to select your destination address by hitting the right arrows. (I want to place it in my Recovery folder, which is in my Pictures folder.)
- When you find your destination folder, open it with the right arrow. If you don't, it will end up in whatever folder you're in now (in my case, Pictures).
- Finally, hit "C" to start the recover process.
You'll see PhotoRec doing its thing now. For my 4 GB card, it took about 5 to 10 minutes.
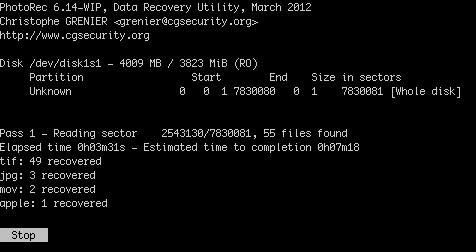
When it's done, you'll see just how many files were saved. I was hoping to get back 4 images that I originally lost, but it returned so many more. Over 100 from previous photo-snapping sessions.
Then just [Quit] out of PhotoRec and close Terminal.
Step 7: Photos Recovered!
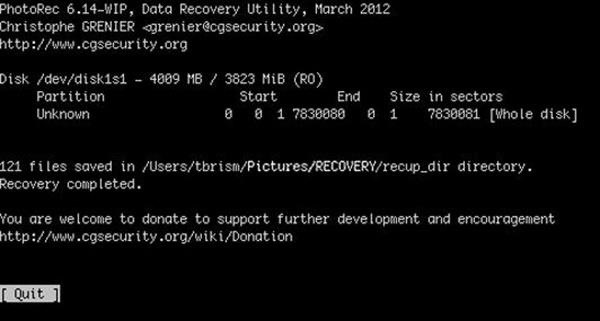
Now, you've just got to check the folder that you downloaded the recovered images and videos to. A folder called recup_dir will house your media, located inside the folder you picked as your destination.
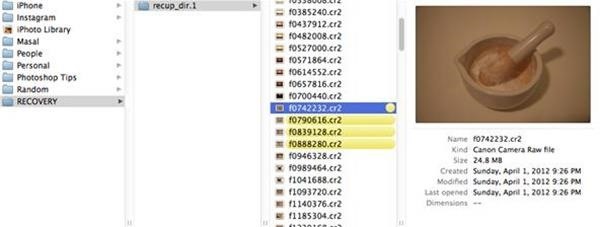
I received way more images and videos back than anticipated. I only needed four, but got back 121 total files. They'll be assigned random names, so you'll just have to hunt for the ones you want and delete the rest.
Just updated your iPhone? You'll find new emoji, enhanced security, podcast transcripts, Apple Cash virtual numbers, and other useful features. There are even new additions hidden within Safari. Find out what's new and changed on your iPhone with the iOS 17.4 update.


30 Comments
Great article, it is worth mentioning some of the other alternatives available to the user, maybe one with a GUI and not terminal for the people that fear the terminal
Yeah, that'd be a good idea, but I'm not sure of any recovery alternatives with a GUI that are totally free. If anybody knows of any free ones, I'd like to know!
Recuva
File Recovery
http://www.piriform.com/recuva
Looks like a good one for Windows. And it seems to be free, despite some ambiguous details on their download page, which makes it look like you can only recover data with the paid version. But that's not the case. Just bad layout of information. Seems to be a working free version though, so cool.
thank u god
also could u put on up outlining this on a pc or linux
I don't have a Linux or Windows-based computer anymore, so I can't verify any of the steps. But if you need help with those systems, you can check out CGSecurity (maker of PhotoRec). This video is also a good one for Linux users. And this article for Windows might help.
thank you very much
I'm continually getting:
MacBook:~ name$ sudo umount /dev/disk2s1
umount: unmount(/Volumes/CANON_DC): Resource busy
That just means that something is trying to use the device, so what you should do is close it in finder, turn off the camera (If thats the device) and make sure the Canon software isn't running. After you do that try again
Would adding force close (-f) to the command help, i.e. "sudo umount -f /dev/disk2s1"? I have not tried it, but I imagine PhotoRec will still be able to find it afterwards.
Yes having it force close like that should work but it will stop anything that is being done to the card so if it does a transfer behind the scenes it will stop that
I don't have a Mac but being BSD/Posix based you could try
# sudo fuser -m /dev/disk2s1
/dev/disk2s1: 1024
Being 1024 de PID of the process or procesess who is (are) using the device.
# ps auxw|grep 1024
yield 1024 0.0 0.0 4624 1244 ? Ss Apr15 0:00 /bin/sh /usr/bin/startkde
You can close the app or just kill the app using the PID
any fixes plz?
Try using the -f syntax that Justin showed
From what I have read, this seems like a valuable program to save and use.
Or you can recover any type of file using foremost. Seriously, this is like pulling out a can opener when you've got a Swiss Army Chainsaw™®©. (Patent Pending)
I wish this worked on a messed up computer hard drive =\ I do photography and my newish computer crashed for no reason ( I don't use it other than photos and Facebook) it will run till startup but it stops with the windows logo that's as far as it will go sad I lost 4 thousand pictures
Simple solution. If this is a desktop take out the hard drive and attach it as extra drive on another computer and the computer will see the drive and you can go in and remove the files, transfer them over, ignoring old Windows. Other option, get an external HDD housing with the cables to connect your hard drive as an external USB device. that'll work if its a laptop drive easiest.Just do the removals with computer off.
it's easy.
How do you do that with the computer off? It's a laptop hard drive... Is there any way you could give me a step by step I'm not that good with this stuff!
<sigh> this site lost my long reply...... OK here it goes again:
You need a Hard drive housing or HDD adaptor like this one for example http://www.newegg.com/Product/Product.aspx?Item=N82E16812119152 or a HDD housing with adaptor cables like this http://www.newegg.com/Product/Product.aspx?Item=N82E16817392032 main thing to make sure is it has to be able to house or attach to your 2.5" Laptop HDD. Any computer parts store will have these between $10-20. Then you need to turn off your laptop, remove the HDD (see video https://www.youtube.com/watch?v=8U23F8JuKKE ). Tools, a fine set of screwdrivers. Dot it on a table not on carpets to avoid static shocks. remove the drive, put it into the new housing or attach adaptor cables. then plug it in to power source as often is needed, you will hear the drive start to spin noisily, attach the UBC to a different running computer. You have one large sized flash drive now and can much thru window folders endlessly to find all of your stuff under various users. If you have any buddies who have built/fixed computers of done this ask them for help. Its pretty simple and you should be up and moving files within a few minutes..... good luck. Google is your friend with stuff like this. Take our hour hard drive and take a photo before going to a store to show them the label size, Serial ATA or SATA is the info they need and a pic of the connectors side is best. PS be super careful for the pins, they are fragile so be patient attaching the cables to them...that's the most important thing. They only go one one way so study the shapes.
will this work for a Flash Drive? I have one that has a bunch of pics on it that I want to retrieve, but it not recognizing it and wants me to re-format, which I know i will lose EVERYTHING on that flash drive.
THANKS
This should work on a flash drive as well! It's all memory.
Don't reformat it though as you will lose everything on the drive.
This is all fine and dandy for flash cards and memory cards, but unlike what it says on the title, there is nothing here for "damaged hard drives."
I would love to find a way to get my photos off of a hard drive that doesn't seem to work instead of having to pay 1500 dollars or more and intrust my drive to a company that's not even in state.
It could work on cards and hard drives with damaged file directories, since PhotoRec ignores the file system altogether. But if it's a super-damaged hard drive with bad sectors, you might consider cloning the drive first with TestDisk, then using PhotoRec on the cloned disk to recover any photos. I'm not entirely sure if it would work, since I've never done it, but there's more info at this link if you want to research more.
Ive got a hard drive the dell messed up putting in and it was not screwed down to the computer and all the extra vibrations from it moving around friend it. Wouldnt turn on or anything when still in the computer. I still have it in my dresser is there anyway to recover that stuff? This write up seems like you still need the drive functioning
i didnt find it usefull.i wanted to recover files from a usb.it scanned completely,but is telling that 0 files recovered.and neither it is being got registered
Hello, I've made a iPhoto book about a year ago and edited it many time and then my computer got wiped.. is there any way i can find the old book i was making? It took me a really really long time to make and i lost all my old pictures that were on the book, so that book is the only way ill have everything back. Can i find the book again by any possible chance?
Hi! I recovered photos and videos successfully but the videos are all in black. I have a Mac Book Air 1.3 GHz Intel Core i5 with 4 GB 1600 MHz DDR3. Do you know whats happening? Those are videos taken with a GO Pro camera. Or maybe, someone must know one software to correct them...thanks!
Hey! plz help i can't do it.
Share Your Thoughts