


As we're all aware, recon is vital to a successful hack. We need to know everything we can about the target in order to perform the best possible attack. Port scanning is a basic recon concept that is introduced very early in learning proper reconnoissance.

The issue with port scanning is that is makes a lot of noise. Every connection to every port will be logged. This is where stealth scanning comes in. Also known as SYN or half-open scanning, stealth port scanning is a bit quieter, and is less likely to be logged as a connection attempt. Now, before we get into building our scanner, we'll need to cover a couple things to really understand how it works.
The TCP Three-Way Handshake
When establishing a connection with TCP, a three-way handshake takes place between the server and the client. First things first, there are many flags that can be marked in a TCP packet. The three that will really be of relevance today are SYN (Synchronize), ACK (Acknowledgment), and RST (Reset).
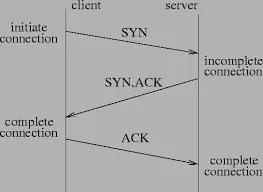
As we can see in the above diagram, the client sends the SYN flag, telling the server that they wish to establish a connection. The server then responds with the SYN and ACK flags. This tells the client that they acknowledge the connection request, and are cooperating. The server may also respond with the RST and ACK flags, telling the client that their connection is being refused. This indicates a closed port, whereas the set of SYN-ACK flags indicates an open one. Finally, the client sends a single ACK flag to confirm the latest SYN flag. Once this has been accomplished a connection is established. Now that we know how it works regularly, we can understand how to work this to our advantage.
The Concept of Stealth Scanning
Now that we have an understanding of the TCP three-way handshake, we can go over the concept of stealth scanning.
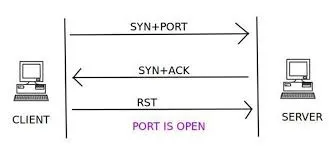
In stealth scanning, the attacker sends a SYN flag to the server. The server then responds with either a set of SYN and ACK flags, or a set of RST and ACK flags. If the server responds with RST and ACK, the port is closed, and thats it. But if the server responds with SYN and ACK, the port is open. The attacker then responds with an RST flag, terminating the connection before it is fully established. This is the concept of stealth scanning, so, without further adieu, let's get building!
Setting Interpreter Path and Importing Modules
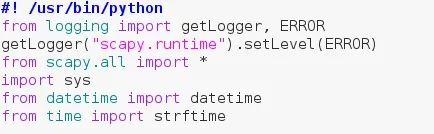
At the very top, we set the interpreter path so it knows what interpreter to use when running this script. Next we import some things from logging and set the "scapy.runtime" logger to ERROR. This will remove the "No Route Found for IPv6 Destination" error when importing scapy. Next, we import the beautiful scapy along with sys and some things from datetime and time.
Getting User Input
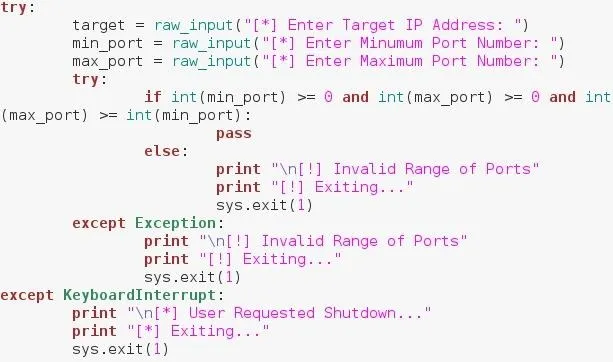
In order to keep error messages from spilling onto into the terminal, we need to be rather precise about what input we accept. We ask for the user initial input within a try, just in case the user wants to quit. We ask the user for a target IP address, a minimum port number, and a maximum port number. Now since we can't be sure of what the user entered, we have to test it. We make an if statement that tests to see if both the numbers are positive, and that the maximum number is greater than or equal to the minimum number. We place these within another try so that if our statement raises an error, it doesn't spill error onto the screen.
Setting Some Values

In this step we're just setting some miscellaneous values to use later. We make a range of numbers out of our minimum and maximum port numbers. We've added one to the max number to make the list inclusive. That means it will scan up to and including the maximum number. For example, a range of 0-10, will result in a list of numbers 0-9. Whereas a range of 0-11, will result in a list of numbers 0-10. We set the startclock value to the current time, this will be used to calculate the total scan time later. Finally, we set two values equal to the values of the SYN-ACK and RST-ACK flag sets. This is so we can reference to them later.
Check That the Target Is Up
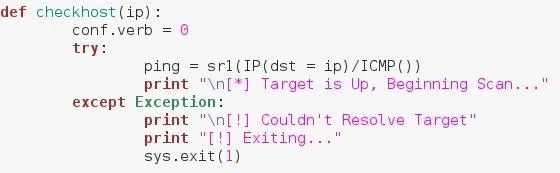
If we're going to be scanning a target, it needs to be up and running. the above function simply crafts a ping packet, and sends it to the target. If there is no error, then the target is up, if we receive an error, the target is invalid or blocking our pings. In the case that we cannot ping the target, we print that we couldn't resolve the target and we shut down the script.
Scanning a Given Port
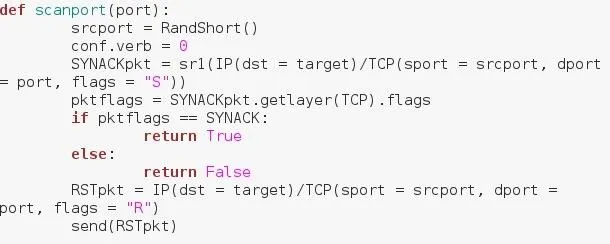
Now we define the function that will be the main function of our script. We set the srcport variable equal to RandShort(). This a function within scapy that generates a small random number to use as a source port. we set conf.verb to 0, this prevents output from sending packets from being printed to the screen. Next, we craft and send our SYN packet. We've used the sr1() function from scapy to do so. What this means is that our packet will be sent, and then the packet we receive will be assigned to this variable, SYNACKpkt now holds the values of our received packet. We then extract the flags from our received packet and assign them to a variable. We then compare them to the flag set values we set earlier, and if they match, return True, if they don't, return False. We then craft our RST packet. As you can see above we don't use the sr1() function as we did with the SYN packet. Instead, we use the send() function. This is because we don't expect a response.
Using Our Functions
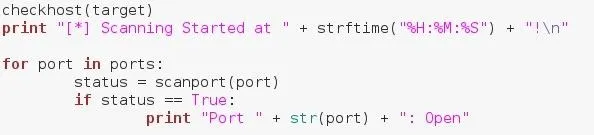
Now that we have the functions we need, it's time to put them to use! We run the checkhost() function that we defined earlier to check that the host is up, we then confirm that scanning has started. We iterate through our range of ports via a for loop, and we call our scanning function on each number we iterate through. If our function returns True, we print that the port is open, if it return false, we don't do anything.
Wrapping It Up

Now that we've finished scanning we have to tell the user that the scan is complete. We set the stopclock variable to the current time, and calculate the total scan time by subtracting the start time. We then confirm that the scan was completed and print the total duration of the scan.
Making It Executable
Now that we have our script (Pastebin Here), we have to make sure we can execute it. We can give the script execute permissions by navigating to it and running the following command...

Now that the script has execute permissions, we can test it out!
Testing It Out
We have our executable script, now the only thing left to do is use it. First we'll run nmap on our target to see what result to expect...
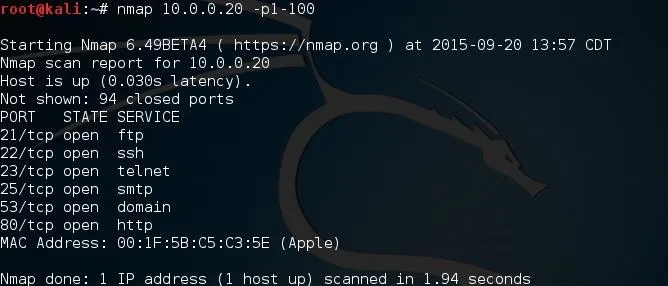
In the above result we scanned ports 1 through 100 and it returned that 6 of them were open. Now let's run our script and see if we can replicate these results!

When we execute our script we'll be prompted for some input. I've input the same target address we scanned using nmap and I've specified ports 0 through 100 for scanning. Let's enter this in and see what results we get!
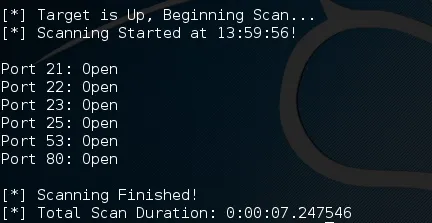
We can see in the above result that it worked! We were able to get the same results as the nmap scan! Now that we know it works, let's make sure it works as intended. Let's pull up wireshark and take a look at our packets...

We can see here that we sent a SYN flag to port 80 from port 60955. We then received a SYN-ACK set of flags confirming that the port is open. Then we sent our RST flag, terminating the connection. The script works as intended!
Now that we have our working script, we can use it to scan ports while reducing the chance of being logged. This is a helpful step towards a stealthy approach to a target.
Feedback!
Leave any comments, questions, or concerns down below and I'm sure they'll be addressed! For any of you that missed the Pastebin link earlier, here is it.
Thanks for reading!
-Defalt


Comments
Be the first, drop a comment!