


For years, PuTTy has reigned supreme as the way to establish a Secure Shell (SSH) connection. However, those days are numbered with the addition of the OpenSSH server and client in the Windows 10 Fall Creators Update, which brings Windows up to par with macOS and Linux's ability to use SSH natively.
As a beta implementation of OpenSSH, native SSH support on Windows suffers from bugs. To date, it has 207 issues reported on the GitHub page, so if you love everything pretty and polished, you may be better served by PuTTY until the bugs have been ironed out. On the other hand, if you are the sort of person that has longingly stared at people using macOS or Linux to seamlessly SSH into servers, then we're going to make your dreams come true.
Because it's a beta feature, OpenSSH doesn't come preinstalled on standard Windows 10 distributions. Fortunately, the installation process takes only a few clicks, and in a few minutes, you'll have an SSH client ready to use.
To follow this guide, you'll need a Windows 10 computer that has been fully updated. Before starting, make sure to check for and install any updates Windows may have or these steps may not work properly.
Enable Developer Mode
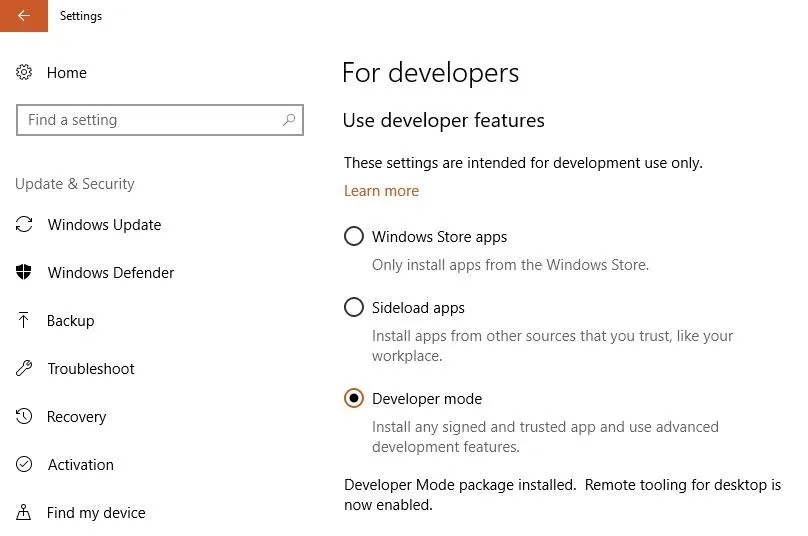
First, we need to make sure that the Windows system is set to "Developer mode," otherwise it will be impossible to download this beta feature. Navigate to the search bar on the bottom left of your screen, then search for "developers settings." It should appear under "Best match" in the results, so click on it to open up the settings.
Under the Use developer features heading, the "Windows Store apps" setting will be selected by default, but we want to select "Developer mode" instead. It should only take a few moments to install the 6 MB file and become a "Windows developer."
Install the OpenSSH Client
There are two different methods you can use to install OpenSSH, either through the Windows GUI or through PowerShell. For beginners, the first method may be easier to follow along with, but for advanced users, the second PowerShell method is probably faster.
Using the Settings GUI
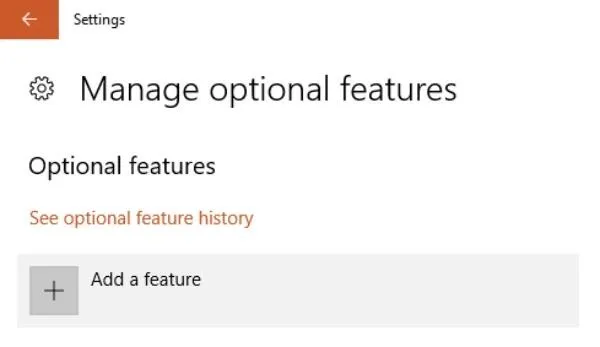
Again, go to the search bar in the bottom left of the screen and search for "manage optional features," then select the option that pops up. Alternatively, you can go to it manually from Settings –> Apps & features –> Manage optional features. Once there, click on "Add a feature" at the top of the list of installed features.
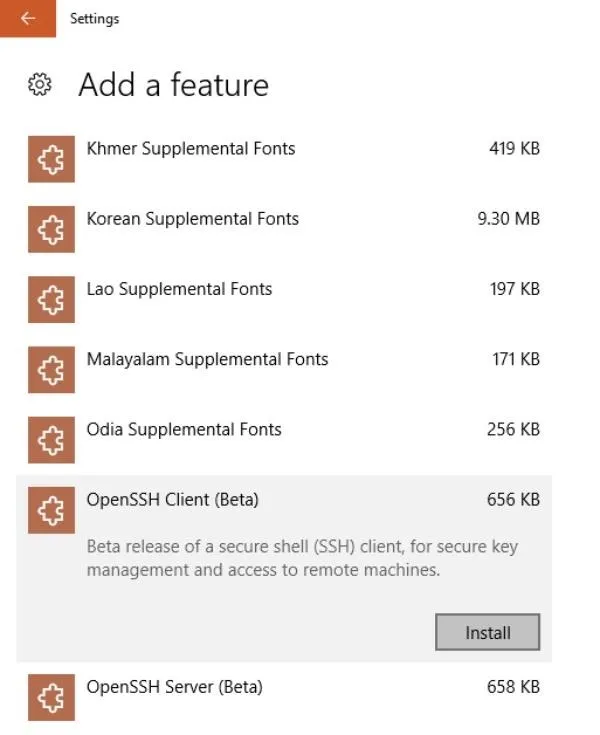
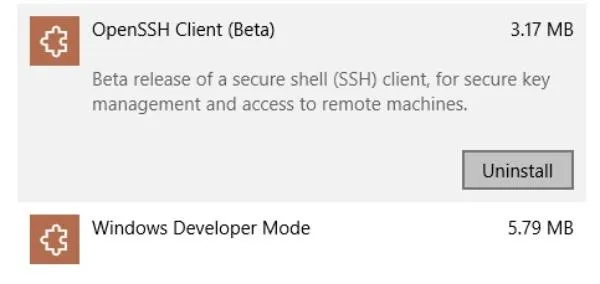
You will be presented with a list of features, most of these are specialty fonts. However, if you keep scrolling near the bottom, you should see "OpenSSH Client (Beta)." If you just want to be able to SSH into a Raspberry Pi or other servers, then the client is all you need.
From here you can also install "OpenSSH Server (Beta)," but remember that means you are opening your computer to SSH connections which could potentially be malicious. Also, installing the server takes extra steps to get working properly.
Click on "OpenSSH Client (Beta)" to download and it will expand, then click "Install." Once done, it will disappear from the list and you can then navigate backward by clicking the back arrow in the top left.
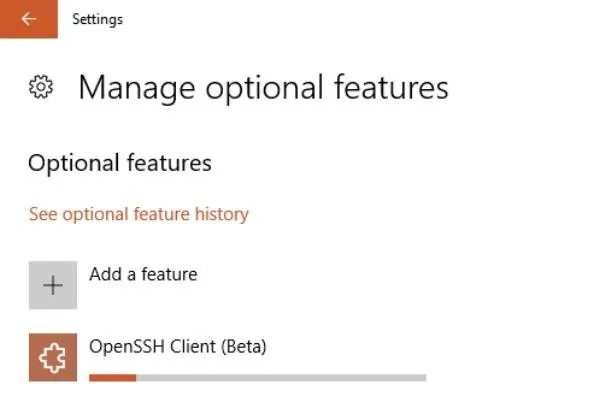
It will now appear on your list of optional features, but it may take a second or two as the system downloads the file.
At this point, everything you need to SSH is downloaded. You just need to reboot the system to use the feature. Rebooting the computer is annoying and normally shouldn't be required, but it's important with this beta version. It will not finish the installation, and won't find the ssh command when you use it in the command prompt if you don't reboot. To do so, click the Windows icon in the bottom left of the screen, then the power icon, and "Restart."
If you ever decide to uninstall SSH, you can return to "Manage optional features," click on the feature to expand it, and select "Uninstall."
Using Powershell
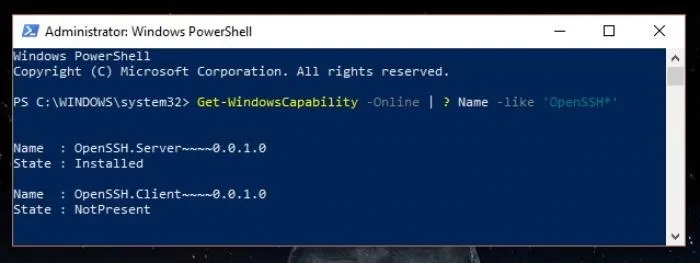
Alternatively, this entire install process can be done in PowerShell, which is faster if you are installing SSH on more than one computer. First, run PowerShell as the administrator by pressing Windows + X and clicking on "Windows PowerShell (Admin)." Then check to ensure that the OpenSSH features are available for install by running the following command.
Get-WindowsCapability -Online | ? Name -like 'OpenSSH*'
It should return something like below. "NotPresent" just means that it isn't downloaded.
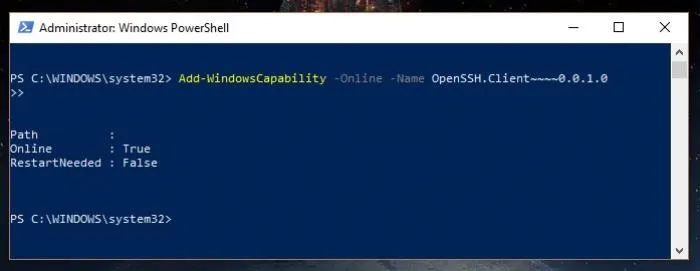
Assuming it's available, you can install the client feature with the following command. If it is not available, make sure your system is updated, and that developer mode is enabled.
Add-WindowsCapability -Online -Name OpenSSH.Client~~~~0.0.1.0
Note that the prompt may say a restart isn't needed, but it's my experience that a restart is in fact required. When the process is complete, you should see something like the screen below.
Once you've run these commands and restart, you should be ready to go.
Start Using SSH Natively
Congratulations, everything is set up for Windows to run an SSH client. Now you only need to invoke the ssh command. This command works in both PowerShell and Command Prompt, so you can use your favorite. To quickly open PowerShell, press Windows + X and then click on "Windows PowerShell" from the menu. Now, enter just ssh to be presented with the current arguments it accepts.
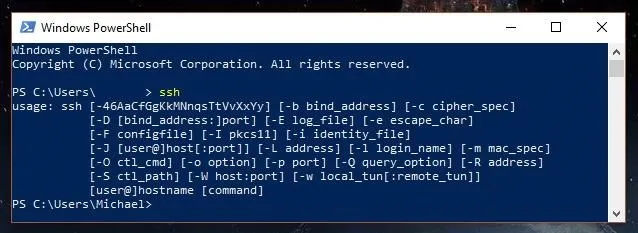
The ssh command works the same as the SSH command on other operating systems, so if you're already familiar with macOS or Linux, then you know how to use it as it's the same syntax. A more detailed explanation of each argument can be found online.
For example, to connect to an SSH server at evilserver.com with the username "Hoid," I would run the following command.
ssh hoid@evilserver.com
By default, OpenSSH attempts to establish an SSH connection on Port 22. Should you wish to use a different port, you need only to add -p and the port number at the end of your command. In the command below, we are attempting to connect to port 6666 on evilserver.com.
ssh hoid@evilserver.com -p 6666
As with any SSH client, you will receive a prompt to accept the host key the first time you connect. You will then be prompted to log in and enter the password for the user account on the remote server before you'll be able to run commands on the system. Once you're connected, you can safely disconnect from the SSH session by simply typing exit.
Many users may choose to continue using PuTTy for the time being, as it remains more stable, and most Window users are already familiar with the friendly GUI. As Windows continues to improve and implement OpenSSH as a full feature, I believe more and more people will come to use it due to its ease of use and convenience. The days of the third-party SSH clients dominating the Windows field are numbered.
Thanks for reading! If you have any questions, you can ask me here or on Twitter @The_Hoid.
- Follow Null Byte on Twitter and Google+
- Follow WonderHowTo on Facebook, Twitter, Pinterest, and Google+
Cover image and screenshots by Hoid/Null Byte


Comments
Be the first, drop a comment!