


PirateBox is a great way to communicate with others nearby when cellular and Wi-Fi networks aren't available. With it, you can anonymously share any kind of media or document and even talk to one another by voice — without being online. However, it needs a Raspberry Pi, which is more expensive than ESP32 boards, and if you only need a text-based chat, there's a much simpler option.
With a cheap ESP32 microcontroller and the ChatterBox sketch for Arduino, you can create an offline anonymous chat server for communicating with others via text. As long as they can connect to the ESP32's network and visit the server's chat page, they can leave messages for others to read, as well as see everything that's already been written in there.
Something like this might be useful for a variety of situations, such as after a disaster in an area that's super remote or as a pop-up community billboard to learn about important things going on in the area. For example, during protests and demonstrations, people can connect and provide everyone with the next steps, warn others of trouble spots or police activity, and secretly devise plans of action, among other things — all so that everyone remains anonymous.
Using an ESP32 board will keep your costs down, so there's no expensive Raspberry Pi like the PirateBox needs. Five bucks is all it takes, give or take. And it has the processing power necessary to put up a chat server and create a Wi-Fi access point to connect to it. The chat server works right in a web browser, so any device with a browser can join and participate.
What You'll Need
To follow along with the guide below, you'll need to have Arduino IDE installed on your computer. You'll also need an inexpensive ESP32-based microcontroller. Some ESP8266 boards may also work, which we've used before in other Null Byte guides. I'm using a D1 Mini ESP32 development board that's less than $4 on AliExpress. You'll also need a Micro-USB cable to connect the board to your computer to flash ChatterBox and power up the ESP32.
- ESP32 D1 Mini on Amazon | AliExpress
- Or you can get a larger ESP32 model on Amazon | AliExpress
- Micro-USB cable on Amazon | AliExpress
Install the ESP32 Board in Arduino IDE
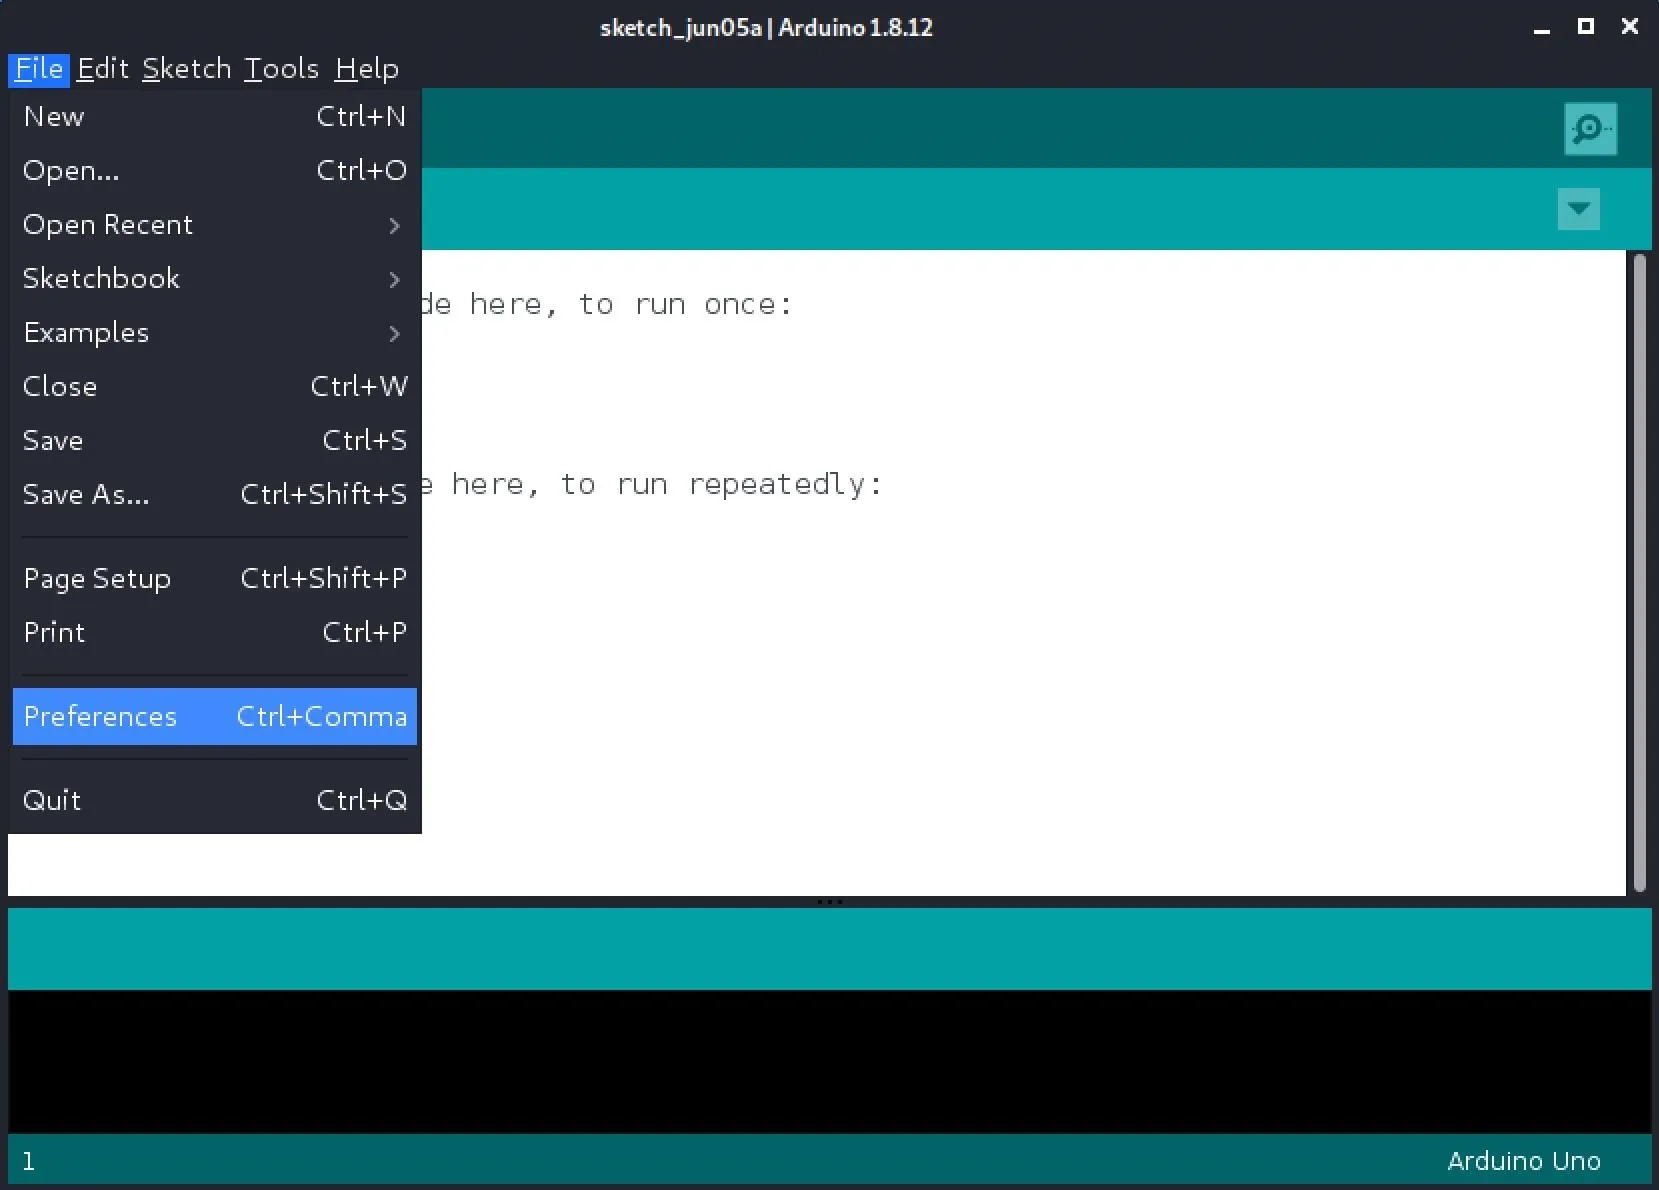
To access our ESP32 microcontroller, we need to install the package that includes all of the compatible boards. Open up the Arduino IDE program, click on "File," then "Preferences."
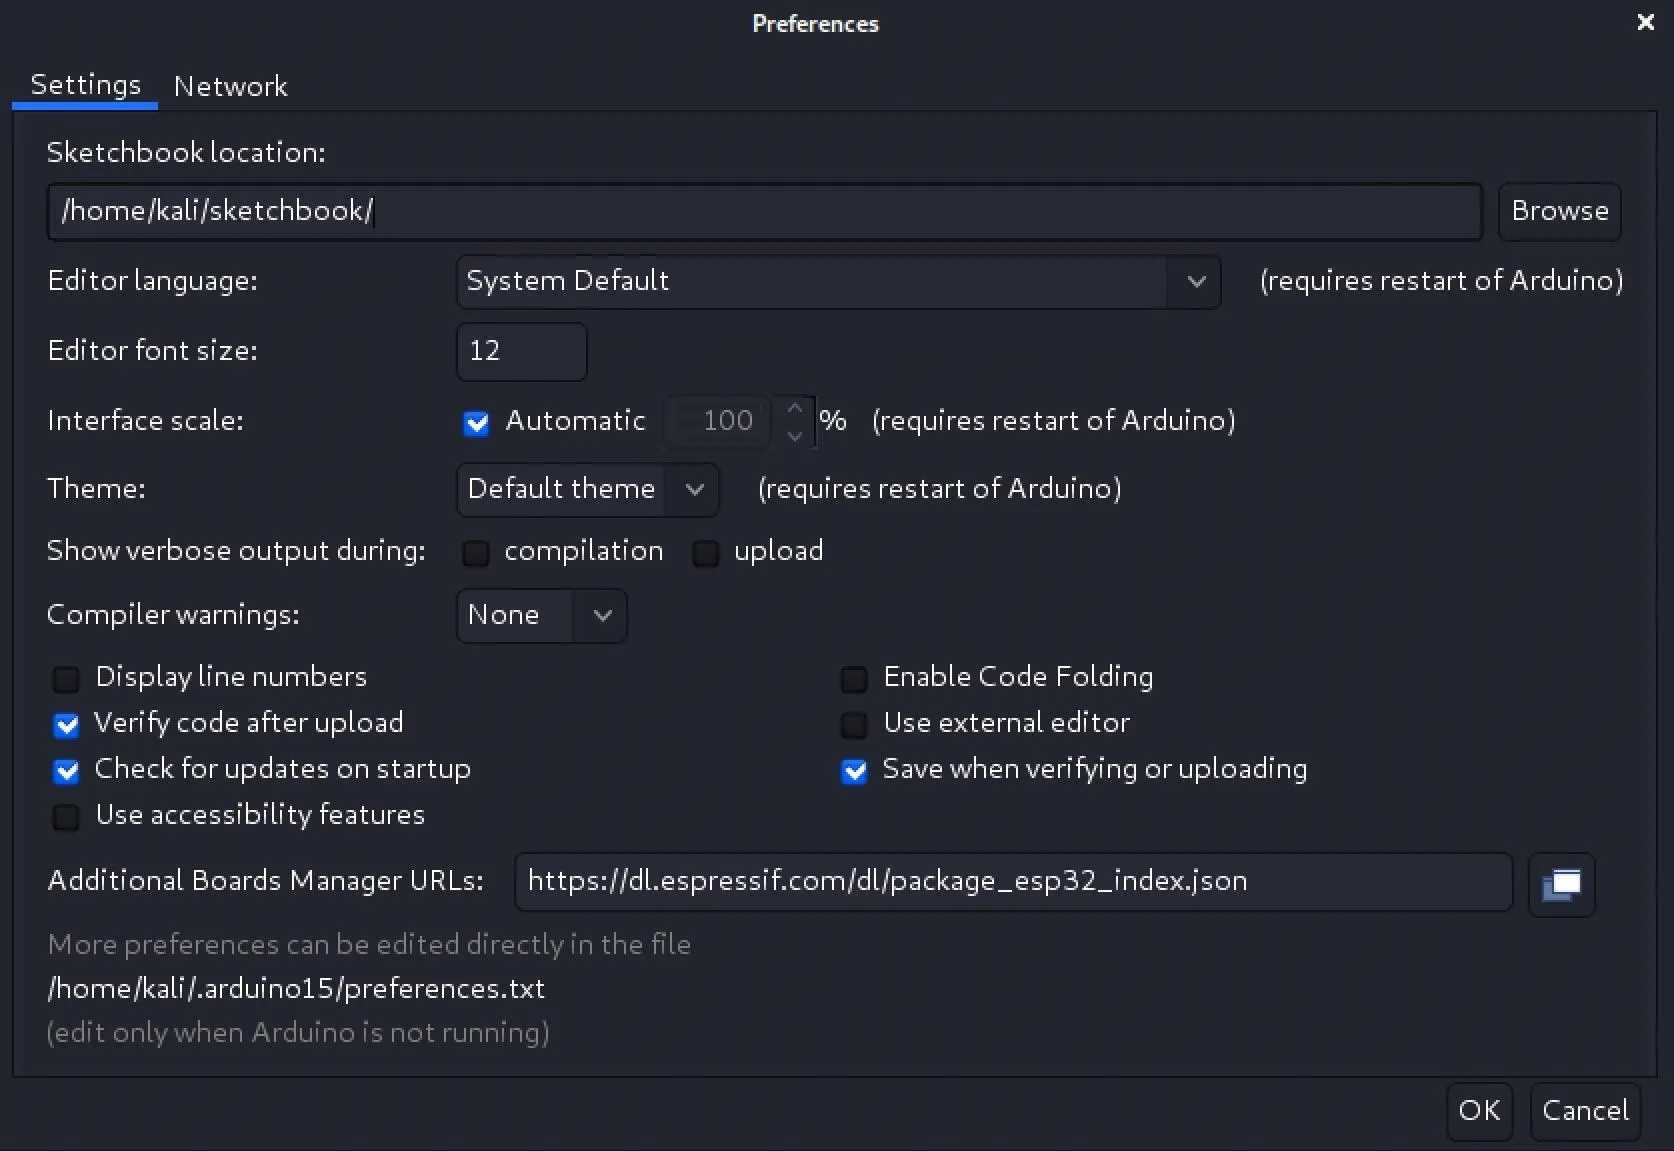
Next, paste the URL seen below:
https://dl.espressif.com/dl/package_esp32_index.jsonInto the "Additional Board Manager URLs" field, and click "OK." You may need to change the location of your sketchbook before doing so.
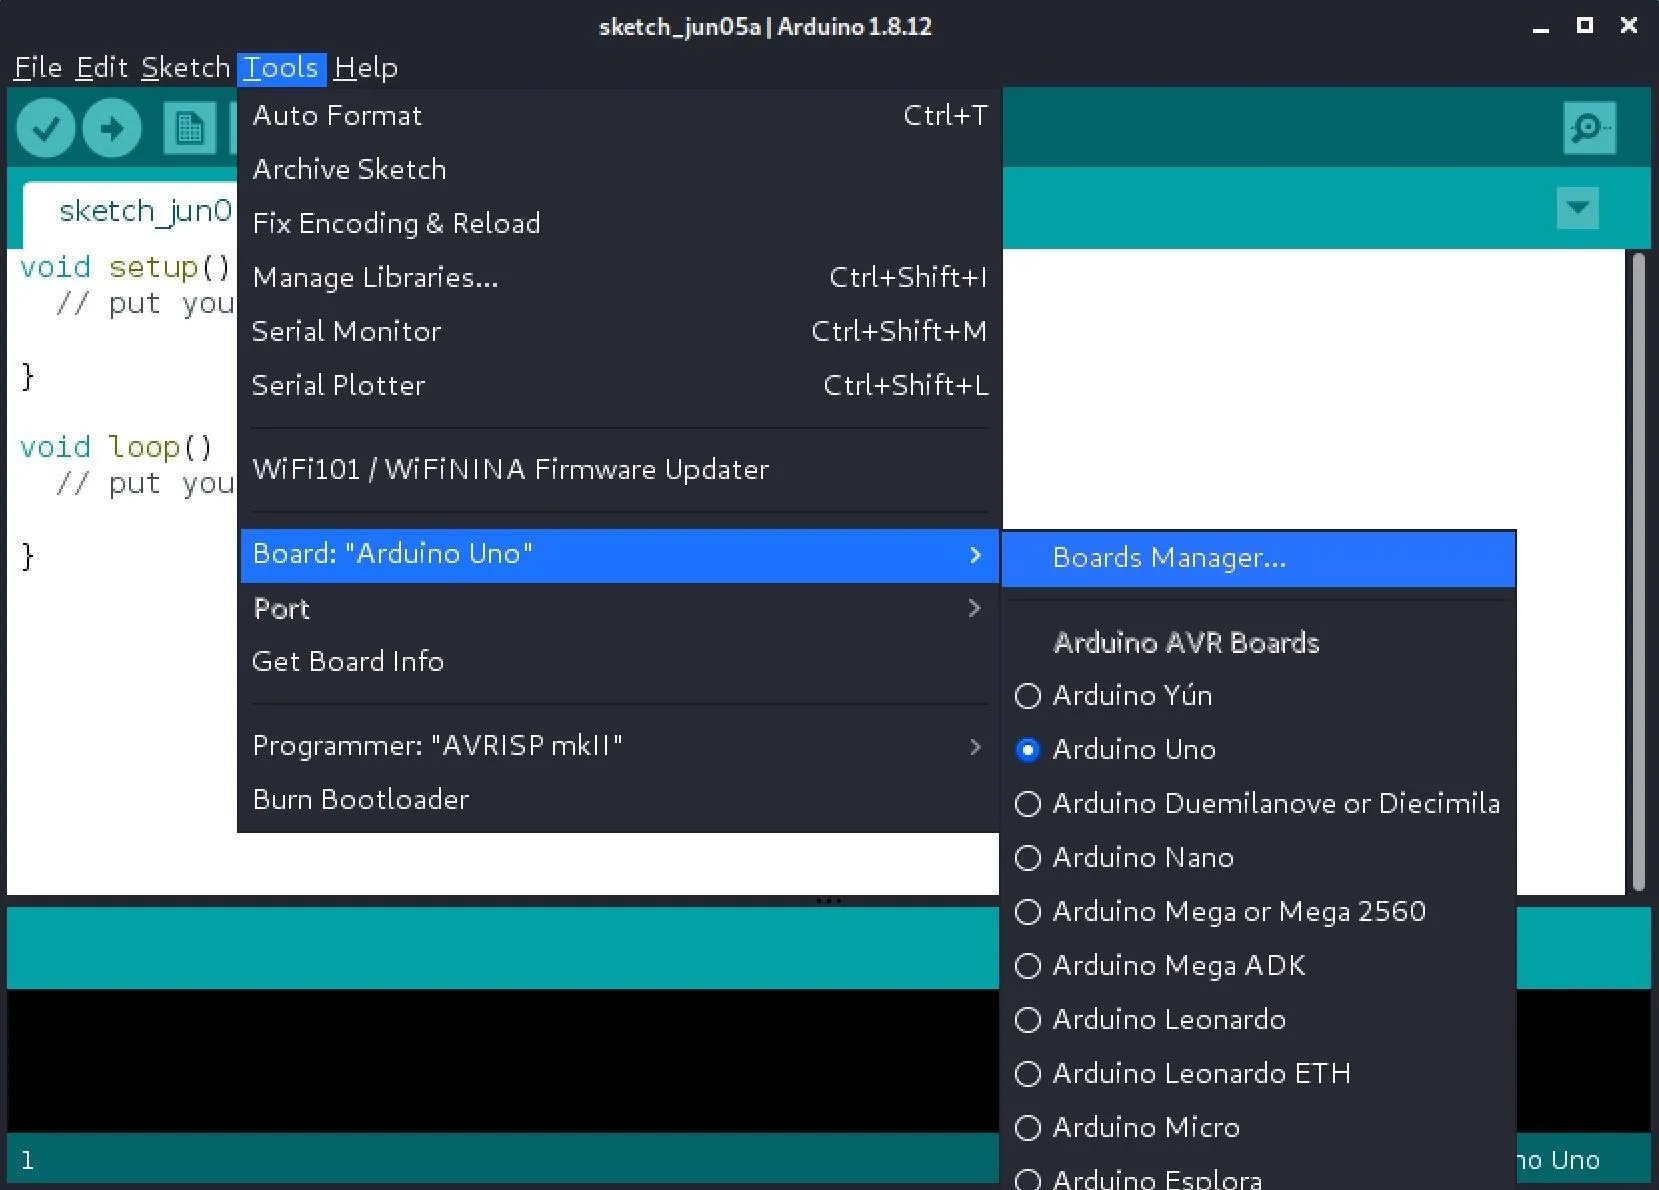
Now that we've downloaded the package, we need to install it, so go to "Tools," then "Board." In the submenu, select "Boards Manager."
Search for "esp32," then install the one we downloaded by Espressif Systems. Once it's done, click "Close" to finish.

Download the ChatterBox Program
With our ESP32 boards installed, it's time to download the ChatterBox program by fenwick67 off of GitHub. The ESP32 ChatterBox bills itself as an anonymous public bulletin board, but there are a lot of things we can use it for. To download it, use:
~$ git clone https://github.com/fenwick67/esp32-chatterbox.git

Cloning into 'esp32-chatterbox'...
remote: Enumerating objects: 31, done.
remote: Total 31 (delta 0), reused 0 (delta 0), pack-reused 31
Receiving objects: 100% (31/31), 8.09 KiB | 2.70 MiB/s, done.
Resolving deltas: 100% (12/12), done.
Now, change (cd) into that directory with:
~$ cd esp32-chatterbox
~/esp32-chatterbox$
And list its contents with ls.
~/esp32-chatterbox$ ls

build.js  clean.ino  esp32_chatterbox.ino
HTMLPAGE.h  index.html  posts  README.md
There are a few different things listed, but the most important ones are the esp32_chatterbox.ino and HTMLPAGE.h files.
Open the ChatterBox Arduino File
Now, it's time to open up the esp32_chatterbox.ino file in Arduino IDE. You can simply go to "File," then "Open," in the program, then locate and open the file. You can also use Terminal; use the following command to do so. If you're on macOS doing this, use open instead of xdg-open.
~/esp32-chatterbox$ xdg-open esp32_chatterbox.inoAs soon as it's opened, Arduino IDE is going to say that the file "needs to be inside a sketch folder names 'esp32_chatterbox'. Create this folder, move the file, and continue?" Click "OK" to do so. However, one crucial file we need did not get transferred over with it, the HTMLPAGE.h file, so we have to do that manually to make sure there are no hiccups along the way.
List the contents of the directory again, and you'll see that it created the "esp32_chatterbox" folder. That folder now contains the sketch file we opened.
~/esp32-chatterbox$ ls

build.js  clean.ino  esp32_chatterbox
HTMLPAGE.h  index.html  posts  README.md
To move the HTMLPAGE.h file to it, use the following command.
~/esp32-chatterbox$ mv HTMLPAGE.h esp32_chatterboxNow change into the esp32_chatterbox folder with:
~/esp32-chatterbox$ cd esp32_chatterbox
~/esp32-chatterbox/esp32_chatterbox$
Then list its contents to verify that the .h file was moved over correctly.
~/esp32-chatterbox/esp32_chatterbox$ ls

esp32_chatterbox.ino  HTMLPAGE.h
Adjust the Sketch if Necessary
Take a look at the sketch's code. If you want to, you can change some of the variables and customize it all if you want the HTML to look like more than just a basic interface on the finished project, but we're not worried about that right now. The only thing I'm going to do here is change the access point name on line 84 from:
WiFi.softAP("ChatterBox");To an AP name that I want people to use:
WiFi.softAP("NullByteNet");So, the full code should look like this, with whatever AP name you chose in there instead if you customized it. You can keep it as "ChatterBox," and you'd be perfectly fine.
#include <WiFi.h>
#include <DNSServer.h>
#include <WebServer.h>
#include <SPIFFS.h>
#include <FS.h>
#include "HTMLPAGE.h"

#define FORMAT_SPIFFS_IF_FAILED true
#define RECORD_SEP "\x1E"

const byte DNS_PORT = 53;
IPAddress apIP(192, 168, 1, 1);
DNSServer dnsServer;
WebServer server(80);

const char* filename = "/posts.txt";

void sendPage(){
  Serial.println("GET /");
  server.send(200,"text/html",HTMLPAGE);
}

void sendMessages(){
  Serial.println("GET /posts");
  File file = SPIFFS.open(filename, FILE_READ);
  if(!file){
      Serial.println("- failed to open file for reading");
  }

  server.streamFile(file,"text/plain");

  file.close();
}

void receiveMessage(){
  Serial.println("POST /post");
  int argCount = server.args();
  if (argCount == 0){
    Serial.println("zero args?");
  }

  File file = SPIFFS.open(filename, FILE_APPEND);
  if(!file){
      Serial.println("- failed to open file for writing");
  }
  if(argCount == 1){
    String line = server.arg(0);
    line.replace(String(RECORD_SEP),String(""));
    file.print(line);
    file.print(RECORD_SEP);
    Serial.print("New message: ");
    Serial.println(line);
  }
  file.close();

  server.send(200,"text.plain","");
}

void setup() {
  Serial.begin(115200);
  if(!SPIFFS.begin(FORMAT_SPIFFS_IF_FAILED)){
    Serial.println("SPIFFS Mount Failed");
    return;
  }

  // initialize file (not totally sure this is necessary but YOLO)
  File file = SPIFFS.open(filename, FILE_READ);
  if(!file){
      file.close();
      File file_write = SPIFFS.open(filename, FILE_WRITE);
      if(!file_write){
          Serial.println("- failed to create file?!?");
      }
      else{
        file_write.print("");
        file_write.close();
      }
  }else{
    file.close();
  }

  WiFi.mode(WIFI_AP);
  WiFi.softAPConfig(apIP, apIP, IPAddress(255, 255, 255, 0));
  WiFi.softAP("NullByteNet");

  // if DNSServer is started with "*" for domain name, it will reply with
  // provided IP to all DNS request
  dnsServer.start(DNS_PORT, "*", apIP);

  // init http server
  server.on("/", HTTP_GET, sendPage);
  server.on("/index.html", HTTP_GET, sendPage);
  server.on("/posts", HTTP_GET, sendMessages);
  server.on("/post", HTTP_POST, receiveMessage);
  server.begin();
}

void loop() {
  dnsServer.processNextRequest();
  server.handleClient();

  // type a "c" in the serial monitor to clean the database
  if (Serial.available() > 0) {
    int incomingByte = Serial.read();
    if(incomingByte == 99){
      Serial.println("overwriting file...");
      File file_write = SPIFFS.open(filename, FILE_WRITE);
      file_write.print("");
      file_write.close();
      Serial.println("file overwritten :)");
    }
  }

}
Flash ChatterBox to Your ESP32 Board
We're almost there! Now, connect your ESP32 to your computer with its USB cable, then locate it in the Arduino IDE. Go to "Tools," then "Board," and you should see a ton of ESP32 boards listed. Find your model, then click on it to select it.
The rest of these settings should mostly default to the right ones, but make sure the port is correct. In "Tools," select "Port," then change it to the correct one if it hasn't already been selected automatically.
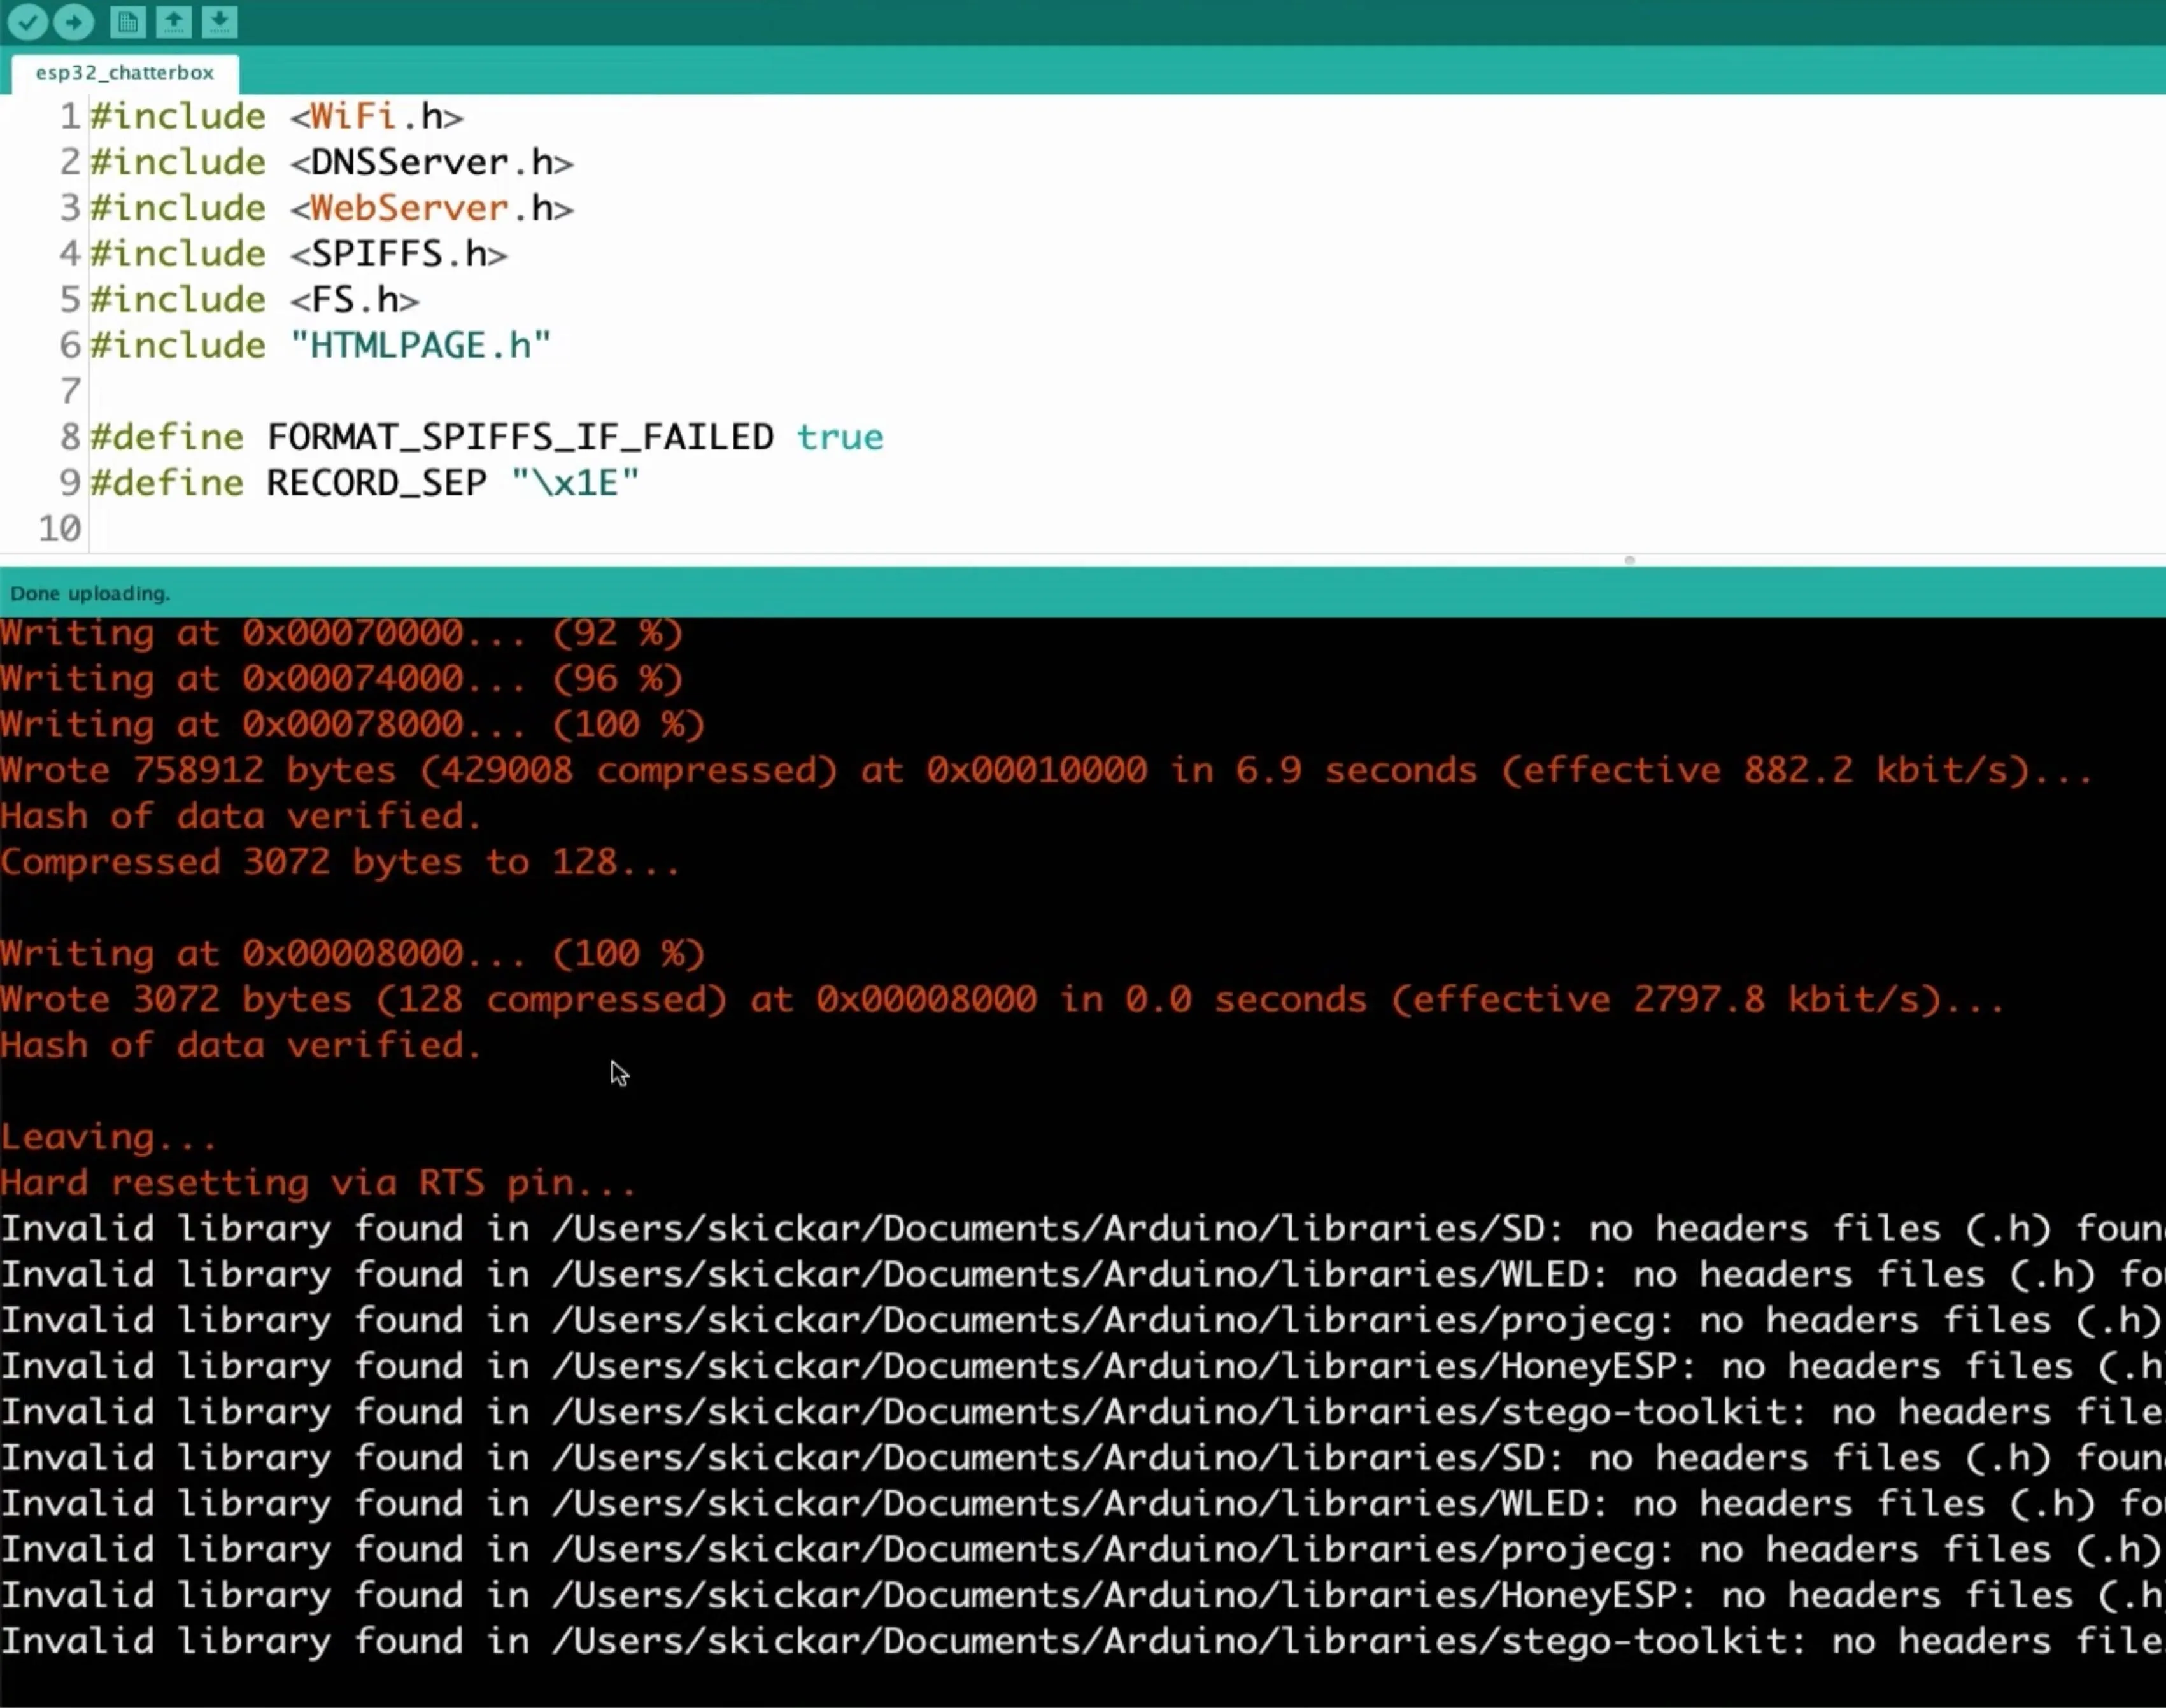
To flash over ChatterBox to your ESP32, click on the upload button (the right arrow in the top left). You'll see a bunch of stuff happen. Once the red text appears on the screen, you know it's actually flashing it over. When it's done, you can open up the Serial Monitor with Control-Shift-M to make sure there were no crazy errors or brownouts, and to look for reboots.
Scan for the Chat's IP Address
Next, run an arp-scan to locate the IP address that the chat webpage is on.
~/esp32-chatterbox/esp32_chatterbox$ arp-scan -l

Interface: en0, datalink type: EN10MB (Ethernet)
Starting arp-scan 1.9.5 with 256 hosts (https://github.com/royhills/arp-scan)
192.168.1.1 3c:71:bf:f9:e3:51   (Unknown)

516 packets received by filter, 0 packets dropped by kernel
Ending arp-scan 1.9.5: 256 hosts scanned in 1.858 seconds (137.78 hosts/sec). 1 responded
As you can see, my ESP32 is using 192.168.1.1, which is not very surprising.
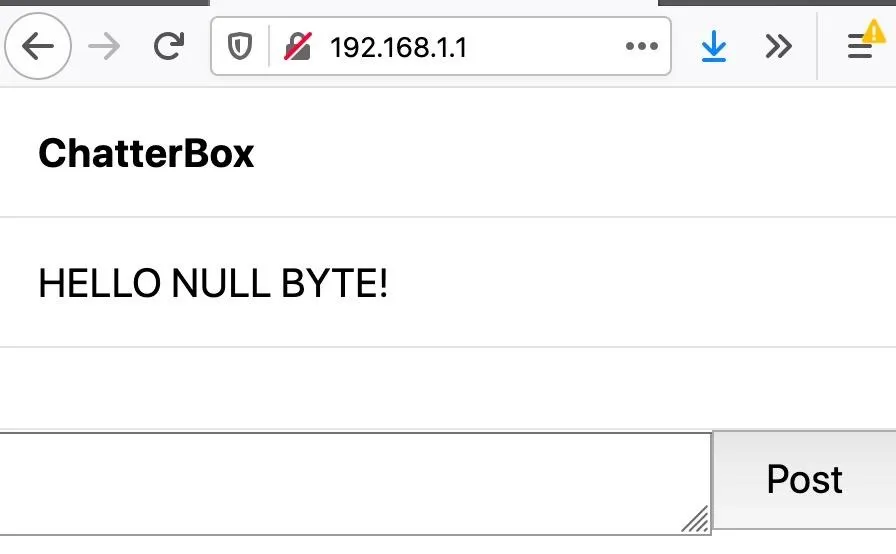
Open the Chat in a Browser
On your smartphone or computer, locate the Wi-Fi network created by the ESP32, and connect to it. Then, in a web browser window, navigate to the IP address you found in the previous step. In my case, that's 192.168.1.1. Once you open the page, you should have the ability to post and receive chat messages.
If you run into any significant issues, make sure the ESP32 is getting enough power to it. Then, get everyone else to connect to your chat so that you can all communicate anonymously.
It's a Simple but Useful Option with Little Cost
ChatterBox is not a super sophisticated chat interface, it's definitely a little buggy, and it's not the fastest. Still, if you're in an area where there's no other option, it will do the trick.
What's interesting about the chat is that there is not a lot of restrictions on how much you can type or paste, so if you wanted to put in a massive block of text, you can. If you want to clear the chat, you can from the Serial Monitor by typing (c) and hitting "Send."
As you can see, an ESP32 chat server is one way we can communicate with each other when we don't have the typical infrastructure like cell towers to get away with it technically. All you really need a microcontroller that costs five dollars, give or take, and you've got a straightforward way to send and receive messages to other people nearby.
You could leave it up in public as a dead drop, maybe in a place where people can go and leave messages for each other. That way, you have a neat way of interacting with others.
If you like the functionality of this project, you should check out our offline voice communications project with the Raspberry Pi and PirateBox. It's in a similar vein with a lot more capability, like file sharing. ChatterBox on an ESP32 is kind of like the little sibling to that project, but both have their benefits and appeal.
Cover photo by Br3nda/Flickr; Screenshots by Retia/Null Byte


Comments
Be the first, drop a comment!