Welcome back, my nascent Hackers!
In my last blog, we looked at a passive way to gather information necessary for a hack. The advantage of using passive recon is that it's totally undetectable, meaning that the target never knows you're scouting them and you leave no tracks. The disadvantage, of course, is that it's limited to only some websites and not entirely reliable.
In this tutorial, we'll look at active reconnaissance of a target with one of the best network scanning tools, nmap.

The risk with active scanning is that you will be detected and the security hardware or security admin will block any further attempts by you to pwn the site, or worse—report you to law enforcement. Nmap has multiple modes of scanning a potential target and many ways of evading detection.
Open Nmap
Let's go to our hacking platform, BackTrack, and open up nmap. To find it, go the BackTrack button at the bottom left of the screen to open up the initial menu options. Then, select BackTrack -> Information Gathering -> Network Analysis -> Network Scanners, and click on nmap.
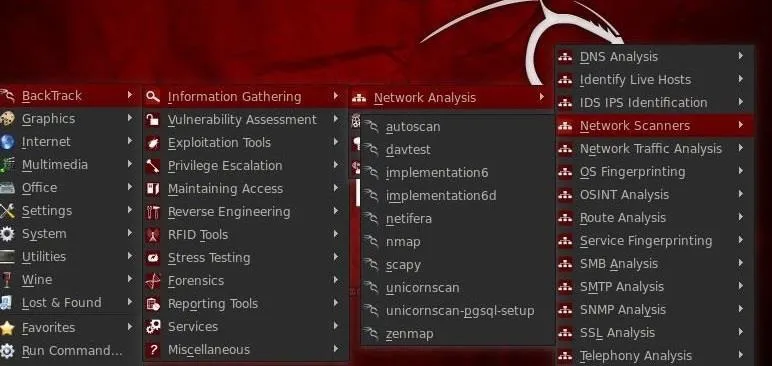
Using Nmap
When you select nmap, you'll open a screen that looks like the screenshot below.
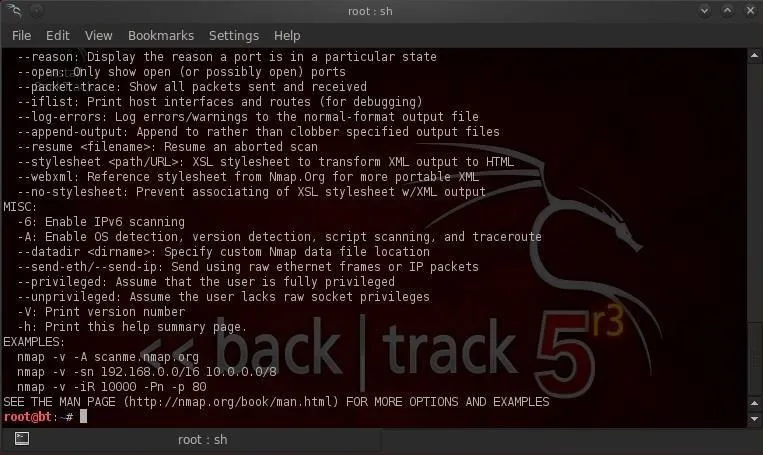
Note that it opens a Linux terminal with the help screen for nmap. Whenever you want to see the help screen, you can simply type at the command prompt:
- bt > nmap -h
You can also get the manual for nmap by typing:
- bt > man nmap
Nmap is a delightful tool for gathering information on a network or site. For instance, if we want to gather information on ESPN.com, we can type:
- bt > nmap -sT espn.com
We can see some of the output below.
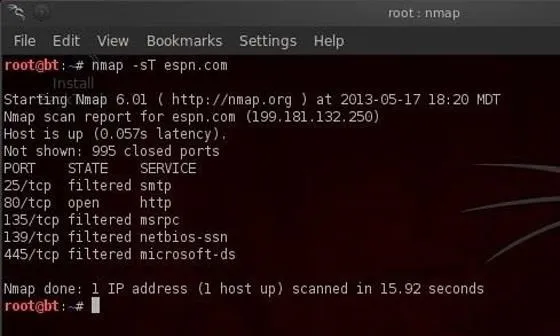
This command tells nmap to scan (-s) using TCP (T) the domain espn.com. Note that the output shows us the ports that this web server has open. With this information, we can then reasonably conclude that the default services for these ports are running on this system. In this case, this server has port 25 open (SMTP), port 80 open (HTTP), port 135 open (msrpc), port 139 open (net-bios), and port 445 (msds).
This is important information to have when selecting a hack/exploit as each hack is specific to technologies/services.
Operating System Detection
Nmap is also capable of detecting and making a guess as to what the operating system is. Type:
- bt > nmap -O espn.com
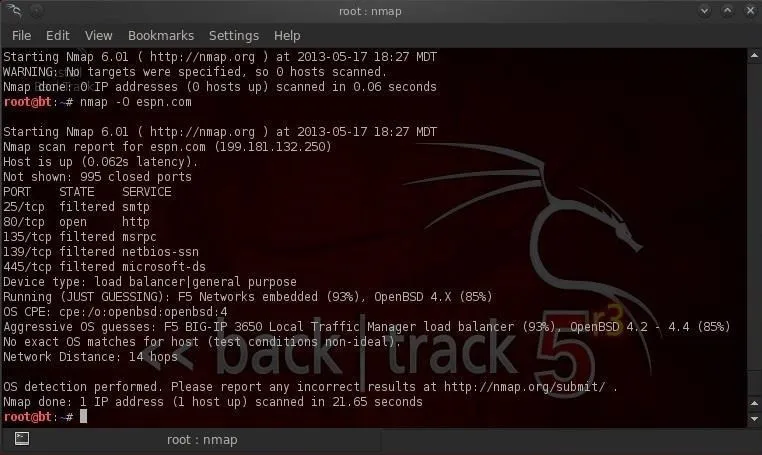
We can see from the screenshot above that nmap guessed that this site is running F5 Networks with a 93% probability and OpenBSD with a lower 85% probability.
Stealth Scan
The above scan by nmap is highly reliable, but its drawback is that it's also easily detectable. Nearly every system admin will know that you're scanning their network as it creates a full TCP connection, and this is logged with your IP address in the log files.
A more stealthy scan can be conducted using the -sS switch in nmap. This scan uses SYN flagged packets that do NOT create a connection on the target machine and therefore are not logged. This type of scan is slightly less reliable, but is much more stealthy. Type:
- bt > nmap -sS espn.com
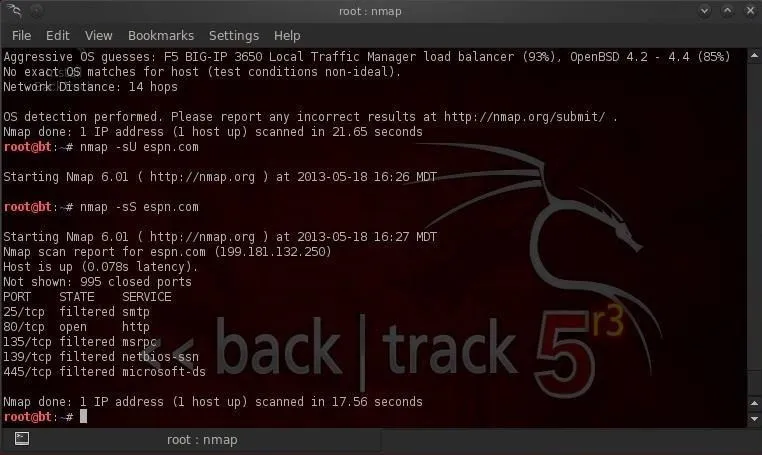
As we can see in the screenshot above, it gave us the same results without our activity being logged by the target system.
Evading Intrusion Detection Systems
Most commercial servers and websites have intrusion detection systems (IDS) protecting them. These systems look for telltale signs of malicious activity, then alert the security administrator. Scans such as ours are easily detected by these systems and can set off an alert.
However, there are numerous ways to evade these IDSs, and we'll look at one here.
IDSs usually have a threshold setting. This means that if it sees numerous packets that appear to be scans, then it will alert the admin. To avoid detection, we can simply slow down our scan below this threshold. Nmap has numerous speed settings. Here we'll use the "sneaky" speed setting. Let's type:
- bt > nmap -sS -T2 espn.com
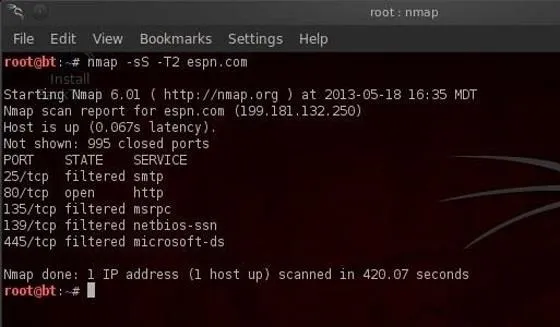
The -T2 setting tells nmap to use the sneaky speed. This scan will likely take longer, but it is much more likely to go undetected by the IDS.
One Final Note
Nmap can also be an excellent denial of service (DOS) tool. If several individuals all send packets from nmap at a target simultaneously at high speed (nmap "insane" speed or -T5), they're likely to overwhelm the target and it will be unable to process new website requests effectively, rendering it useless.
We'll continue with more reconnaissance techniques in future tutorials, so keep coming back! Until then, feel free to ask questions on this topic below, or head the Null Byte forum for any questions off topic.
Cover image courtesy of 20th Century Fox


Comments
Be the first, drop a comment!