


As penetration testers, we sometimes need to securely store customer data for prolonged periods. Bruteforce-resistant, vault-like containers can be created with just a few commands to protect ourselves from physical attacks and unintended data disclosures.
The subject of cryptography and encryption are incredibly vast and complex. Rather than diving into ciphers, algorithms, AES, hash functions, and LUKS, this article will focus more on walking readers through setting up a simple but very secure file container.
Essentially, we'll be creating a container (a file) that acts like a vault. When it's unlocked, we can store sensitive data collected during red team and post-exploitation engagements. When the container is locked, no one will be able to view files stored inside.
I'll be using Kali Linux for the duration of this tutorial. Ubuntu and Debian users will be able to follow along and should use a non-root terminal to run the following commands. The sudo command is prepended where root privileges are necessary. If you're using Ubuntu or Debian, prepend sudo as instructed.
Create a Key to Unlock the Container
To get started, we'll create a file to act as the master key to unlock the container. I'm advising against password use here because a key file will completely thwart any potential for password brute-force attacks against the container.
dd if=/dev/urandom of=/path/to/master.keyfile bs=4096 count=1

1+0 records in
1+0 records out
4096 bytes (4.1 kB, 4.0 KiB) copied, 0.000300577 s, 13.6 MB/s
The key file name is arbitrary. For simplicity, I'm using "master.keyfile" in the above example. The dd command will randomly (/dev/urandom) generate a key file of exactly 4096 bytes, which is exponentially stronger than any possible 32-character password we can think of. This key file can be saved to a USB thumb drive for safekeeping or stored on a remote server. Don't share, email, or lose this file. Without it, the container will be impossible to unlock!
Create an Empty Container
Next, we'll use dd and zero to create an empty file full of null characeters. This will allow us to create an empty container of a specified size.
dd if=/dev/zero of=/path/to/CONTAINER bs=1 count=0 seek=1G

0+0 records in
0+0 records out
0 bytes copied, 0.000190114 s, 0.0 kB/s
There are two values in the above command you'll need to change. The path to the "CONTAINER" should be named more appropriately. Something like "Vault" or "Encrypted" might make more sense — so you don't forget which file is being used to store sensitive data. Alternatively, if you were trying to disguise the container's true contents, naming it something like "TaylorSwift.mp3" and placing it in a directory full of songs might help evade passive forensics.
I'm creating a container that's 1 gigabyte (seek=1G) in size. This means we'll only be allowed to store up to 1 gigabytes worth of data inside the encrypted file. This value can be increased or decreased as needed. For example, a container 250 megabytes is represented as "250M." A very small container of 750 kilobytes is represented as "750K."
Encrypt the Container
Next, we'll encrypt the container using the below cryptsetup command.
sudo cryptsetup -y -c aes-xts-plain64 -s 512 -h sha512 -i 5000 --use-random luksFormat /path/to/CONTAINER /path/to/master.keyfile

WARNING!
========
This will overwrite data on /tmp/CONTAINER irrevocably.

Are you sure? (Type uppercase yes): YES
Key slot 0 created.
Command successful.
The cipher (-c), key size (-s), and hash function (-h) are all set to strong values and should not be modified. This cryptsetup command will format (luksFormat) the CONTAINER and encrypt it using the "master.keyfile" to lock and unlock it.
You'll be asked to enter "YES" in all uppercase (capslock) letters to proceed. This process can take several minutes to complete depending on how large the container is. A container of 100 GB in size may take up to five minutes.
Unlock the Container
When that's done, we'll need to unlock the CONTAINER to format the volume.
sudo cryptsetup luksOpen /path/to/CONTAINER PRIVATE --key-file /path/to/master.keyfileThis cryptsetup command will unlock (luksOpen) our container using the "master.keyfile" (--key-file) created in step one. The mapper point ("PRIVATE") is used for mapping (and later mounting) devices and volumes. The name "PRIVATE" is arbitrary and can be renamed to anything.
Format the Unlocked Volume
Formatting the unlocked CONTAINER will allow us to actually read and write data to the volume. There are many usable format types such as FAT32 and NTFS. I'll be using Ext4, a widely-supported and flexible Unix format. Any Debian or Ubuntu machine will be able to unlock and read files stored in the container.
Use the below mkfs command to format the unlocked container.
sudo mkfs.ext4 /dev/mapper/PRIVATE

mke2fs 1.44.3 (10-July-2018)
Creating filesystem with 261632 4k blocks and 65408 inodes
Filesystem UUID: 948eae1b-dd6d-4910-8a3c-3474488bdf0c
Superblock backups stored on blocks:
    32768, 98304, 163840, 229376

Allocating group tables: done
Writing inode tables: done
Creating journal (4096 blocks): done
Writing superblocks and filesystem accounting information: done
Mount the Unlocked Volume to a Local Directory
First, create a directory using the mkdir command. When the volume is unlocked and mounted, files in the container will be accessible in this directory. I'm calling the directory "Private" but it can be renamed to anything.
mkdir ~/PrivateThen, use the below command to mount the unlocked volume to the new ~/Private directory.
sudo mount /dev/mapper/PRIVATE ~/PrivateUsing mount is much like inserting a USB into your laptop. Kali users can access the contents by navigating to /root/Private using the File Manager.
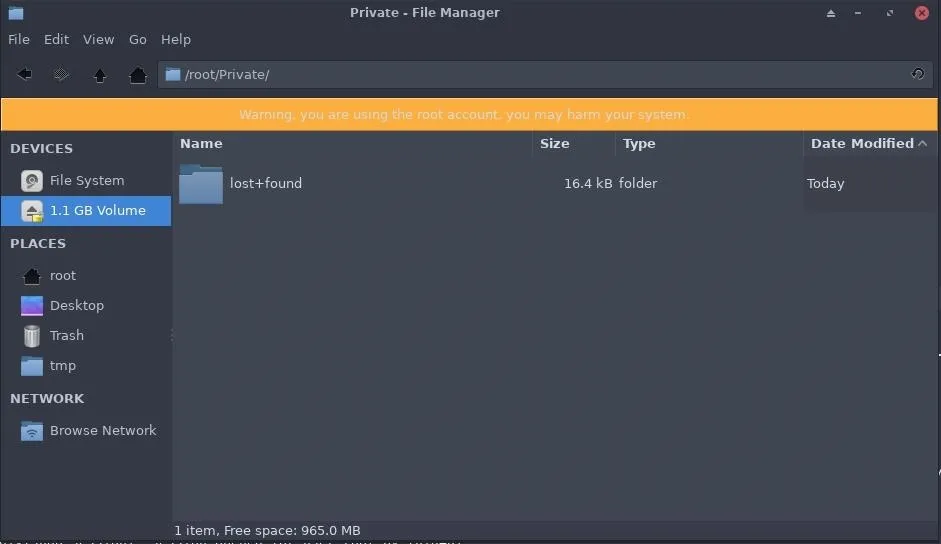
Ubuntu and Debian users can navigate to /home/
Set File Permissions
This command is especially important for Ubuntu and Debian users. Set the volume permissions so that non-root users can access data in the container when it's unlocked. Otherwise, only root users will be able to modify content in the container.
sudo chown -R "$USER":"$USER" ~/PrivateThe chown command will recursively (-R) change the permissions of the unlocked container and its contents to the current users ($USER) permission setting.
Lock the Container When You're Done
When you're done adding or deleting files in the container, use the below umount command to unmount the volume and lock (luksClose) the container.
sudo umount /root/Private && sudo cryptsetup luksClose PRIVATEUnlock the Container When You Need It
In the future, when you need to unlock the container again, use the below command to unlock (luksOpen) the container.
sudo cryptsetup luksOpen /path/to/CONTAINER PRIVATE --key-file /path/to/master.keyfileThen, mount the volume to a local directory using the mount command.
sudo mount /dev/mapper/PRIVATE ~/PrivateAutomating Secure Container Creation (Optional)
For this article, I created an interactive Bash script for automating the creation of secure containers. It will ask the user to select a container name, key file name, mount point, and specify the container size. The rest of the process is fully automated and takes less than 60 seconds to complete.
#!/bin/bash

    G="\033[1;32m";
    N="\033[0;39m";
    function notification ()
    {
        echo -e "$G" "\n[+] $1" "$N"
    };
    function nameVol ()
    {
        read -p "Name of encrypted container (e.g., "Vault", "grocerylist.txt"): " vol_name;
        if [[ ! -n "$vol_name" ]]; then
            vol_name='EncryptedContainer';
        fi
    };
    function nameKey ()
    {
        read -p "Name of Key file (e.g., "master.keyfile", "image.jpg"): " key_file;
        if [[ ! -n "$key_file" ]]; then
            key_file='master.keyfile';
        fi
    };
    function nameMount ()
    {
        read -p "Where to mount the container when it's unlocked (e.g., "luksPrivate"): " mount_dir;
        if [[ ! -n "$mount_dir" ]]; then
            mount_dir='luksPrivate';
        fi
    };
    function nameSize ()
    {
        read -p "Choose volume size (e.g., 10G, 200M): " vol_size;
        if [[ ! -n "$vol_size" ]]; then
            vol_size='1G';
        fi
    };
    function ddZero ()
    {
        dd if=/dev/zero of="$vol_name" bs=1 count=0 seek="$vol_size" && notification "Empty volume created."
    };
    function ddRandom ()
    {
        dd if=/dev/urandom of="$key_file" bs=4096 count=1 && notification "Key file successfully created."
    };
    function encryptCon ()
    {
        sudo cryptsetup -y -c aes-xts-plain64 -s 512 -h sha512 -i 5000 --use-random luksFormat "$vol_name" "$key_file" && notification "Encrypted container created."
    };
    function encryptOpen ()
    {
        sudo cryptsetup luksOpen "$vol_name" "$mount_dir" --key-file "$key_file" && notification "Volume unlocked."
    };
    function mkfsFormat ()
    {
        sudo mkfs.ext4 /dev/mapper/"$mount_dir" && notification "Volume formatted."
    };
    function mountDir ()
    {
        if [[ ! -d $HOME/"$mount_dir"/ ]]; then
            mkdir -p $HOME/"$mount_dir"/;
        fi;
        sudo mount /dev/mapper/"$mount_dir" "$HOME"/"$mount_dir"/ && notification "Volume mounted."
    };
    function volPerm ()
    {
        sudo chown -R "$USER":"$USER" "$HOME"/"$mount_dir" && notification "Volume permissions set. Don't lose the Key file!"
    };
    nameVol;
    nameKey;
    nameMount;
    nameSize;
    ddZero;
    ddRandom;
    encryptCon;
    encryptOpen;
    mkfsFormat;
    mountDir;
    volPerm
Simply save the above script to a file named "createContainer.sh," allow the script to execute (chmod), and run it using the following commands.
chmod +x createContainer.sh
./createContainer.sh
Below is a GIF of the script in action.
Encrypt All the Things!
There are many uses for encrypted containers. As a penetration tester, it's essential to store customer data in a secure location as you're working to prevent unintended file disclosures. As an every-day Ubuntu user, financial records, password files, and private photos can be easily secured using this method. With just a few simple steps, anyone can secure their data.
If you have any questions or concerns regarding any step taken in this article, please feel free to leave a comment below.
- Follow Null Byte on Twitter, Flipboard, and YouTube
- Sign up for Null Byte's weekly newsletter
- Follow WonderHowTo on Facebook, Twitter, Pinterest, and Flipboard
Cover photo by marcos mayer; Screenshots by tokyoneon/Null Byte


Comments
Be the first, drop a comment!