


If you've spotted an unintended Ethernet connection and wondered what you could do with all of the information coursing through those wires, there's an easy way to hack into it and find out.
Let's say there's a router that we need to know the password for, and we have physical access to an Ethernet connection where we can attach a Packet Squirrel, a pocket-sized tool to main-in-the-middle the network. If the router isn't using HTTPS, we can record all of the traffic over the Ethernet. Once somebody accesses the router, we gain access to the credentials to log in. Then we can do pretty much anything we want.
Requirements
Since we're using a Packet Squirrel for this demonstration, we'll obviously need a Packet Squirrel, which was created by Hak5. You can get one from its website, Amazon, or possibly another shop online.
It doesn't come with a power adapter, so we'll also need a Micro-USB cable and power source. In our demonstration, we're just plugging it into our computer's USB port, but if you want to deploy it out in the real world, you'll need a power adapter or small battery instead.
The Packet Squirrel requires just 5 volts and 150 milliamps, so you could use something as simple as an extra smartphone charger. If the drop-off won't be long, a tiny battery pack could be enough (this one comes with its own tiny USB cable!). For an extended session, a bigger battery pack with a Micro-USB cable will be necessary.
- Buy: Small battery pack for short sniffing sessions
- Buy: Small battery pack for longer sniffing sessions
- Buy: Micro-USB to USB 2.0 cable
To capture the results of the traffic we're eavesdropping on, we'll also need a USB flash drive. You can pick up any USB flash drive that you like, but the smaller the physical size, the less bulk you'll add to the Packet Squirrel. It will need to be formatted in NTFS, but we'll deal with that later.
Lastly, we need access to an Ethernet connection we have permission to sniff, as well as Wireshark to unravel the mysteries of the data we capture.
Choose the Payload
The Packet Squirrel comes with three types of payloads: TCP dump packet capture, DNS spoofing man-in-the-middle attack, and OpenVPN tunnel in or out. Since we don't want to do anything elaborate like setting up a server or making complicated configurations, we're going to use a simple TCP dump.
Hook Up the Packet Squirrel
To begin, we'll need to set the Packet Squirrel to Arming Mode, which can be done using the same switch on the device that lets you select between payloads. To do so, push the switch all of the way toward the USB port side. Next, plug the Packet Squirrel into a power source.
Next, plug in an Ethernet cable from your computer to the Ethernet In port on the Packet Squirrel, which is right next to the power port. If you want access to the internet while you're testing things out, you can hook that up via another Ethernet cable to the Ethernet Out port next to the USB port. It won't do anything terrible to you — it'll just give you access to the device via SSH.
Arm the Packet Squirrel
Now, let's see if we can access the device without any issues. In a terminal window, let's SSH into the device using its root IP address, which is 172.16.32.1 for all Packet Squirrels. Then, enter the default password of hak5quirrel to log in.
~$ ssh root@172.16.32.1

root@172.16.32.1's password: hak5quirrel

BusyBox v1.23.2 (2017-06-28 18:58:08 PDT) built-in shell (ash)

    __ (\\_          Packet Squirrel          _//) __
   (_ \( '.)             by Hak5             (.' )/ _)
     ) \ _))     _                     __    ((_ / (
    (_   )_     (') Nuts for Networks ((')    _(   _)

root@squirrel:~#
We're in! Now, let's do a quick listing (ls) to see what we have.
root@squirrel:~# ls

VERSION   payloads
Payloads is what we want, so let's change into that directory, then do another ls to see what's there.
root@squirrel:~# cd payloads
root@squirrel:~/payloads# ls

switch1  switch2  switch3
There should be three switches in there, one for each of the three payloads that the Packet Squirrel comes loaded with. If we wanted to, we could customize one or two of these switches with our own payloads, but we're just going to go into switch1, which is for the TCP dump payload, the one we want to use. Then, let's do another ls to see what's inside.
root@squirrel:~/payloads# cd switch1
root@squirrel:~/payloads/switch1# ls

payload.sh
Let's see how the payload works now. Use cat to open the file.
root@squirrel:~/payloads/switch1# cat payload.sh

#!/bin/bash
# TCPDump payload v1.0

function monitor_space() {
    while true
    do
        [[ $(df | grep /mnt | awk '{print $4}') -lt 10000 ]] && {
            kill $1
            LED G SUCCESS
            sync
            break
        }
        sleep 5
    done
}

function finish() {
    # Kill TCPDump and sync filesystem
    kill $1
    wait $1
    sync

    # Indicate successful shutdown
    LED R SUCCESS
    sleep 1

    # Halt the system
    LED OFF
    halt
}

function run() {
    # Create loot directory
    mkdir -p /mnt/loot/tcpdump &> /dev/null

    # Set networking to TRANSPARENT mode and wait five seconds
    NETMODE TRANSPARENT
    sleep 5

    # Start tcpdump on the bridge interface
    tcpdump -i br-lan -w /mnt/loot/tcpdump/dump_$(date +%Y-%m-%d-%H%M%S).pcap &>/dev/null &
    tpid=$1

    # Wait for button to be pressed (disable button LED)
    NO_LED=true BUTTON
    finish $tpid
}

# This payload will only run if we have USB storage
[[ ! -f /mnt/NO_MOUNT ]] && {
    LED ATTACK
    run &
    monitor_space $! &
} || {
    LED FAIL
}
The whole script is visible above. What it basically does is route traffic, while simultaneously dumping all of the traffic it's routing, to a TCP dump file. As you can see near the end of the script, the payload only works if there is a USB storage device attached to the Packet Squirrel.
Format the USB Flash Drive
Now format your USB flash drive. In a terminal in Kali Linux or macOS, use the following command to locate the USB flash drive, so we know we've got the right device.
~$ df -h

Filesystem        Size  Used Avail Use% Mounted on
udev              2.8G     0  2.8G   0% /dev
tmpfs             566M  1.1M  565M   1% /run
/dev/sda1          77G   47G   26G  65% /
tmpfs             2.8G   28K  2.8G   1% /dev/shm
tmpfs             5.0M     0  5.0M   0% /run/lock
tmpfs             2.8G     0  2.8G   0% /sys/fs/cgroup
VBoxSharedFolder  234G  227G  7.5G  97% /media
/dev/sdc1       124.4G  1.4G  123G   1% /media
For me, my 128 GB USB flash drive is at /dev/sdc1, so that's what I'm using. Since it's mounted, we need to unmount it before formatting it using Windows NT Filesystem, or NTFS.
~$ sudo umount /dev/sdc1Now, to format it using NTFS, use:
~$ sudo mkfs.ntfs /dev/sdc1On a Mac, you can also use Disk Utility to format the drive. Just make sure to use Windows NT Filesystem when you erase it.
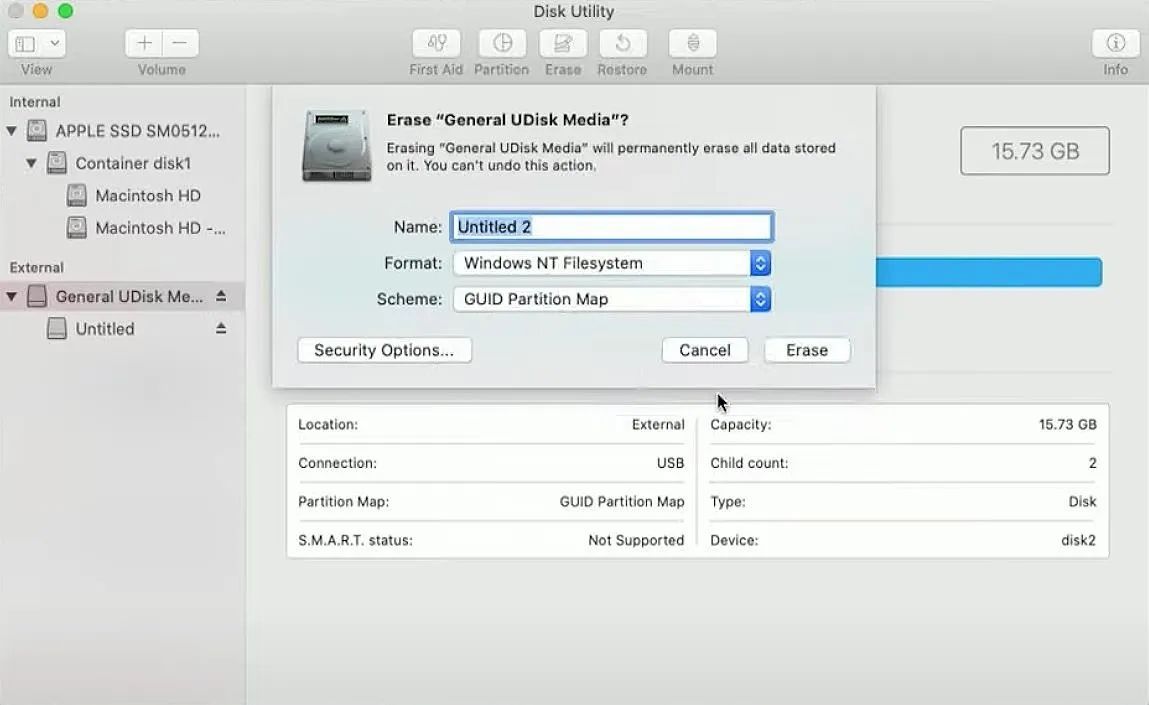
When done, eject the drive, then plug it into the Packet Squirrel.
Select the Right Payload Switch
Now, on the Packet Squirrel, we need to move the switch from Arming Mode to the TCP dump payload, which is the first switch. So push the switch all of the way toward the power port side. Then, let's reboot the Packet Squirrel by unplugging it from power, then plugging it back in.
Start Capturing Data!
Now, it should be ready for us to plug into the network we want to monitor and start capturing anyone's internet activity who plugs into the Ethernet. We should be able to see all sorts of exciting stuff, depending on what type of websites they're visiting and what services they're running. After we capture enough information using the Packet Squirrel, we can grab the USB thumb drive from it and plug it into our computer to examine what was found.
Analyze the Data with Wireshark
Navigate to the /loot/tcpdump/ directory to find all of the .pcap files the Packet Squirrel captured. These files can be viewed using Wireshark, so let's open one of them up. There should be a lot of encrypted and unencrypted data logged, the latter being mostly HTTP and DNS requests. By viewing that unencrypted information, we can figure out what the target has been up to.
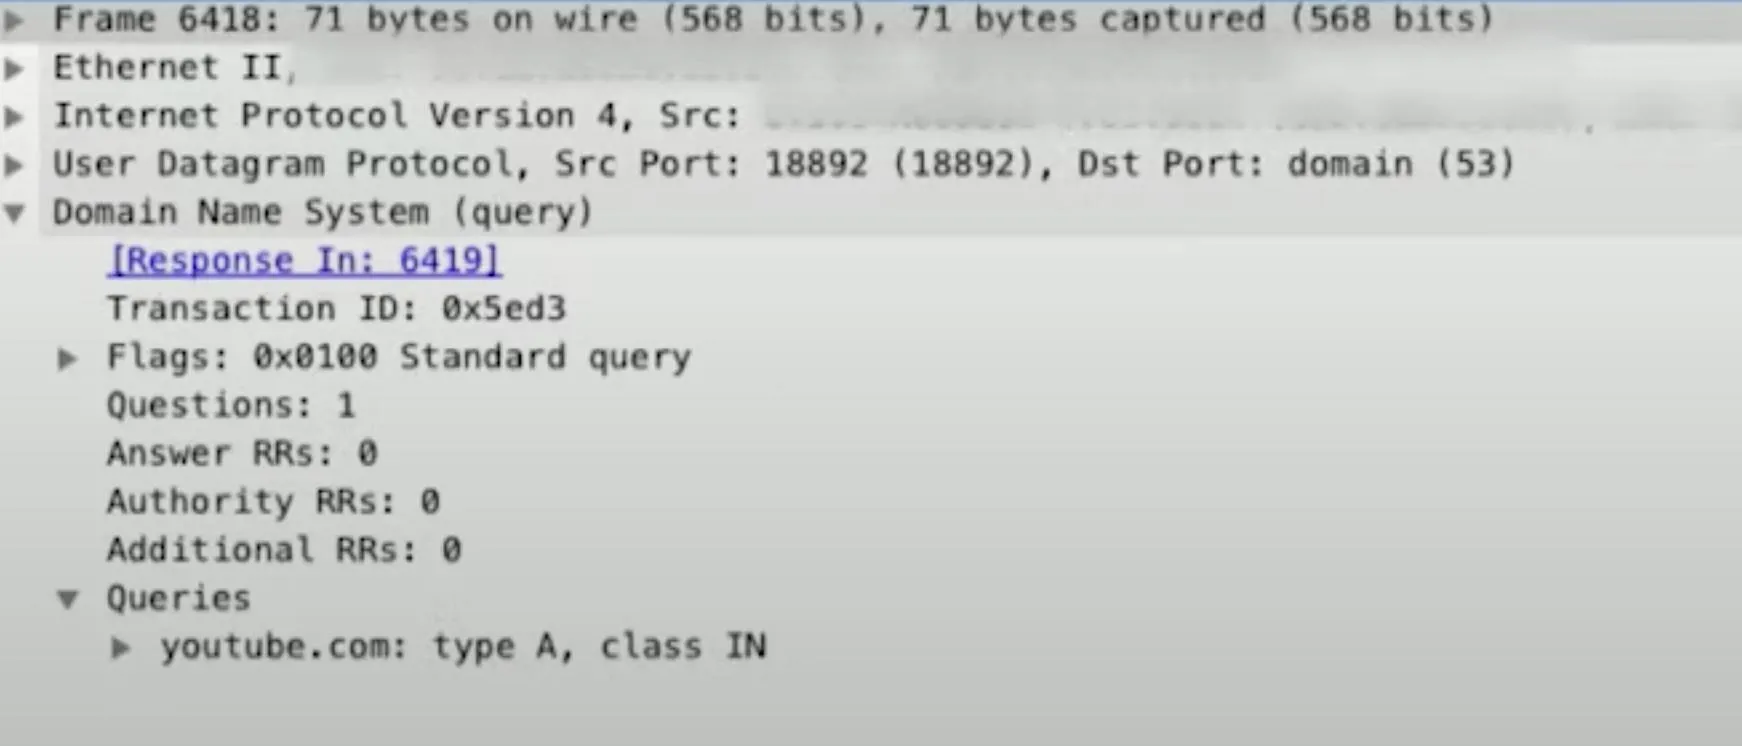
In the Wireshark search bar, type dns to see all of the DNS requests that went out. If we click on any of them, we can open the "Domain Name System (response)," then the "Queries," and we should see whether it was an automated or user query that was sent out. Then we can browse through the rest, looking at the "Queries" section of each, to see where they've been.
In the Wireshark search bar, type http to see all of the HTTP requests that went out. Left-click on any of the logged items, choose "Follow," then "HTTP Stream." That will open a new window, which will track what happened, possibly showing both sides of the conversation between the computer and server (sent and received). We can see things such as the information exchanged, the user agent, the referrer, and more.
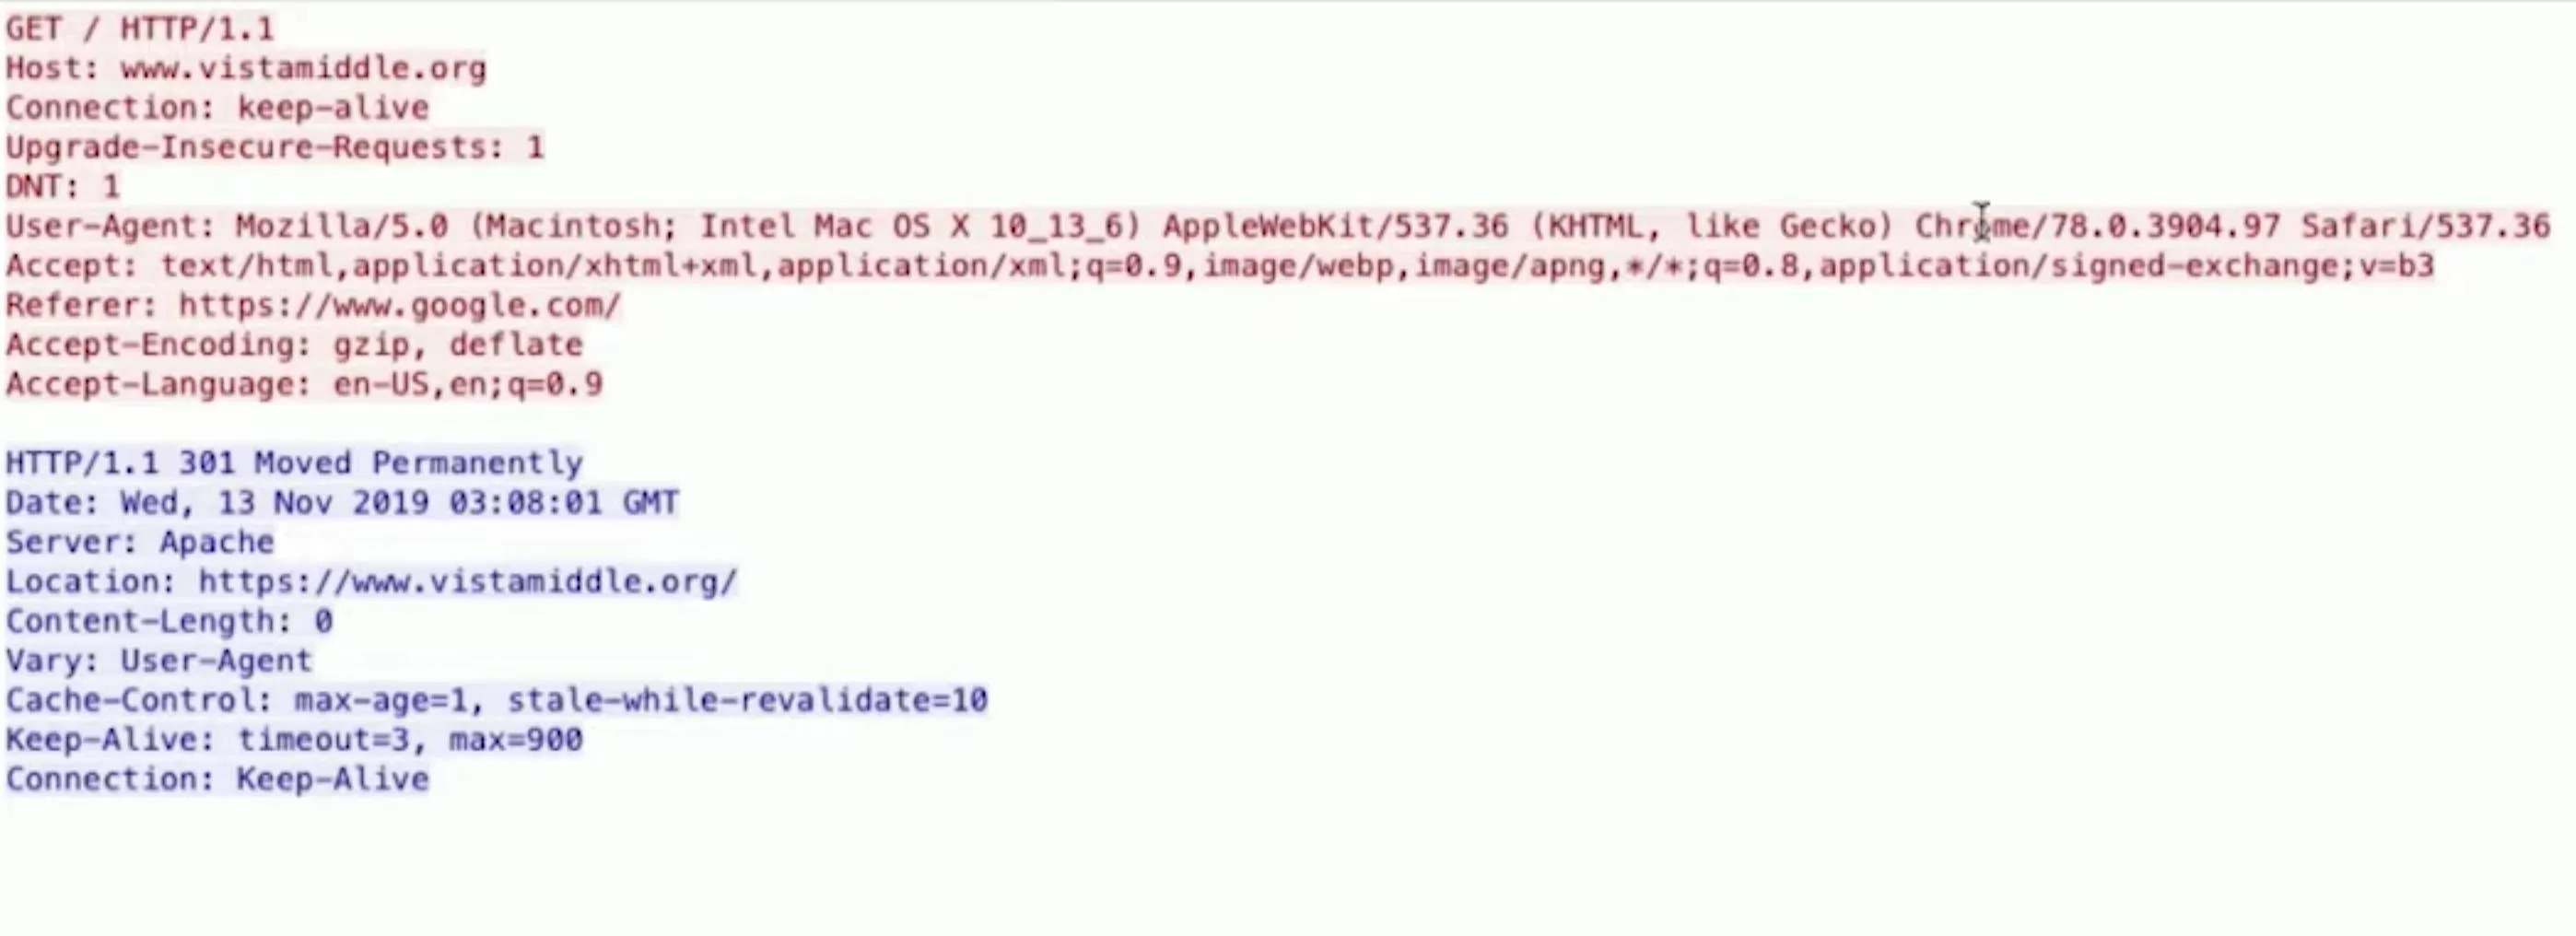
You could also search for something like http contains "vistamiddle" to see all of the HTTP requests that come interactions with vistamiddle.org. Double-click on a request to see detailed info. This is one way we can sniff for passwords to a router or to something more personal.
There Are Some Limitations
While the Hak5 Packet Squirrel is a fantastic tool for taking advantage of any unattended Ethernet connections, there are a couple of limitations that you should be aware of.
For one, when you plant it, you'll need to come back for the USB flash drive if you want to get the data. So if you only have access once, then this might not be the best tool to use.
Second, this won't be able to capture any traffic sent using a VPN, or over SSL, so there will be some things you won't be able to see. However, HTTP requests and DNS requests are all up for grabs.
Cover image via Hak5/YouTube; screenshots by Retia/Null Byte


Comments
Be the first, drop a comment!