SSH local forwarding is a must for covering your tracks and getting out there to do your work. Also called SSH tunneling, this process will put one or more steps between your machine and the machine you're working on, for security and other purposes. It can be a bit daunting for newbies to get down, and that's where Punchabunch comes in.
Punchabunch is a new SSH local port-forwarding script from Michael S. Fischer of Zendesk that will easily get you hopping away from your machine. All you need here is Linux, as in Kali, Ubuntu, or Debian. Whichever you prefer.
Get Go
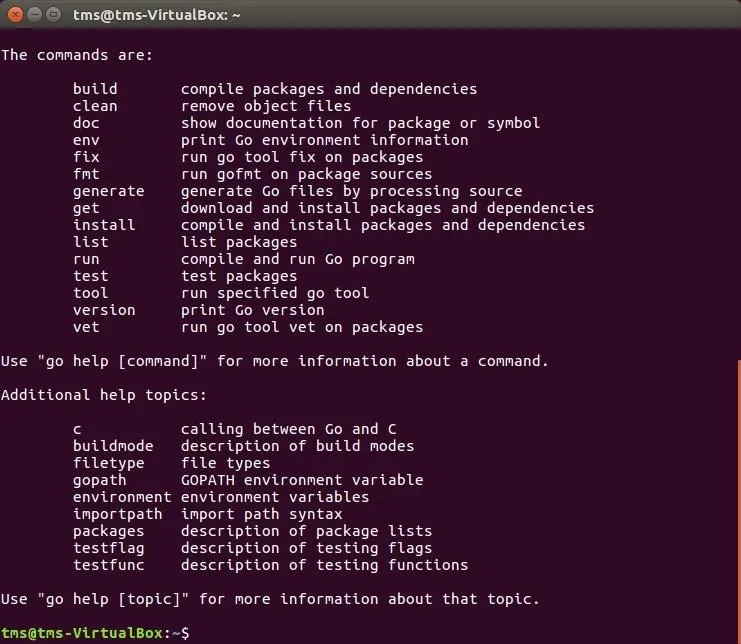
As simple as Punchabunch is, at this point, it requires you to have Google's Go or GoLang programming language installed on your system. If you're not sure whether or not you already have Go, open up your terminal, then type the go command and hit enter. If it looks like it does below, you're good to go.

If you don't see the above after typing go, you'll need to install GoLang, and it's really simple to do. Just use the following two commands to get it done.
sudo apt-get update
sudo apt install golang-go
Afterward, if you type the go command again, you should see what's pictured above.
Ready Your Go Environment
Before you can install Punchabunch, you have to get our Go environment set up correctly. To do that, you need to type a few lines into the terminal so that Go knows where it lives, and so that Go will put its apps in the right place. Enter the two lines below one at a time, so Go will live in a directory just beneath your home directory, and moving forward, you'll know where to find everything it installs.
export GOPATH=$HOME/go
export PATH=$PATH:$GOROOT/bin:$GOPATH/bin
Install Punchabunch
Now, download Punchabunch by entering the following command in your terminal:
go get github.com/zendesk/punchabunch
This will tell Go to pull Punchabunch from GitHub, and put it in the right place, which is in go/bin beneath your home directory, like mentioned earlier.
Set Up Punchabunch
With Go installed, and the Punchabunch parts living where they're supposed to be, we can easily set things up now. Change into your Punchabunch directory, which is at ~/go/src/github.com/zendesk/punchabunch, then rename the included TOML file, which is called config.example.toml, to the new name example.toml. The following command will copy the default TOML file into a new one called example.toml.
cp config.example.toml example.toml
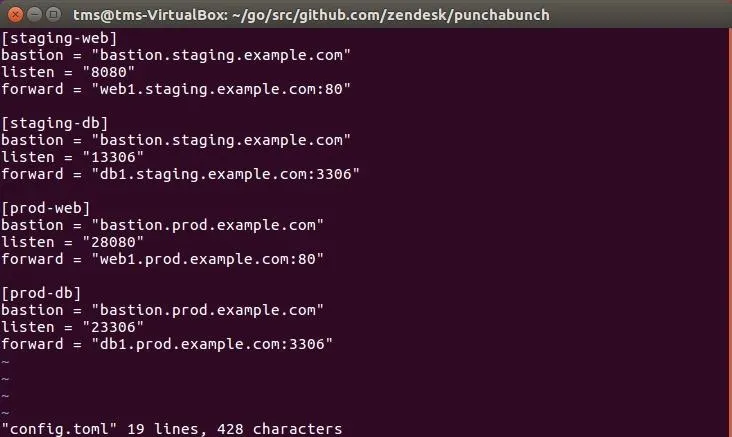
Now, open up and edit that file to populate it with your server data. I'm editing the file with the Vi editor.
Don't be intimidated by the "bastion" term you'll see. A bastion host is just a single-purpose computer designed to handle your SSH forwarding connections. You might have one or more of your own servers for this, such as in a secured corporate environment, on your own network, or another online place you use. Any computer running SSH that accepts incoming connections from you can serve as the bastion host.

Also needed are port numbers for each server, defined here by "listen." Most network setups don't usually run the traditional port for SSH forwarding, so you'll need to figure that out for your configuration.
Finally, know where you want to go after your stop at the bastion host—that's the "forward" address here.
Run Punchabunch
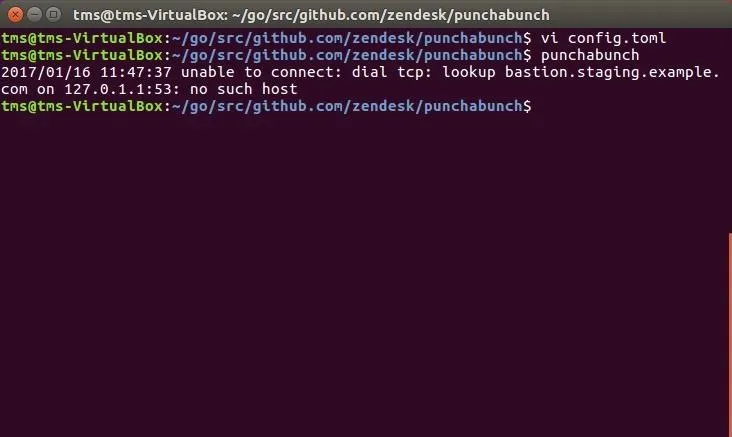
Now that you've got everything straight, and the information in place for the servers you want to hit, it's time to run Punchabunch. Remember, you're running Go now, so this will run through Go, but it will feel like a regular script because of the way we set everything up. Just make sure you're still in ~/go/src/github.com/zendesk/punchabunch to run the following command.
punchabunch
Note: I'm running the script with the default configuration, which will fail in my case, but the failure to connect will prove it's working because it tried!

To prevent this error, make sure that your settings reflect real bastion, or "jump" servers, that you actually use.
What Punchabunch Is & Isn't
To be fair, Punchabunch doesn't do anything that an assortment of other scripts can't do, it just simplifies the setup and ongoing maintenance. Remember the example.toml file? Just input whatever servers you want to use, then run it. Sure, the Go or GoLang setup complicated this exercise a bit, but now you've got the world of Go open to you, and this won't be the last time we visit Go.
- Follow Null Byte on Twitter and Google+
- Follow WonderHowTo on Facebook, Twitter, Pinterest, and Google+
Cover image and screenshots by EvilToddler/Null Byte


Comments
Be the first, drop a comment!