


No more carrying around heavy laptops and thousands of Linux Live CDs and USBs to always be ready for pentesting on the fly!
I hope you had a good Christmas and happy new year!
Update1: Added the section "weaponizing your Android" where I talk about apps and fundamental Kali tools on Android!
Update2 06/26/15: Added the some troubleshooting regarding different common errors and more useful tools. Also provided links to Complete Linux Installer and Install or Mount from XDA developers. Now has link to Null Byter FEAR's guide about NetHunter installation.
If you remember, about six months ago we talked about how to install pentesting tools on your jailbroken iDevice, and in that same article I said I would have posted about the same topic but for Android devices, if the feedback would have been positive. Since it was, here I am, a little bit late maybe.
A great feature iDevices don't have but Android ones do is being open source! This leads to lots of cool stuff like custom firmwares ecc... and we know that.
The great thing that this allows you to do, speaking about linux portability, is booting Linux both in your Android and from your Android, by physically plugging the USB cable in your computer and using an app called DriveDroid, but we'll get there later.
Edit: I have to make a little clarification here. You can with an iPhone too with tools like USB Drive and robyUSb from Cydia. I'll eventually write something about it, though switching between USB and iPhone connection is more complicated and takes more time and you'll have to install your distro with external tools (as explained in my Kali Portability guide). But with some struggles, it is possible.
Our smartphones are slowly turning into little computers, in terms of speed and processors. Because of Android being open source, more and more smartphone vendors can use Android as their product's OS. This means that Android can be found in devices that are slowly increasing their capabilities to the star. New Androids can reach 2.5 GHz of processor. And obviously, this opens the gate to Linux when talking about ARM processors.
Note: if you have a Nexus or OnePlus One device, consider installing Offensive Security's Kali Linux NetHunter. The topic is discussed after Linux Deploy and DriveDroid.
Let's give it a closer look, the requirements for today's topic are:
-Rooted Android device: although this being probably the hardest step of this article, I obviously won't be explaining this. Instead, I will be referring to WonderHowTo always updated rooting guide for any phone and tablet. I also strongly recommend you to read this lifehacker's guide to rooting, it explains quite well a few things and gives even more informations about rooting and where to find help for rooting. A few effective ways are not in the article although being very difficult and risky. If you can't root your device (probably most recent ones) with the above guide, try looking on XDA developers forum.
Disclaimer: I'm not responsible for the damage you make to your Android device by rooting it or attempting to root it. Although usually this is a pretty straight forward and secure process, it's not bug-free. If you'll be using an alternative way to root your Android device, be sure of what you are doing. If you don't know how to do this you probably don't need this, so just DON'T DO IT.
NOTE FOR NON-ROOT USERS: you might try to use a PC emulator to run Linux ISOs. Although not being the best way, everyone should first give a look to this, just to see if you are happy with that, you can stop here. Note: this did not work for me with Kali Linux and most of other OSes, all fail on boot.
The odds of successfully rooting your Android device are higher with older models. Same thing goes for the processes I'll be writing in this guide. I'll try to troubleshoot the problems that I solved while doing this, but I'm not an expert. Just know this: the more your device is recent, the more errors you'll get. I told you.
-"Linux Deploy" application (booting Linux on your Android).
-VNC or SSH client (booting Linux on your Android).
-"DriveDroid" application (booting Linux from your Android).
-"BusyBox" installed on your device. This can be accomplished in a few ways, I'll be writing them down (booting Linux on your Android).
-Optional: USB Mass Storage support (UMS). Again, if you don't know what it is, look it up. If you don't get this, you don't need to boot Linux with your Android. I'll talk about it later.
Setup done. I hope you got that this is not quite straight forward and you shouldn't do this if you don't need this.
Boot Linux Within Your Android Device (Chroot Environment)
I'll be breaking this down in steps, to make it more eye-friendly.
-A few recommendations first:
1) Be sure you have enough space on your device. Although we are going to install a very minimalistic version of Kali in this example (you can go with Ubuntu, Fedora, Arch, Debian and a few others), this is going to create a .img file. You can install the Linux distro either on your internal memory or your external SD card, we'll go trough it later. Just to be sure, 5GBs should be enough, though we are not going to use them all.
2) There will be a lot of troubleshooting along with the mainstream way to do it.
3) For those who will follow the guide installing Kali: Linux Deploy will NOT install the entire OS, but only the minimal base system. This means: you'll have to download the tools yourself. I'll be talking about some alternative ways, although the "Linux Deploy" one is the recommended one. I'll be doing a mini-tutorial on how to install metasploit. Again, if you don't need this, do't do it.
4) What does Chroot mean anyway?: Chroot means that the entire base system will be installed on your phone and Linux Deploy will only start the system. You'll need log into the SSH or VNC server started with it to actually use it.
-So: the process is, by its own, pretty simple. Start by downloading "Linux Deploy" form the Play Store, obviously after having rooted your device.
-Just for reference, this is the guide I'll be referring to (Kali Linux official website).
-Once started Linux Deploy, you'll face this first screen:

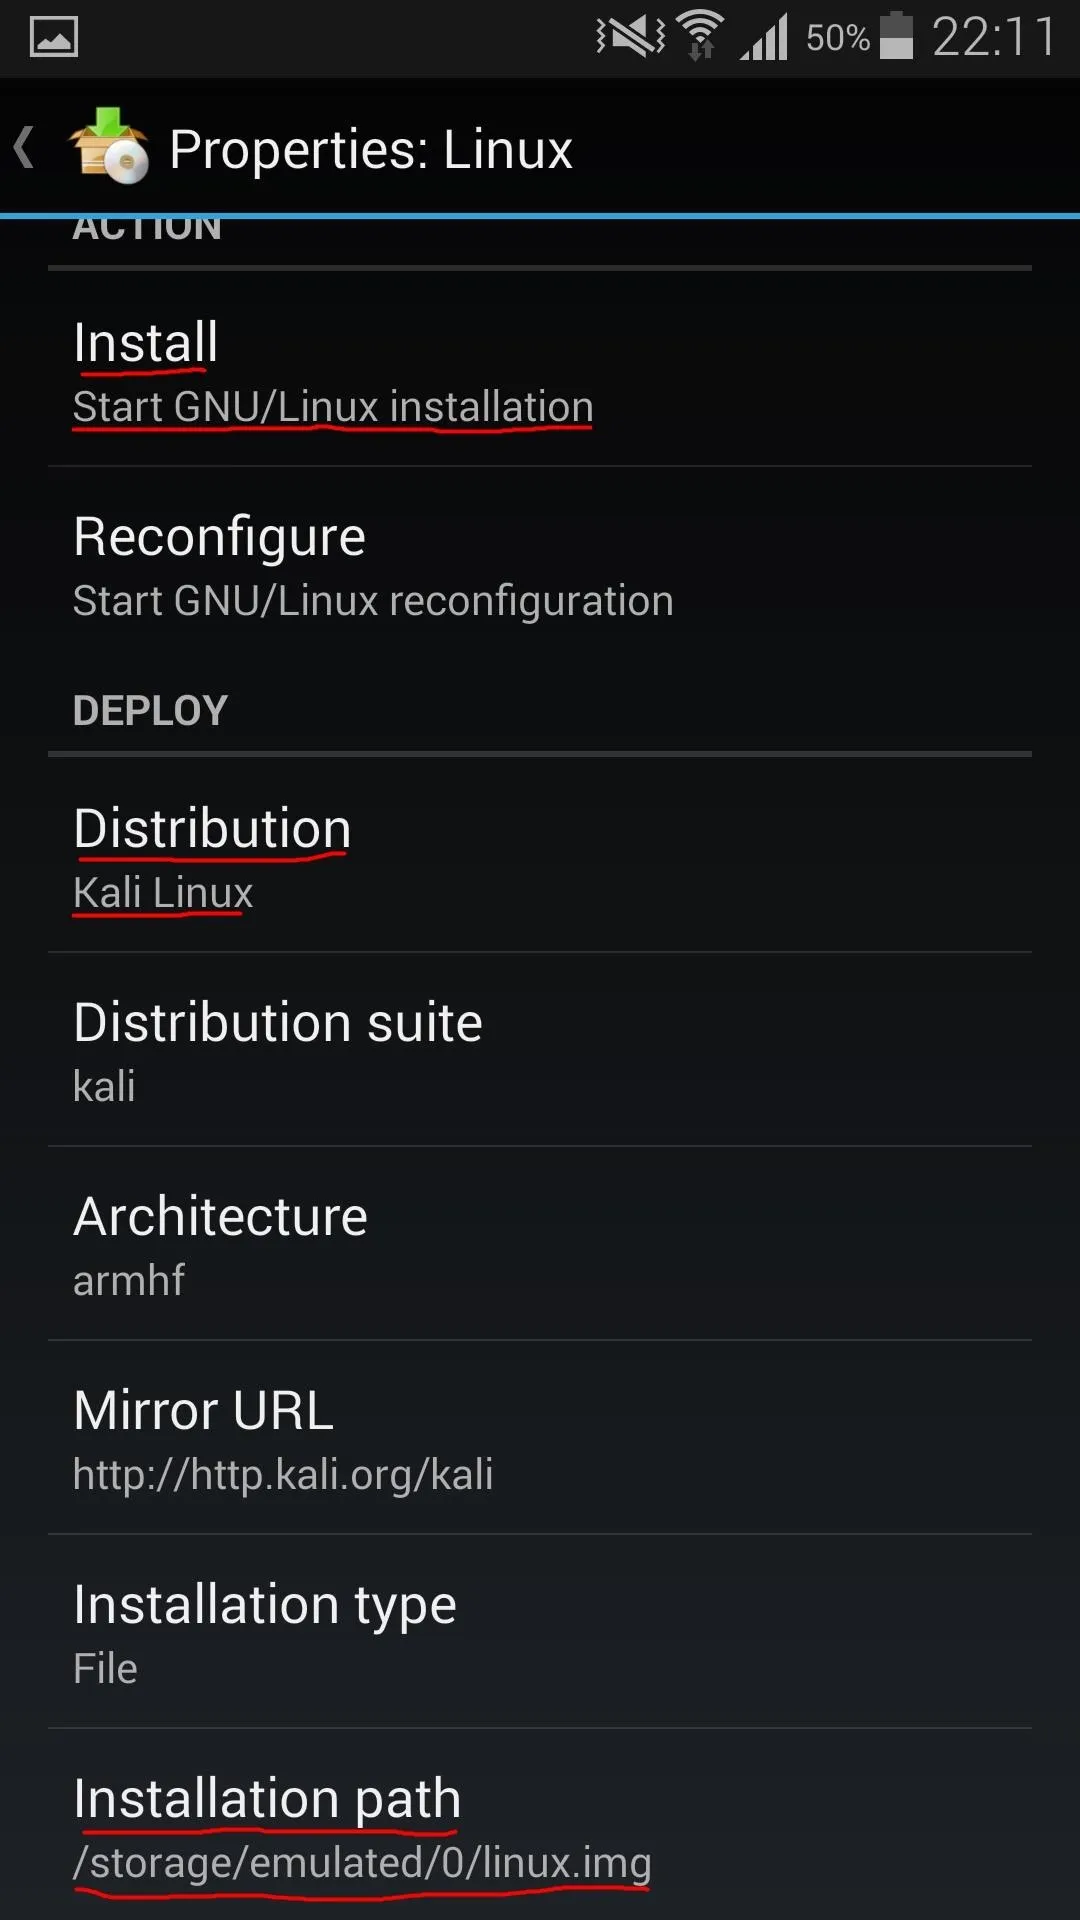
Linux Deploy Main Layout and distro settings menu
-What you need to do is click the second button from the bottom right (down arrow). The second image is the screen you'll be shown.
-Make sure your settings menu looks like mine above. You have to change "Distribution" to "Kali Linux" in order to install Kali Linux, obviously. Here is where you can choose a different distro, if you want. As suggested by Kali developers, make sure you have at least 5 GB of space free. If you want to install the image on your SD external card, just change the "Installation path" to /storage/extSdCard/YOURFOLDERHERE/linux.img (the linux.img will be created by Linux Deploy). Eventually, you can change "Localization" to en_US.UTF-8 instead of ru-'. Here you can also choose what basic tools and Desktop Environment to install (below the screenshot I posted), but the default should be fine. Again: be sure of what you are doing.
-This should be all fine, if you get any error during the next steps, don't worry, I did too, I'll post a little solution below. Click on "Install" and wait for the installation to complete. It depends on your internet connection how much time it is going to take (with a good one, 10 minutes of average). Oh and, for those who don't get it: it is going to install a Linux distro, not an application. It's heavy, DON'T use 3G, be sure you are connected to a Wi-Fi Access Point.
-If you get any error or fail message, do the below steps (not going to upload screens actually):
UPDATE: At the end, I put a troubleshooting section too, if these steps can't help you
1)Go back to main menu (first screenshot), then click the settings button (first bottom right)->Settings.
2)Make sure "ENV Directory" is set to
"/data/data/ru.meefik.linuxdeploy/linux".
3)Uncheck "Built-in shell".
4)Click on Update ENV.
5)Download "BusyBox Installer" from the Play Store. Open the application and click "Install". Be sure you are connected to a Wi-Fi eventually, and wait for the installation to complete. If you are not able to accomplish this step, follow other guides that you trust. Else, leave "Built-in shell" checked.
6)Optional: in the distro settings, choose "User name":"root".
And then try to reinstall it by clicking "Install" once again. If you need more help, ask in the comments. I told you this is tricky.
-After an "<< end" message appears, you can now start your Kali minimal system by clicking the "Start" button in the main menu. If there's no error message, we can move on.
-Choose to download either a VNC or SSH client. I prefer SSH, because the VNC GUI looks really fancy on Android, you would have to adjust too many options to get it working. SSH gives you only a terminal, but IMO it is way far better for Linux users. I recommend "JuiceSSH" as SSH client, just the first that worked for my, nothing special about it (and it's eye-candy).
-If you'd like to change the Desktop Environment, for example for the one which mostly resembles the one used by Kali Linux for PCs, go to Distribution Settings-> Desktop Environment-> GNOME (or the one you want to pick). Next time you'll log in trough VNC, the new Desktop Environment will be loaded.
-In your client, make sure type is set to "SSH", Address to "127.0.0.1" it is running on your Android device or the IP address of the device (that you can find in the main menu of Linux Deploy) if you are in a LAN. Make sure port is set to 22 (if you can't change it, it is set to 22). When you are asked for credentials, user is "android" if you did not run trough the troubleshooting section or "root" if you changed the user name when I told you. Password is "changeme", you should now be able to run commands on your Kali environment. Same for VNC (excpet for the port obviously), but you'll see it is very annoying, developers themselves say most of the people will be SSHing in it.
-If you want to mount Android places in Linux Deploy (under /mnt), go to Distribution Settings-> check "Custom Mounts"-> Mount Points-> select the one you want to mount in /mnt. This way you can access Android files, external sd card or even save files on your Android storage.
-If there's anything unclear, please refer to this guide on the XDA developers forum.
-Once done, click on "Stop" in Linux Deployer.
-To setup the system, once SSHed in Kali, run the commands: sudo apt-get update, sudo apt-get upgrade, and sudo apt-get install kali-linux -yq to install the tools.
-For example, to install metasploit, simply do apt-get install metasploit, as if you were in Kali on your computer.
-Note for promiscuous mode users: some vendors use promiscuous mode (therefore packet injection and sniffing ecc...) able wireless adapters. If your Android device can, lucky you, you now have someone who publicly hates you, me. Anyway, just figure out with iwconfig which is the wlan0 you will be using, install aircrack-ng like you were sitting in front of your computer and let your imagination fly.
For those who are too lazy to read trough the tutorial and are complaining against me because of my terrifying explanation, I linked these other two guides (except for the little troubleshooting part I added):
XDA forums and official Kali website. Just to let you know.
Whoa, this was long. Gonna take a break. See you in 1 line.
Linux Deploy Troubleshooting
I've learnt how this cool guy of Linux Deploy works now, and after having some troubles which took me very long to solve (no documentation online >.>), here I am, trying to collect all the solutions I found:
First of all, the cause of many issues is that Busybox:
Download any Busybox installer, choose to install it in /system/xbin and uncheck "Built-in-Shell" in Linux Deploy settings (with some very last udpates is seems working, not sure, however doing this is more reliable).
-Issue: sh <stdin> ".../linuxdeploy: no such file or directory":
This error is cause by Linux Deploy trying to find the sh executable in its folders and, for some reason, not finding it.
This can be easily solved by feeding another sh by symlinking:
Open a terminal:
cd /data/data/ru.meefik.linuxdeploy/linux/bin
rm sh (if any)
ln -s /system/bin/sh sh
Or, if you want to use busybox one if you have it:
ln -s /system/xbin/bash sh
-Issue: "Can't check if filesystem is mounted..." -"E: Cannot install into target '/data/data/ru.meefik.linuxdeploy/linux/mnt' mounted with noexec or nodev"
I solved randomly tweaking around and checking the box "Use built-in-shell" and "Create symlink". Not sure if this was actually the solution.
More troubleshooting here at the github issues: #60, #216
Boot Linux Directly from Your Android Device
-We are going to use the application "DriveDroid". This time you won't need BusyBox or else. The process is definitely easier, although you might encounter troubles during it, mostly in terms of compatibility. One thing at the time.
-Download and install DriveDroid from the Play Store. This should be the main layout:
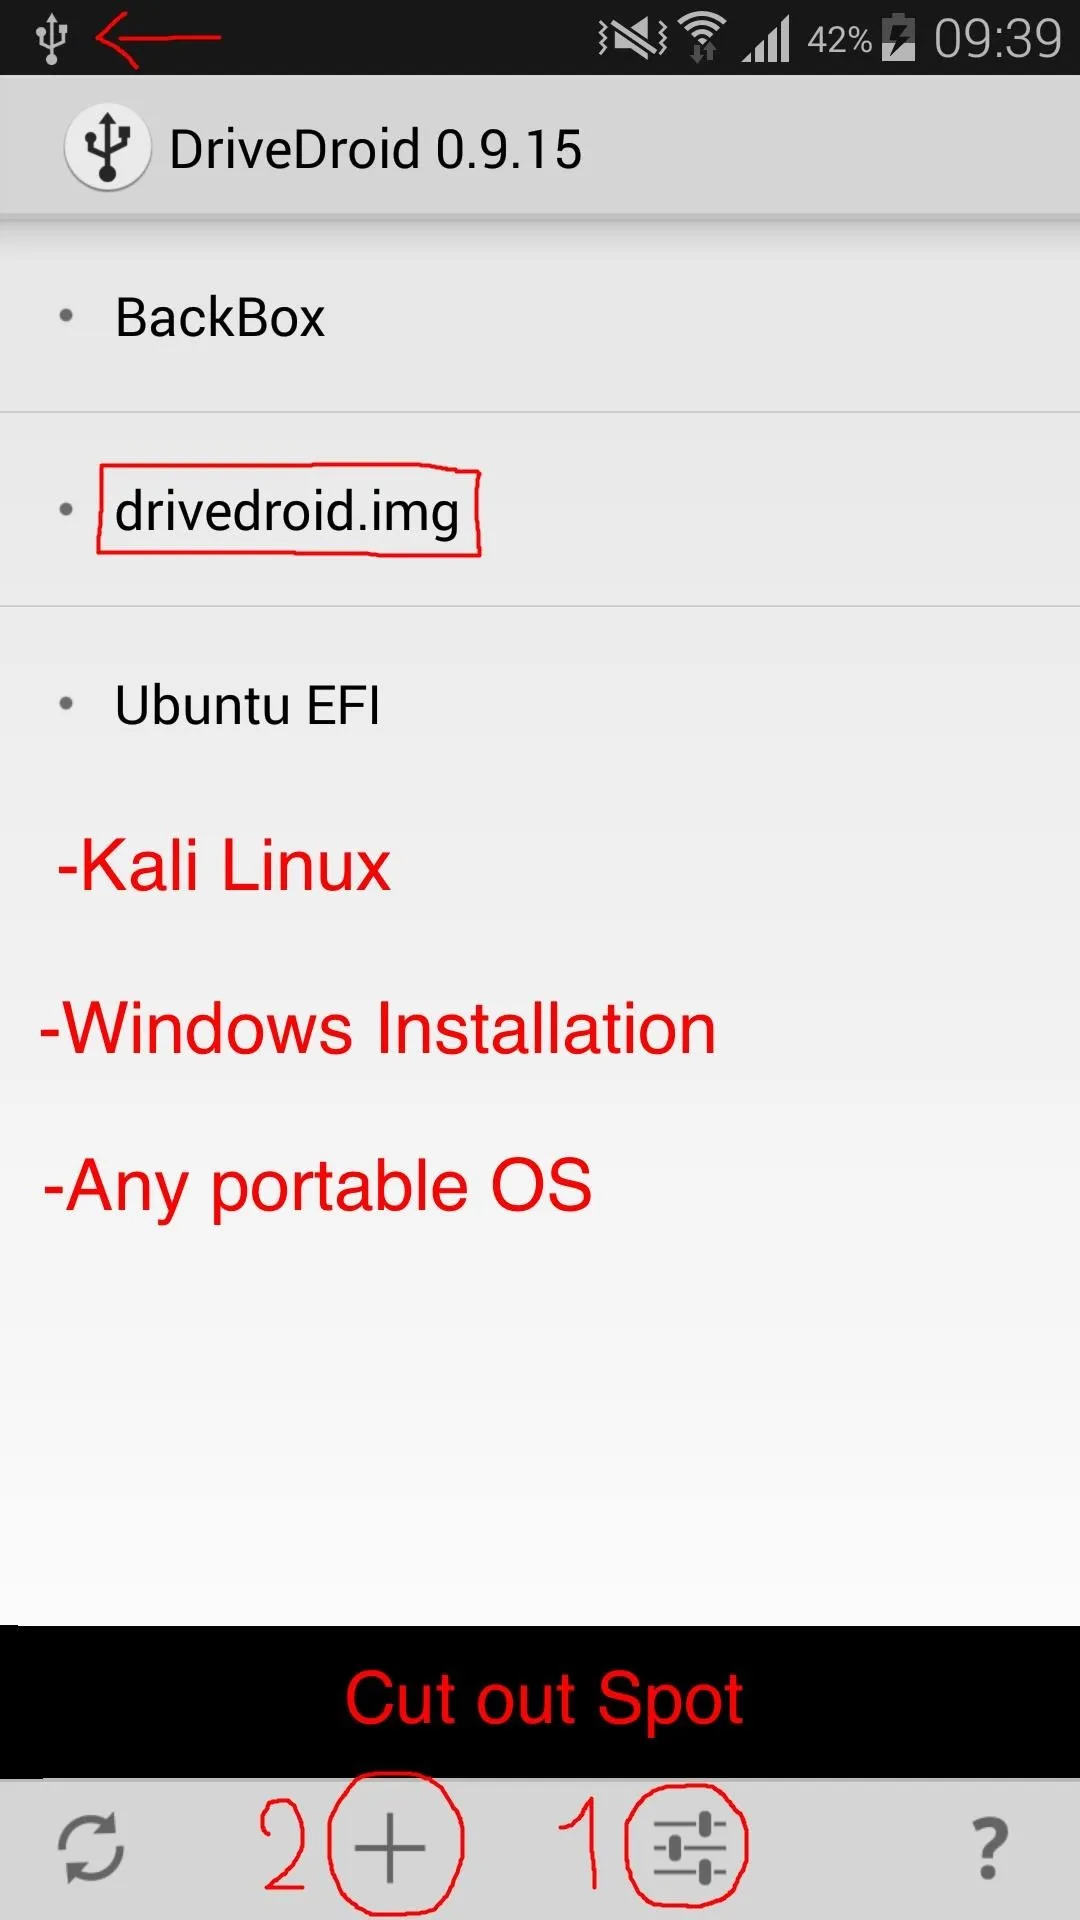
So, what do all these read things mean? Got no skills to explain? Almost.
-You will only have drivedroid.img as available OS here, I have more that I use. The red ones are only examples of what you might be able to do with this.
-However! Before you can access the main page, a wizard setup will pop up. Follow the wizard setup (if you didn't, you can always click on the button marked as 1 and under "Usb Settings" you'll find USB Setup Wizard), with these recommendations and considerations:
1) The first screen tells you if your device is supported. Most are, but if it isn't, forget it.
2) The second tries to acquire root privileges. Your root manager (e.g. SuperSU) will tell you that this application is trying to acquire root. I can tell you that absolutely nothing bad should happen, but you never know, so if you don't trust this, don't do it and abandon the guide here.
3) As the setup will tell you, plug the USB cable in your computer.
4) This is important. Basically, you will be choosing which USB system will manage the USB connection between your device and the computer. As said in the setup, most of the times the first in the list just works fine, but if you encounter any error, you are free to try and use the other ones.
Important: Here is where Usb Mass Storage (UMS) support comes in handy. If this feature comes with your device, you should (even without DrvieDroid or rooting, be able to connect your device to your computer as a USB drive, sharing data storage like the SD Card and your internal memory file archive (not the internal system obviously). If you don't have this feature (so, if you only have MTP and PTP when you click on USB connection notification) you can't use DriveDroid with its greatest potential. Basically:
- If you have UMS support, you can choose to share DriveDroid files to boot your portable OS (Linux Distro) as either a USB or a non-rewritable device.
- If you don't have UMS support, you can only share it as non-rewritable device.
What this means is that if you have UMS support you can format that space and install Kali Linux as it was an USB driver as shown here. However if you don't have UMS support you will be able to choose but even if you chose USB, it will always show up as a non-rewritable device (basically, a full CD).
5) Once you have chosen how to share DriveDroid space, your computer will either recognize the device as a USB or a CD or not recognize it anymore (Macs, for example). Don't worry, we can revert back to MTP in a few seconds later, and this doesn't mean that the computer won't recognize it at all, because during the boot process it will. In the next page, choose "I see an USB drive" if you want to share it as USB drive, or "I see a CD drive" if you want to share it as a CD. Since I was not able to use it as an USB drive, I'll go with the CD. now you can either finish the setup or go back to the main page.
-Now: you are given with only one drivedroid.img file. To add your OS, you have three ways: download the image directly within DriveDroid, use an image you have in your internal archive or external Sd card or write your image with any tool you have in your computer on a blank image.
-Press the "+" button (2) and choose your option.
1) If you'd like to Download an image (this can take a few hours, make sure you are connected to a wifi access point), press "Download Image". Choose the OS you'd like to install (e.g. Kali Linux) and choose which image to download. Once the download is finished, the image will appear in the main page (if not, add it as explained in the second step, using as path /storage/0/emulated/downloads/IMAGE.ISO-IMG, you can browse there with a root browser to see how it is called).
2) You can add your own image by "Add image from file", obviously you first have to connect your device as MTP, transfer the ISO or IMG in the shared archive ("Phone") or external SD card ("Card"). Write a title and the path to your image (you can browse there with a root browser, I suggest "Root Browser" in the Play Store). If you have your image in your shared archive, the path is /storage/0/emulated/pathtoyourimage.img-iso, while if you have it in your external SD card, the path is /storage/extSdCard/pathtoyourimage.img-iso (again, you can browse there). Once done, click on "Done" in the right top corner.
3) Alternatively, you can "Create a Blank Image" (make sure you give it enough space!) as explained in this XDA forum article and in this SoftwareBackery article. NOTE: this is the way I recommend, as it is the less error-full way, however, this CAN'T be done if you don't have UMS support (so I didn't try it). If you don't know what you are doing, then simply follow the first or the second way, or just don't do it. This is harmless, but you could end up filling random space on your precious device.
-Note that with this process you should also be able to boot Windows and Mac OSX directly from your android. Pretty interesting, I guess?
-Once done, you simply have to click on the image in the main page and choose how to host it (if you chose CD, then you'll be given with only one option, if you chose USB, you can choose both writable and read-only USB). Then reboot your computer, plug in the USB cable, enter the boot menu and you should be able to boot in your OS.
-Personal experience and sad considerations: If you want some practical examples, take this: I have a Samsung Galaxy S5 (formally known as SM-G900F) without UMS support (and every application that promises UMS support failed), so I can't write my own ISO to a Blank Image. So far, I've tried: Kali Linux 1.0.9a (did not even start), Kali Linux 1.0.9 (both 32 and 64 bits gave me a squashfs system error at boot and I wasn't able to go any further), BackBox Ubuntu (worked with BIOS and should probably work with UEFI, but Mac's EFI boot holding C returned a strange error that could be solved by using the boot command line but I wasn't able to type anything because of Mac's awfulness), Ubuntu 14 (works in BIOS, UEFI and Mac's EFI perfectly, although not supporting, as far as I can see, Mac's wireless adapter) and some smaller distros that worked almost anywhere (but didn't even have drivers for my computers, so they were pretty useless).
-If you want to revert back to MTP or PTP (or any file USB file sharing system you used to use on your Android device), try to close DriveDroid and click on the USB share notification by DriveDroid (a restore message in the notification bar should appear). If that doesn't work, you can try to force the device to restore USB settings by rebooting it or simply (this works) activating developers settings by Settings->About phone->tap 7 times "Build number", and then Settings->Developer settings-> check or uncheck "Debug USB".
Kali Linux NetHunter for Nexus and OnePlus One
Alternatively, if you have got a Nexus or OnePlus One device, you can install Offensive Security's NetHunter. The process to install it is completely explained in the mentioned link.
Update: the user F.E.A.R. made a guide about installing it!How to flash Kali Nethunter oneplus and nexus devises most as secondary rom.
"Complete Linux Installer" or "Linux-on-Android" and "Install or Mount"
These two projects are also very useful in terms of chrooted linux in Android, along with some others Debian related.
Complete Linux Installer XDA page: where you can also find some clarifications about chroot environments. I honestly found a lot of problems with this project, however I don't feel like putting it down, because it seems a very good one. If anyone can get it working, report please! Also, these guys from XDA host a huge amount of chroot Linux images for ARM, so if Linux Deploy is not enough for you, check this out!
Install or Mount XDA Page: this project if simpler than the other ones, however still buggy and deprecated. Again, couldn't manage to make it work, but still pretty interesting. It was aimed to be a fast bootstrap ubuntu and kali installer. If you need it, you can check it out. It is terminal based and offers a very simple interface.
Update: Weaponizing Your Android!
Constantly updating
Now that you setup everything, is time to have fun.
Linux Deploy Kali Tools
Tools that can be used in Kali Chroot
-Exploitation: Metasploit.
Metasploit obviously needs no introduction. You can get the latest version by installing it with apt-get.
-Man-In-The-Middle: Ettercap, Wireshark, SSLStrip...
A long list of tools in this category, which can all be obtained by installing them via apt-get.
Android Application
This is a very large category, is you have any suggestion please post in the comments. Here I posted some of the most interesting and common tools
-Man-In-The-Middle:Zanti.
Zanti is basically dSploit legacy. With Zanti you can perform MITM, Port Scanning, Session Hijacking, Password Sniffing, SSLStrip sessions, code injection... is, in my opinion, one of the best suites (if not the best) for MITM on Android.
-Bcmon: a tool that, if supported, can put your wireless card into monitor mode.
-Pcap Capture: Very awesome tool that allows you to capture packets to then analyze with wireshark with 0x0bda and 0x8187 external adapters devices and an OTG cable(for example, awus036h, also known as alfa!). Unfortunately, it is only a standalone application, and doesn't actually put your adapter in monitor mode globally, so you still can't use it, for example, with aircrack.
-Wigle Wifi: tool for wardriving which keeps track of all the APs that your phone catches and saves the details, with the incorporated use of map and GPS. Very cool to check out!
More can be found in this infosec institute article.
Capturing Packets and Analyzing Them with Wireshark
If your phone's wireless adapter can't go in monitor mode, you can always use an external wireless adapter and use the application "pcap capture" to capture packets trough the air. You can the save the files in a place that is mounted in Kali on your Android, install Wireshark and analyze them.
Conclusion
As you can see this is a very comprehensive guide full of references and troubleshooting. I think that there isn't much documentation about this topic (mostly for troubleshooting), so that's why I like to share the ways I solved the problems that I encountered, so that this is public on the internet and not vague anymore (most of the times I solved these problems by looking at the comments section trying out what people did).
And let me repeat this once again: some of these steps can be troublesome, specifically in newer devices. For instance, with a S3 you should be able to enjoy any aforementioned capabilities without any problem. So do it only if you really need it or you are a very troublemaker security enthusiast.
As always, I'm very, very sorry about any unclear part or explanation due to lack of english language knowledge. If you have any suggestion to improve this guide, please comment. Also, please share your experiences with this, so that people who come here can make sure this is a safe thing to do and that they can do it on their device. If any link in the guide is considered spam or illegal, delete this immediately (I doubt, but I don't know).
Thank you for reading and hope this helped.
Cover image: android+kali linux+linux logos with windows lurking in the back. In case you didn't notice, my cover images are supposed to be easter eggs. I know I am not funny, but give me satisfaction at least (does this seriousness work?). Oh you read it this time because it's longer ah?


Comments
Be the first, drop a comment!