


Transferring hundreds of screenshots, webcam recordings, keystroke logs, and audio recordings between your VPS and a local Kali machine can be tricky. Services like Dropbox don't always have the best privacy policies and suffer data breaches just like any other website. To mitigate these risks, we'll use a secure, open source, and decentralized alternative.
Syncthing, created by Jakob Borg, is a cross-platform, private, lightweight file-syncing (Dropbox) alternative. With Syncthing, none of your data is ever stored anywhere else other than on your computers. There's no central server that might be compromised (legally or illegally). You're essentially removing the middleman (Dropbox) and syncing sensitive files directly between your computers.
The uses for Syncthing aren't limited to this scenario. Between a local Windows machine and a MacBook, we can securely sync browser bookmarks, password manager files, OS backups, media, and much more.
Install Syncthing in Kali & Ubuntu
The installation process for Kali (Debian) and an Ubuntu VPS are about the same. The only variation is in Step 2, where I make note of the difference. Otherwise, Kali and Ubuntu users can follow along verbatim.
First, ensure the apt-transport-https package is installed using the below apt-get command. This will allow you to securely fetch packages and updates from the Syncthing developers.
apt-get update && apt-get install apt-transport-https -V

Hit:2 http://archive-7.kali.org/kali kali-rolling InRelease
Reading package lists... Done
Building dependency tree
Reading state information... Done
apt-transport-https is already the newest version (1.6.3).
0 upgraded, 0 newly installed, 0 to remove and 406 not upgraded.
Then, import the Syncthing release PGP keys. These are used to securely sign the packages and help prevent attackers from manipulating the Syncthing packages.
curl -s https://syncthing.net/release-key.txt | sudo apt-key add -

OK
Add the Syncthing repository to your APT sources using the echo command.
echo 'deb https://apt.syncthing.net/ syncthing stable' >> /etc/apt/sources.listKali's repositories offer an older version of Syncthing. To ensure the syncthing.net packages are always used when installing and updating Syncthing, create the following Pin-Priority in the /etc/apt/preferences.d/ directory. Copy the entire below command into a terminal and press Enter.
echo 'Package: *
Pin: origin apt.syncthing.net
Pin-Priority: 1001' > /etc/apt/preferences.d/syncthing
Finally, update APT and install Syncthing.
apt-get update && apt-get install syncthing

     1	Hit:1 https://apt.syncthing.net syncthing InRelease
     2	Hit:2 http://kali.mirror.garr.it/mirrors/kali kali-rolling InRelease
     3	Reading package lists... Done
     4	Reading package lists... Done
     5	Building dependency tree
     6	Reading state information... Done
     7	The following NEW packages will be installed:
     8	   syncthing (0.14.48)
     9	0 upgraded, 1 newly installed, 0 to remove and 406 not upgraded.
    10	Need to get 6,824 kB of archives.
    11	After this operation, 15.7 MB of additional disk space will be used.
    12	Get:1 https://apt.syncthing.net syncthing/stable amd64 syncthing amd64 0.14.48 [6,824 kB]
    13	Fetched 6,824 kB in 15s (459 kB/s)
    14	Selecting previously unselected package syncthing.
    15	(Reading database ... 183744 files and directories currently installed.)
    16	Preparing to unpack .../syncthing_0.14.48_amd64.deb ...
    17	Unpacking syncthing (0.14.48) ...
    18	Setting up syncthing (0.14.48) ...
    19	Processing triggers for man-db (2.8.3-2) ...
Notice on line 12, the Syncthing package was downloaded from the syncthing.net domain and not a Kali mirror. This means Syncthing was installed successfully.
Start Syncthing
After installing Syncthing, we can start the background process using systemctl.
systemctl --user start syncthing.serviceThis command will produce no output. Using a web browser, navigate to http://127.0.0.1:8384/ to view the Syncthing user interface in Kali.
Here's where the installation process varies slightly. Users trying to access port 8384 on their VPS will need to take an additional step. Open a new terminal and SSH into the VPS using the -L argument to enable port forwarding.
ssh -L 9999:127.0.0.1:8384 -p 22 user@YOUR-VPS-IP-ADDRESSThen, from your local machine, open a new browser tab and navigate to http://127.0.0.1:9999. This essentially creates a secure tunnel that allows remote users to access a service (Syncthing) running on the VPS loopback (127.0.0.1) address.

That's it for installing Syncthing in a Kali and Ubuntu VPS.
Configure Syncthing
Now that we have Syncthing installed and running on our Kali and VPS machines, we can begin configuring the settings. Before we can sync any directories, we must first introduce the two Syncthing servers to each other.
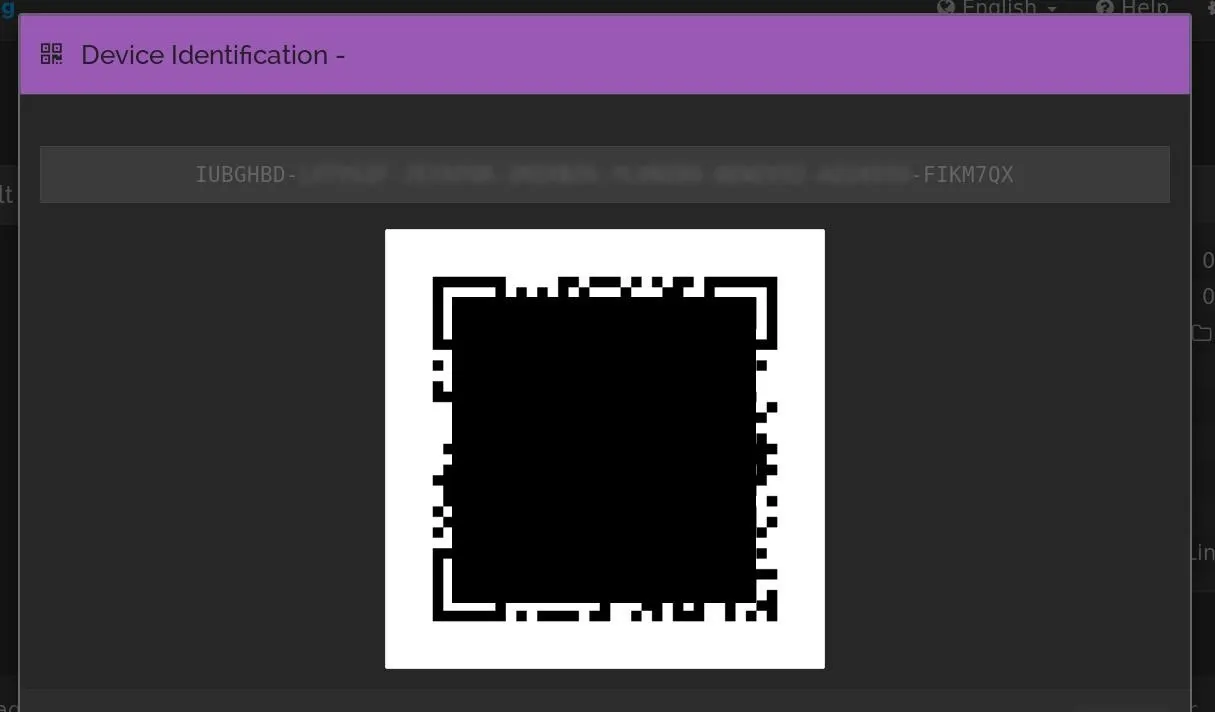
From the VPS, navigate to the "Actions" menu and select the "Show ID" option. Copy the 56 character ID to your clipboard.
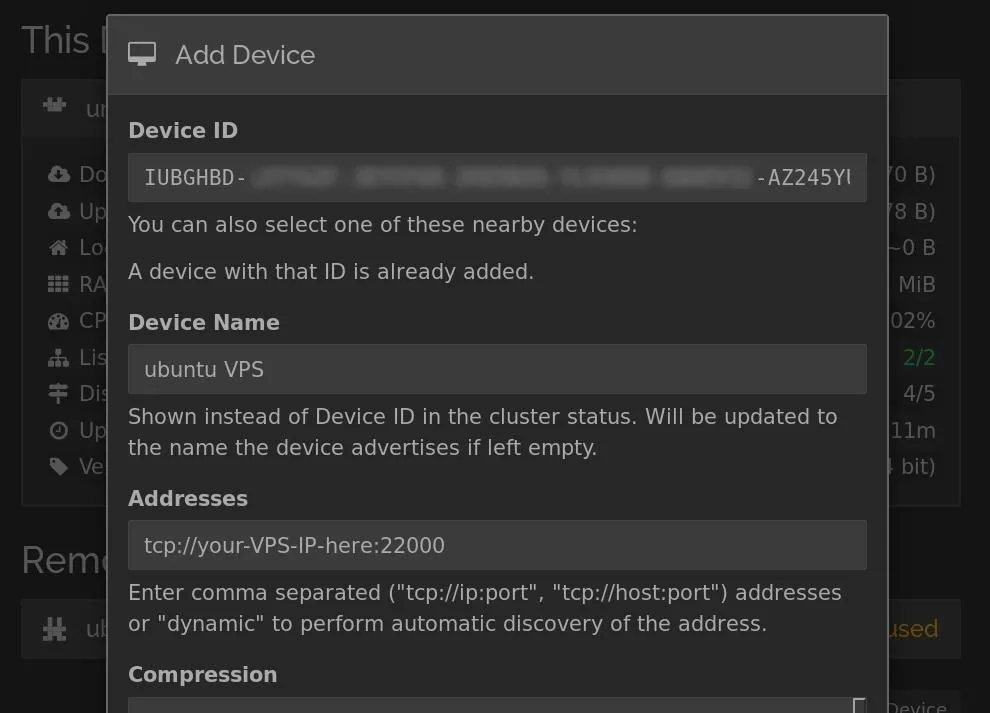
From the local Kali machine, click on the "Add Remote Device" button to open the Add Device menu. Paste the device ID, name the device, manually enter your VPS IP address, and at the very bottom, check the "Default Folder" option. When entering your VPS IP address, be sure to append port :22000 to the IP — this is the default Syncthing listening port.
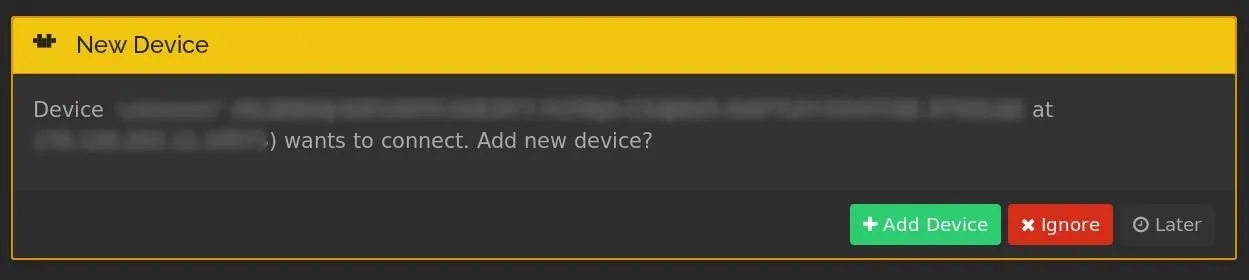
Then, press the "Save" button for the settings to take effect. After a few seconds, Syncthing running on the VPS will tell you a new device is attempting to connect. Click the "Add Device" button to accept.
That's all there is to it! Any files placed in /root/Sync/ in Kali or /home/

Start Syncthing Automatically at Boot (Optional)
It may be desirable to have Syncthing start automatically when Kali or the VPS is powered on. To do this, create a new "syncthing.service" file in the /etc/systemd/system directory using nano.
nano /etc/systemd/system/syncthing.serviceAdd the following lines, then save and exit nano by pressing Ctrl + X, then Y, then Enter.
[Unit]
Description=Syncthing - Open Source Continuous File Synchronization
Documentation=man:syncthing(1)

[Service]
ExecStart=/usr/bin/syncthing -no-browser -no-restart -logflags=0
Restart=on-failure
SuccessExitStatus=3 4
RestartForceExitStatus=3 4

[Install]
WantedBy=default.target
Use the systemctl command to enable Syncthing at every boot.
systemctl --user enable syncthing

Created symlink /root/.config/systemd/user/default.target.wants/syncthing.service → /usr/lib/systemd/user/syncthing.service.
Add Devices & Sync Multiple Directories (Conclusion)
Syncthing is a secure and private alternative to proprietary file syncing solutions. It might be a bit intimidating at first, but with every device and directory added, Syncthing becomes more useful. We can sync Metasploit loot directories, bookmarks between devices, password manager files, sensitive work files, encrypted backups, and so much more.
Readers are encouraged to dive in and explore all of Syncthings settings. The documentation and support forum are both great places for users who may have questions or require assistance. Readers looking for a technical understanding of how Syncthing works should check out the developer's blog.
- Follow Null Byte on Twitter, Flipboard, and YouTube
- Follow WonderHowTo on Facebook, Twitter, Pinterest, and Flipboard
Cover photo by luis gomes/PEXELS; Screenshots by tokyoneon/Null Byte


Comments
Be the first, drop a comment!