


Identifying vulnerable devices and services on a target router can be difficult without leaving logs and other traces of an active attacker on the network. However, there is a way to covertly decrypt and view Wi-Fi activity without ever connecting to the wireless network.
When targeting Wi-Fi routers, hackers may try to brute-force WPA2 handshakes or phish for passwords. Once the Wi-Fi credentials have been acquired, they will begin mapping and fingerprinting the compromised network using a variety of techniques.
Port scanners will create an enormous amount of noise on wireless networks. Man-in-the-middle attacks can be too aggressive and alert users and administrators to the presence of a hacker. Routers keep logs of every device that connects to the network. Every action taken while connected to a network may in some way result in being discovered on the compromised router.
It's better not to connect to the Wi-Fi router at all. In this guide, we'll develop an understanding of how attackers capture packets as they transmit to and from the wireless router with Airodump-ng — and decrypt WPA2 traffic in near real time.
How the Attack Works
Wireshark is the world's foremost and widely used network analyzer. It allows users to see what's happening on networks at a microscopic level and is the de facto network auditing tool across commercial and non-profit enterprises, government agencies, and educational institutions.
A great feature built into Wireshark allows attackers to decrypt and view router activity transmitted over the air in plain-text, and that's exactly what we're going to find out in this guide.
Identify the Target Network
Airodump-ng is available in all popular Linux distributions and will work on virtual machines and on Raspberry Pi installations. I'll be using Kali Linux to collect data belonging to a Wi-Fi router that I control. If you've never used Airdodump-ng before, you can learn some basics in my article on hacking a neighbor with a Post-It note or in our Aircrack-ng overall guide linked below.
- Don't Miss: Getting Started with the Aircrack-ng
To enable monitor mode on a wireless adapter, use the below command.
airmon-ng start wlan0

Then, find the target network. To view Wi-Fi networks in the surrounding area, use the below command. I'll be targeting my "Null Byte" router as an example.
airodump-ng wlan0mon
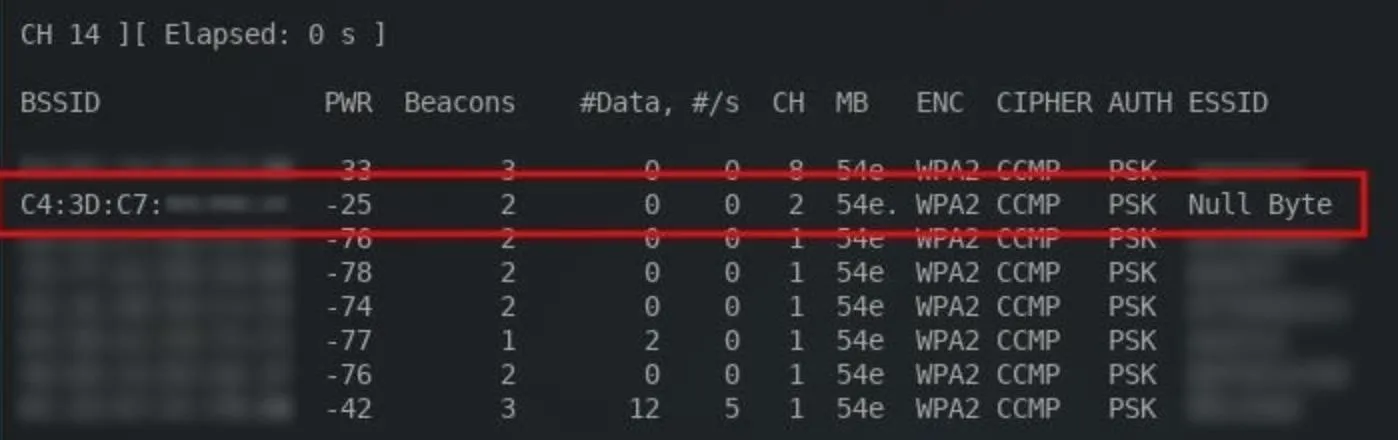
Take note of the BSSID, CH, and ESSID. This information is required to collect data transmitting to the router.
Start Capturing Wi-Fi Data
To start collecting data belonging to a target network, type the below command, replacing the parts in italics with what you're working with.
airodump-ng --bssid TargetMACaddressHere --essid RouterNameHere -c ChannelNumber -w SaveDestination wlan0mon

I'm saving the collected data into my /tmp directory to a file named "null_byte" using the -w argument. Airodump-ng will automatically append a number to the end of the filename, so it'll actually be saved to the /tmp directory as "null_byte-01.cap."
Here's what to expect from a running Airodump-ng terminal:
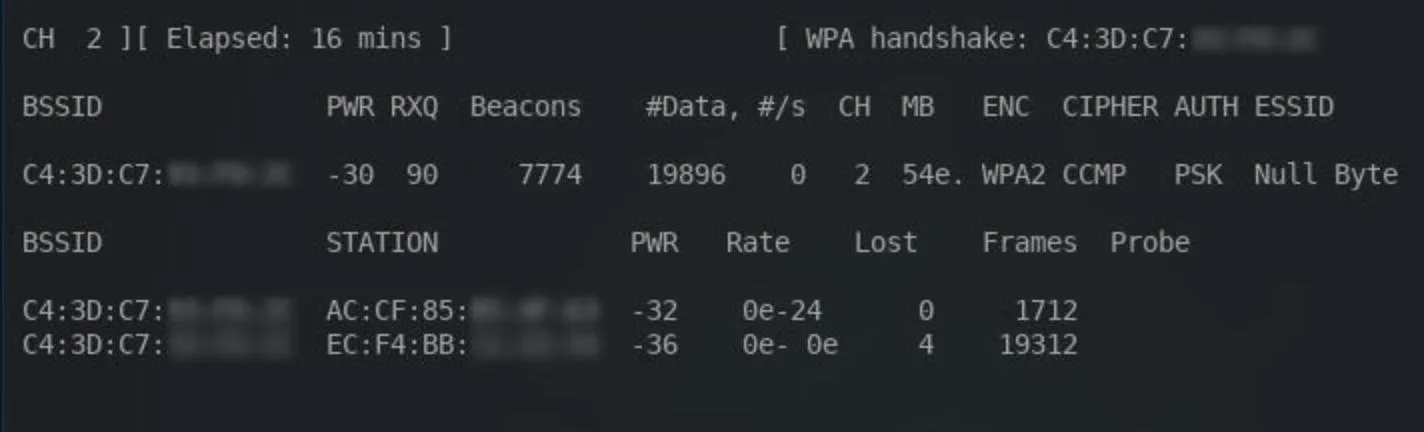
The most important thing to consider here is the WPA handshake in the top-right corner. A handshake must occur for Wireshark to later decrypt the Wi-Fi traffic. It's possible to use Aireplay-ng to forcefully disconnect devices from the network. Doing this will require devices to reconnect and hopefully produce the WPA handshake in the process, but this may create suspicion among users connected to the network.
As long as the Airodump-ng terminal is running, data will continue to accumulate. The Airodump-ng terminal can run for hours or even days. In my example Airodump-ng session, I let the packet collection run for over 15 minutes. The time elapsed can be identified in the top-left corner of the terminal.
Notice the #Data column in the above screenshot. This number indicates how many data packets have been collected. The higher this number is, the more likely attackers are to discover sensitive information which can be used to pivot or further compromise the target.
When a satisfactory amount of data has been collected, the Airodump-ng session can be stopped by pressing Ctrl + C. There will now be a "null_byte-01.cap" file (or whatever you named it) in the /tmp directory. This .cap file will be opened using Wireshark.
Install the Latest Version of Wireshark
By default, Wireshark is included in almost all versions of Kali. There are a few versions which don't include Wireshark, so I'll quickly cover how to install it in Kali.
First, run the apt-get update command to ensure the most recently tested and curated (by the Kali developers) version of Wireshark is available for download. Open a terminal, and type the below command.
sudo apt-get update
Then, use the following command to install Wireshark.
sudo apt-get install wireshark
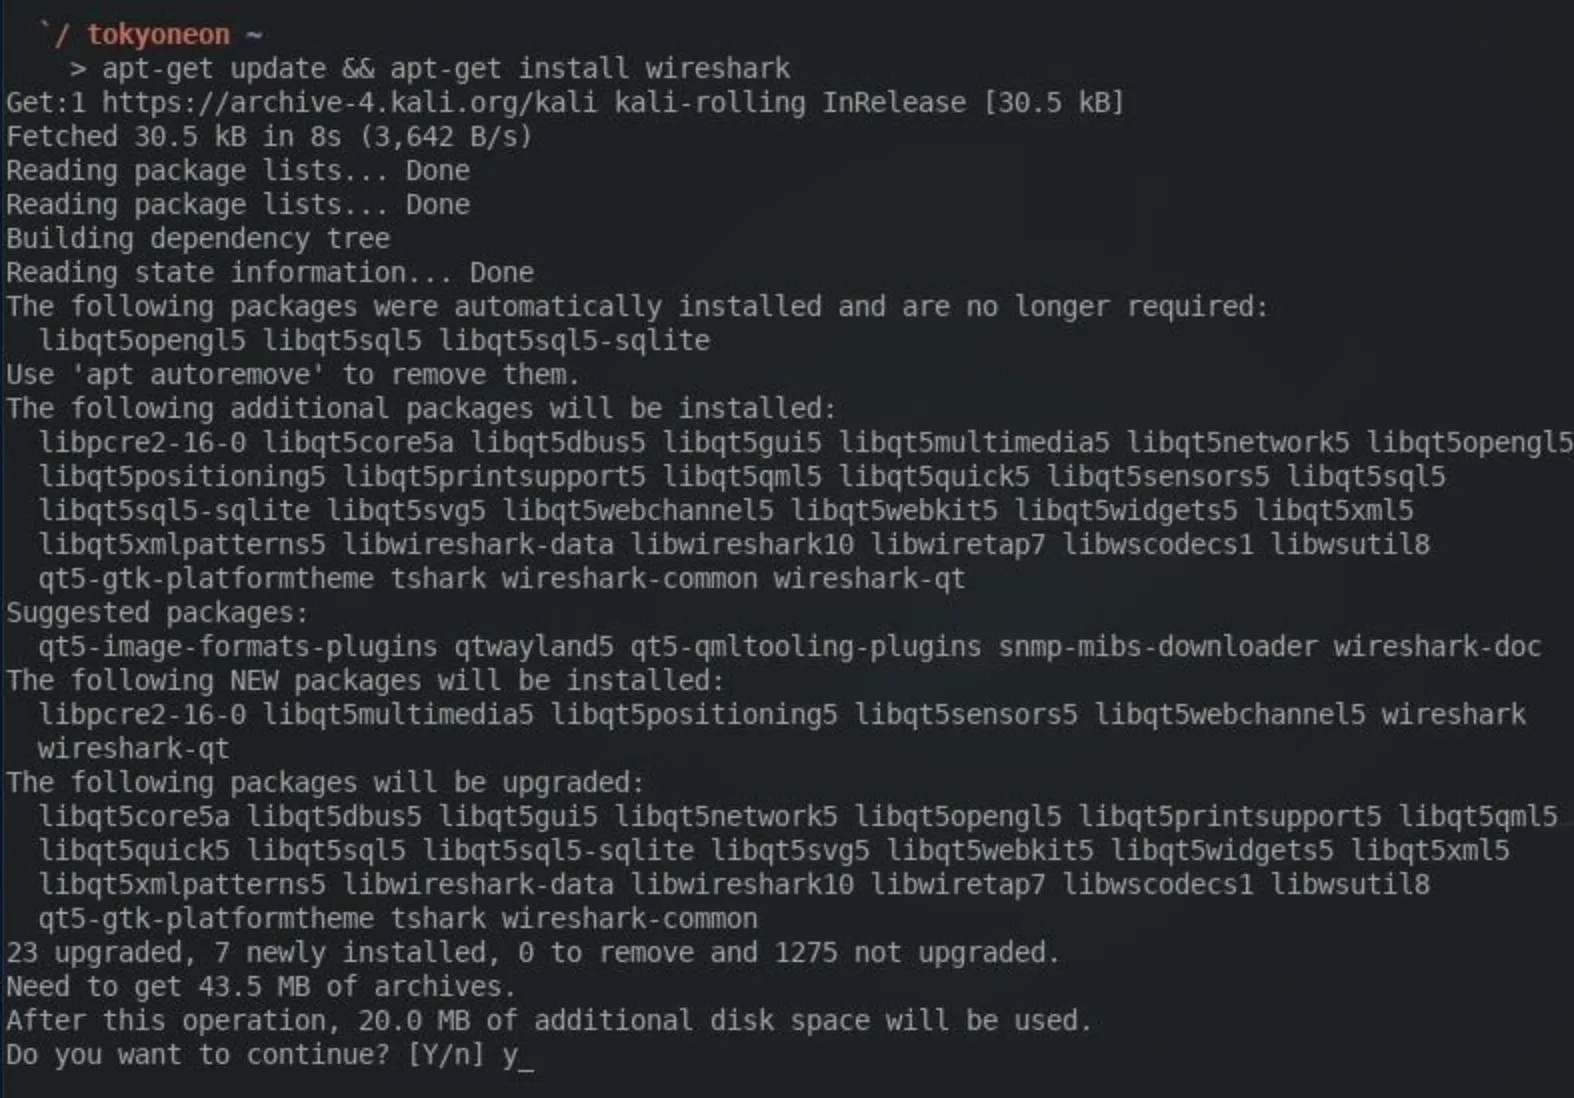
The && characters can be used between the two commands as I did in the screenshot above. This will instruct the terminal to first sync the package index with its sources, the Kali repositories. Then — and only if the update is successful — it will install Wireshark.
Start the Wireshark Tool
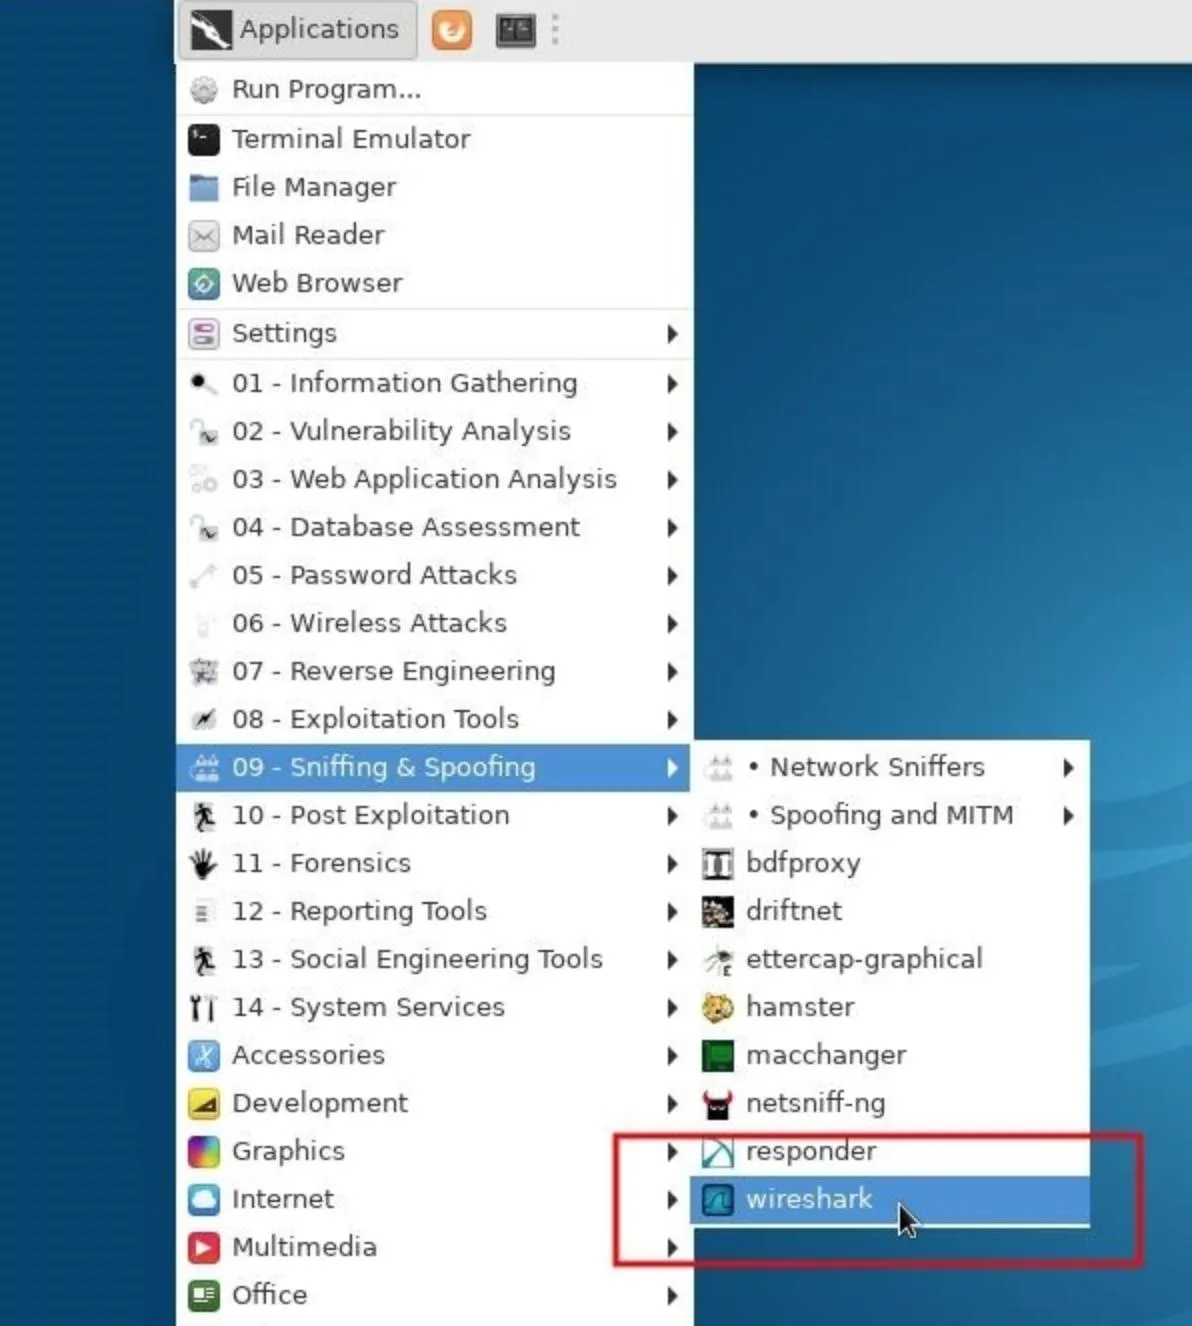
When that's done, Wireshark can be found in the "Sniffing & Spoofing" category in the "Applications" menu. To start Wireshark, simply click on the icon.
Configure Wireshark to Decrypt Data
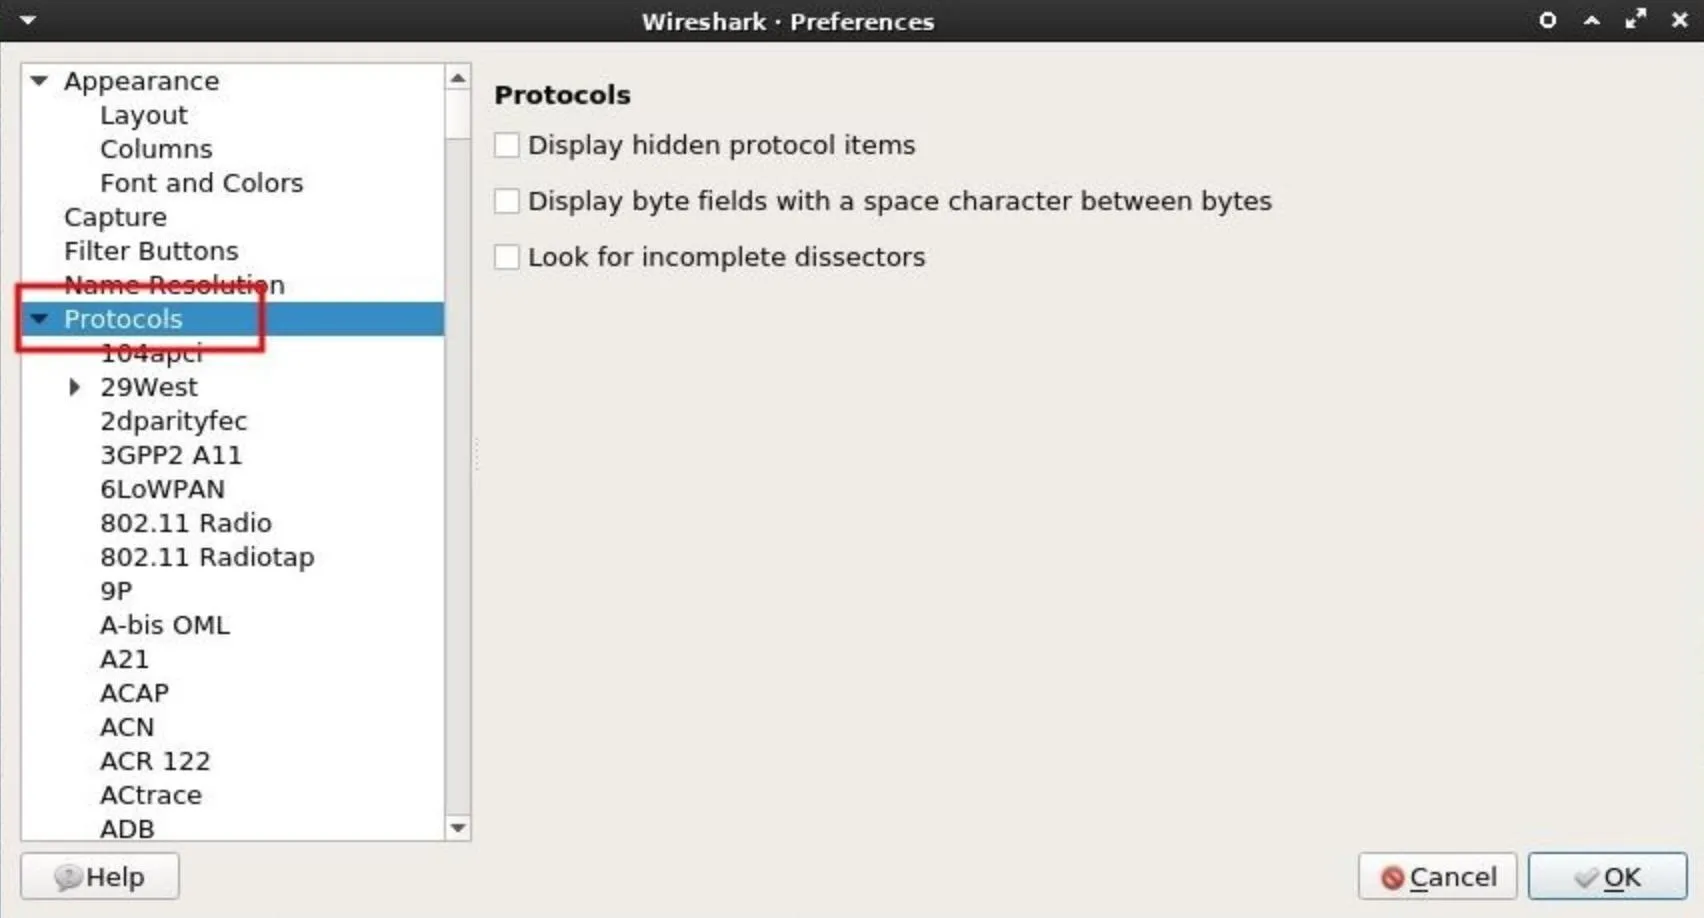
To configure Wireshark to decrypt data found in the .cap, click on "Edit" button in the top bar, then "Preferences," and expand the "Protocols" drop-down menu.
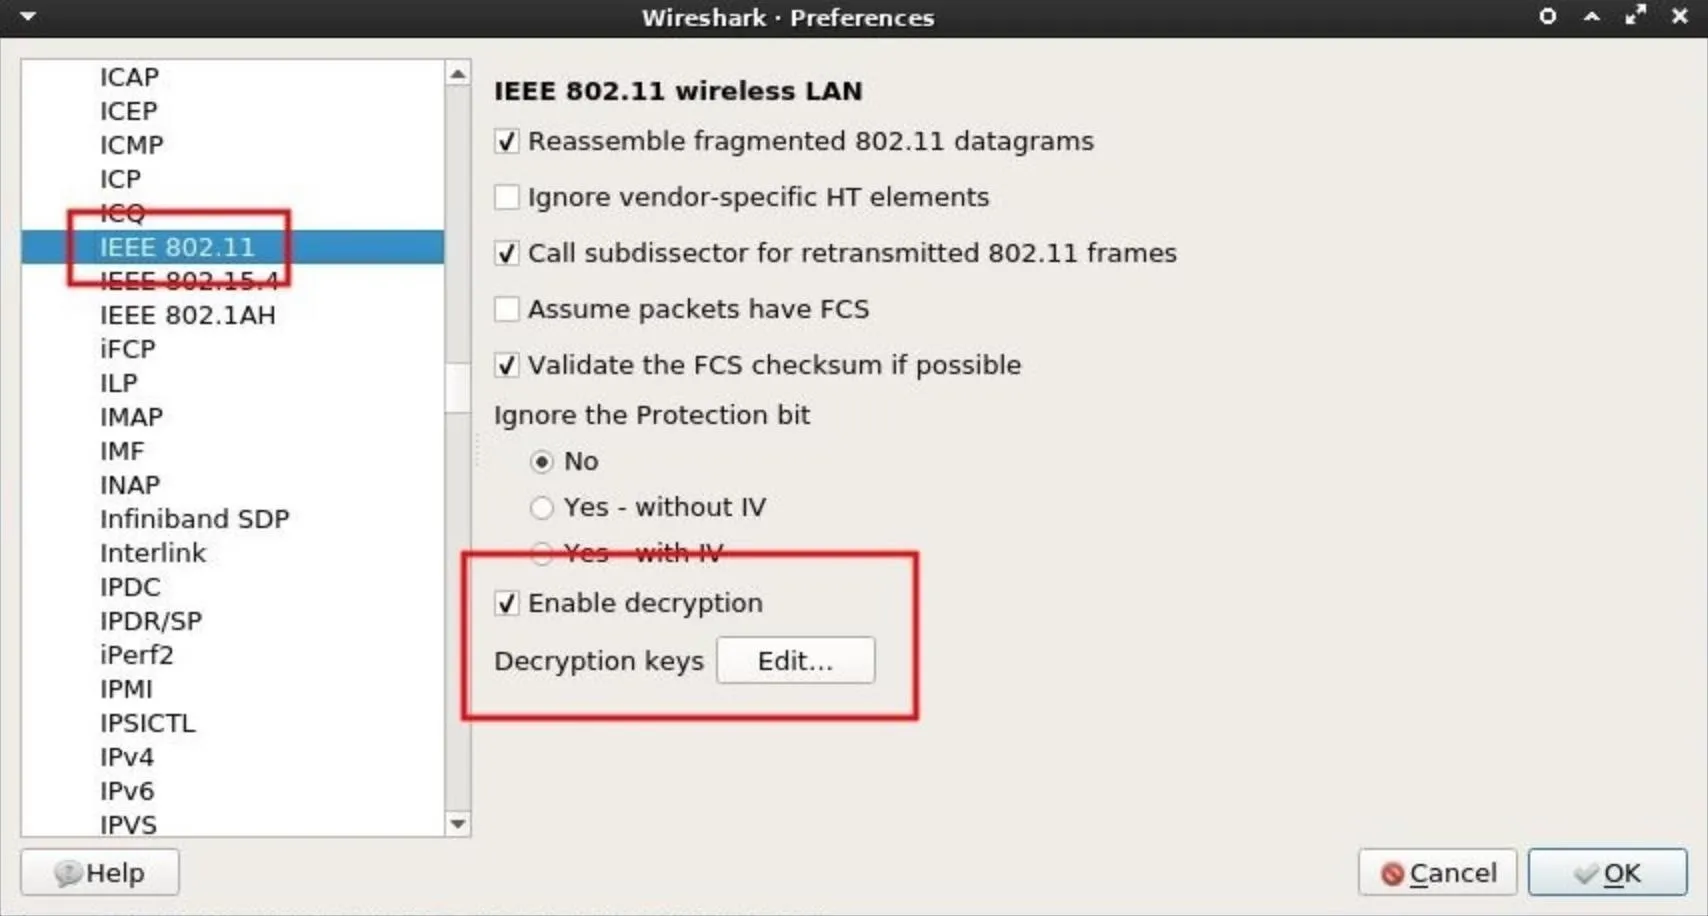
Then, scroll down and select "IEEE 802.11." The box next to Enable decryption must be checked. Next, click on "Edit" to add decryption keys for a particular Wi-Fi network.
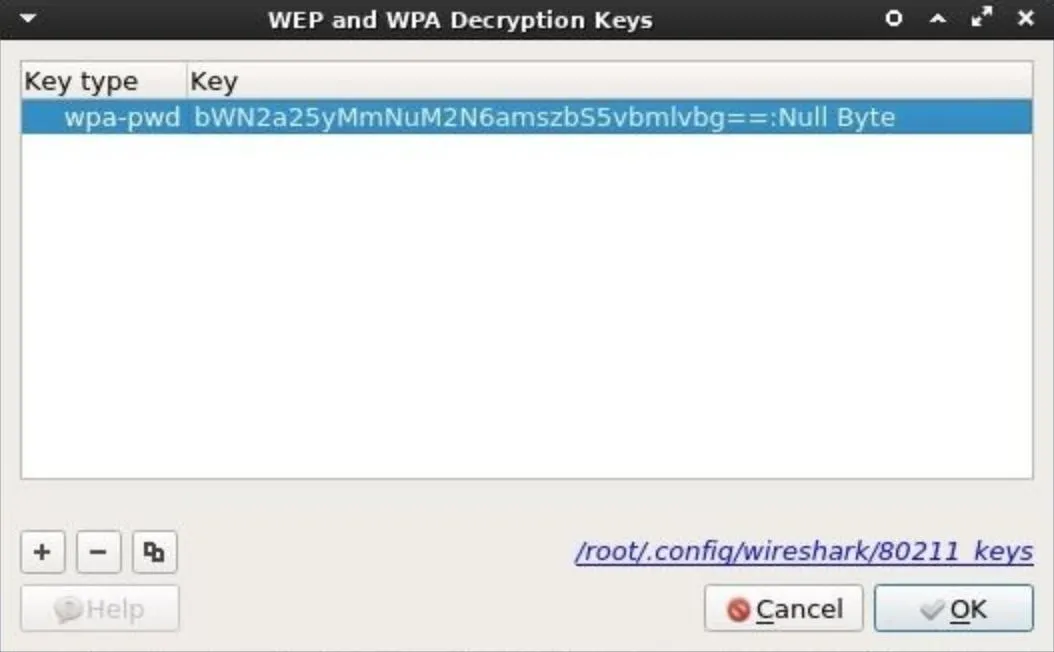
A new window will pop up. This is where the password and router name are to be specified. The credentials should be entered with the password and router name separated by a colon (e.g., password:router_name).
First, select the "wpa-pwd" Key type. This key type is required to set the WPA password in plain-text. The password to my "Null Byte" Wi-Fi network is a long encoded string, so I entered "bWN2a25yMmNuM2N6amszbS5vbmlvbg==:Null Byte" in the Key column. Another example would be "Wonderfulboat555:NETGEAR72," where "Wonderfulboat555" is the password to a "NETGEAR72" router.
When that's done, click "OK" to save the credentials. Wireshark will now automatically decrypt data belonging to the "Null Byte" Wi-Fi network when a .cap file is imported.
Perform Deep Packet Inspection (DPI)
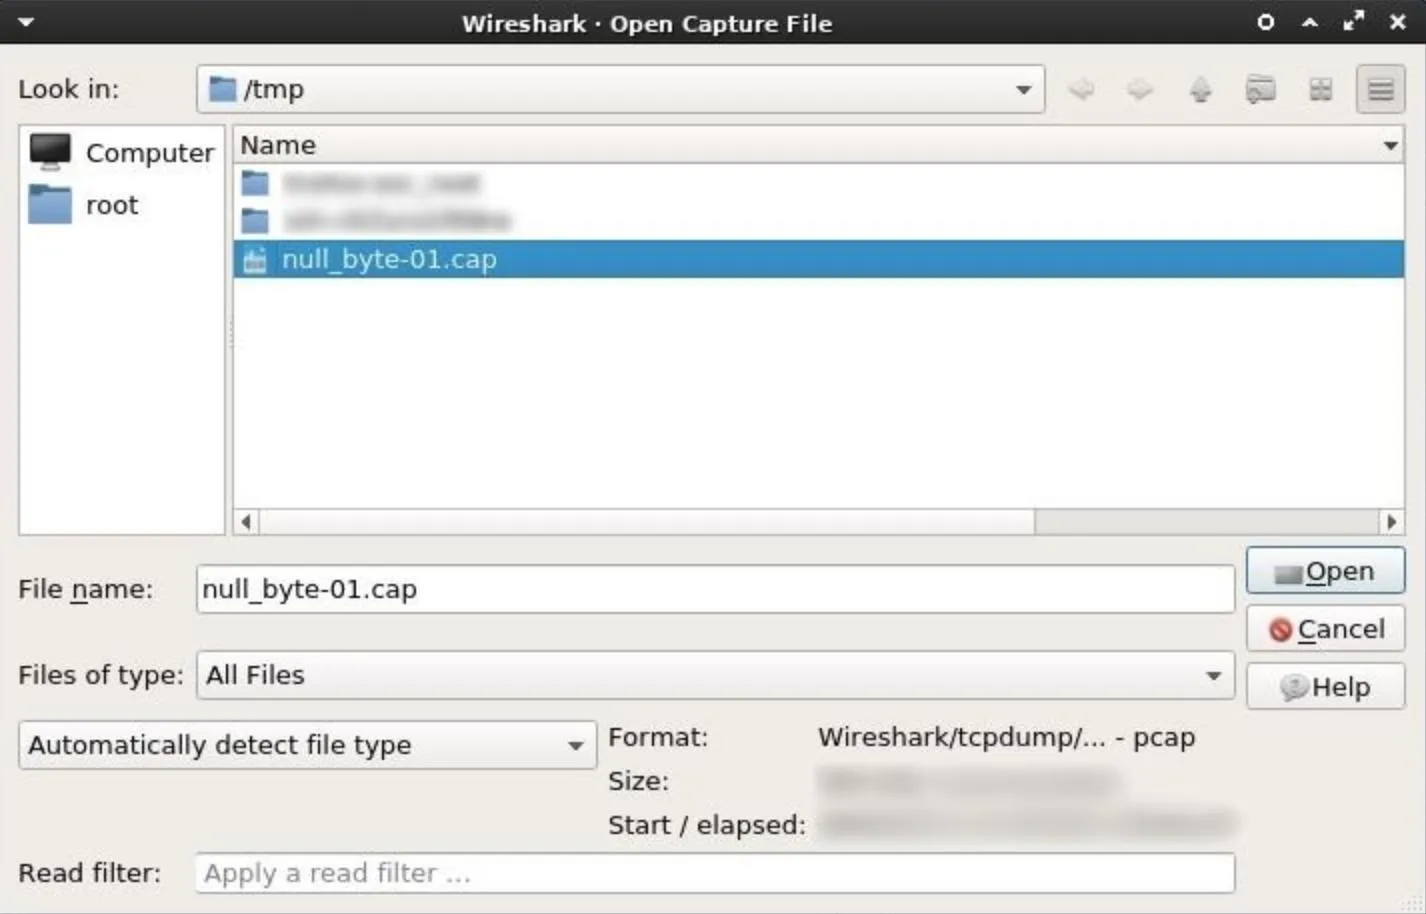
To import a .cap into Wireshark, click on the "File" button in the top bar, then click "Open." The .cap will be found in the /tmp directory; Select it, then click "Open." Depending on how long the Airodump-ng terminal collected data, it could take Wireshark several minutes to import and decrypt all the data.
After opening the .cap in Wireshark, there may be thousands of lines of raw web traffic. This can be intimidating. Fortunately, Wireshark has Display Filters which can be used to manage and filter out packets that aren't useful. There are many display filter cheat sheets online to help Wireshark users find relevant and sensitive data, but I'll cover a few useful display filters below which attackers use to inspect activity taking place on the network.
1. Find POST Data
The HTTP POST request method is often used when uploading a file or submitting usernames and passwords to a website. When someone logs into Facebook or posts a comment at the bottom of this article, it's done using a POST request.
POST data in the .cap will most likely hold the most compromising and revealing data. Attackers may find, usernames, passwords, real names, home addresses, email addresses, chat logs, and much more. To filter POST data, enter the below string into the display filter bar.
http.request.method == "POST"

In my example, I subscribed to a random technology website I found online. It's not unreasonable to believe someone would request email notifications from their favorite news sites.
If POST requests were found in the .cap, the Info column will display which lines contain POST data. Double-clicking on one of the lines will produce a new Wireshark window containing more information. Scroll down and expand the "HTML Form" drop-down to inspect the data.
By inspecting the data collected from this single POST request, a lot of information belonging to someone on the network was discovered.
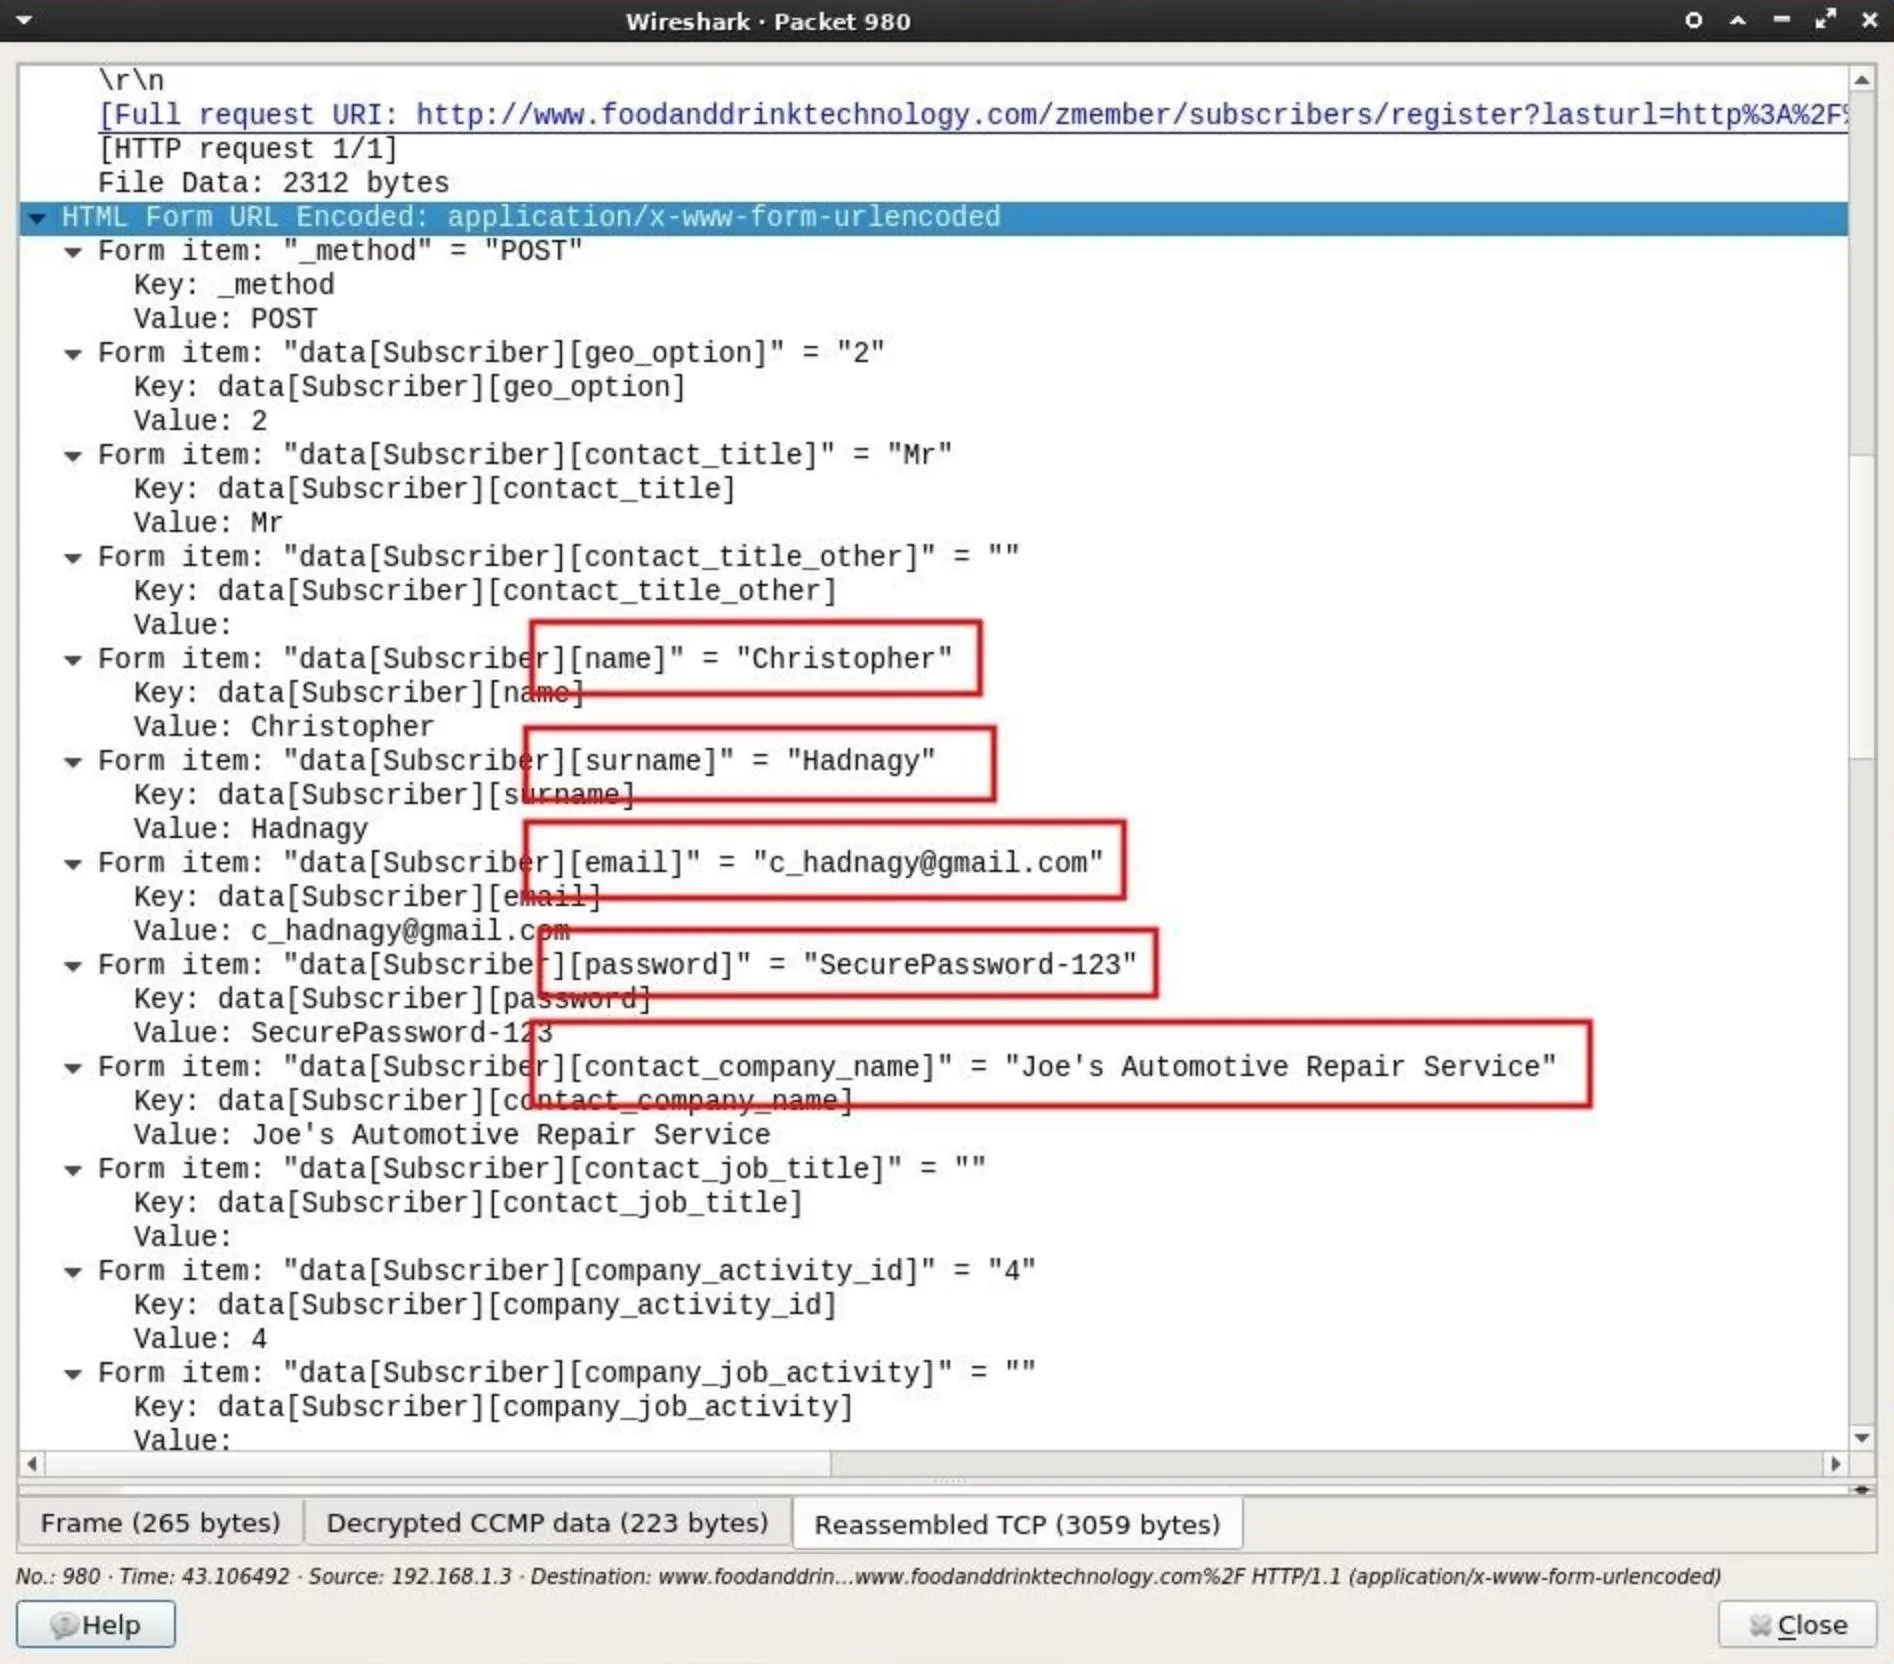
Collected data included a first name, last name, and an email address which can later be used for phishing and targeted hacks.
There's also a password form required by the website, which can be added to password lists and brute-force attacks. It's not uncommon for people to reuse passwords across multiple accounts. It's certainly possible that password will grant an attacker access to the Gmail address also found in the POST data.
Also discovered in the data is a name of a company, presumably where Christopher Hadnagy is employed. This information can be used by an attacker for further social engineering.
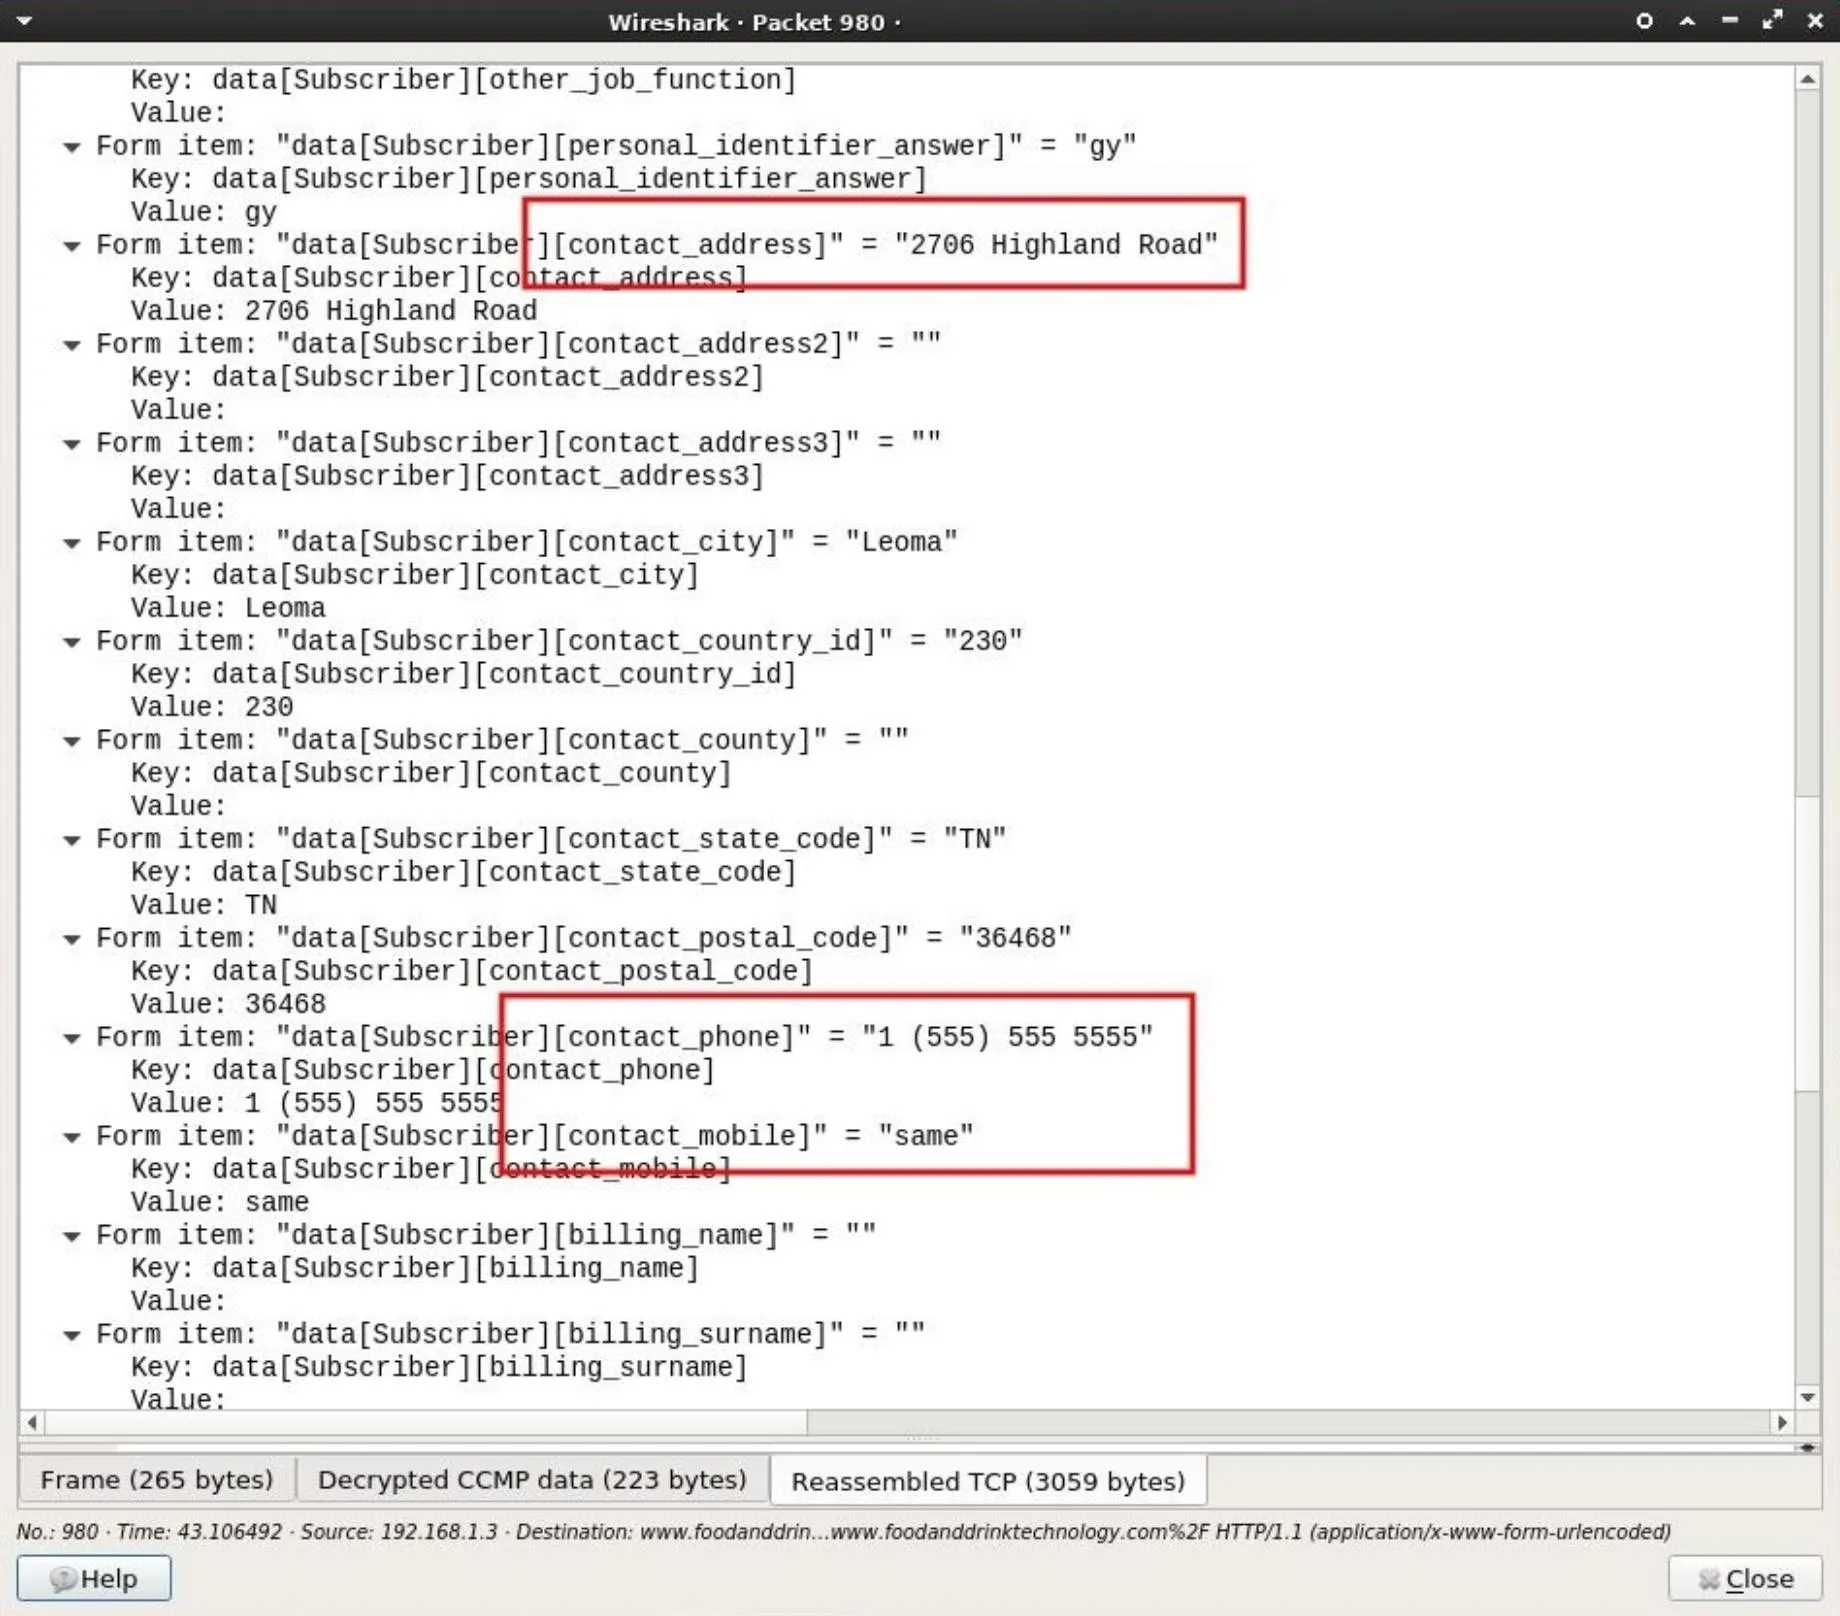
Strolling down the POST data a bit further, there's even more information to be found. A full home address, ZIP code, and phone number is also included in just one POST request. This would inform the attacker of exactly which home the Wi-Fi router belongs to and a phone number which can be used for further social engineering should the hacker decide to send spoofed SMS messages.
2. Find GET Data
The HTTP GET request method is used for fetching or downloading data from web servers. For example, if someone views my Twitter account, their browser would use a GET request to fetch resources from the twitter.com web servers. Inspecting the .cap for GET requests wouldn't reveal usernames or email addresses but it will allow attackers to develop a comprehensive profile of a persons web browsing habits.
To filter GET data, enter the below string into the display filter bar.
http.request.method == "GET"
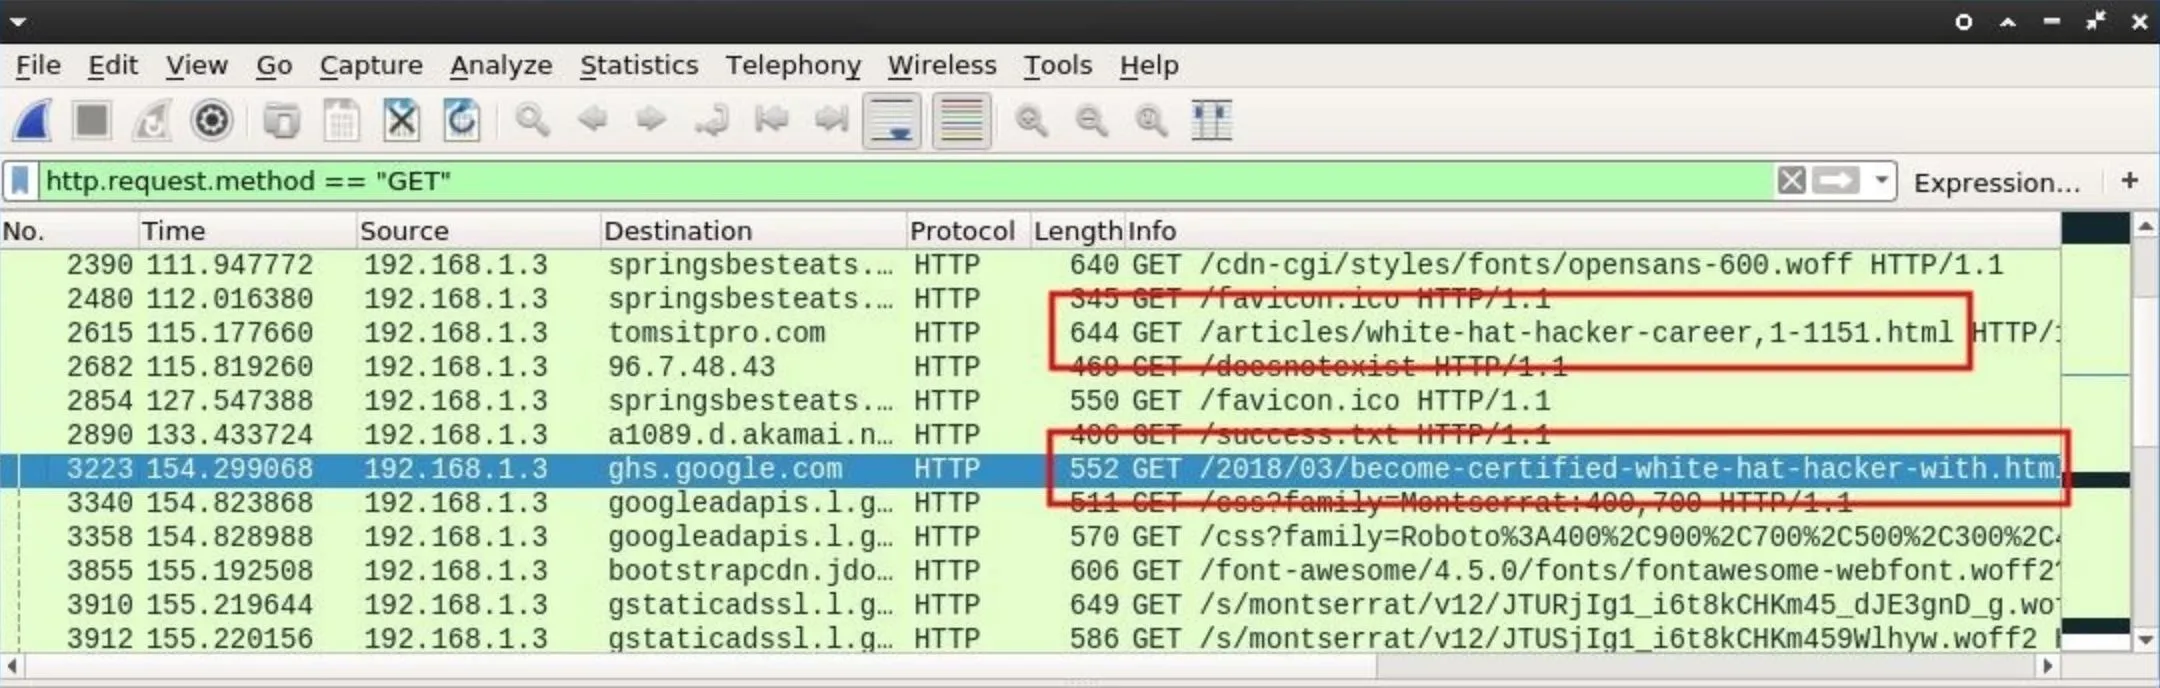
Many websites append .html or .php to the end of the URLs. This can be an indicator of a website viewed by someone on the Wi-Fi network.
It might be helpful to filter out CSS and font related GET requests, as these kinds of requests happen silently in the background when we view web pages online. To filter out CSS content, use the below Wireshark filter.
http.request.method == "GET" && !(http.request.line matches "css")
The && here literally means "and." The ! (exclamation point) here means "not," so Wireshark is instructed to display only GET requests and not to display HTTP request lines that match css in any way. This will hopefully filter out some useless information related to benign web resources.
Clicking on one of the lines to investigate and expanding the "Hypertext Transfer Protocol" data will provide more identifiable information.

We can see the target is using a Windows computer with a Chrome browser user-agent. As far as hardware reconnaissance goes, this information is highly valuable. Attackers can now, with a great degree of certainty, generate a payload for this user specific to the Windows operating system being used.
The "Referer" tells us what website the target user was viewing immediately before viewing tomsitpro.com. This most likely means they found the "white hat hacker career" article via some duckduckgo.com query.
Referrer's containing DuckDuckGo over Google's search engine might indicate a privacy-conscious user, as Google is known for having invasive policies harmful to its customers. Someone with a concern for privacy might also have an interest in security software like antivirus programs. This is something attackers will consider when generating a targeted payload.
3. Find DNS Data
Encrypted internet traffic will transmit over port 443 by default. One might think to use the tcp.port == 443 display filter to better understand what kind of websites are being viewed but that will usually produce raw IP addresses in the destination column which isn't a very convenient way of quickly identifying domains. In fact, a more efficient way of identifying websites sending and receiving encrypted data is by filtering DNS requests.
The Domain Name System (DNS) is used to resolve websites names into machine-readable IP addresses like https://104.193.19.59. When we visit a domain such as null-byte.wonderhowto.com, our computer converts the human-readable domain name into an IP address. This happens every time we use a domain name to view websites, send emails, or chat online.
Searching the .cap for DNS requests will further aid attackers in understanding which websites are frequently visited by people connected to the router. Attackers will also be able to see domain names belonging to websites sending and receiving encrypted data to and from websites like Facebook, Twitter, and Google.
To filter DNS data, enter the below string into the display filter bar.
dns
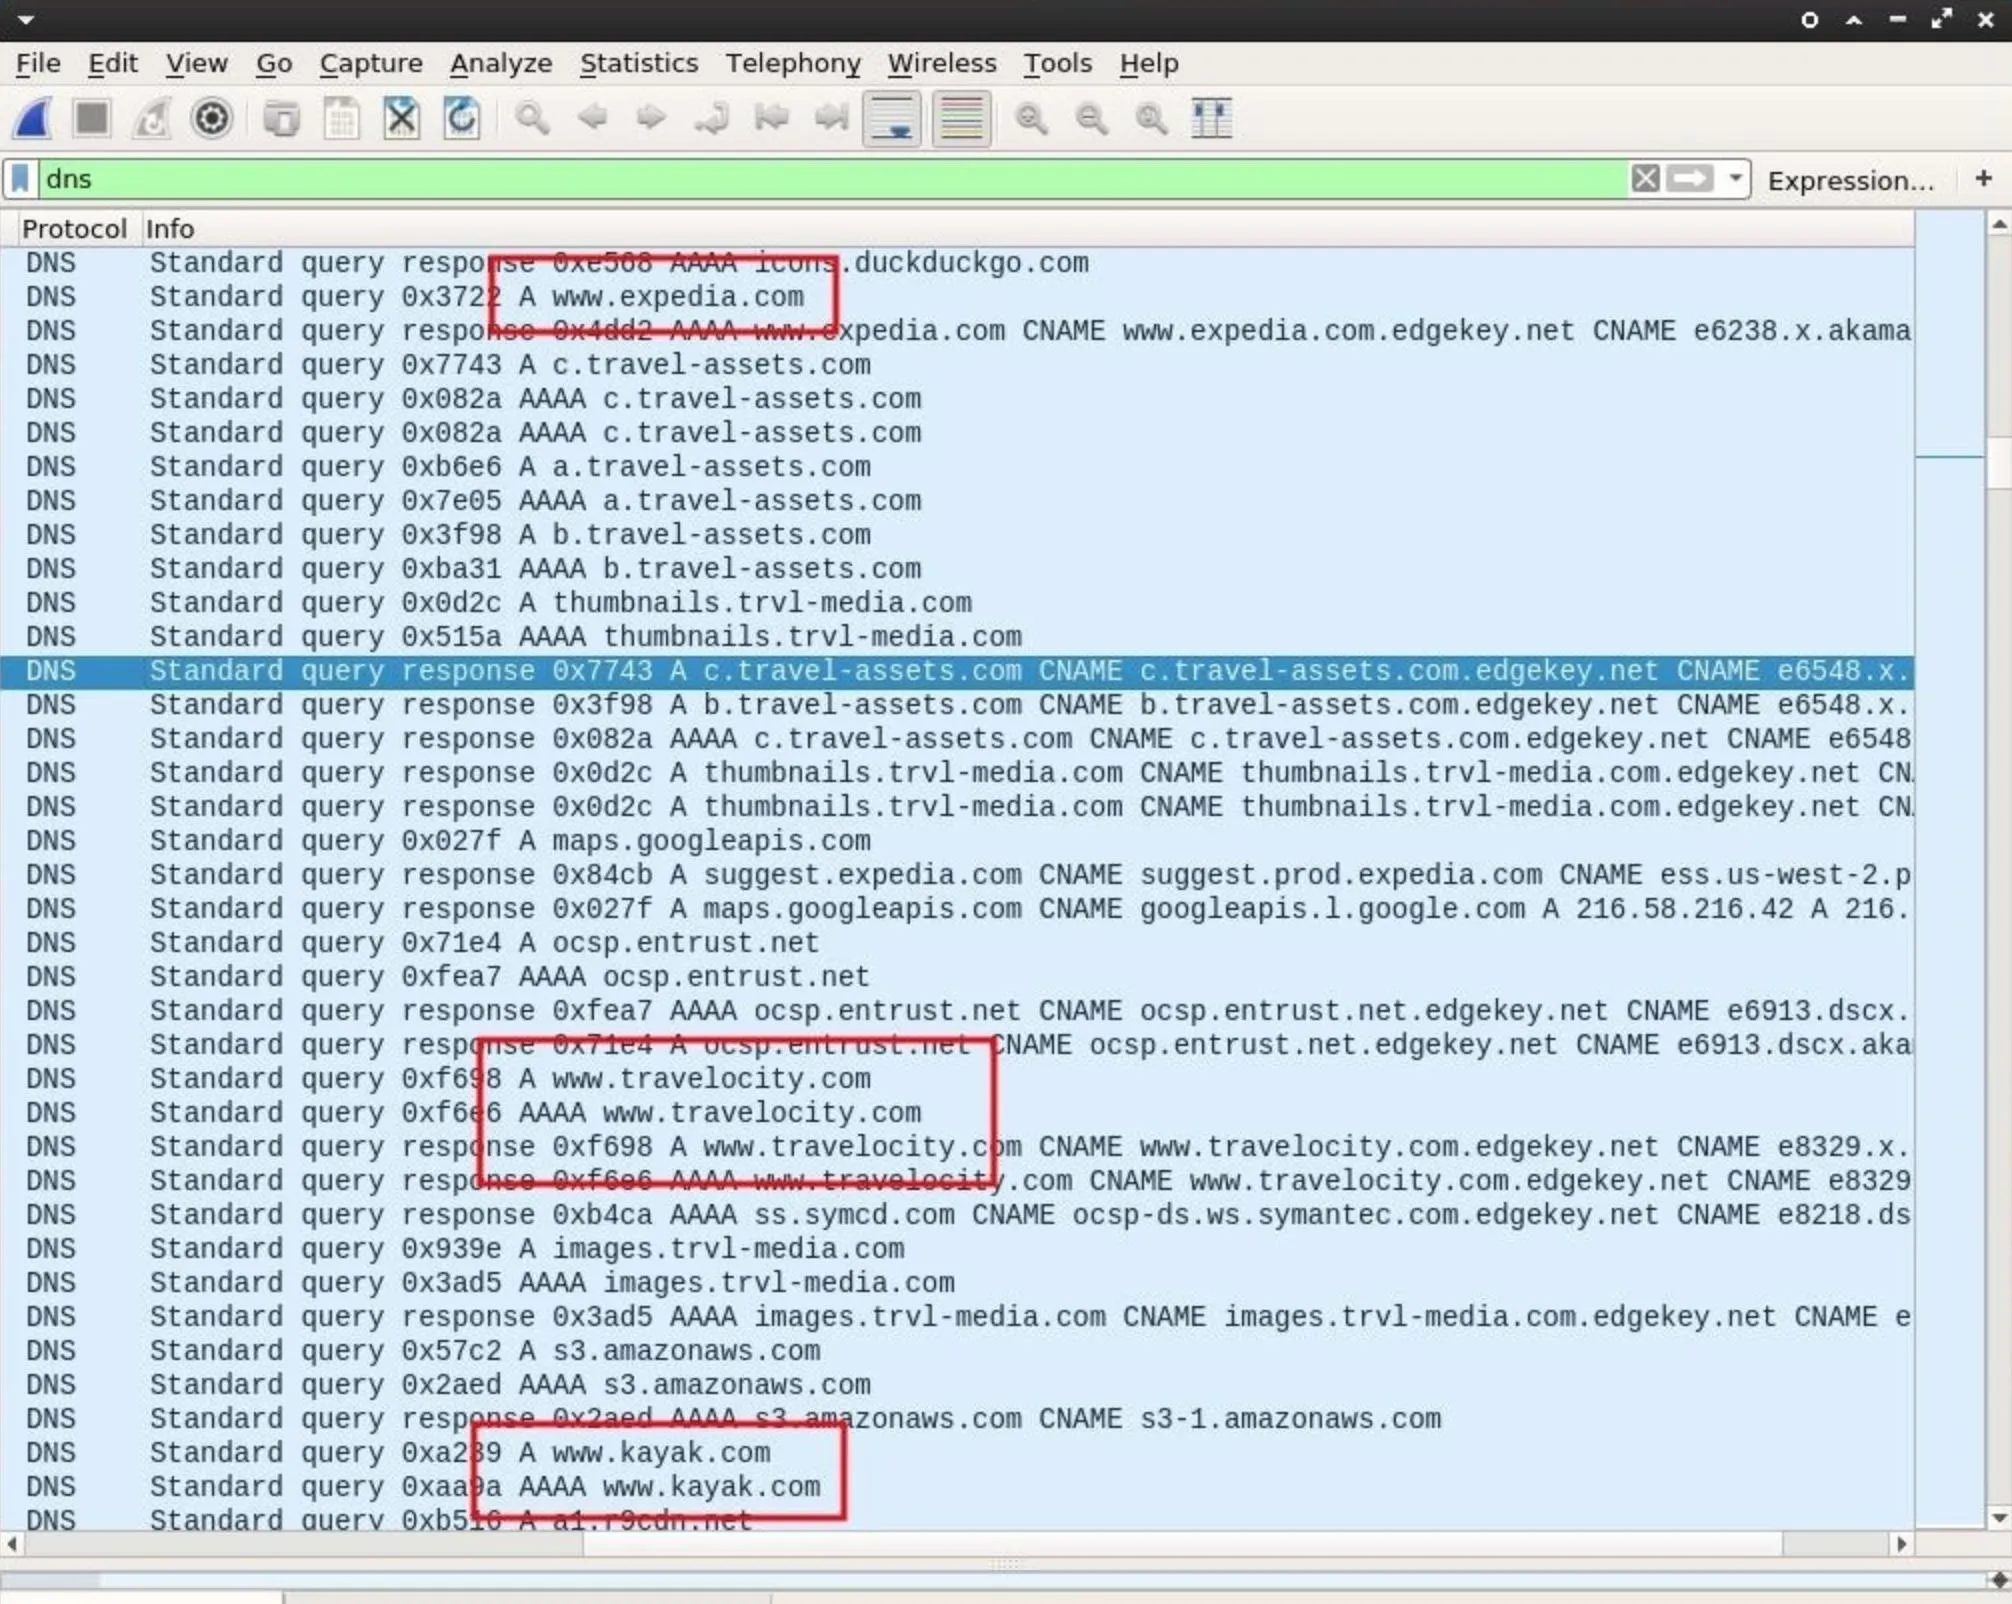
Viewing the DNS requests may provide some interesting information. We can clearly see this user browsing travel websites like expedia.com and kayak.com. This might suggest the user will soon be away from home for an extended period of time.
The data is encrypted so attackers can't learn the flight destination or departure information, but using this information to send phishing emails might make it possible for an attacker to social engineer the user into divulging personal and financial information.
For example, if DNS requests for a particular banking website were also discovered, attackers could fake an email from that bank and claim a large Expedia credit card transaction just took place. The fake email might also contain accurate information relating to the target with a link to a fake banking website (controlled by the attacker) dedicated to harvesting banking credentials.
How to Keep Your Personal Data Safe from Hackers
At a glance, all of the personal data discovered in the .cap file might appear harmless or innocuous, but inspecting just a few packets, I learned the target's real name, username, password, email address, home address, phone number, hardware manufacturer, operating system, browser fingerprint, web browsing habits, and more.
All of this data was collected without ever connecting to the router. There would be no way for victims to know this was happening to them. All of this data can be used by attackers to launch an elaborate and targeted hack against companies and individuals.
Keep in mind, all of the personally identifiable information uncovered in this article is also available to internet service providers (ISP) like Verizon and AT&T. Readers should be aware that DPI is performed by ISPs every single day. To protect ourselves from such activity, we can:
- Use stronger passwords. Brute-forcing weak passwords is an attacker's primary method for gaining access to Wi-Fi routers.
- Use a Virtual Private Network (VPN). With a secure connection between you and the VPN provider, all of the data uncovered in this article would not have been accessible to an attacker. However, if the VPN provider is logging or performing deep packet inspection, then all of the data would then be easily accessible to them as well.
- Use Tor. Unlike VPNs, the Tor network is built on a different security model which doesn't relinquish all of our data to one single network or ISP.
- Use SSL/TLS. Transport Layer Security (HTTPS) will encrypt your web traffic between your browser and the website. Tools like HTTPSEverywhere may help ensure the details of your web browsing traffic are encrypted.
Until next time, follow me on Twitter @tokyoneon_ and GitHub. And as always, leave a comment below or message me on Twitter if you have any questions.
- Follow Null Byte on Twitter, Flipboard, and YouTube
- Follow WonderHowTo on Facebook, Twitter, Pinterest, and Flipboard
Cover photo by Doug Davey/Flickr; Screenshots by tokyoneon/Null Byte


Comments
Be the first, drop a comment!