


When hacking into a network during a penetration test, it can sometimes be useful to create your own wireless AP simply by plugging a Pi into an available Ethernet port. With this setup, you have your own backdoor wireless connection to the network in a matter of seconds. Creating an AP is also helpful while traveling, or needing to share a connection with a group of people.
There are many reasons you might want to turn your Raspberry Pi into a hotspot. A simple use case is having your own cheap DIY travel router to use in hotel rooms while you're on the road, or even on campus to have a faster private connection to the network. A more nefarious application, such as a rogue access point, could also enable you to trick users into connecting to your network.
Fortunately for your budget, the Pi 3 and Pi Zero W both are capable of working as an access point and should work with whatever Linux distribution you may have running on your Pi. To do so, we'll be using hostapd and DNSmasq, which have been recently patched after Google's security team discovered several serious vulnerabilities.
What You'll Need to Get Started
- Raspberry Pi 3 or the Pi Zero W.
- microSD card with Kali Linux or Raspbian image loaded
- power supply
- Ethernet cable
For this guide, we will assume that you already have a Raspberry Pi 3 running Raspbian or Kali Linux. If you don't, consult our previous How to Set Up a Headless Raspberry Pi Hacking Platform Running Kali Linux.
Update the OS & Install HostAPD
Before we start, make sure that the Pi is connected to both Ethernet and power. Best practice is to make sure that you are starting off with the Pi running the most up-to-date software, so let's update first. Open a terminal window and type the following.
sudo apt-get update
sudo apt-get upgrade
After your OS finishes updating, let's install hostapd and dnsmasq.
Hostapd is the package that will actually let us use the Pi as a Wi-Fi access point. While we are using the internal Wi-Fi in this build, we could use any number of Wireless Network Adapters.
Dnsmasq is an easy-to-configure software package that acts as both a Dynamic Host Configuration Protocol (DHCP) and Domain Name Server (DNS). DHCP is the standardized protocol that dynamically issues network configuration parameters. We will be using it to assign IP addresses to interfaces and services.
DHCP is why you only have to input a password when connecting to a new wireless access point, it handles the configuration after that for you. DNS, on the other hand, translates between IP addresses and domain names and is vital to being able to use the internet. It is why you can go to wonderhowto.com without having to know the IP address the website is actually hosted at.
Let's download both by typing the following into terminal.
sudo apt-get install hostapd
sudo apt-get install dnsmasq
If you ever find that you need something more robust and are a more advanced Linux user, you can use isc-dhcp-server for DHCP and bind9 for DNS, as they both give the user more advanced control and offer an enterprise-grade solution. We will not be using them in this guide in an effort to keep things as simple as possible.
Configure the Interface
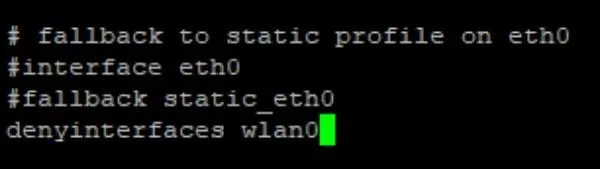
By default, dhcpcd handles interface configuration. Because we are going to set up a static wireless IP later we need it to ignore wlan0, the default Wi-Fi card, and prevent interfaces from using it. This should prevent anything from interfering with our access point. Open the file in nano for editing.
sudo nano /etc/dhcpcd.conf
Place the following line at the end of the file. If you have added any interfaces, then place this above them in order to deny them wlan0.
denyinterfaces wlan0
On a fresh install, I just placed it at the end of the file.
To save our changes in nano, we need to Ctrl + X then Y then Enter. Remember this key combo, as we will use it a lot.
Static IP Address
We're now ready to set a static wireless IP for our hotspot, just like any router does. If we didn't, devices attempting to connect to the hotspot wouldn't be able to find it. We'll do this by editing the interfaces file by typing the following into terminal.
sudo nano /etc/network/interfaces
The wlan0 settings are the most important for connecting to the Pi. If you decide to change them, be sure to do the same on each step below, or your hotspot will not work. In nano, go ahead and replace everything from the line that says "auto lo" down with the following.
auto lo
iface lo inet loopbackauto eth0
allow-hotplug eth0
iface eth0 inet static
address 192.168.1.2
netmask 255.255.255.0
gateway 192.168.1.1
dns-nameservers 8.8.8.8 8.8.4.4allow-hotplug wlan0
iface wlan0 inet static
address 192.168.220.1
netmask 255.255.255.0
network 192.168.220.0
broadcast 192.168.220.255
# wpa-conf /etc/wpa_supplicant/wpa_supplicant.conf
I also set a static Ethernet IP for this tutorial, but you may want to leave it dynamic by typing iface eth0 inet dhcp into a terminal window, and then leave out the addresses directly after that. For more details on this, look at the network configuration wiki.
Having a dynamic IP address is important if you plan on connecting it to an unknown network that may already have another device using that IP, otherwise you could end up with IP collisions. IP collisions are when two different devices are given the same IP address, which can confuse the network and cause it to ignore packets from both.
When you are done it should look something like this.
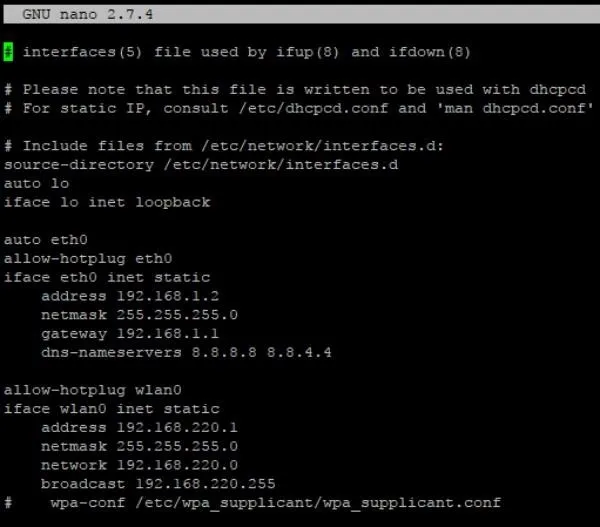
When it looks the same, Ctrl + X then Y then Enter to save.
After exiting nano, we need to restart dhcpd to have it load in the changes that we made to the configuration file, and then do the same for wlan0. We will do so by typing the following into a terminal window.
sudo service dhcpcd restart
sudo ifdown wlan0; sudo ifup wlan0
Hostapd Configuration
Next, we are going to configure hostapd. To do this, we will open the file with nano by typing the following into terminal.
sudo nano /etc/hostapd/hostapd.conf
Next, add the following lines, which will set up how we want wlan0 to work.
# WifI interface and driver to be used
interface=wlan0
driver=nl80211# WiFi settings
hw_mode=g
channel=6
ieee80211n=1
wmm_enabled=1
ht_capab=[HT40][SHORT-GI-20][DSSS_CCK-40]
macaddr_acl=0
ignore_broadcast_ssid=0# Use WPA authentication and a pre-shared key
auth_algs=1
wpa=2
wpa_key_mgmt=WPA-PSK
rsn_pairwise=CCMP# Network Name
ssid=Pi3-AP
# Network password
wpa_passphrase=raspberry
The main things you will want to change are the SSID (service set identifier) and wpa_passphrase at the bottom of the file. The SSID is the hotspot name, and how your device identifies the network.
The wpa_passphrase is the password to the AP. It is very important to create a strong password, or else anyone could access your network. For the more advanced, you may also wish to change the default channel the AP will transmit on, as 6 is the most commonly used by Wi-Fi and easily gets crowded.
If you ever chose to use a network adapter other than the built-in Wi-Fi module, the driver will have to be changed to the driver suitable for the Wi-Fi dongle.
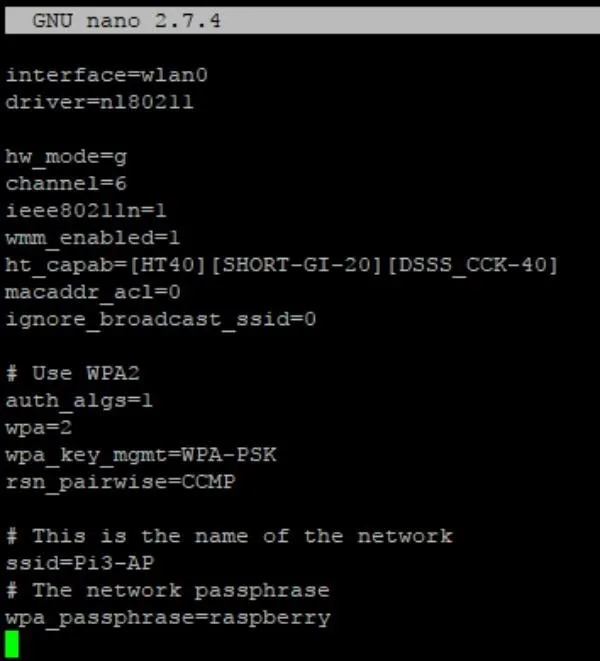
When complete, hitCtrl + X then Y then Enter to save.
Once that is finished, we need to tell hostapd how to find the file. We'll do this by adding to two files.
The first we can open by typing sudo nano /etc/default/hostapd into a terminal window and change the DAEMON_CONF line near the top to read like so.
DAEMON_CONF="/etc/hostapd/hostapd.conf"
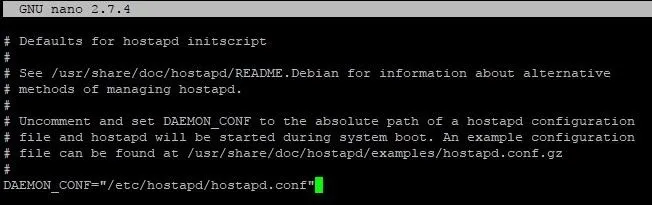
When complete, hit Ctrl + X then Y then Enter to save.
The process to add to the second is much the same. Open the file by typing sudo nano /etc/init.d/hostapd into a terminal window, and then change DAEMON_CONF line to read as follows.
DAEMON_CONF=/etc/hostapd/hostapd.conf
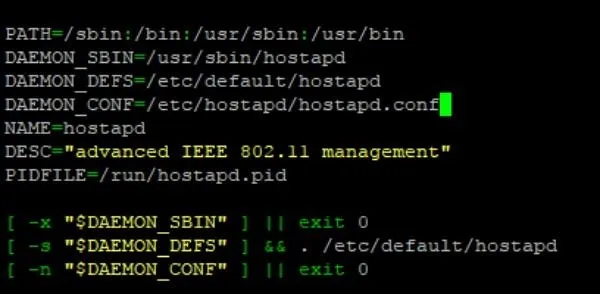
When it looks like the photo above, hit Ctrl + X then Y then Enter to save.
Dnsmasq Configuration
The default dnsmasq configuration file is complex and wouldn't work for our needs. It will be much easier, in this case, for us to start from a blank file.
Because it's good practice, and just in case we ever need it in the future, we'll move the default configuration file out of the way. In terminal, we can do this by by typing sudo mv /etc/dnsmasq.conf /etc/dnsmasq.conf.orig, and create our own new blank file by typing sudo nano /etc/dnsmasq.conf.
With the blank file now open in nano, add the following lines.
interface=wlan0
listen-address=192.168.220.1
bind-interfaces
server=8.8.8.8
domain-needed
bogus-priv
dhcp-range=192.168.220.50,192.168.220.150,12h
This tells dnsmasq to use wlan0 and listen on 192.168.220.1. We also do a few other things: binding interfaces again to make sure they aren't sending, forwarding DNS requests to Google, not forwarding short names, dropping non-routed address, and assigning IPs between 192.168.220.50-150 with a 12-hour lease.
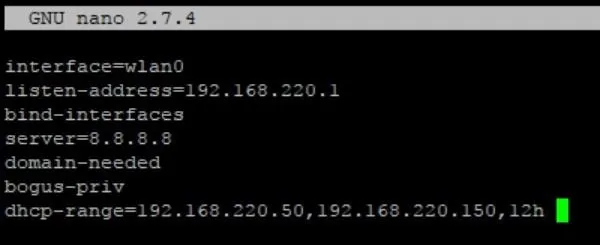
When yours looks like the image above, hit Ctrl + X then Y then Enter to save.
IPv4 Forwarding
Now, we have the Wi-Fi side of things set up, but it isn't going to be much of a hotspot if it can't connect to the internet. Let's fix this by forwarding the wlan0 traffic to the ethernet connection.
The first thing to do is open the sysctl.conf file by typing sudo nano /etc/sysctl.conf into terminal, and then uncomment the following line by removing the #.
net.ipv4.ip_forward=1
When done, it should look like below.
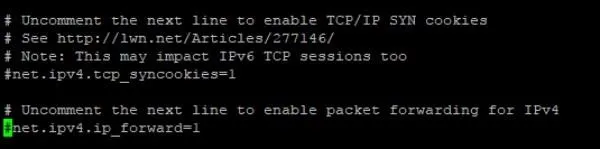
Save and exit by hittingCtrl + X then Y then Enter.
This change would normally not be applied until the Pi is rebooted, but we don't have to do that. Instead, we can restart the service by typing the following.
sudo sh -c "echo 1 > /proc/sys/net/ipv4/ip_forward"
With the IPv4 forwarding now working properly, we can get our NAT (network address translation) between wlan0 and eth0 up and running. To do that, we need to update our iptables. We'll do this by entering the following lines into terminal, one by one.
sudo iptables -t nat -A POSTROUTING -o eth0 -j MASQUERADE
sudo iptables -A FORWARD -i eth0 -o wlan0 -m state --state RELATED,ESTABLISHED -j ACCEPT
sudo iptables -A FORWARD -i wlan0 -o eth0 -j ACCEPT
It should look like the image below.

That's it! Everything would work now, but there is one hiccup. The iptables are flushed with every boot, meaning they'd need to be reset. You could go in and update them every time ,but that would get annoying fast, and we are lazy, so we need to make them persistent.
Luckily there's a package for that. Download it by typing the following into terminal.
sudo apt-get install iptables-persistent
When the dialogue box pops up, make sure Yes is selected and press Enter this will save our current iptables. It will also ask about IPv6 too, it shouldn't affect anything but save them anyway.

If you ever need to change the iptables in the future, do so, and then save those changes by typing sudo netfilter-persistent save into a terminal window.
Now, we only need to enable the service by typing the following.
sudo systemctl enable netfilter-persistent
Enable Services
The last step is to start hostapd by typing sudo service hostapd start ,and dnsmasq by typing sudo service dnsmasq start. After typing each, wait a few seconds and check another Wi-Fi enabled device to see if you can see the access point.
This will be different if you used another SSID in step three. Hopefully, your password has been changed too, as raspberry is the very definition of an easy-to-guess password. Below, we see the hotspot showing up.

To make sure everything will work properly, it's a good idea to go ahead and reboot the Pi with sudo reboot. Make sure the Pi is connected to Ethernet, and connect to the Pi's hotspot again and try to access the internet.
Conclusion
Today, we learned how to quickly turn our Raspberry Pi 3s or Pi zero Ws into a wireless hotspot using a few easy-to-install packages. While simple, it is still quite useful to have wireless access to any network, or pop up a wireless AP on demand. This project also makes a great building block, which we will be able to expand on in the future. Future projects, such as adding OpenVPN to route all the traffic through a VPN, or enabling a Pi-based surveillance camera, will build off this method.
Thanks for reading, and if you have any questions, please leave a comment here or send me a message on Twitter!
- Follow me on Twitter
- Follow Null Byte on Twitter and Google+
- Follow WonderHowTo on Facebook, Twitter, Pinterest, and Google+
Cover photo and screenshots by Hoid/Null Byte


Comments
Be the first, drop a comment!