Greetings all.
I'm back with another informational review of the diversity of utilities for use in the sphere of hacking at your disposal. Today we are going to cover the insides of CUPP (Common User Passwords Profiler) in its entirety. The tool is very basic in nature, as there is little to no configuration needed to get cracking (worst pun ever). So let's get started, shall we?
First and foremost, get ahold of CUPP if you don't have it already, and unzip it. You will find there are 3 files and a folder inside the main folder (those being README.md + cupp.cfg + cupp.py + /docs/). However, the only items that are of use and concern are cupp.cfg and cupp.py because those are the only ones that are used in the process.
In Terminal, navigate to the parent folder of these files. List the contents to make sure you are in the correct directory.
> cd /path/to/cupp-master
> ls
README.mdcupp.cfgcupp.pydocs
Now that you're in the right place, let's move onto using CUPP and understanding it. To be totally honest, there is little here to get your head around, but I will go through the steps for those who are clueless as to how the command line operates. To use CUPP you can input one of the two commands:
> python cupp.py
OR
> ./cupp.py
Both work so fear not.
Now we are presented with a few options.
-h : This is of no use other than to point out the configuration file's name, but I'm sure we have figured that out by now.
-i : The interface for profiling your victim.
-w : Useful if you already have a wordlist and wish to diversify it.
-l : Choose different wordlists to download from a preset repository.
-a : Download default usernames and passwords from a preset database.
-v : Displays the version of CUPP being used.
Interface (-i)
In order for you to actually profile someone, to be able to go to measures such as making a list of possible passwords they could use, you must first gain a fair amount of intelligence on your victim. However you may choose to do that, make sure that the information is verifiable or else you're just burning daylight. Once you have all the necessary information about the victim written down or remembered, go ahead and proceed to the profiling interface.
> python cupp.py -i
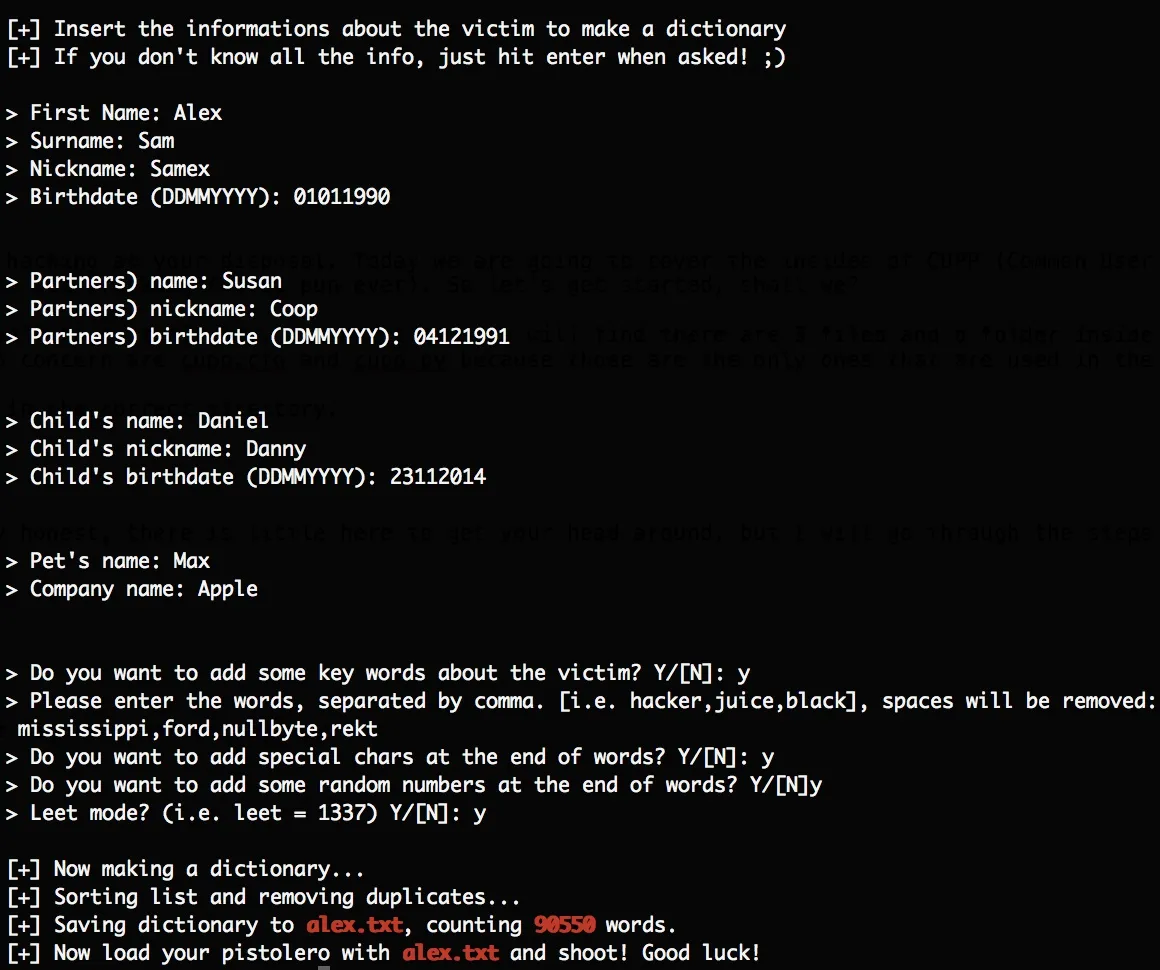
From there you can take it on your own in this section. Here is a fictitious example that I made to demonstrate each step taken by CUPP to formulate the password list.

The output file was under 1 megabyte and consisted of 90550 word entries. And mind you, that would not be considered a great wordlist, since those rank in sizes of gigabytes and such.
Diversification (-w)
If you are set and ready with a password list filled with information about your victim, you may want to consider expanding its contents just to be sure to cover as much ground as possible and increase your chances of hitting the mark. Let's explore this step. The syntax of this option is as follows.
> python cupp.py -w filename
The filename is the location of the wordlist to which you desire to bring sophistication. To put words into action, type the command above with your wordlist included. You will then be presented with four questions. Answer as you wish, but I suggest you answer Y to all of them if you intend to make the most of this option. Once completed, the output will be generated into filename.txt.cupp.txt in the same folder as your original filename.
Downloads (-a and -l)
At some point you might want to make use of wordlists that others have compiled and already probed and proved to be functional. In that case there are two options embedded in CUPP to help you with exactly that.
> python cupp.py -a
This immediately starts downloading default username and passwords from Project Alecto's database. The list is comprised of an enhanced and purified version of Phenoelit's and CIRT's merged databases.
> python cupp.py -l
This brings you to an options menu which displays a number of categories for wordlists to be retrieved from. Type the number corresponding to the category of your choice and the download will begin. There will be several outputs, all of which will be store in /dictionaries/category/ of the CUPP main folder. To view the contents of the wordlists, you must first unzip the files since they all use the .gz extension. So navigate to the dictionaries/category folder and do just that.
> cd dictionaries/category
> gunzip filename.gz
You can now go ahead and remove the filename.gz files that you've already unzipped.
Conclusion
Our work here is done. You are now equipped with an additional tool, which you can add to your arsenal, that simplifies profiling to the most basic of all command-line interfaces. I hope some of you found this how-to useful. Keep in mind, this is only the beginning. I will keep adding content to NullByte as much as I can, regarding tutorials and informational manuals. If you have any suggestions for me to take into account, I am more than happy to take them in.
Start slow and keep steady fellows.
TRT


Comments
Be the first, drop a comment!