


Virtual private networks, or VPNs, are popular for helping you stay anonymous online by changing your IP address, encrypting traffic, and hiding your location. However, common IoT devices, media players, and smart TVs are hard to connect to a VPN, but we have a solution: Turn a Raspberry Pi into a router running through PIA VPN, which will ensure every connected device gets the VPN treatment.
It's best to think of what we are building as an add-on to your home router. We will link the Pi directly to the home router and set up a VPN client on it. We can then simply point devices on our network to the Pi, which will take the traffic, encrypt it, and run it through our VPN.
This makes it much easier to secure traffic from Internet of Things (IoT) devices, such as a Chromecast and Apple TV, and helps decrease the CPU usage on our computers by having the Pi do all the hard work. The real hidden gem here is that this system will only count as one device.
Let me explain. Many VPN providers limit the number of devices you can have connected at the same time. For example, PIA, or Private Internet Access, limits us to five. By directing the traffic through the Pi, it appears as only one device to PIA, and our Pi build can handle 5–6 devices connected to it, depending on how much data they use.
This is super helpful if you have a lot of little devices in your house. By using five Pis like the one we are about to build, you could have 25–30 devices connected on one PIA subscription.
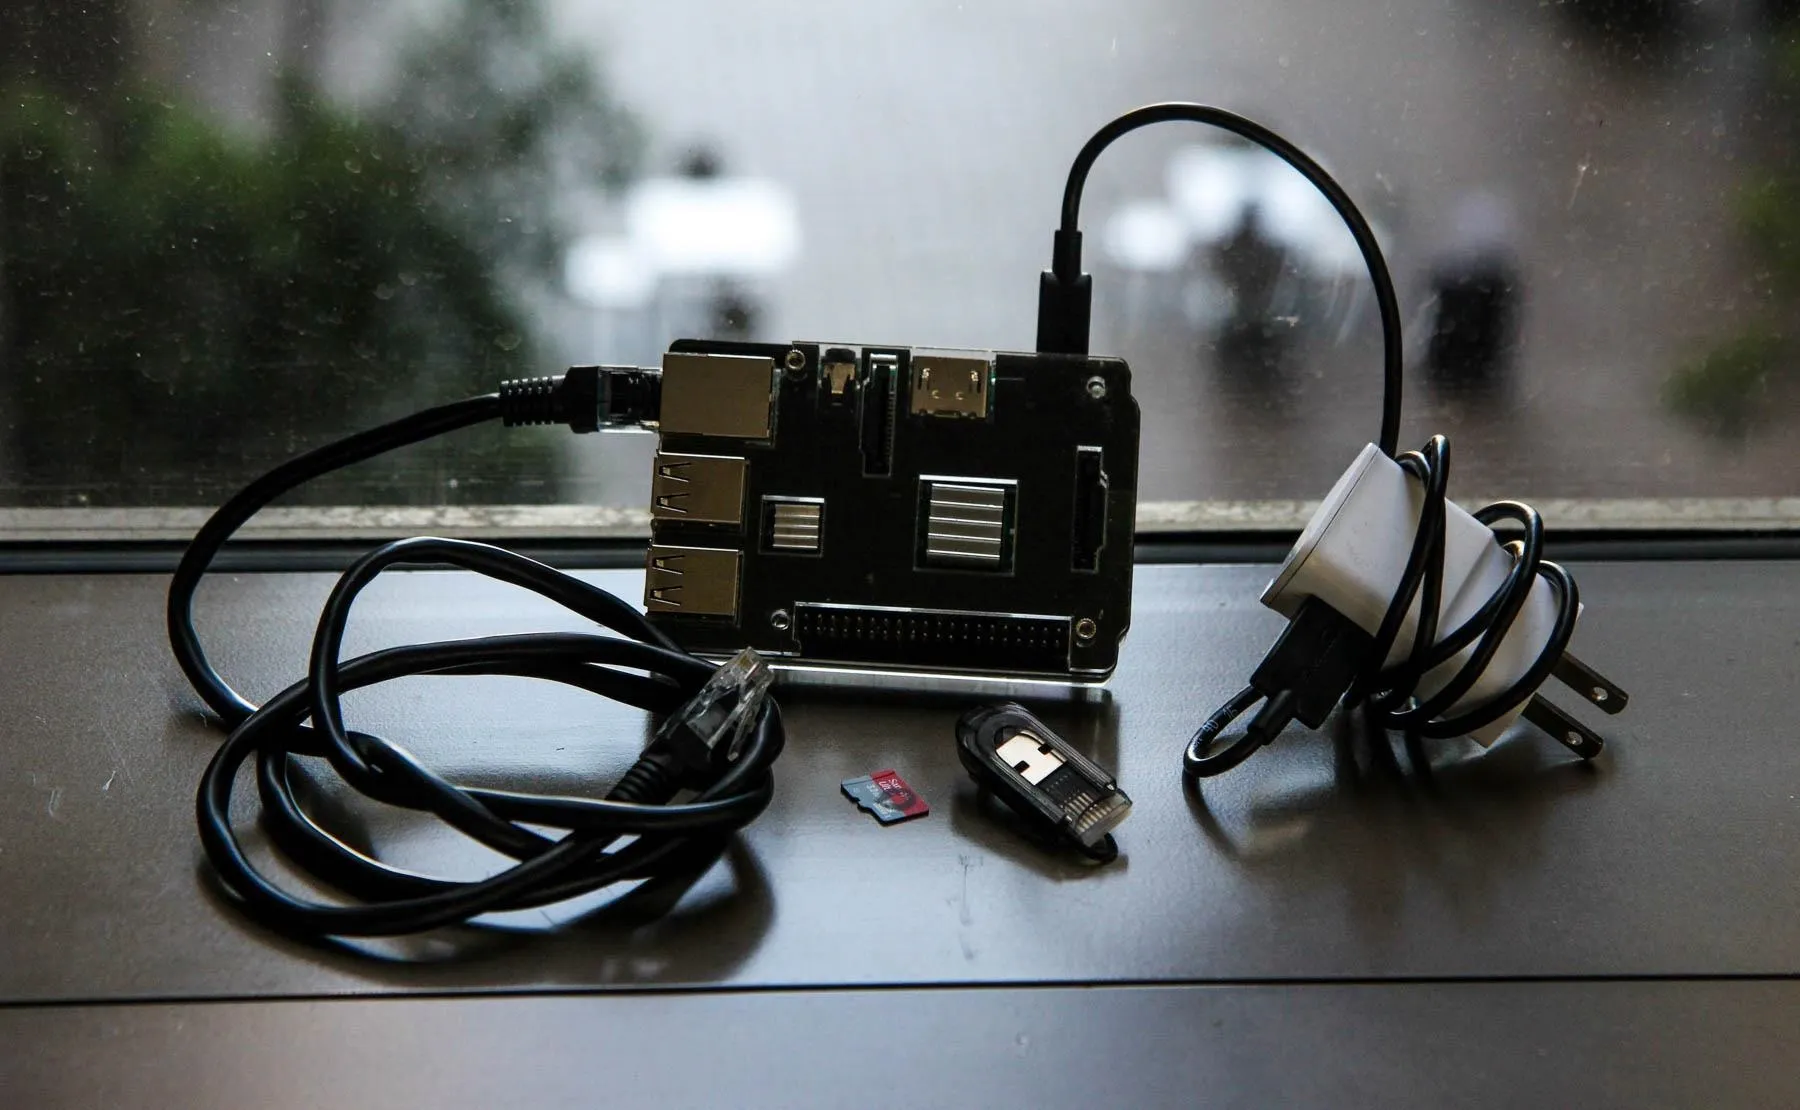
SADMIN/Null Byte
Let's dive in and get started. If you already have a Raspberry Pi up and running, then you can skip steps two, three, and four below.
What You'll Need to Get Started
Sign-Up for Private Internet Access
To begin, we will need a Private Internet Access membership. We picked PIA because of its reputation for not logging and its good standing in the community, but it's important to be aware that with any VPN provider, you simply can't know for sure that there is no logging.
Some services may collect metadata like DNS requests, who you connect to, and what exit node you connect to, which is enough to cover themselves and arrest you for doing anything really bad. Very few VPN providers would be willing to go to jail for crazy stuff you do on their service. PIA supports the Electronic Frontier Foundation and works with open-source projects to protect privacy, so we recommend their service.
PIA will run you $6.95/month and you can cancel at any time. If you want to save a little money, you could get their 6-month plan for $35.95 (which equals out to $5.99/month) also, but their best plan is the yearly one at $39.95 (equaling $3.33/month). If you don't like the service within 7 days of testing it out, you can ask for a full refund.

Once you sign up, you will get an email that includes your username and password. Make sure to write down your username and password, as we will need these later.
Install a BitTorrent Client (If You Don't Have One)
In the next step, we'll be downloading Raspbian for the Raspberry Pi. The fastest way to do that is with a BitTorrent client. If you already have one, then that's great! Use it. Otherwise, we need to download one. This guide uses Deluge which works for Windows, Mac, and Linux. Once you navigate to the Deluge website, download the latest version for the operating system you are using and follow the on-screen instructions to install it.
Download the Raspbian Image
Now that we have Deluge (or another BitTorrent client) installed, we can use it to download Raspbian via torrent. Once the file is downloaded, you only need to click on it and Deluge should open and start downloading it.
Flash the Image to the MicroSD Card
We need to write the image to our microSD card. The best practice is to unplug any external hard drives or other USB devices you have, and then insert your microSD into its adapter and plug it in. This is important because you don't want to accidentally flash the wrong device.
If you already have a program to flash the image to the card, then you can use that. Otherwise, install Etcher, as it's the easiest to use for making bootable SD cards. It works on Windows, Mac, and Linux, while also having a simple to use interface.
Etcher should detect what operating system you are using, but if not, make sure you download the correct version based on your operating system, then open the file and follow the on-screen installation directions. Open Etcher (if it doesn't automatically open after installation), and select the image you just downloaded.
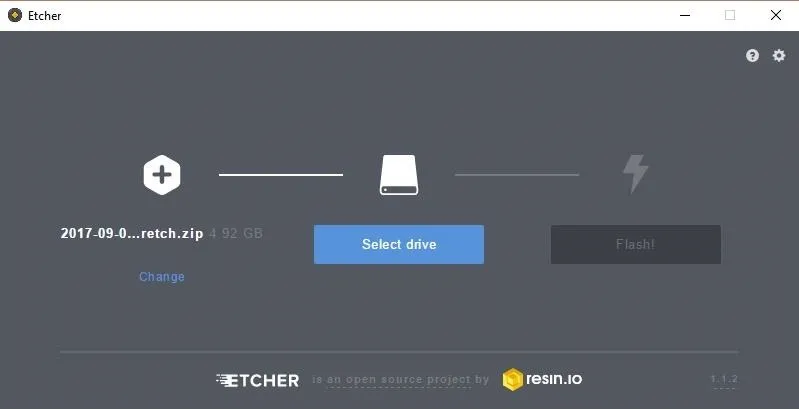
Next, be sure the proper drive is selected and flash the image. Once it's done, it will safely eject the SD card.
There is a rare chance that Etcher will cause an error. If that does happen, use ApplePiBaker for Mac or Win32 Disk Imager for Windows.
If you plan on using a Secure Shell (SSH) to access your Pi, then you will want to add an empty file ssh with no file type to the boot folder on the microSD card.
Start Your Pi
Insert the SD card into the slot at the bottom of your Raspberry Pi and plug the Pi into both Ethernet and power. The other end of the Ethernet cable goes into your router (which is wired or wirelessly connected to your computer).
You can now connect to your Pi however you like. I'm old-school, so I just SSH into the Pi using PuTTY or the Secure Shell extension for Chrome.
Remember the username is pi and the password is raspberry. After you connect, make sure to change the password with passwd, and then update your Pi:
sudo apt-get update
sudo apt-get upgrade
sudo apt-get dist-upgrade
Enable a Static IP Address
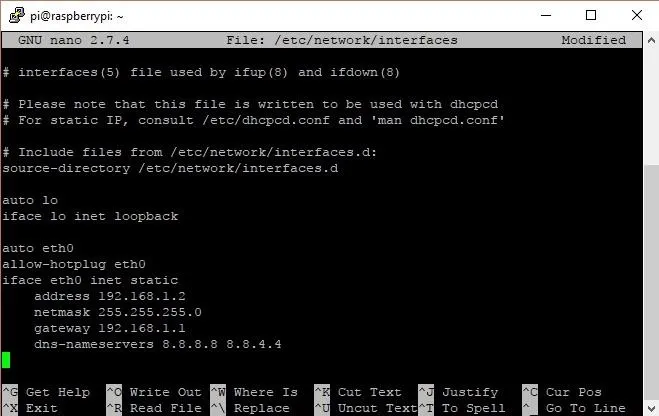
Now, we are ready to get started setting our Pi up to route traffic through our VPN. To do that, we'll need to know which gateway to point our devices at, thus we need to create a static IP address. To begin, let's open the proper file for editing with:
sudo nano /etc/network/interfaces
And then, let's add the following.
auto lo
iface lo inet loopbackauto eth0
allow-hotplug eth0
iface eth0 inet static
address 192.168.1.2
netmask 255.255.255.0
gateway 192.168.1.1
dns-nameservers 8.8.8.8 8.8.4.4
You may need to change the exact IP address, depending on how your network is set up and what you want it to be. In the end, it should look something like this:
Now you are ready to save the file with Ctrl-X and Y, then Enter.
Set Up the VPN Client
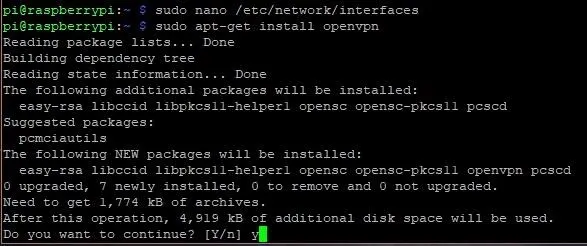
We will use OpenVPN for this build, but our Pis don't have it pre-installed, so we can download it now by typing sudo apt-get install openvpn into a terminal.
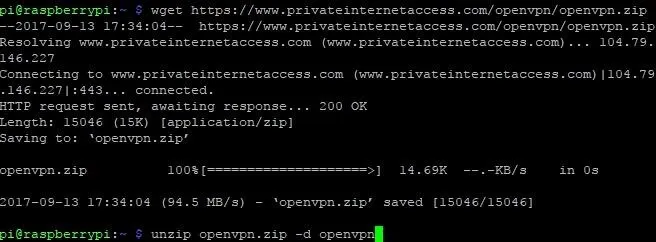
Then we can download the PIA files, such as the certificates we will need, with wget, and then unzip and copy them over to OpenVPN. To do so, we'll type the following.
wget https://www.privateinternetaccess.com/openvpn/openvpn.zip
unzip openvpn.zip -d openvpn
sudo cp openvpn/ca.rsa.2048.crt openvpn/crl.rsa.2048.pem /etc/openvpn/
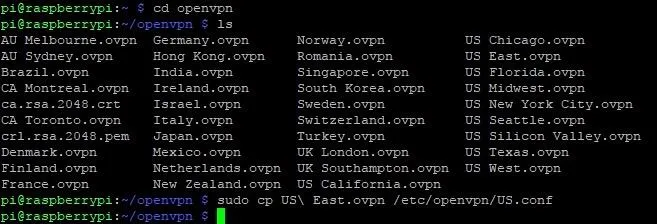
Move to the OpenVPN directory with cd openvpn, and look at your region choices with ls.
Remember those locations close to you will be faster with less lag, but will also cause your IP to appear to come from that area. Once you decide on one, we need to copy it over too. Say I wanted to use US East, I would need to type in:
sudo cp US\ East.ovpn /etc/openvpn/US.conf
Don't forget, you need to put a \ in front of spaces for the file name.
Next, we need to give the program our PIA login credentials from before. To do this, we will create a login file with
sudo nano /etc/openvpn/login
Then we put our username on one line, and the password on the next.

Just as before, when using nano, save the file with Ctrl-X and Y, then Enter. Now, we will configure the file from before so that it knows where to find everything. Open it with sudo nano /etc/openvpn/US.conf, then edit the following lines seen in the screenshot below.
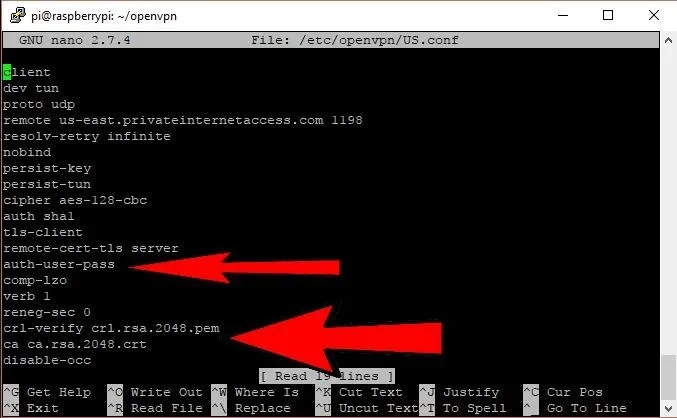
Change them to read like as below. Note you are not deleting any lines, just changing those three.
auth-user-pass /etc/openvpn/login
crl-verify /etc/openvpn/crl.rsa.2048.pem
ca /etc/openvpn/ca.rsa.2048.crt
You know the drill: Save the file with Ctrl-X and Y, then Enter. Then, reboot the system to apply all the changes we have made by typing sudo reboot.
Test the VPN
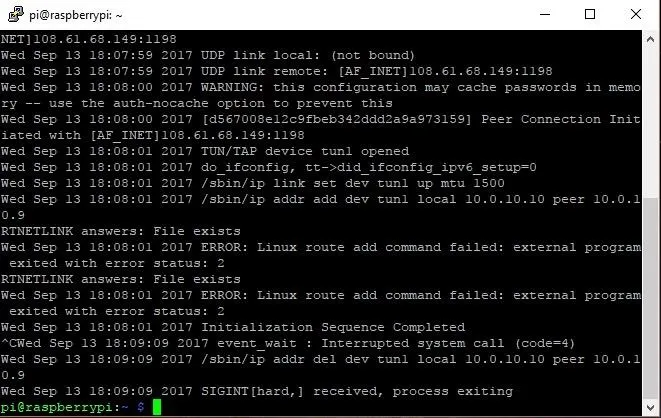
If we did all the previous steps right, we should have a working VPN now! Just reconnect to the Pi after it reboots. We can test that it is working by running:
sudo openvpn --config /etc/openvpn/US.conf
If all is working, the last line should read some date, then "Initialization Sequence Completed," and you shouldn't have a command prompt. You can exit out with Ctrl-C. If it fails for some reason, then the most likely cause is that you put in your login information wrong, so go back and check it before retrying.
Once we have tested that the VPN is connected to PIA and running properly, then we are ready to tell the Pi to run it on boot by typing the command:
sudo systemctl enable openvpn@US

From now on, our Pi will connect every time it starts.
Enable Forwarding
Great, now we have a working VPN, but to use it as we intend, we need to be able to forward network traffic to the Pi. Just in case you thought we hadn't played around with enough conf files yet, we get to open another one by typing:
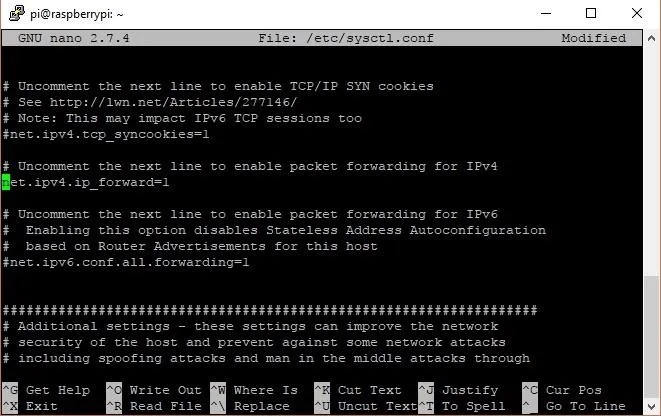
sudo nano /etc/sysctl.conf
It's a big file, but we only need to uncomment one line by deleting the "#" before "net.ipv4.ip_forward = 1." When done, it should look like the picture below.
Save the file and restart the service to finalize the changes we made. To do this, you could reboot, if you really wanted to, or just do it the easy way with sudo sysctl -p.

Next, we need to change the rules for the IPTables. Just copy and paste from below to save time. Copy each line individually and press Enter after each one, not the whole thing together.
sudo iptables -A INPUT -i lo -m comment --comment "loopback" -j ACCEPT
sudo iptables -A OUTPUT -o lo -m comment --comment "loopback" -j ACCEPT
sudo iptables -I INPUT -i eth0 -m comment --comment "In from LAN" -j ACCEPT
sudo iptables -I OUTPUT -o tun+ -m comment --comment "Out to VPN" -j ACCEPT
sudo iptables -A OUTPUT -o eth0 -p udp --dport 1198 -m comment --comment "openvpn" -j ACCEPT
sudo iptables -A OUTPUT -o eth0 -p udp --dport 123 -m comment --comment "ntp" -j ACCEPT
sudo iptables -A OUTPUT -p UDP --dport 67:68 -m comment --comment "dhcp" -j ACCEPT
sudo iptables -A OUTPUT -o eth0 -p udp --dport 53 -m comment --comment "dns" -j ACCEPT
sudo iptables -A FORWARD -i tun+ -o eth0 -m state --state RELATED,ESTABLISHED -j ACCEPT
sudo iptables -A FORWARD -i eth0 -o tun+ -m comment --comment "LAN out to VPN" -j ACCEPT
sudo iptables -t nat -A POSTROUTING -o tun+ -j MASQUERADE
The first two lines above enable loopback for those services that require it, and the next two lines allow traffic in from the LAN network and out to the VPN.
After that, we enable sockets then NTP (Network Time Protocol) so that the Pi and VPN can synchronize clocks. Then we enable DHCP (Dynamic Host Configuration Protocol) and output through the VPN tunnel. Next, and probably most importantly, we install a kind of kill switch which only allows forwarding when the VPN is alive. In practical terms, this means that once we have a device connected to our Pi, it will be disconnected from the internet whenever the VPN stops working.
Unless you really want to reconfigure that every time you start up the Pi, you need to make those changes persistent. To do that, we use the iptables-persistent service, which you can download by running the command:
sudo apt-get install iptables-persistent
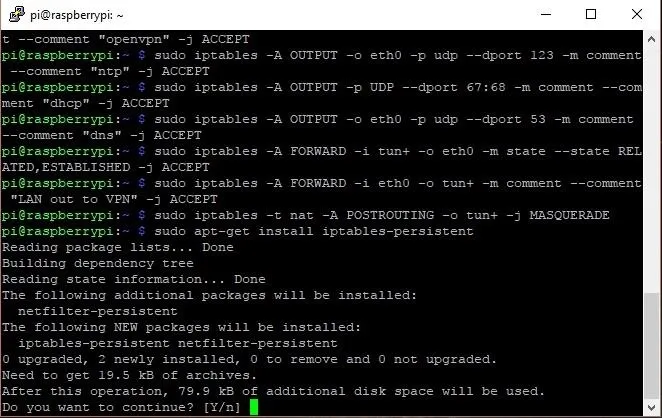
You will be asked about saving the rules. Naturally, you want to save the current ones, so select "Yes" and press Enter.

If you ever need to update or change the rules for whatever reason, you can do so with the sudo netfilter-persistent save command.
Since we already did that, we now only need to tell the Pi to run these settings on boot. To do this, type:
sudo systemctl enable netfilter-persistent
At this point, we are all done with the Pi side of things! Just reboot to make sure all the updates are working properly. You can do this by running sudo reboot.

Direct Traffic to Your Pi
The last thing left to do is point whatever devices you want to be using PIA to the Pi's static IP address. It's impossible to go over every device you might want to do this on, but to just give an idea of what needs to be done, let's look at how to do it on Windows 10.
To test the result, google "IP" in your browser, and at the top of the search results, Google should tell you your public IP address. Note it down or keep the tab open.

Next, go to "Control Panel" -> "Network and Internet" -> "Network Connections," and select "Ethernet" or "Wi-Fi," based on how you're currently connected. I'm on Wi-Fi, so I'll double-click on that, then click on "Details" in the pop-up window.
I'm looking for my computer's current IP, you'll want to write that down. You can also find the IP of devices on your network with a program like Nmap or Fing, which can be quite helpful when connecting something like an Apple TV.
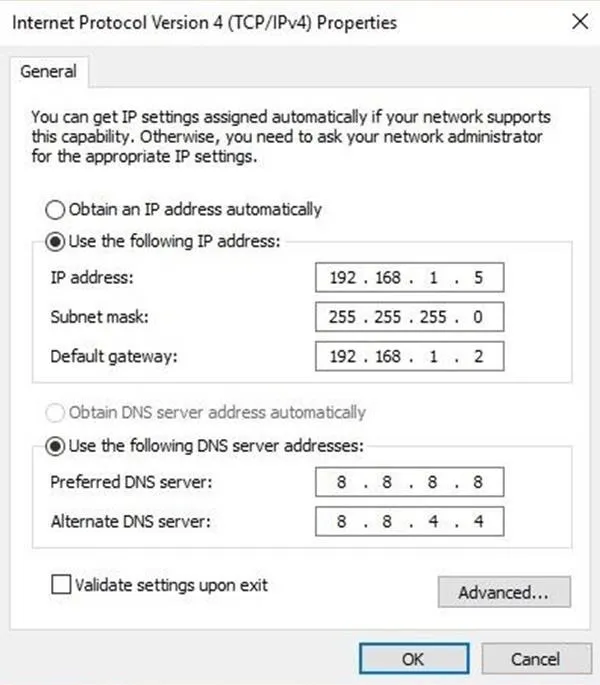
Return to the first popup and click on "Properties." Select "IPv4" by clicking it. You will be brought to a window like the one below. You want your device to keep the same local IP, so fill that in from before. The Subnet mask should be 255.255.255.0, and then the Default gateway is our Pi, so enter our static IP of 192.168.1.2. These may be different depending on how you have your network set up and what you put as your static IP back in Step 5.
Last, we are using the Google DNS, so change the DNS server to be 8.8.8.8 and 8.8.4.4, and the whole thing should look something like this when complete.
Now we can go back to Google and search "IP" as we did before. If it's working, this time our IP address should be different. Congratulations, your device is now running on a VPN!
In general, when connecting devices, just remember to do these steps:
- Locate the device IP address.
- Go to "Advanced Wi-Fi/Network" settings.
- Keep the same IP as before but use the Pi's IP as the gateway.
All of Your Devices Can Now Use a VPN
Now you can connect any device on your network to PIA to secure your IP address and encrypt your data. In a future article, we will look at how to make this a more mobile setup by turning the Pi into a mobile hotspot that we can take with us anywhere. Thanks for reading! If you have any questions, you can ask them here or hit me up on Twitter @The_Hoid.
- Follow Null Byte on Twitter and Google+
- Follow WonderHowTo on Facebook, Twitter, Pinterest, and Google+
Cover image by Sadmin/Null Byte; Screenshots by Hoid/Null Byte


Comments
Be the first, drop a comment!