


Welcome back, my greenhorn hackers!
I've been writing these Linux tutorials in an attempt to fill the void in the education of some aspiring hackers into the Linux operating system. There is a lot to know, and in this tutorial, we'll look at Linux file permissions.

Checking Permissions
When we want to find the permissions on a file, we can simply use the ls command with the -l or long switch. Let's use that command in the pentest/wireless/aircrack-ng directory and see what it tells us about the files there.

If we look at each line, we can see quite a bit of info on the file including whether it's a file or directory, the permissions on the file, the number of links, the owner of the file, the group owner of the file, the size of the file, when it was created or modified, and finally, the name of the file. Let's examine each of these.
Identifying a File or Directory
The very first character of the line tells us whether it's a file or directory. If the line begins with a d, it's a directory. If it begins with a -, it's a file.

Identifying the Permissions
The next section of characters defines the permissions on the file. There are three sets of rwx that stands for read, write and execute. This determines whether there is the permission to read the file, write to the file, or execute the file. Each set of rwx represents the permissions of the owner, group, and then all others.
So, if we look at the second line for the ChangeLog file...
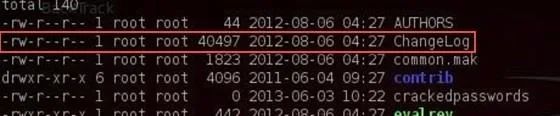
We can see that it begins with:
- -rw-r--r--
This means that it's a file (-) where the owner has read (r) and write (w) permissions, but not execute permission (-).

The next set of permissions represents those of the group. Here we can see that the group has read permissions (r), but not write (-) or execute permission (-).

Finally, the last set of permissions are for all others. We can see that all others have only the read (r) permission on the ChangeLog file.

Changing Permissions
Let's imagine a case where we wanted the group to be able to both write and execute the ChangeLog file. Linux has a command called chmod that allows us to change the permissions on a file as long as we're root or the owner of the file. These permissions are represented by their binary equivalents in the operating system.
The Numbers
Remember that everything is simply zeros and ones in the underlying operating system, and these permissions are represented by on and off switches in the system. So, if we could imagine the permissions as three on/off switches and these switches are in the base two-number system, the far right switch represents 1 when it's on, the middle switch represents 2 when it's on, and finally, the far left switch represents 4 when on.
So, the three permissions look like this when they are all on:
- r w x
- 4 2 1 = 7
If you sum these three, you get seven, right? In Linux, when all the permission switches are on, we can represent it with the decimal numerical equivalent of 7. So, if we wanted to represent that the owner (7) and the group (7) and all users (7) had all permissions, we could represent it as:
- 777
Now, lets go back to our ChangeLog file. Remember its permissions? They were rw-r--r--, so we could represent that numerically like:
- r w - r - - r - -
- 4 2 0 4 0 0 4 0 0
This can be represented by 644.
Changing the Actual Permissions of ChangeLog
Now, if we wanted to give the group write (2) and execute (1) privilege, we can use the chmod command to do it. We need to add the write (2) privilege and the execute (1) privilege to the ChangeLog file. We do that by:
- chmod 7 7 4 ChangeLog
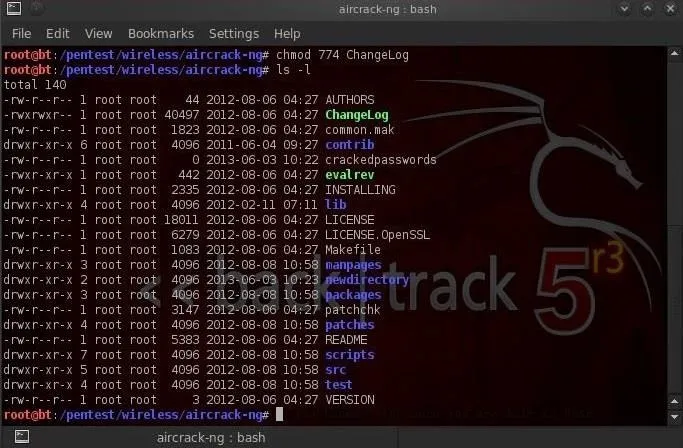
This statements says give the owner all permissions (4+2+1=7), the group the same (4+2+1=7). and give everyone else simply read permission (4+0+0=4). When we now do a ls -l, we can see that the permissions for ChangeLog are now:
- r w x r w x r - -
Simple, right?
Changing Permissions with UGO
Although the numeric method is probably the most common method for changing permissions in Linux (every self-respecting Linux guru can use it), there's another method that some people are more comfortable with. It's often referred to as the UGO syntax. UGO stands for U=user or owner, G=group and O=others. UGO has three operators:
- + for add a permission
- - for subtract a permission
- = to set a permission
So, if I wanted to subtract the write permission to the group that ChangeLog belongs to, I could write:
- chmod g-w ChangeLog
This command says "for the group (g) subtract (-) the write (w) permission to ChangeLog."

You can see that when I now check file permissions by typing ls -l, that the ChangeLog file no longer has write permission for the group.
If I wanted to give both the user and group execute permission, I could type:
- chmod u+x, g+x ChangeLog
This command says "for the user add the execute permission, for the group add the execute permission to the file ChangeLog."
Giving Ourselves Execute Permission on a New Hacking Tool
Very often as a hacker, we'll need to download new hacking tools. After we download, extract, unzip, make, and install them, we'll very often need to give ourselves permission to execute it. If we don't, we will usually get a message that we don't have adequate permission to execute.

We can see in the screenshot above that our newhackertool does not have execute permission for anyone.
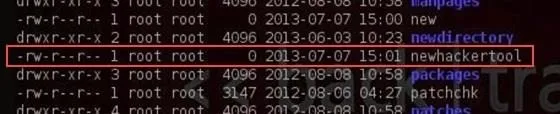
We can give ourselves permission to execute on a newhackertool by writing:
- chmod 766 newhackertool

As you now know, this would give us, the owner, all permissions including execute, and the group and everyone else just read and write permissions (4+2=6). You can see in the screenshot above that after running the chmod command, that's exactly what we get!
In my next Linux tutorial, we will look at managing running processes, so make sure to come back. If you haven't already, make sure to check out the first six parts of this series, and if you have any questions, ask them in the comments below or in the Null Byte forum.
Photos by Joe Shlabotnik, bazzat2003


Comments
Be the first, drop a comment!