


Bluetooth Low Energy (BLE) is the de facto wireless protocol choice by many wearables developers, and much of the emerging internet of things (IoT) market. Thanks to it's near ubiquity in modern smartphones, tablets, and computers, BLE represents a large and frequently insecure attack surface. This surface can now be mapped with the use of Blue Hydra.
Built on the bluez library, Blue Hydra employs built-in BLE hardware, which can be further enabled by the use of Ubertooth hardware, to discover and track not only low energy, but classic Bluetooth devices too. You can learn more about how Blue Hydra works by watching the Defcon 24 talk. In this tutorial, we will download Blue Hydra on a Raspberry Pi running Raspbian, and get started tracking.
Those of you already familiar with using Aircrack -ng will be right at home with Blue Hydra, as they are very similar.
If you want to get more familiar with Bluetooth security, Null Byte has you covered! You can get up to speed with Terms, Technologies, & Security, learn to Control Any Mobile Device, and get your Reconnaissance on.
What You'll Need to Get Started
- Raspberry Pi
- MicroSD card
- MicroSD card reader
- Power supply
- Bluetooth dongle (optional to improve range)
- Ubertooth hardware (optional to detect Classic devices not in discoverable mode) Not a replacement for a conventional Bluetooth dongle!
Download & Flash the Raspbian Image
First, we'll prepare the OS we'll be runnig Blue Hydra on. For this tutorial, we'll be using Raspbian. You can download the Raspbian image directly, or torrent via your favorite Torrent client on the Raspbian download site.
Once the download is complete, we need to write the image to our microSD card. It's a good idea to unplug any external hard drives or other USB devices you have, and then insert your microSD into its adapter and plug it in. This is important since you don't want to accidentally flash the wrong device.
If you already have a program for flashing live images to the card, then you can use that. Otherwise, download and install Etcher, as it's the easiest to use for making bootable SD cards. It works on Windows, Mac, and Linux, while also having a simple to use interface. Go ahead and open Etcher when it finishes installing.
Etcher should detect what operating system you are using, but if not, make sure you download the correct version based on your operating system, then open the file and follow the on-screen installation directions. Open Etcher (if it doesn't automatically open after installation), and select the image you just downloaded.
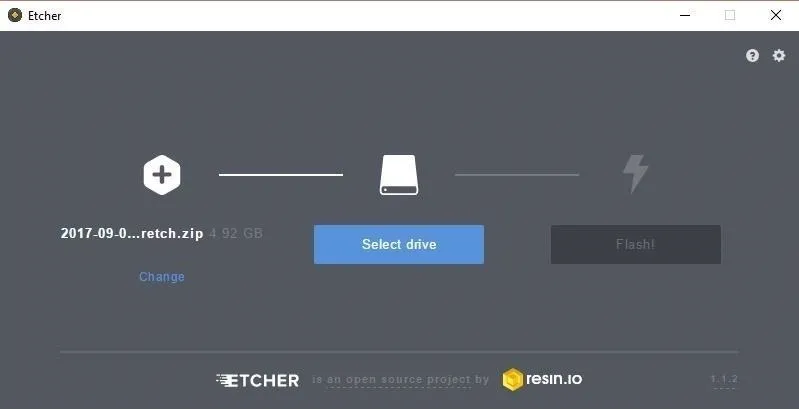
Next, be sure the proper drive is selected and flash the image. Once it's done, it will safely eject the SD card.
There is a rare chance that Etcher will cause an error. If that does happen, use ApplePiBaker for Mac or Win32 Disk Imager for Windows.
If you plan on using a Secure Shell (SSH) to access your Pi, then you will want to add an empty file ssh with no file type to the boot folder on the microSD card.
Start Your Pi
Insert the SD card into the slot at the bottom of your Raspberry Pi and plug the Pi into an HDMI cable leading to a display and a power cable. If you want to SSH into your Pi, make sure to plug the Pi into Ethernet, with the other end of the Ethernet cable going into your router (which is wired or wirelessly connected to your computer).
You can now connect to your Pi however you like. I'm old-school, so I just SSH into the Pi using PuTTY or the Secure Shell extension for Chrome.
Remember the username is pi and the password is raspberry. After you connect, make sure to change the password with passwd, and then update your Pi with the following commands.
sudo apt-get update
sudo apt-get upgrade
sudo apt-get dist-upgrade
Ubertooth Installation
If you aren't planning on using Ubertooth hardware, you should still follow these steps or Blue Hydra may not run correctly. If you are using an Ubertooth, make sure to plug it in before we start, as it may need a firmware update. Unfortunately, Ubertooth is not in the Raspbian repository, so we have to download it manually.
First, we need to install the dependencies for Ubertooth before we can build libbtbb and Ubertooth. This can take some time, but usually not much longer than 5 minutes.
sudo apt-get install cmake libusb-1.0-0-dev make gcc g++ libbluetooth-dev \
pkg-config libpcap-dev python-numpy python-pyside python-qt4

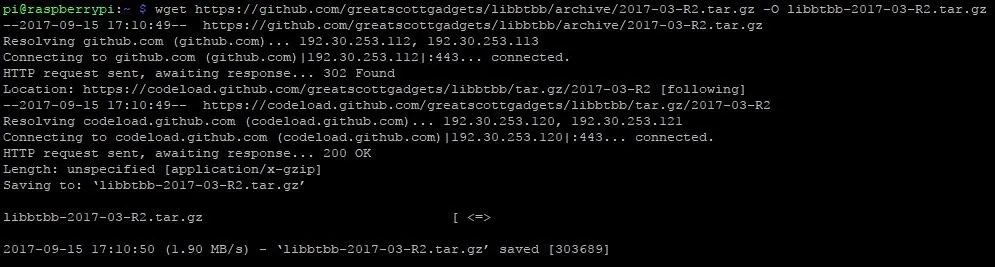
Now, we are ready to set up the Bluetooth baseband library, libbtbb. This lets the Ubertooth decode Bluetooth packets. Download the file from Github with the command below.
wget https://github.com/greatscottgadgets/libbtbb/archive/2017-03-R2.tar.gz -O libbtbb-2017-03-R2.tar.gz
Now, unzip it, navigate to the directory, and create a build directory by typing the following.
tar xf libbtbb-2017-03-R2.tar.gz
cd libbtbb-2017-03-R2
mkdir build
cd build

We are now ready to use cmake to install it.
cmake ..
make
sudo make install
Wonderful! Now that we have libbtbb installed, we are ready to install Ubertooth itself. Move to your home directory by typing cd and then are ready to do the same process as before to install Ubertooth file. Download it from Github.
wget https://github.com/greatscottgadgets/ubertooth/releases/download/2017-03-R2/ubertooth-2017-03-R2.tar.xz -O ubertooth-2017-03-R2.tar.xz
Then use the same process as before to install.
tar xf ubertooth-2017-03-R2.tar.xz
cd ubertooth-2017-03-R2/host
mkdir build
cd build
cmake ..
make
sudo make install
Lastly, move back home with cd, and if you actually have an Ubertooth device, make sure it is configured correctly with sudo ldconfig and ubertooth-util -v which should be "Firmware version: 2017-03-R2 (API:1.02)"

Now we are ready to install Blue Hydra's dependencies.
Install Blue Hydra Dependencies
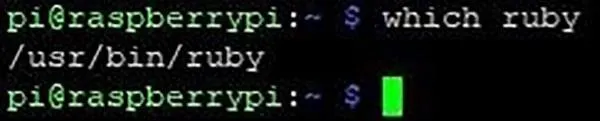
Blue Hydra runs on Ruby code, so first we need to check to see if we have that already installed by running which ruby. If that returns "/usr/bin/ruby" or something similar then you're good to go. If you don't have it then sudo apt-get install ruby-full
Start with downloading bundler
sudo gem install bundler
Now we are ready to install the long list of other dependencies required.
sudo apt-get install python-bluez python-dbus sqlite3 bluez-tools ruby-dev bluez bluez-test-scripts python-bluez python-dbus libsqlite3-dev

Install Blue Hydra
Now we are ready to clone Blue Hydra from Github

Then we need to move to the "blue_hydra" directory
cd blue_hydra
Before running the last command you should know that if you run it as root it could cause problems for other users that try to use Blue Hydra. If you only use root then you're fine, otherwise, you can use the sudo command as needed.
bundle install
Run Blue Hydra
Now we're ready to start tracking Bluetooth devices. Make sure that you have your Ubertooth connected if you are using one. Keep in mind that the use of multiple dongles such as having an external Bluetooth dongle and Ubertooth hardware can draw a lot of power so you want to be doubly sure that you have at least a 2.5A power supply or you may run into power issues. Now move to "blue_hydra/bin/", if you're already in "blue_hydra" just cd ./bin Then start the program with
sudo ./blue_hydra
There are also a number of flags you can use when you run the program:
- -d or --daemonize suppress Command Line Interface (CLI) output and run in background
- -z or --demo runs with CLI output but mask displayed macs for demo purposes
- -p or --pulse attempt to send data to Pwn Pulse
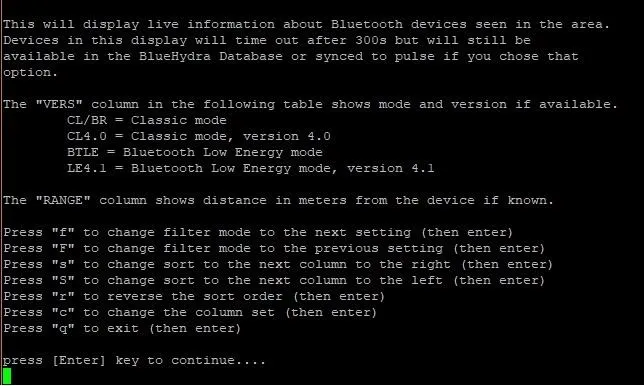
You may want to write down some quick notes about the controls before you press enter or you can just reference this screenshot.
To test it out I set off to the local Starbucks, for reference you can see how crowed it was below.

Hoid's local Starbucks at the time.
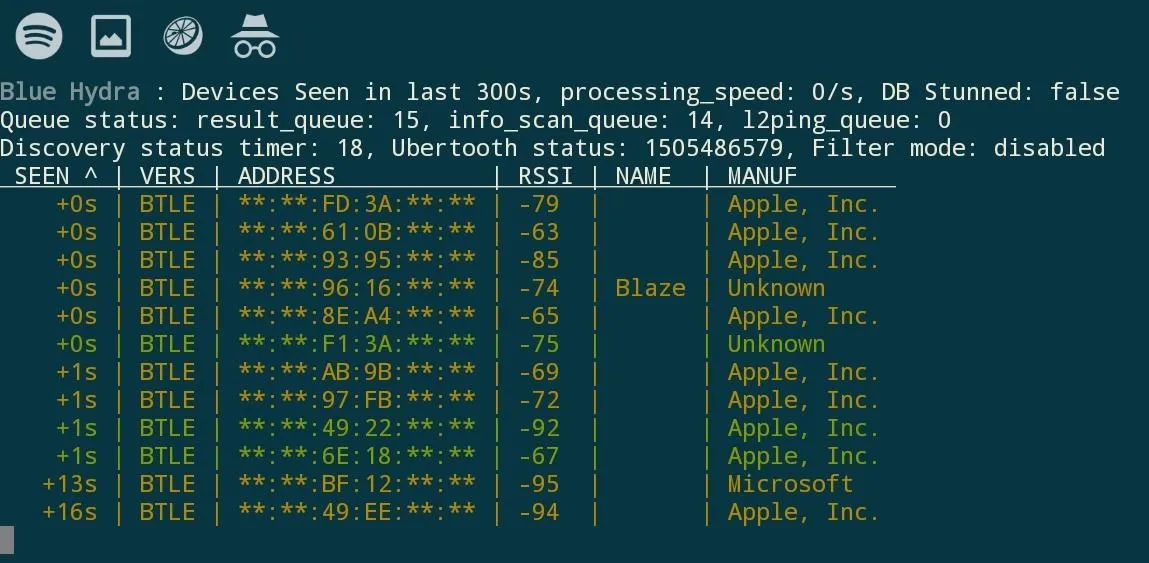
You can see there are quite a few devices in this small area.
Hoid's local Starbucks at the time.
You can see there are quite a few devices in this small area.
My setup was nothing but the internal Bluetooth and Ubertooth hardware. With an external Bluetooth dongle and the range it offers, I could have easily detected twice as many devices. If you are wondering, I'm powering the Pi off of a battery pack and using Juice SSH on my smartphone, Blue Hydra is being run in demo mode to help protect the privacy of the people.
Configuring Options
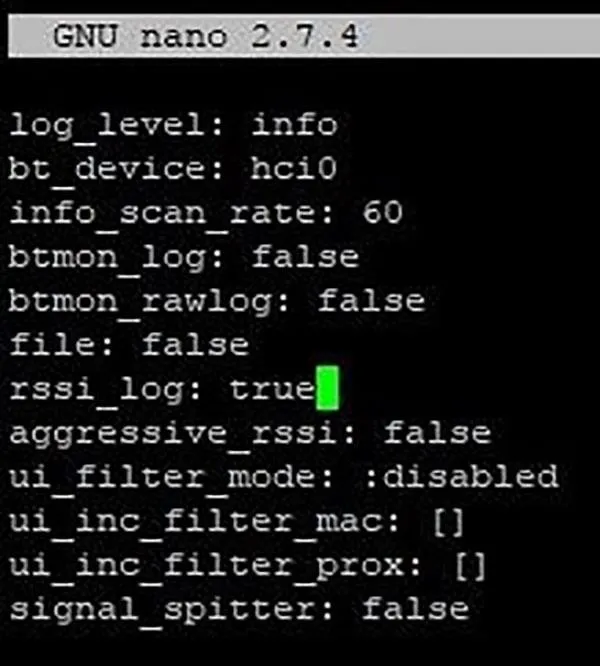
The "blue_hydra.yml" file can be edited to configure several options:
- log_level If this is set to "false" then the log files will not be created.
- bt_device This is how you change the main Bluetooth interface, change if you're using a dongle.
- info_scan_rate This is how often info scan is run in seconds.
- status_sync_rate This is how often to sync device status to Pulse in seconds.
- btmon_log When True it will log filtered btmon output.
- btmon_rawlogWhen True it will log unfiltered btmon output
- file If set to a file it will use it rather than live sensor data
- rssi_logControls if serialized RSSI values are logged
- aggressive_rssi This will aggressively send RSSIs to Pulse
Pulse is Pwnie Express' IoT Security Platform
Tracking with BLE Finder
Blue Hydra saves to two log files, "blue_hydra.log" is where it logs all the data it collects, which is more than it shows on the user interface, this is how it tracks devices over time. The second, "blue_hydra_rssi.log" is where it logs signal strength which can be used to find the distance to the Bluetooth device. For example, you could make a simple python script that alerts you when a certain device is close by, just as the Hacker Warehouse team did. Let's download it and take a look at it.
First move to the Blue Hydra directory, cd ~/blue_hydra and then download the Python program
wget https://raw.githubusercontent.com/hackerwarehouse/ble_finder/master/ble_finder.py

The Python program uses the tailer module as well, so we need to get that with pip install tailer

Now we need to make sure that Blue Hydra is saving the RSSI log file so lets use nano to open the configuration file mentioned before. sudo nano blue_hydra.yml then set rssi_log true
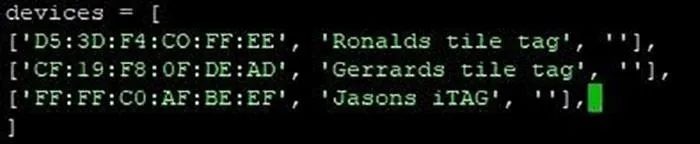
Then save with Ctrl + X and Y then Enter . The only thing for us to do now is tell the script which Mac IDs to look for. To do that lets open the python file with nano. sudo nano ble_finder.py if you have trouble opening it with nano just restart the pi with sudo reboot find the devices list and edit it to the MAC IDs of your choice, remember it is case sensitive. If you want more than, you can just expand the list with ['MAC ID', 'Name', ' '],
Below this you can also set how often it reports, the default is 45 seconds.

While you are here you may want to go over the code. The program checks the RSSI log for the MAC IDs from our list. When you're done, save just like before with Ctrl + X and Y then Enter.
Now let's put it in action with cd blue_hydra/bin/ and then use sudo ./blue_hydra now open another shell and move to Blue Hydra with cd blue_hydra then run python ble_finder. If all is working properly you'll see something like this.

Put It to Use for Yourself
Now that you have the basics, you can do something much more advanced. Say you wanted to get into a high-level executive's office, but you need to know when they are there. You could put a Pi running Blue Hydra, and set some code to email me when his Fitbit leaves the office.
You could also set up a trilateration program to map all the devices in the environment. Even just leaving it sitting in place can yield interesting results. The real limiting factor to Blue Hydra's usefulness is your imagination, so don't let it hold you back!
- Follow me on Twitter
- Follow Null Byte on Twitter and Google+
- Follow WonderHowTo on Facebook, Twitter, Pinterest, and Google+
Cover image by Kody & mecha_aries
Screenshots by Hoid/Null Byte


Comments
Be the first, drop a comment!