Automating port scanners, directory crawlers, and reconnaissance tools can be complicated for beginners just getting started with Kali Linux. Sparta solves this problem with an easy-to-use graphical interface designed to simplify a penetration tester's tasks.
Sparta, authored by Antonio Quina and Leonidas Stavliotis, is a Python-based GUI application that automates scanning, information gathering, and vulnerability assessment with tools like Nikto, WhatWeb, Nmap, Telnet, Dirbuster, and Netcat. It was designed with a simple point-and-click user interface and displays discovered services in an easy-to-navigate and intuitive way.
Save for a few minor updates, no significant changes or features have been added to Sparta since its inception. Still, it's an excellent recon tool worth learning. This article pairs nicely with Kody's Null Byte video below by focusing on Sparta's brute-force module and Nikto web crawler, as well as coupling it with other tools to maximize its usefulness for pen-tests and white hat endeavors.
Install & Start Sparta
Sparta will be pre-installed in most version of Kali Linux, but lightweight Kali users will need to install it with the following command.
~# apt-get update && apt-get install sparta python-requests

Reading package lists... Done
Building dependency tree
Reading state information... Done
The following additional packages will be installed:
  avahi-daemon cutycapt finger firebird3.0-common firebird3.0-common-doc geoclue-2.0 hydra iio-sensor-proxy javascript-common ldap-utils libapr1 libaprutil1 libaudio2 libavahi-core7 libavahi-glib1 libbrotli1
  libdaemon0 libdouble-conversion1 libfbclient2 libhyphen0 libjs-jquery libmng1 libnss-mdns libpcre2-16-0 libpq5 libqt4-dbus libqt4-declarative libqt4-designer libqt4-help libqt4-network libqt4-script
  libqt4-scripttools libqt4-sql libqt4-sql-mysql libqt4-svg libqt4-test libqt4-xml libqt4-xmlpatterns libqt5core5a libqt5dbus5 libqt5gui5 libqt5network5 libqt5positioning5 libqt5printsupport5 libqt5qml5
  libqt5quick5 libqt5sensors5 libqt5svg5 libqt5webchannel5 libqt5webkit5 libqt5widgets5 libqtassistantclient4 libqtcore4 libqtdbus4 libqtgui4 libserf-1-1 libssh-4 libsvn1 libtommath1 libutf8proc2 libwoff1
  libxcb-icccm4 libxcb-image0 libxcb-keysyms1 libxcb-randr0 libxcb-render-util0 libxcb-xinerama0 libxcb-xkb1 libxkbcommon-x11-0 libxslt1.1 nikto python-asn1crypto python-blinker python-cffi-backend python-click
  python-colorama python-crypto python-cryptography python-elixir python-enum34 python-flask python-impacket python-ipaddress python-itsdangerous python-jinja2 python-ldap3 python-markupsafe python-openssl
  python-pkg-resources python-pyasn1 python-pycryptodome python-pyinotify python-qt4 python-simplejson python-sip python-six python-sqlalchemy python-sqlalchemy-ext python-werkzeug qdbus qt-at-spi
  qt5-gtk-platformtheme qtchooser qtcore4-l10n qttranslations5-l10n rwho rwhod sparta xsltproc
0 upgraded, 109 newly installed, 0 to remove and 0 not upgraded.
Need to get 57.8 MB of archives.
After this operation, 227 MB of additional disk space will be used.
Do you want to continue? [Y/n]
From here on, Sparta can be initiated from any terminal with the sparta command.
~# sparta

[+] Creating temporary files..
[+] Wordlist was created/opened: /tmp/sparta-9AE08J-tool-output/sparta-usernames.txt
[+] Wordlist was created/opened: /tmp/sparta-9AE08J-tool-output/sparta-passwords.txt
[+] Loading settings file..
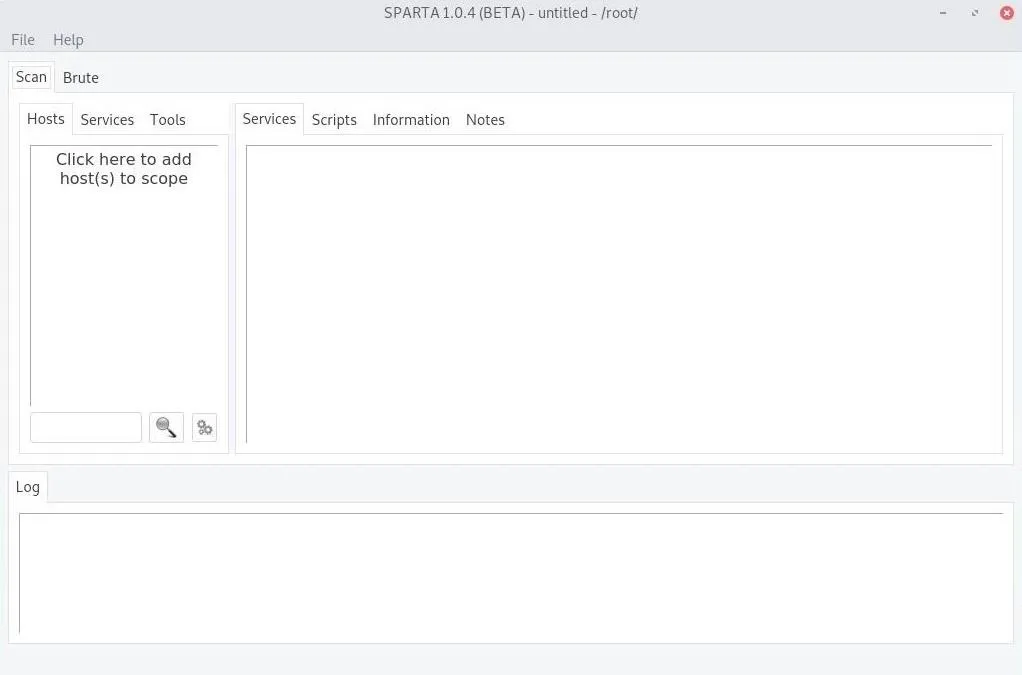
Once the command initializes, Sparta's GUI will appear. Alternatively, you can open up the Sparta GUI in Kali directly by visiting the "Information Gathering" section in Applications or via a quick search for the app, but the terminal window will still open showing where the temporary files are located.
Scan Networks, Devices, or Web Apps
Sparta can scan a range of IP addresses on a network, but it can also scan website domain names. Once you know the range of IP addresses on the network or the web app you want to check, click on "Click here to add host(s) to scope" under the "Scan" tab.
If choosing a network, and you don't know the network range, use ifconfig in a new terminal window to get your IP addresses on the network, then ipcalc YourIPAddress to discover the range next to the "Network" result. If you want only to scan the router, use the "HostMin" IP Address. Enter the IP address or range in the IP Range field in the Sparta prompt. Hit the "Add to Scope" button when ready to scan.
To scan a web app instead, enter its URL or IP address. Hit the "Add to Scope" button when ready to scan.
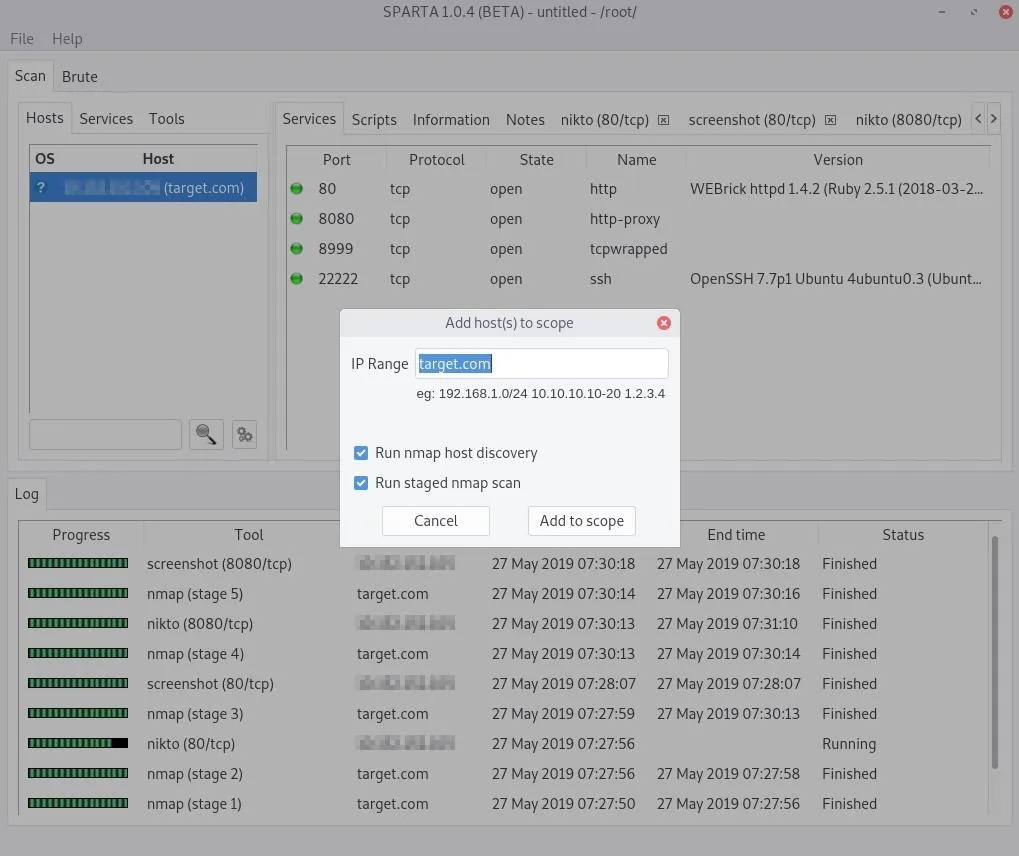
An Nmap scan will take place right away, probing default ports to see if anything is open and available. After that, Nmap and Nikto will run a sequence of other scans looking at less common ports, and screenshots will be attempted. If you open the "Services" tab, you can view services such as HTTP, HTTPS, and UPnP; and in the "Tools" tab, you can see the results on the target scans performed by Nikto and others.
Analyze the Results
After scanning a web app, there are several interesting services reported within seconds of the scan. To see what would appear when scanning a router on a network or a whole network to find subnet devices, check out the video above. Otherwise, we'll be going over a web app scan here.
Most notable in the web app scan seen above, the SSH service is on port 22222. The system administrator likely changed the default SSH port from 22. This attempt to hide the SSH service is called "security through obscurity" and is always a bad security practice. The administrator believes changing the port number to something non-standard will make it harder for attackers to find the service. As we can see, this is not true — Sparta still detected the SSH service.
If you want to perform more actions, such as taking a screenshot for a service that has not been screenshotted or did not catch a good enough screengrab, you can right-click on the service. You'll find options such as the following depending on what service or target you right-clicked.
- Portscan
- Mark as checked
- Open with telnet
- Open with ssh client (as root)
- Open with netcat
- Send to Brute
- Open in browser
- Take screenshot
- Run whatweb
- Run nmap (scripts) on port
- Run nikto
- Launch webslayer
- Launch dirbuster
- Grab banner
From the "Hosts" tab, you can also select on the other tabs that appear on the right for a selected host. Aside from "Services," there may be options for "Notes," "Scripts," and "Information." In the latter option, you can get more detailed information about the highlighted system, such as the operating system of the target. The results from the "Tools" tab can also be found as additional tabs here for each target, but the "Tools" tab lets you see other compatible tools that may not have been employed yet.
Additionally, you can add more targets to the scope of your can by clicking on "File" in the menu bar, then "Add host(s) to scope."
Target SSH Services
SSH is an extremely popular remote administration protocol. If we right-click on a discovered service, in my case, port 22222, and select "Open with SSH client," Sparta will open a new terminal and attempt to authenticate to the service.
The authenticity of host '[███.███.███.███]:22222 ([███.███.███.███]:22222)' can't be established.
ECDSA key fingerprint is SHA256:f94dIlgg2kDtCK4ahtN5/iAZxY9D6v+FtNTLK03uTr4.
Are you sure you want to continue connecting (yes/no)? yes
Warning: Permanently added '[███.███.███.███]:22222' (ECDSA) to the list of known hosts.

This is a private system maintained by ██████████ Corporation.
All connections are logged and monitored. Issues accessing this server should be reported to ████████@████████████.org.

root@███████████'s password:
Some SSH services have login banners configured that may prompt clients with a message or warning. In my example, the server displays a warning message when someone attempts to authenticate, revealing an email address. The SSH banner is divulging more information than is necessary since an attacker performing reconnaissance would be able to use the discovered email address in targeted phishing attacks.
Right-click on the SSH service again, but this time click the "Send to Brute" option. Then, click on the "Brute" tab in the top left of the Sparta window.
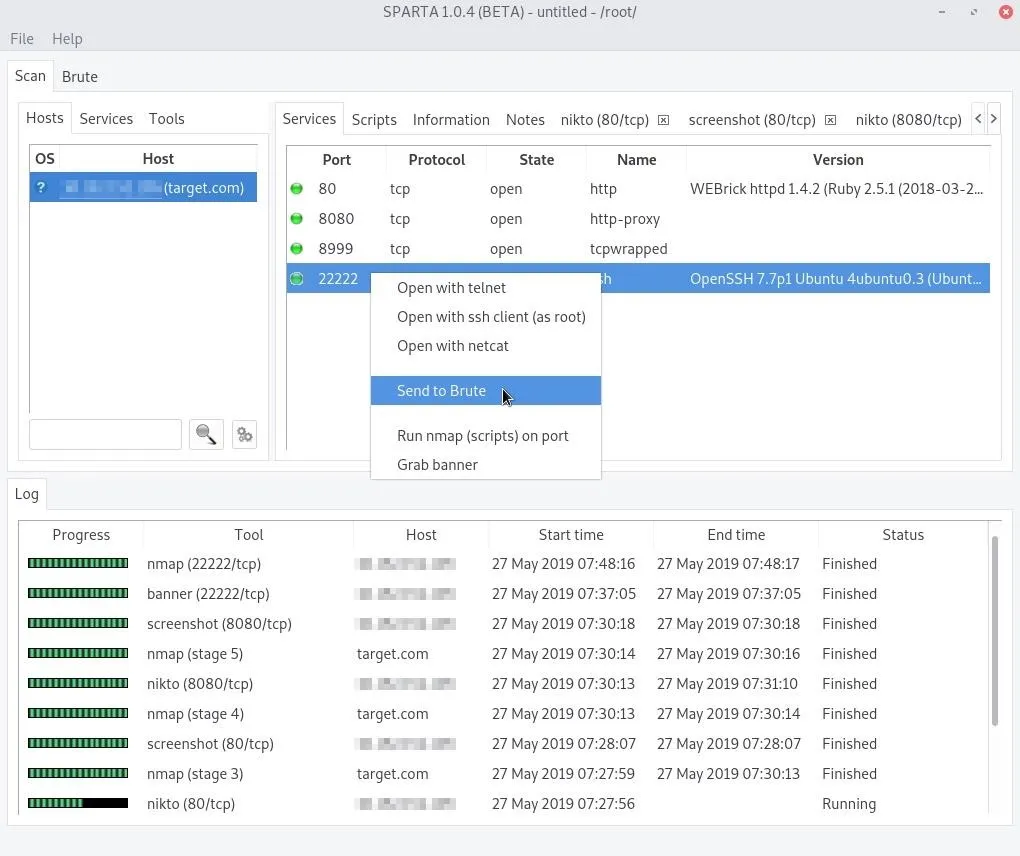
From this tab, the SSH service can be brute-forced. Select a username and wordlist to use in the attack. Wordlists in Kali Linux can be found in the /usr/share/wordlists/ directory. The SecLists repository and Hashes.org website also have great wordlists for penetration testers.
When the options are configured, simply press the "Run" button and Sparta will invoke the Hydra brute-force tool.
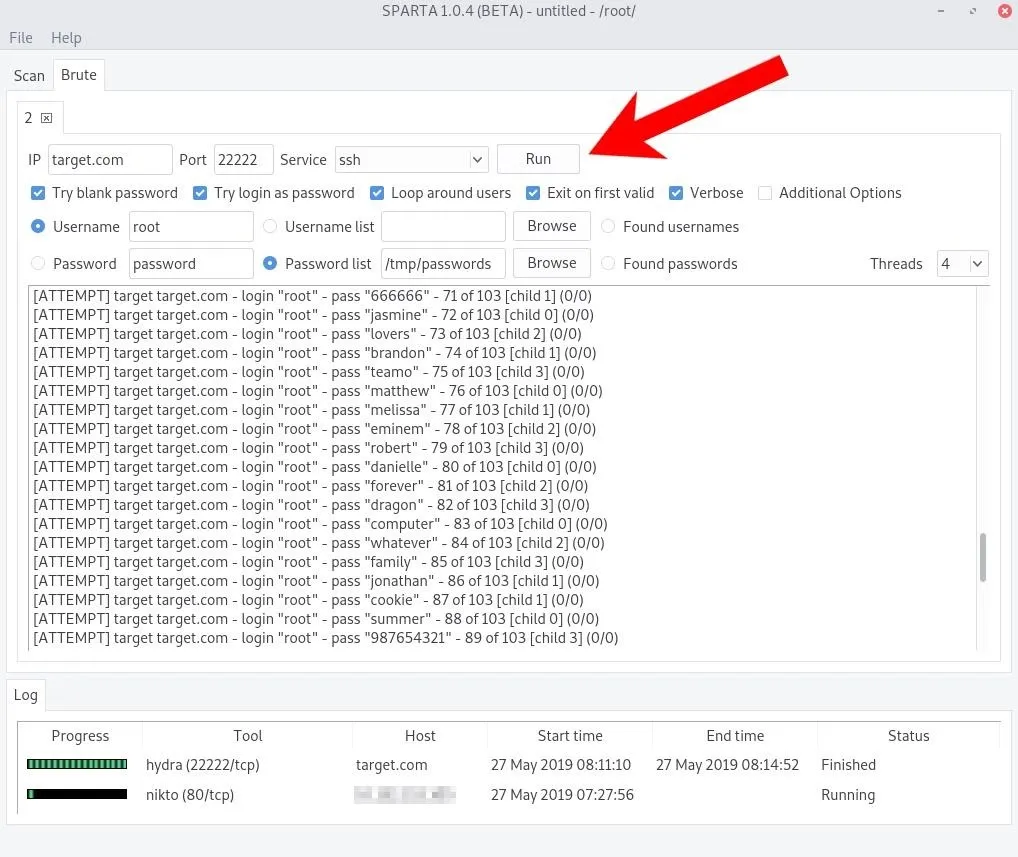
If you're familiar with Hydra's command-line options, you can tick the "Additional Options" box to enable them. A successful login will appear as shown below.
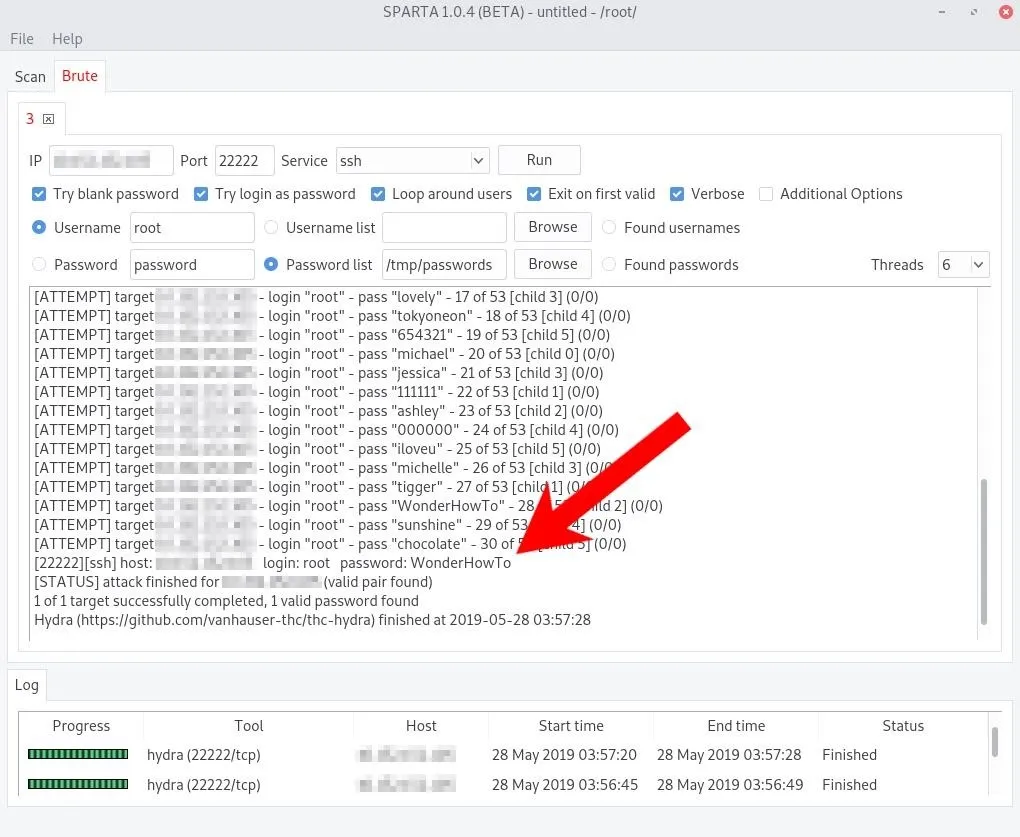
Realistically, without knowing anything about the system administrator(s) who set up the server, a brute-force attack will likely fail as well as create a ton of authentication failures in the logs (shown below).
sshd[18614]: Failed password for root from 11.22.33.44 port 42046 ssh2
sshd[18614]: error: maximum authentication attempts exceeded for root from 11.22.33.44 port 42046 ssh2 [preauth]
sshd[18614]: Disconnecting authenticating user root 11.22.33.44 port 42046: Too many authentication failures [preauth]
sshd[18614]: PAM 4 more authentication failures; logname= uid=0 euid=0 tty=ssh ruser= rhost=11.22.33.44  user=root
sshd[18614]: PAM service(sshd) ignoring max retries; 5 > 3
sshd[18616]: Failed password for root from 11.22.33.44 port 42050 ssh2
sshd[18616]: Connection closed by authenticating user root 11.22.33.44 port 42050 [preauth]
sshd[18616]: PAM 4 more authentication failures; logname= uid=0 euid=0 tty=ssh ruser= rhost=11.22.33.44  user=root
sshd[18616]: PAM service(sshd) ignoring max retries; 5 > 3
sshd[18615]: Failed password for root from 11.22.33.44 port 42048 ssh2
sshd[18615]: Connection closed by authenticating user root 11.22.33.44 port 42048 [preauth]
sshd[18615]: PAM 4 more authentication failures; logname= uid=0 euid=0 tty=ssh ruser= rhost=11.22.33.44  user=root
sshd[18615]: PAM service(sshd) ignoring max retries; 5 > 3
sshd[18618]: Failed password for root from 11.22.33.44 port 42054 ssh2
sshd[18618]: Connection closed by authenticating user root 11.22.33.44 port 42054 [preauth]
sshd[18618]: PAM 4 more authentication failures; logname= uid=0 euid=0 tty=ssh ruser= rhost=11.22.33.44  user=root
sshd[18618]: PAM service(sshd) ignoring max retries; 5 > 3
Target HTTP Services
Nikto is a vulnerability scanner which performs a variety of tests against web servers. Among its many scanning features, it checks for outdated software, server misconfigurations, directory checks, weak HTTP headers, and has many available plugins to enhance its functionalities further.
It will crawl the web app and attempt to locate thousands of files commonly found in the root directory and sub-directories. On the server side, the system administrator will see error messages that appear as shown below.
[2019-05-27 00:28:14] ERROR `/wls-wsat/RegistrationPortTypeRPC11' not found.
[2019-05-27 00:28:14] ERROR `/wls-wsat/ParticipantPortType11' not found.
[2019-05-27 00:28:14] ERROR `/common/about' not found.
[2019-05-27 00:28:14] ERROR `/master.xml' not found.
[2019-05-27 00:28:14] ERROR `/masters.xml' not found.
[2019-05-27 00:28:14] ERROR `/connections.xml' not found.
[2019-05-27 00:28:14] ERROR `/connection.xml' not found.
[2019-05-27 00:28:14] ERROR `/passwords.xml' not found.
[2019-05-27 00:28:14] ERROR `/PasswordsData.xml' not found.
[2019-05-27 00:28:14] ERROR `/users.xml' not found.
[2019-05-27 00:28:14] ERROR `/conndb.xml' not found.
[2019-05-27 00:28:14] ERROR `/conn.xml' not found.
[2019-05-27 00:28:14] ERROR `/security.xml' not found.
[2019-05-27 00:28:14] ERROR `/accounts.xml' not found.
[2019-05-27 00:28:14] ERROR `/db.json' not found.
[2019-05-27 00:28:14] ERROR `/userdata.json' not found.
[2019-05-27 00:28:14] ERROR `/login.json' not found.
[2019-05-27 00:28:14] ERROR `/master.json' not found.
[2019-05-27 00:28:14] ERROR `/masters.json' not found.
[2019-05-27 00:28:14] ERROR `/connections.json' not found.
[2019-05-27 00:28:14] ERROR `/connection.json' not found.
[2019-05-27 00:28:14] ERROR `/passwords.json' not found.
[2019-05-27 00:28:14] ERROR `/PasswordsData.json' not found.
[2019-05-27 00:28:14] ERROR `/users.json' not found.
[2019-05-27 00:28:14] ERROR `/conndb.json' not found.
[2019-05-27 00:28:14] ERROR `/conn.json' not found.
[2019-05-27 00:28:14] ERROR `/security.json' not found.
[2019-05-27 00:28:14] ERROR `/accounts.json' not found.
[2019-05-27 00:28:14] ERROR `/package.json' not found.
[2019-05-27 00:28:14] ERROR `/redis_config.json' not found.
[2019-05-27 00:28:14] ERROR `/credis/tests/redis_config.json' not found.
[2019-05-27 00:28:14] ERROR `/redis/config.json' not found.
[2019-05-27 00:28:14] ERROR `/config/redis.json' not found.
[2019-05-27 00:28:14] ERROR `/firebase.json' not found.
[2019-05-27 00:28:14] ERROR `/ws.asmx' not found.
[2019-05-27 00:28:14] ERROR `/ws/ws.asmx' not found.
[2019-05-27 00:28:14] ERROR `/.gitignore' not found.
[2019-05-27 00:28:14] ERROR `/.hgignore' not found.
[2019-05-27 00:28:14] ERROR `/.env' not found.
There are a few noteworthy results in the Nikto output. As we can see in the below report, Nikto tried 7,889 different directories and file names. The "/key" file is probably worth investigating first.
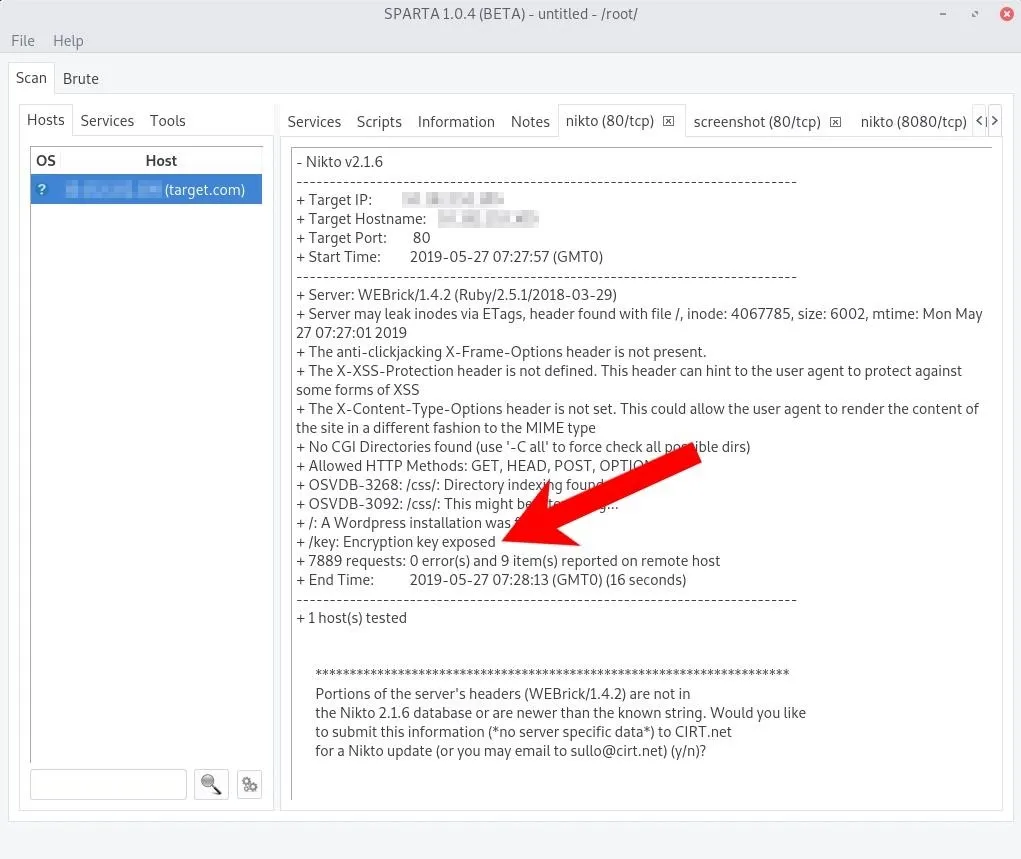
The /key file can be accessed by opening a terminal in Kali and using the following wget command.
~# wget -qO- 'http://target.com/key'

# qbittorrent password in case you forget
password: Hunter432
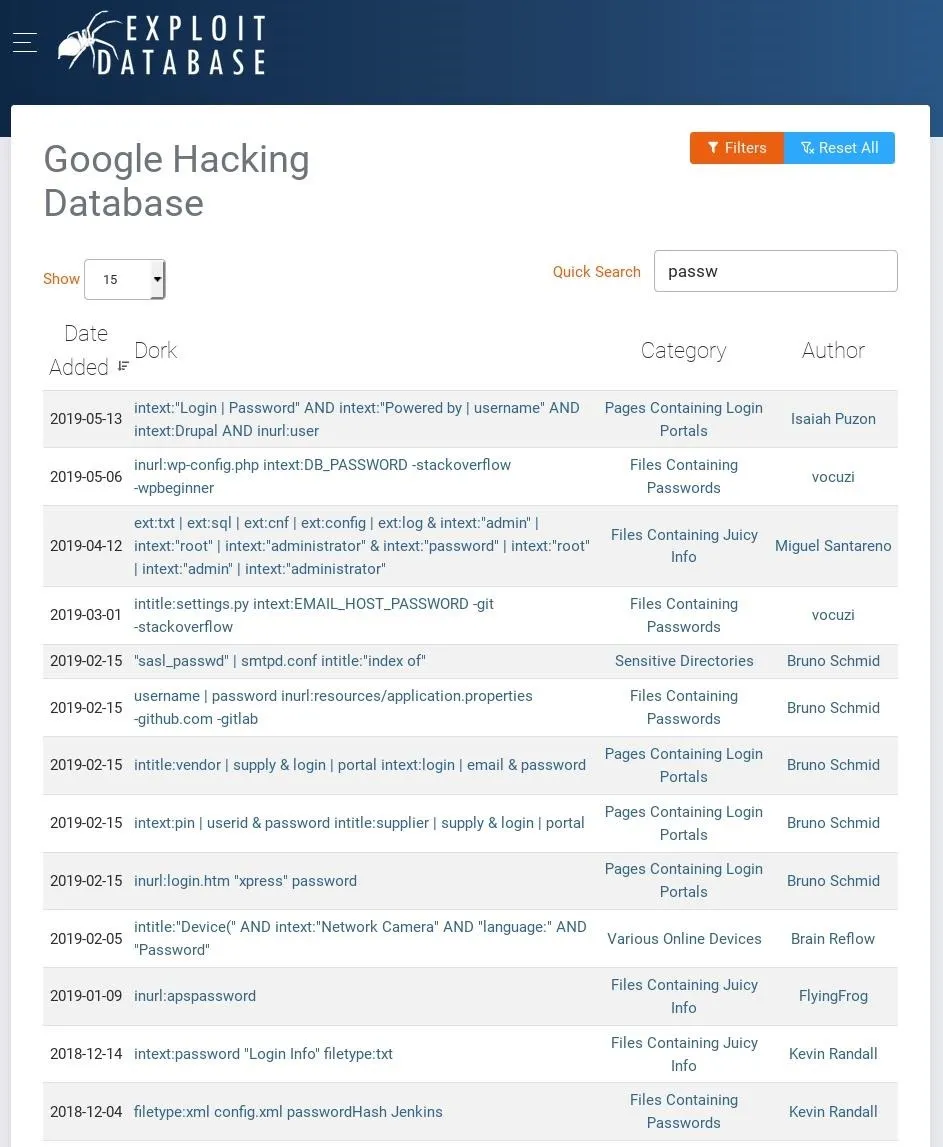
The /key file appears to be a note to someone containing a password. It's extremely common for system administrators to leave sensitive files in root directories. This is best demonstrated in a quick search for "passw" in the Exploit-DB Google Hacking Database.
Target Non-Standard HTTP Services
Sparta will treat web servers detected on non-standard ports (i.e., port 8080) like any other by automating Nikto scans, banner grabbing, and screenshots.
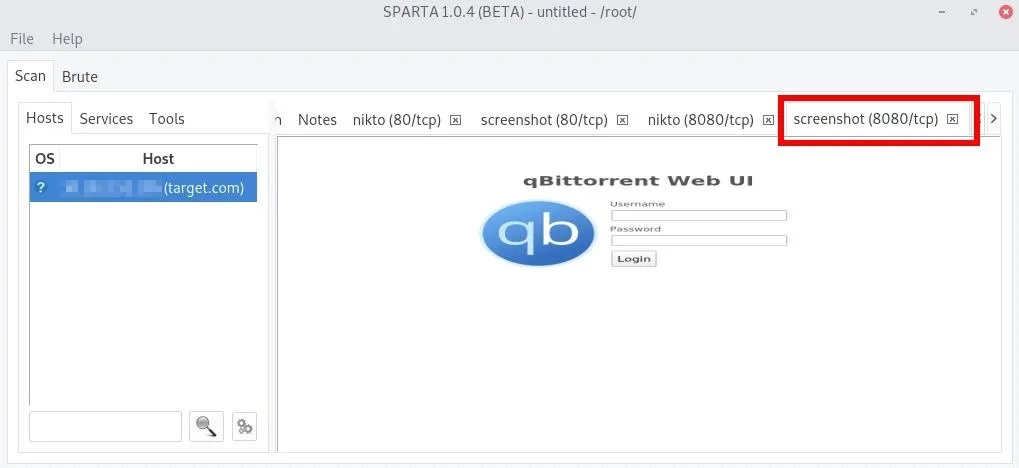
Reviewing the Nikto report for the service discovered on port 8080, a /login.html webpage has been detected in our scenario here.
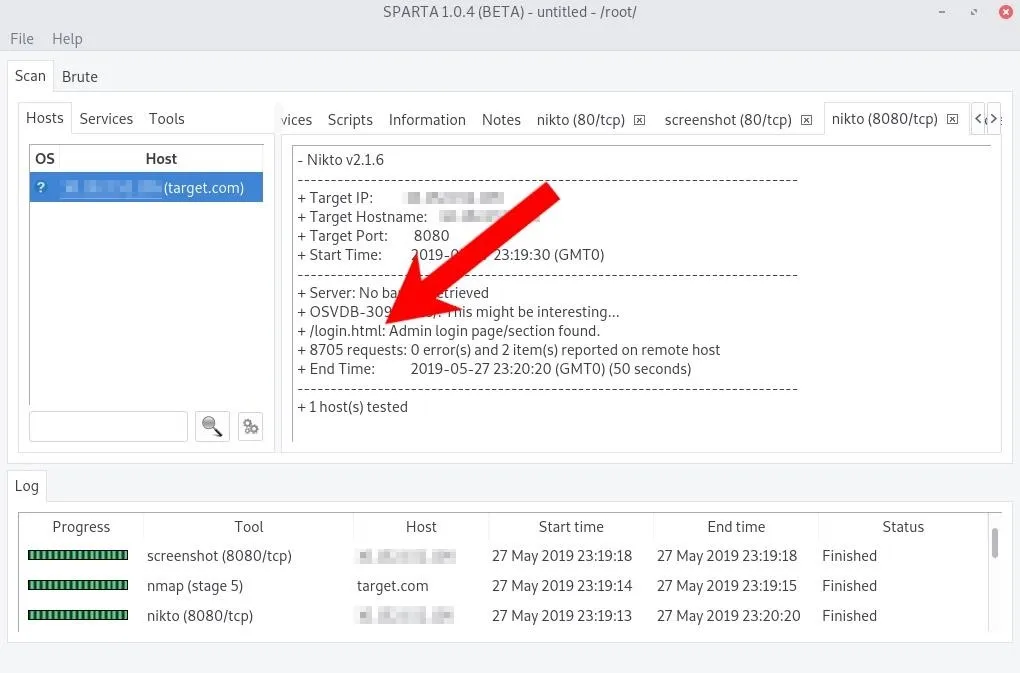
Navigating to target.com:8080/login.html in Firefox opens the login page for what appears to be a qBittorrent web client. This particular torrent client is good at detecting brute-force attacks.
Fortunately, the system administrator left the qBittorrent password in the root of the web server. With a quick Google search, we learn "admin" is likely the default qBittorrent username. That, coupled with the password provided in the /key file, allows us to access the web application remotely.
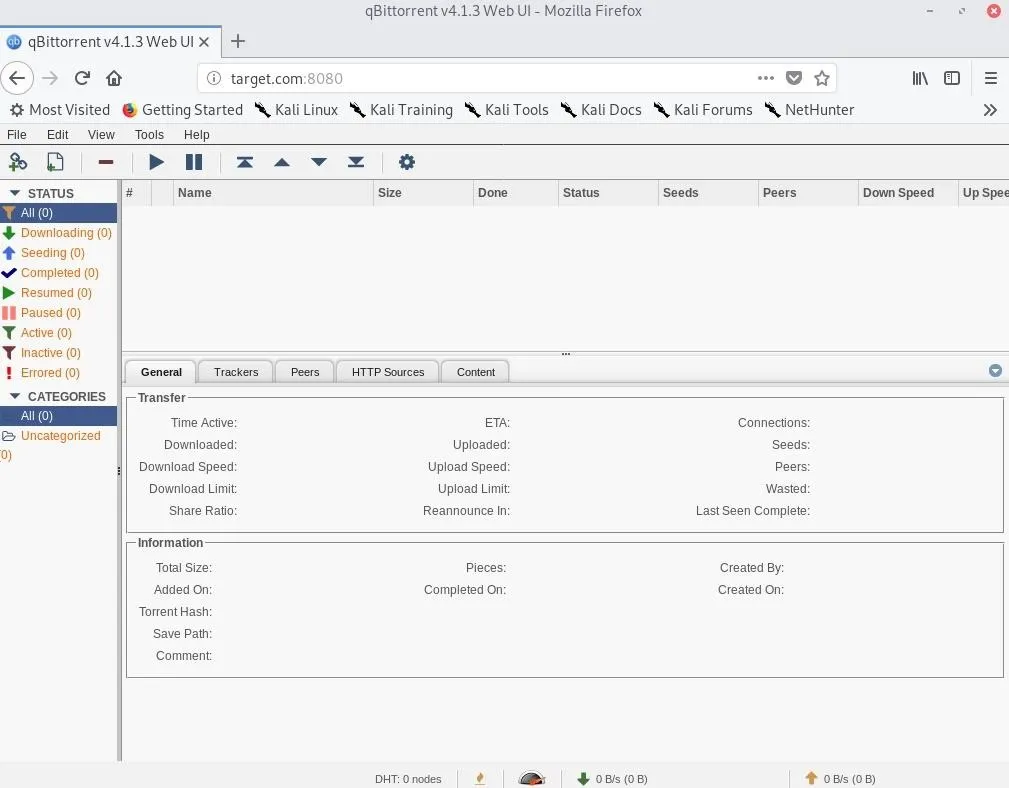
Now, pivoting from a web app like qBittorrent to the host operating system is beyond the scope of this article. We will be covering the creation of malicious torrent files and backdooring Windows and Linux servers through compromised torrent clients in a future article.
Save Your Sparta Progress
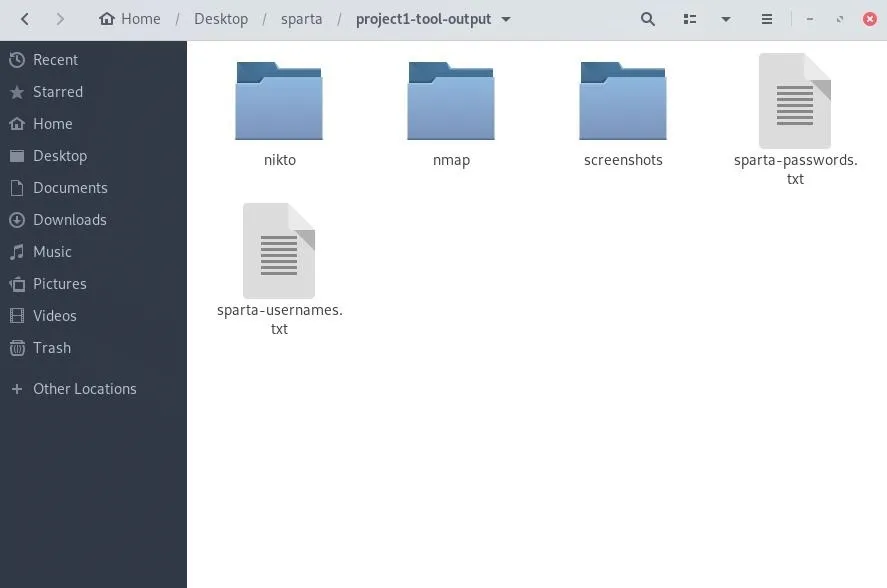
It may be desirable to save the scan results for a given scope. In Sparta, click "File" in the menu bar, then "Save As." Select a save location, name it, and click "Save," and all of the Nikto, Nmap, screenshots, and successful brute-force credentials will be available for later review (shown below). Also, with the provided *.sprt file, the results can always be re-opened in Sparta.
Conclusion
Sparta's graphical interface makes it easy to navigate between different services and ports discovered by Nikto, Nmap, and Hydra. Anyone new to these tools will appreciate how Sparta brings them all together in an intuitive, simple way. Sparta is essential for beginners who want to automate and expand their toolset.
Cover photo and screenshots by distortion/Null Byte


Comments
Be the first, drop a comment!