


If you've wanted to get into Wi-Fi hacking, you might have noticed that it can be pretty challenging to find a safe and legal target to hack. But you can easily create your own test network using a single ESP8266-based microcontroller like the D1 Mini.
Our goal is to crack a handshake that we capture from our wireless card. So what we'll do here is flash an Arduino sketch onto an ESP8266-based board that allows us to play both sides of a Wi-Fi conversation, simulating a device joining a Wi-Fi network. From our computer, we'll listen for the attempt to join and then try to crack the password.
For this to work, you'll need a computer with Arduino IDE installed, as well as a D1 Mini or another type of ESP8266-based development board. You can pick one of these up below. I personally recommend the D1 Mini.
- IZOKEE ESP8266 ESP-12F D1 Mini (3 Pack) (currently $12.69)
- IZOKEE ESP8266 ESP-12F D1 Mini (5 Pack) (currently $15.79)
- Organizer ESP8266 ESP-12F D1 Mini (5 Pack) (currently $15.69)
Get the Arduino Sketch
Head to Kody's Esp8266Wpa2Handshake project on GitHub and download the "hamshake_injector.ino" sketch. You could also start a new sketch in Arduino IDE and add the sketch's code below if you don't want to download anything. (Kody created this sketch in collaboration with Spacehuhn.)
#include <ESP8266WiFi.h>

extern "C" {
#include "user_interface.h"
  typedef void (*freedom_outside_cb_t)(uint8 status);
  int wifi_register_send_pkt_freedom_cb(freedom_outside_cb_t cb);
  void wifi_unregister_send_pkt_freedom_cb(void);
  int wifi_send_pkt_freedom(uint8 *buf, int len, bool sys_seq);
}

uint8_t packet0[] = {
  0x80, 0x00, 0x00, 0x00, 0xff, 0xff, 0xff,
  0xff, 0xff, 0xff, 0xda, 0xf1, 0x5b, 0x0c, 0xe2,
  0xff, 0xda, 0xf1, 0x5b, 0x0c, 0xe2, 0xff, 0xd0,
  0x36, 0x8a, 0xf5, 0xd3, 0x04, 0x00, 0x00, 0x00,
  0x00, 0x64, 0x00, 0x11, 0x00, 0x00, 0x04, 0x74,
  0x65, 0x73, 0x74, 0x01, 0x08, 0x8b, 0x96, 0x82,
  0x84, 0x0c, 0x18, 0x30, 0x60, 0x03, 0x01, 0x01,
  0x05, 0x04, 0x00, 0x02, 0x00, 0x00, 0x07, 0x06,
  0x43, 0x4e, 0x00, 0x01, 0x0d, 0x14, 0x32, 0x04,
  0x6c, 0x12, 0x24, 0x48, 0xdd, 0x09, 0x18, 0xfe,
  0x34, 0x03, 0x01, 0x00, 0x00, 0x00, 0x00, 0x30,
  0x18, 0x01, 0x00, 0x00, 0x0f, 0xac, 0x02, 0x02,
  0x00, 0x00, 0x0f, 0xac, 0x04, 0x00, 0x0f, 0xac,
  0x02, 0x01, 0x00, 0x00, 0x0f, 0xac, 0x02, 0x00,
  0x00
};

uint8_t packet1[] = {
  0x08, 0x02, 0x3a, 0x01, 0xbc, 0xdd, 0xc2,
  0xb2, 0xc0, 0xab, 0xda, 0xf1, 0x5b, 0x0c, 0xe2,
  0xff, 0xda, 0xf1, 0x5b, 0x0c, 0xe2, 0xff, 0x00,
  0x00, 0xaa, 0xaa, 0x03, 0x00, 0x00, 0x00, 0x88,
  0x8e, 0x02, 0x03, 0x00, 0x5f, 0x02, 0x00, 0x8a,
  0x00, 0x10, 0x00, 0x00, 0x00, 0x00, 0x00, 0x00,
  0x00, 0x01, 0xa3, 0x16, 0xe8, 0xc7, 0x81, 0xa0,
  0x4f, 0xfe, 0x9d, 0xab, 0x1c, 0x6c, 0xba, 0xc0,
  0xc8, 0xf2, 0x71, 0xce, 0x9f, 0xf4, 0x11, 0x56,
  0xf1, 0x0f, 0x33, 0x5b, 0x31, 0x71, 0xae, 0x8c,
  0xa5, 0x86, 0x00, 0x00, 0x00, 0x00, 0x00, 0x00,
  0x00, 0x00, 0x00, 0x00, 0x00, 0x00, 0x00, 0x00,
  0x00, 0x00, 0x00, 0x00, 0x00, 0x00, 0x00, 0x00,
  0x00, 0x00, 0x00, 0x00, 0x00, 0x00, 0x00, 0x00,
  0x00, 0x00, 0x00, 0x00, 0x00, 0x00, 0x00, 0x00,
  0x00, 0x00, 0x00, 0x00, 0x00, 0x00, 0x00, 0x00,
  0x00, 0x00, 0x00, 0x00
};

uint8_t packet2[] = {
  0x08, 0x01, 0x3a, 0x01, 0xda, 0xf1, 0x5b,
  0x0c, 0xe2, 0xff, 0xbc, 0xdd, 0xc2, 0xb2, 0xc0,
  0xab, 0xda, 0xf1, 0x5b, 0x0c, 0xe2, 0xff, 0x00,
  0x00, 0xaa, 0xaa, 0x03, 0x00, 0x00, 0x00, 0x88,
  0x8e, 0x01, 0x03, 0x00, 0x75, 0x02, 0x01, 0x0a,
  0x00, 0x00, 0x00, 0x00, 0x00, 0x00, 0x00, 0x00,
  0x00, 0x01, 0xdb, 0x6a, 0x19, 0x1d, 0x59, 0x75,
  0xbf, 0x01, 0x0c, 0x7c, 0xb4, 0x41, 0xd6, 0xfb,
  0x2b, 0xcb, 0xf3, 0xf5, 0xfb, 0x21, 0x6b, 0x50,
  0xd8, 0xfb, 0xa6, 0x57, 0xb6, 0xef, 0xc9, 0x1a,
  0x4c, 0xc8, 0x00, 0x00, 0x00, 0x00, 0x00, 0x00,
  0x00, 0x00, 0x00, 0x00, 0x00, 0x00, 0x00, 0x00,
  0x00, 0x00, 0x00, 0x00, 0x00, 0x00, 0x00, 0x00,
  0x00, 0x00, 0x00, 0x00, 0x00, 0x00, 0x00, 0x00,
  0x00, 0x00, 0x23, 0x98, 0xca, 0x33, 0x5e, 0x53,
  0x26, 0x8a, 0x12, 0xe2, 0xea, 0x47, 0xd4, 0x6e,
  0xcb, 0x0f, 0x00, 0x16, 0x30, 0x14, 0x01, 0x00,
  0x00, 0x0f, 0xac, 0x02, 0x01, 0x00, 0x00, 0x0f,
  0xac, 0x04, 0x01, 0x00, 0x00, 0x0f, 0xac, 0x02,
  0x00, 0x00
};

uint8_t packet3[] = {
  0x08, 0x02, 0x3a, 0x01, 0xbc, 0xdd, 0xc2,
  0xb2, 0xc0, 0xab, 0xda, 0xf1, 0x5b, 0x0c, 0xe2,
  0xff, 0xda, 0xf1, 0x5b, 0x0c, 0xe2, 0xff, 0x10,
  0x00, 0xaa, 0xaa, 0x03, 0x00, 0x00, 0x00, 0x88,
  0x8e, 0x02, 0x03, 0x00, 0xaf, 0x02, 0x13, 0xca,
  0x00, 0x10, 0x00, 0x00, 0x00, 0x00, 0x00, 0x00,
  0x00, 0x02, 0xa3, 0x16, 0xe8, 0xc7, 0x81, 0xa0,
  0x4f, 0xfe, 0x9d, 0xab, 0x1c, 0x6c, 0xba, 0xc0,
  0xc8, 0xf2, 0x71, 0xce, 0x9f, 0xf4, 0x11, 0x56,
  0xf1, 0x0f, 0x33, 0x5b, 0x31, 0x71, 0xae, 0x8c,
  0xa5, 0x86, 0x00, 0x00, 0x00, 0x00, 0x00, 0x00,
  0x00, 0x00, 0x00, 0x00, 0x00, 0x00, 0x00, 0x00,
  0x00, 0x00, 0x00, 0x00, 0x00, 0x00, 0x00, 0x00,
  0x00, 0x00, 0x00, 0x00, 0x00, 0x00, 0x00, 0x00,
  0x00, 0x00, 0x61, 0x40, 0xb2, 0xb8, 0x81, 0xf6,
  0xd2, 0xc0, 0x2f, 0x92, 0x8a, 0x63, 0x36, 0x04,
  0x68, 0xc4, 0x00, 0x50, 0x67, 0x1c, 0x65, 0xee,
  0xc4, 0xba, 0xf0, 0x2d, 0xe9, 0x0e, 0xfe, 0x58,
  0x65, 0x7d, 0xfc, 0xab, 0xe9, 0x8e, 0x99, 0x0f,
  0xcf, 0x04, 0x39, 0x3b, 0x20, 0x3c, 0x17, 0xc6,
  0xec, 0xd9, 0x2a, 0xda, 0x31, 0xa6, 0xd8, 0x42,
  0xfd, 0x66, 0x8e, 0x09, 0x47, 0xeb, 0x0d, 0x1c,
  0x0a, 0x5f, 0x69, 0x47, 0xdf, 0x68, 0xf7, 0xf0,
  0x98, 0xa9, 0xb0, 0x8c, 0xa7, 0x61, 0x45, 0x60,
  0xb2, 0x09, 0xce, 0x99, 0xae, 0xba, 0xb5, 0xea,
  0xba, 0x4c, 0xc0, 0x76, 0xe7, 0x4b, 0x8e, 0x01,
  0x06, 0x9c, 0x9c, 0x43
};
uint8_t packet4[] = {
  0x08, 0x01, 0x3a, 0x01, 0xda, 0xf1, 0x5b,
  0x0c, 0xe2, 0xff, 0xbc, 0xdd, 0xc2, 0xb2, 0xc0,
  0xab, 0xda, 0xf1, 0x5b, 0x0c, 0xe2, 0xff, 0x10,
  0x00, 0xaa, 0xaa, 0x03, 0x00, 0x00, 0x00, 0x88,
  0x8e, 0x01, 0x03, 0x00, 0x5f, 0x02, 0x03, 0x0a,
  0x00, 0x00, 0x00, 0x00, 0x00, 0x00, 0x00, 0x00,
  0x00, 0x02, 0x00, 0x00, 0x00, 0x00, 0x00, 0x00,
  0x00, 0x00, 0x00, 0x00, 0x00, 0x00, 0x00, 0x00,
  0x00, 0x00, 0x00, 0x00, 0x00, 0x00, 0x00, 0x00,
  0x00, 0x00, 0x00, 0x00, 0x00, 0x00, 0x00, 0x00,
  0x00, 0x00, 0x00, 0x00, 0x00, 0x00, 0x00, 0x00,
  0x00, 0x00, 0x00, 0x00, 0x00, 0x00, 0x00, 0x00,
  0x00, 0x00, 0x00, 0x00, 0x00, 0x00, 0x00, 0x00,
  0x00, 0x00, 0x00, 0x00, 0x00, 0x00, 0x00, 0x00,
  0x00, 0x00, 0xb5, 0x84, 0x9b, 0x18, 0x61, 0x0b,
  0xd3, 0x76, 0x1d, 0x79, 0x21, 0xdd, 0x0a, 0xcf,
  0x2d, 0x00, 0x00, 0x00
};

void setup() {
  Serial.begin(115200);
  Serial.println();

  // start WiFi
  WiFi.mode(WIFI_OFF);
  wifi_set_opmode(STATION_MODE);

  // set channel
  wifi_set_channel(11);
}

void loop() {
  int i=0;
  i += wifi_send_pkt_freedom(packet0, sizeof(packet0), 0);
  delay(100);
  i += wifi_send_pkt_freedom(packet1, sizeof(packet1), 0);
  delay(100);
  i += wifi_send_pkt_freedom(packet2, sizeof(packet2), 0);
  delay(100);
  i += wifi_send_pkt_freedom(packet3, sizeof(packet3), 0);
  delay(100);
  i += wifi_send_pkt_freedom(packet4, sizeof(packet4), 0);
  delay(100);
  Serial.println(i);
  delay(500);
}
Add Boards to Arduino
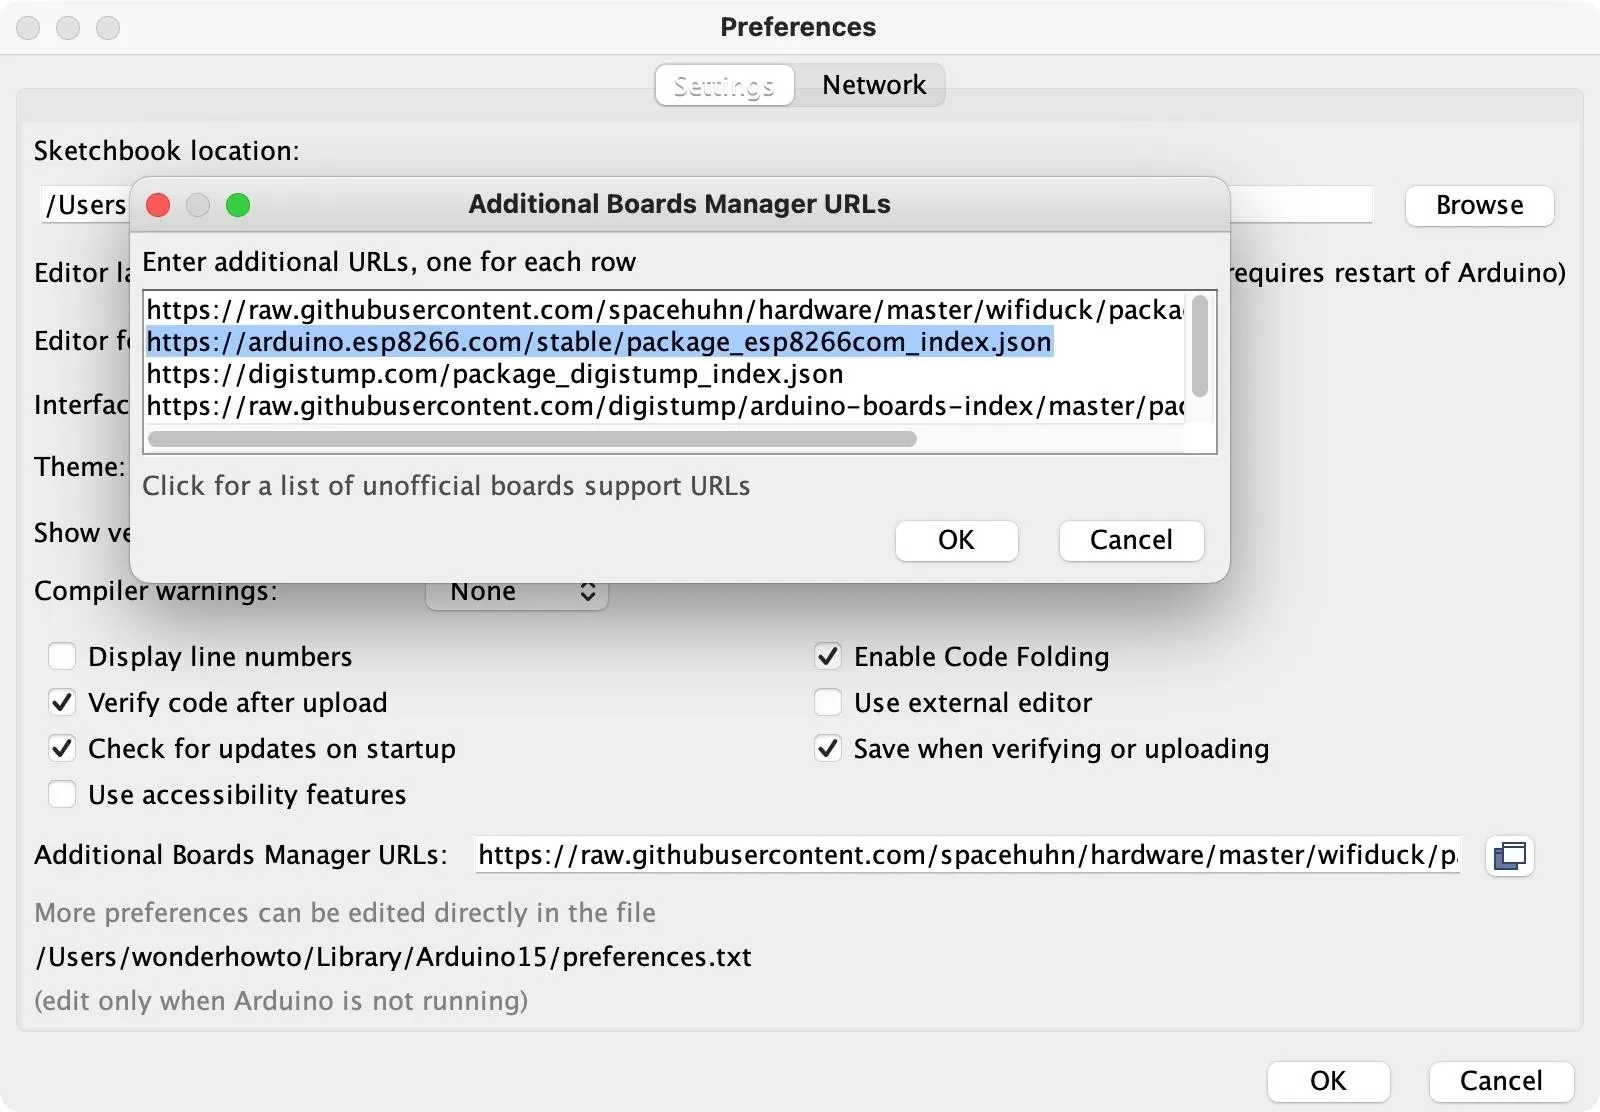
Before we can flash the sketch over to the microcontroller, we'll need to make sure we have the correct board installed. Open up the "Preferences" in Arduino IDE, then paste the following JSON link in the "Additional Board Manager URLs" field. If you already have some board URLs, you can click the expand button to see it better. Paste the following URL on a separate line. Click "OK," then "OK" again to close the settings.
https://arduino.esp8266.com/stable/package_esp8266com_index.jsonWhen this is correctly added to Arduino IDE, it will pull down all of the different ESP8266-based boards so that we can select the version we have to set up a line of communication between the software and microcontroller.
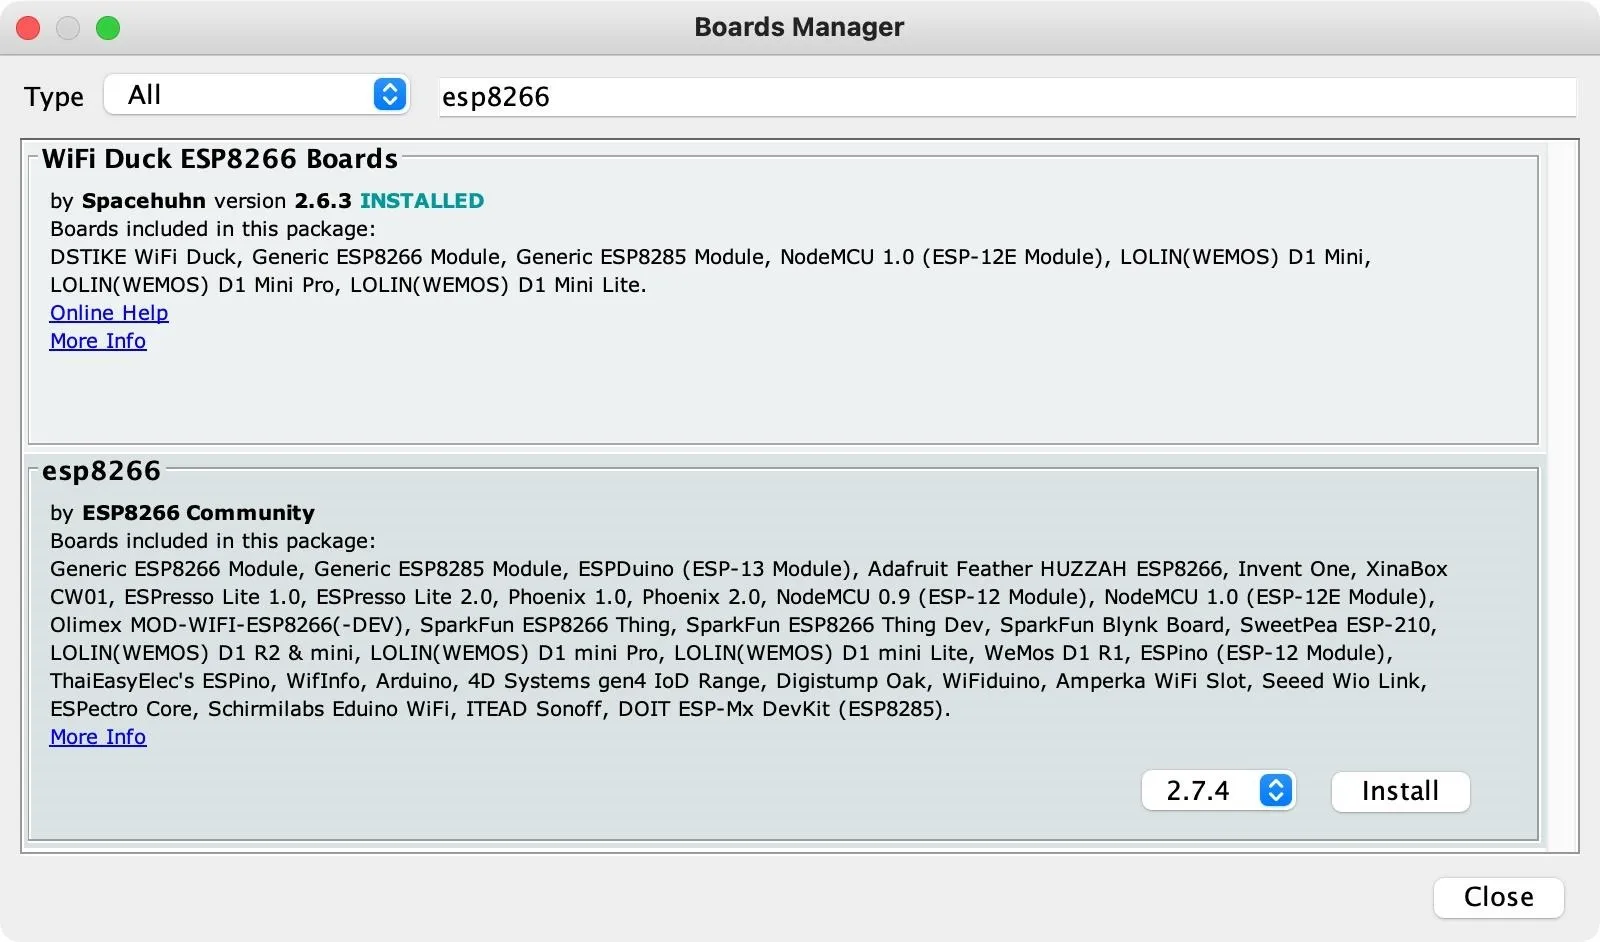
Now, go to "Tools," choose "Board," then "Boards Manager." In the search field, type "esp8266," then install the one by ESP8266 Community. Wait for it to finish installing, then "Close" out of the window.
Choose the Right Port
To communicate with the ESP8266 board, you need to choose the correct port that it's using to connect. So if you haven't connected your D1 Mini or another type of ESP8266 to your computer, do that now. Make sure you have a good USB data cable. If it's not showing up, try another cable.
To find your port in Linux, open a terminal window, and try:
~$ dmesg | grep tty

/dev/cu.Bluetooth-Incoming-Port /dev/cu.usbserial-110
/dev/cu.debug-console       /dev/cu.wlan-debug
In macOS, you can try:
~$ ls /dev/cu.*

/dev/cu.Bluetooth-Incoming-Port /dev/cu.usbserial-110
/dev/cu.debug-console       /dev/cu.wlan-debug
To verify you have the right device, you can unplug the MCU, rerun the scan, and see which port is missing. Plug it back in, rerun it again, and you should see it pop back up. For me, it's /dev/cu.usbserial-110.
Back in Arduino IDE, go to "Tools," then "Port," and make sure to select the MCU's port. Then, in "Tools," go back to "Board," but this time select "ESP8266 Boards." These are the boards the link in Step 2 populated. Find and select your microcontroller's model.
Erase the Board
If you already used the ESP8266 at some point before, there might be code on it already. In that case, you should use the following to erase the board first. See our other guide for more information on getting and using esptool.py to erase your boards.
~$ esptool.py --port /dev/cu.wchusbserial14140 erase_flash

esptool.py v3.0
Serial port /dev/cu.usbserial-110
Connecting....
Detecting chip type... ESP8266
Chip is ESP8266EX
Features: WiFi
Crystal is 26MHz
MAC: ██:██:██:██:██:██
Uploading stub...
Running stub...
Stub running...
Erasing flash (this may take a while)...
Chip erase completed successfully in 9.0s
Hard resetting via RTS pin...
Set Your Channel
Before we compile and flash the sketch, let's look at it. We're going to be transmitting several different packets later, but what are these packets? Well, these are a four-way handshake — all the information we need to try to crack a Wi-Fi password — as well as a beacon frame.
That last part is important because the cracking tools we're going to use simply cannot recognize a beacon frame without the network name in it. If it lacks that piece of information, it wouldn't be able to put our password guesses through the algorithm necessary to create the hash to compare them against. So we really need the Wi-Fi network name in the beacon frame, as well as the handshake, to pull this off.
When we compile and flash the sketch to the ESP8266 board a few steps down, we will be broadcasting these packets, but we will have a hard time finding them if we don't know what channel to listen in on. If you look at the sketch, you can see a spot for the channel. I have it as channel 11 since that's the channel for the network I'm connected to, but you can edit this channel now before you upload it to the board. This is so that we'll know where to be listening in for these packets being broadcasted.
void setup() {
  Serial.begin(115200);
  Serial.println();

  // start WiFi
  WiFi.mode(WIFI_OFF);
  wifi_set_opmode(STATION_MODE);

  // set channel
  wifi_set_channel(11);
}
Compile & Flash the Sketch
When your board is ready to go, in the hamshake_injector.ino sketch, click the "Upload" button to compile and upload the code to the microcontroller. At the bottom of the window, you should see something similar to the following.
Sketch uses 266372 bytes (25%) of program storage space. Maximum is 1044464 bytes.Executable segment sizes:

IROM   : 236768          - code in flash         (default or ICACHE_FLASH_ATTR)
Global variables use 27684 bytes (33%) of dynamic memory, leaving 54236 bytes for local variables. Maximum is 81920 bytes.
IRAM   : 26888   / 32768 - code in IRAM          (ICACHE_RAM_ATTR, ISRs...)
DATA   : 1988  )         - initialized variables (global, static) in RAM/HEAP
RODATA : 728   ) / 81920 - constants             (global, static) in RAM/HEAP
BSS    : 24968 )         - zeroed variables      (global, static) in RAM/HEAP
esptool.py v2.8
Serial port /dev/cu.usbserial-110
Connecting....
Chip is ESP8266EX
Features: WiFi
Crystal is 26MHz
MAC: ██:██:██:██:██:██
Uploading stub...
Running stub...
Stub running...
Changing baud rate to 460800
Changed.
Configuring flash size...
Auto-detected Flash size: 4MB
Compressed 270528 bytes to 199394...
Wrote 270528 bytes (199394 compressed) at 0x00000000 in 5.2 seconds (effective 416.4 kbit/s)...
Hash of data verified.

Leaving...
Hard resetting via RTS pin...
Enter Monitor Mode
On your computer, put your wireless interface into monitor mode so that we can sniff the traffic over the network. You can use grep UP with ip a or ifconfig to find the name of your Wi-Fi adapter. Below, mine is wlp3s0.
~$ ip a | grep UP

1: lo: <LOOPBACK,UP,LOWER_UP> mtu 65536 qdisc noqueue state UNKNOWN group default qlen 1000
2: enp0s25: <NO-CARRIER,BROADCAST,MULTICAST,UP> mtu 1500 qdisc fq_codel state DOWN group default qlen 1000
4: wlp3s0: <BROADCAST,MULTICAST,UP,LOWER_UP> mtu 1500 qdisc mq state UP group default qlen 1000
Now, take your wireless card's name and use the airmon-ng start command to put it into monitor mode.
~$ sudo airmon-ng start wlp3s0

PHY Interface   Driver      Chipset

phy0    wlp3s0      iwlwifi     Intel Corporation Centrino Advanced-N 6205 [Taylor Peak] (rev 34)

        (mac80211 monitor mode vif enabled for [phy0]wlp3s0 on [phy0]wlp3s0mon)
        (mac80211 station mode vif disabled for [phy0]wlp3s0)
You can now check that the card has a "mon" at the end using the same command used above to find the card's name. You could also try it with iwconfig. Below, mine is now wlp3s0mon.
~$ ip a | grep UP

1: lo: <LOOPBACK,UP,LOWER_UP> mtu 65536 qdisc noqueue state UNKNOWN group default qlen 1000
2: enp0s25: <NO-CARRIER,BROADCAST,MULTICAST,UP> mtu 1500 qdisc fq_codel state DOWN group default qlen 1000
17: wlp3s0mon: <BROADCAST,MULTICAST,UP,LOWER_UP> mtu 1500 qdisc mq state UNKNOWN group default qlen 1000
Now, start recording on a wireless interface with airodump-ng using -c 11 to set channel it to 11. Of course, if you used a different channel, make sure to use that instead.
~$ sudo airodump-ng wlp3s0mon -c 1Open Wireshark
Now, unplug the ESP8266 board from your computer, and let's jump over to Wireshark. Here, we'll try to capture packets and make sure that we can successfully receive what we're looking for.
So, start Wireshark, and make sure you're currently connected to the correct Wi-Fi network. Start running it (click the shark fin icon), and then stop it shortly after to see that it's working. Now, we need to write a capture filter that will allow us to search for handshakes. Type the following into the filter field.
wlan.ssid == "test" || eapolEapol will give us handshakes and omit any other packets that aren't relevant, so we should only see handshakes to capture if we're scanning with this filter.
Start the scan again, then plug in the microcontroller to see if we're broadcasting handshakes.
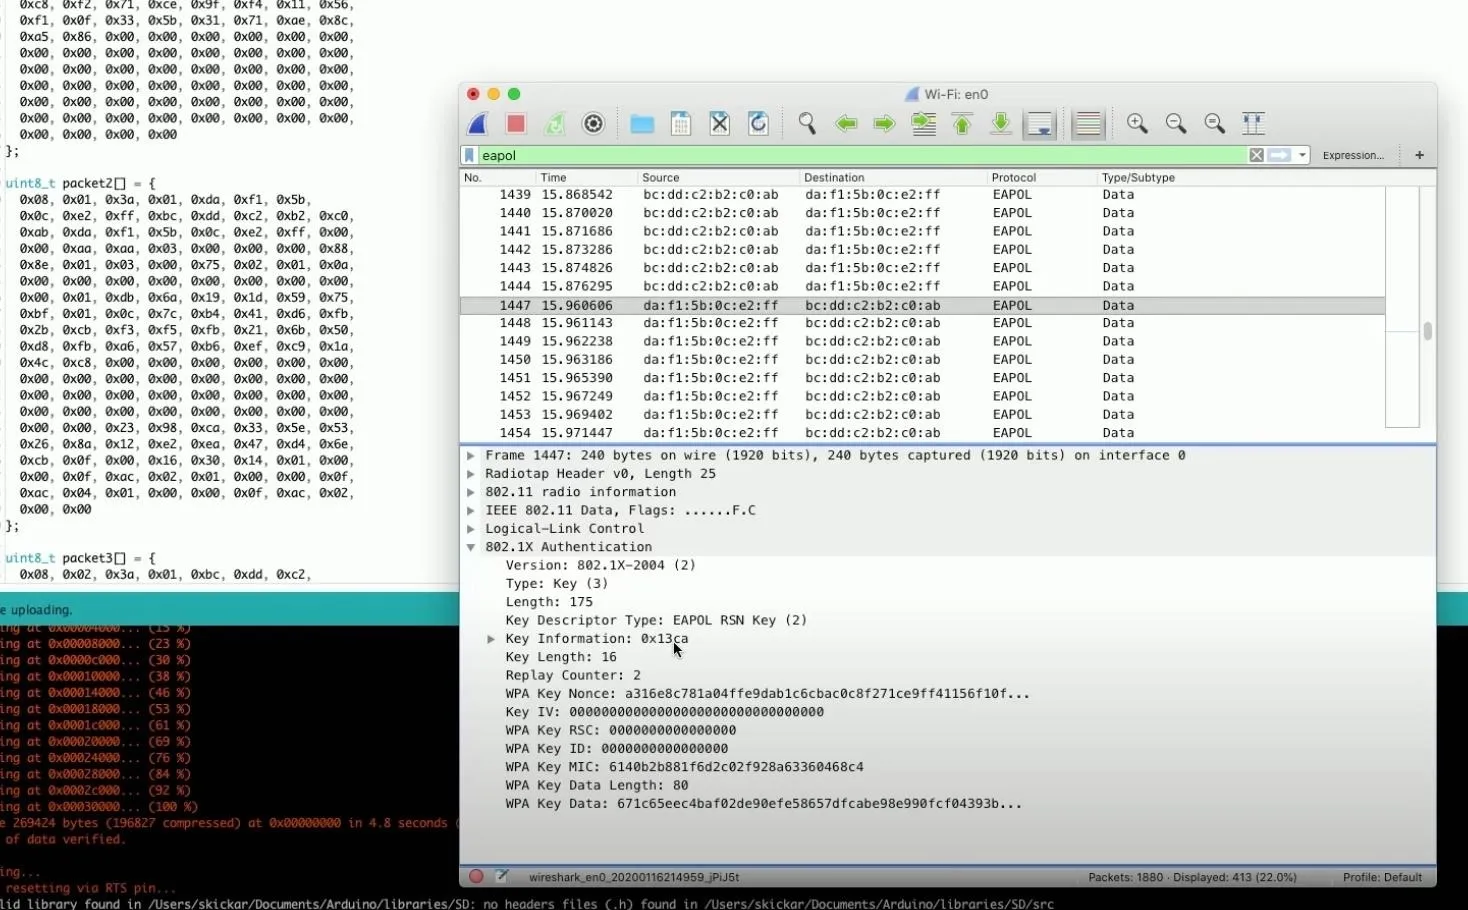
You should now be seeing lots and lots of different handshakes. Stop the scan because this should be everything we need. Click on one of the handshakes to see more information about it. Then, you can scroll through the handshakes to see all the different keys.
With all of these, we should have everything needed to crack the password.
Save Your Scan
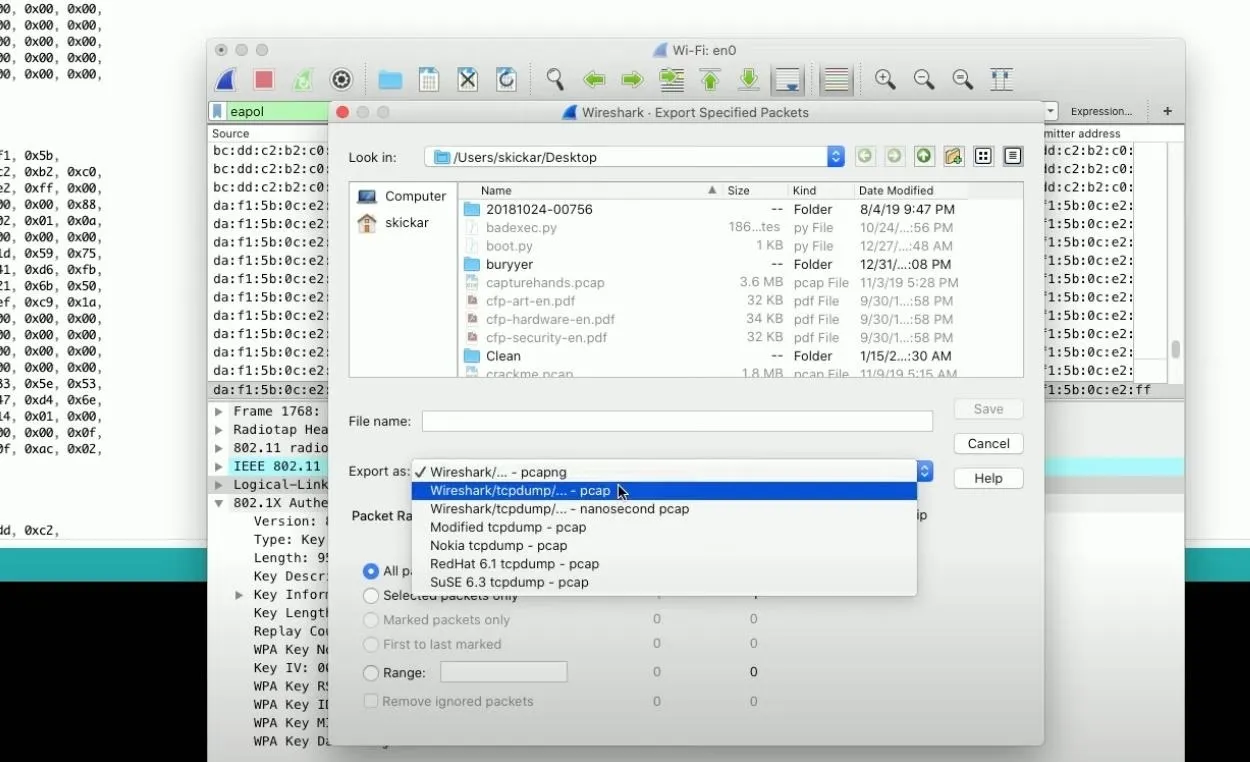
Now, how do we actually go about cracking the password? First, let's save what we found. In Wireshark, go to "File," then "Export Specific Packet." I'm saving it to my desktop (name it whatever you want), but make sure you change the "Export as" type to "pcap" format. Save it.
Run the Attack
OK, now open a terminal window and run aircrack-ng with a dictionary and the PCAP file. This will locate any handshakes inside the file that are valid to crack. At first, I'm going to omit the wordlist because it will auto-run. This would be the list we would use if we wanted to actually attempt some cracking, but I just want to confirm there is a captured handshake.
~$ sudo aircrack-ng /myhandshakes.pcap

Opening myhandshakes.pcap
Read 413 packets.

   #  BSSID                 ESSID          Encryption

   1  ██:██:██:██:██:██                    WPA (0 handshake)
   2  ██:██:██:██:██:██                    WPA (1 handshake)

Index number of target network?
As you can see above, there is one with a valid handshake. Now, let's see if we can run the attack.
~$ sudo aircrack-ng -w /wordlist.txt /myhandshakes.pcap

Opening myhandshakes.pcap
Read 413 packets.

   #  BSSID                 ESSID          Encryption

   1  ██:██:██:██:██:██                    WPA (0 handshake)
   2  ██:██:██:██:██:██                    WPA (1 handshake)

Index number of target network? 2

Opening myhandshakes.pcap
Read 413 packets.

1 potential targets

An ESSID is required. Try option -e.

Quitting airrack-ng...
If you get an error like the one above, you didn't capture any beacon frames with the network name in them, which is necessary to crack it.
In this case, I actually wrote a bad filter above, where I was only including eapol packets when I exported everything from Wireshark. To fix this, go back to Wireshark. The beacon frames contain the name of the network under the tag parameters, so change the capture filter to have the transmitter address of the fake network, then re-export the file to your desktop.
eapol || wlan.fc.type_subtype == 0x0008Now, run the attack again with the newly created PCAP file.
~$ sudo aircrack-ng -w /wordlist.txt /myhandshakesUPDATED.pcap

                                    Aircrack-ng 1.2 rc4

      [00:00:01] 3956/4002 keys tested (2209.00 k/s)

      Time left: 0 seconds                                      98.85%

                        KEY FOUND! [ nullbytewht ]

      Master Key     : 47 69 21 B2 4E CF 10 C4 CC AE 08 85 17 96 05 DD
                       88 89 48 A3 F8 04 A8 8E D1 6B 81 23 FD 90 DC BB

      Transient Key  : AC 07 60 0B A3 82 44 95 97 2C E0 88 44 29 04 20
                       B2 68 33 99 73 17 C6 31 41 24 58 F8 F6 F9 85 63
                       01 F9 E7 B7 E8 D2 6B EE 1A 02 71 56 5C D6 38 41
                       D0 DA 26 38 63 ED 70 71 ED F9 B8 3A 1B 7E 94 B5

      EAPOL HMAC     : BB 77 1B 4D 6F FD FE 44 C1 94 8A A1 3E 31 2A 0B
When we run it now, we can see we were able to successfully crack the network because we actually had the beacon frame necessary. Now, if we go back and omit the wordlist again, we should be able to see that we were successfully able to identify not only the handshake but also the name of the network.
~$ sudo aircrack-ng /myhandshakesUPDATED.pcap

Opening myhandshakesUPDATED.pcap
Read 7851 packets.

   #  BSSID                 ESSID          Encryption

   1  ██:██:██:██:██:██     TheName        WPA (1 handshake)

Choosing first network as target.

Opening myhandshakesUPDATED.pcap
Read 7851 packets.

1 potential targets

Please specify a dictionary (option -w).
As you can see above, I have a single valid handshake for the network called "TheName," which we were able to generate by flashing the ESP8266 in Arduino IDE.
Happy Cracking!
We already know the ESP8266 microcontroller is a pretty incredible device. With it, we can play both sides of a Wi-Fi conversation and make it so we can practice Wi-Fi handshake cracking on a single microcontroller that costs just a few dollars.
Cover photo and screenshots by Retia/Null Byte


Comments
Be the first, drop a comment!